manuals.online logo
Brands
  1. Home
  2. •
  3. Brands
  4. •
  5. Savant
  6. •
  7. Controllers
  8. •
  9. Savant SmartLighting 2 User manual

Savant SmartLighting 2 User manual

The Savant® SmartLighting 2 controller with Wi-Fi (SSL-W002) Quick Reference Guide provides
all the steps necessary to install the SSL-W002. The SSL-W002 supports Wi-Fi using the IEEE
802.11 b/g/n standard.
Box Contents
(1) SSL-W002
(1) Installation Kit (075-0153-xx):
(1) Power Supply 5V DC 2.5 Amps (025-0098-xx)
(8) Screws #6 x 1/4 Phillips (039-0143-xx)
(2) Side mount brackets (071-0625-xx)
(1) Antenna with SMA connector (045-0137-xx)
(1) Cable Tie-4 inch (014-0071-xx)
(1) Quick Reference Guide (this document)
Optional Components
SmartConnect Accessory (SCA-CONF or SCA-CONFL)
SmartConnect App
SmartConnect Micro USB-B to RJ-45 Adapter
Specifications
Environmental
Environmental
Temperature
32° to 104° F (0° to 40° C)
Humidity
10% to 90% Relative Humidity (non-condensing)
Maximum BTUs
10 BTUs/hour
Dimensions and Weight
Height
1.59 in/4.04 cm
Width
4.32 in/10.96 cm
Depth
6.50 in/16.51 cm
Weight
3.00lb/1.36kg
Rack Space
1U
Power
Power
Input Power
5V DC, 120-240V AC, 50/60 Hz
Nominal Power
1.3 watts at 5V DC
Nominal Power
1.6 watts at 120V DC
Maximum Power
2 watts at 5V DC
Maximum Power
3 watts at 120V DC
Compliance
Compliance
Safety and
Emissions
FCC Part 15 | CE Mark | C-Tick
FCC ID: Q0Q-WF111 | IC ID: 5123A-BGTWF111
This device complies with Part 15 of the FCC Rules. Operation is subject
to the following two conditions:
(1) this device may not cause harmful interference, and
(2) this device must accept any interference received, including
interference that may cause undesired operation.
Any changes or modifications of this product, not approved by
manufacturer will void the user’s authority to operate the equipment.
This device complies with Industry Canada license-exempt RSS
standard(s). Operation is subject to the following two conditions: (1) this
device may not cause interference, and (2) this device must accept any
interference, including interference that may cause undesired operation of
the device.
Le présent appareil est conforme aux CNR d'Industrie Canada
applicables aux appareils radio exempts de licence. L'exploitation est
autorisée aux deux conditions suivantes: (1) l'appareil ne doit pas
produire de brouillage, et (2) l'utilisateur de l'appareil doit accepter tout
brouillage radioélectrique subi, même si le brouillage est susceptible d'en
compromettre le fonctionnement.
RoHS
Compliant
Minimum Requirement: Release da Vinci 5.2.2
Antenna
The antenna is a 2.4 -2.5 GHz, dipole (radio) 2 dBi (decibel isotropic) SMA (SubMiniature
Version A)with reverse polarity. It is field-replaceable.
Specifications
Specifications
Gain
+ 2 dBi
Impedance
50 ohms
Type
Dipole
Polarization
Linear Vertical
VSWR
≤2.5:1
Frequency
~2400-2500 MHz
Weight
13 grams
Size
105 mm x 10 mm
12 3 4 5
6
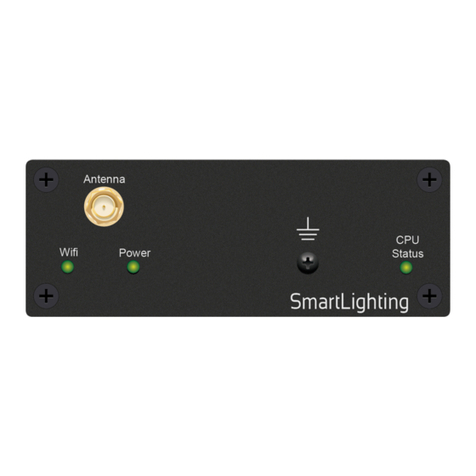
Front View of SSL-W002
Antenna
SMA connector for Antenna.
Wifi LED
Green indicates the SSL-W002 is configured on the network.
Green flashing indicates Access Point network is active.
Off indicates the SSL-W002 is resetting or is booting the
embedded firmware.
Red indicates the configured network cannot be found.
Red flashing indicated the network is found but unable to join the
network due to incorrect credentials.
Power LED
Green indicates power.
Off indicates no power.
Ground Connector (Optional)
Connect this terminal to a suitable ground surface.
CPU Status LED
Green indicates the Host has established communications with
the SSL-W002
Green flashing indicates the SSL-W002 is ready (running with
DHCP or static IP address), but the Host has not established
communications with the SSL-W002.
Off indicates the SSL-W002 is resetting or is booting the
embedded firmware.
Red indicates the Host has determined the firmware needs to be
updated, but a problem occurred during the process that will
initiate a reset.
Red flashing indicates the firmware is running, but has not
received a DHCP IP Address.
Amber indicates the Host is currently updating the firmware.
Amber flashing indicates the SSL-W002 has a valid link-local IP
Address and is waiting to connect to the Host.
Rear View of SSL-W002
NOTE: The SSL-W002 Station port defaults to RS-422 but is configurable to RS-232 by a
Savant dealer.
1
Reset Button
Resets to factory default DHCP mode.
Press and hold the rest button for 5+ seconds.
2
Ethernet
Link/Activity LED
For future use.
3
Ethernet Speed LED
For future use.
4
Station
Defaults to RS-422 for communication with the SKL-4000.
5
5VDC
Provides 5V DC input power
6
Module
RJ-45 port used to transmit and receive serial binary data
transmission to the bus. Defaults to RS-422 and used to
communicate to lighting modules in the Module Enclosures.
7
Cable Tie Mount
Holds the power cable with the cable tie.
12 3 4 5
6 7
Savant SmartLighting 2 with Wi-Fi™
(SSL-W002)
Quick Reference Guide
009-0999-01
SSL-W002-00
092313
RS-232 Wiring
1 (Not Used for RS-232)
5 RXD (RS-232)
2 (Not Used for RS-232)
6 TXD (RS-232)
3 (Not Used for RS-232)
7 CTS (RS-232)
4 GND (RS-232)
8 RTS (RS-232)
RS-422/RS-485 Pinouts
1 RS+ (RS-422/485)
5 (Not used for RS-422/485)
2 RS- (RS-422/485)
6 TX- (RS-422/485)
3 TX+ (RS-422/485)
7 (Not used for RS-422/485)
4 GND (RS-422/485)
8 (Not used for RS-422/485)
Interconnect the Network
The SSL-W002 requires business class/commercial grade network equipment to process the IP
traffic between Savant SmartSystems™ and Savant SmartLighting network equipment. When
configuring the network ensure that all of the connected Savant units (including SSL-W002 and
HST-4001) are on the same local area network (subnet or LAN). When on the same network,
Savant units locate each other using the Bonjour®network protocol.
Mounting Installation
The SSL-W002 can be placed on a 1U rack shelf-mounted or wall-mounted using the side-
mounting brackets (included). Use the supplied screws to install the brackets to the SSL-W002
as shown.
Setting Up Wi-Fi Using SmartConnect
This procedure assumes that you have already installed the Savant SmartConnect app on your iOS device. The next procedure applies to both SmartConnect accessories SCA-CONF or SCA-CONFL.
\
11.3."Apple"Lightening"Connector"Adapter
!"#$%&'()'*$+#,-.$/'012)#3$23&4($1"# $500,#$6&("14&4($7-44#/1-)$5%'01#)$&4$/-4824/9-4$$$.&1"$
1"#$ :*')17-44#/1$ 5//#33-);$ 1-$ /-44#/1$ 1-$ '4;$ -<$ 1"#$ 4#.$ 500,#$ &=:$ %#>&/#3$ 1"'1$ "'>#$ '4$
&41#()'1#%$6&("14&4($7-44#/1-)$?41#)<'/#@$32/"$'3$1"#$&A"-4#$B$-)$B1"$C#4#)'9-4$&A-%$1-2/"D
11.4."$"References"
•!"#$ '21"-)3 $,#>#)'(#%$ 1"# $ /2))#41$ &=:$ E&F& $:#120$ 500$ G')H#1$ '4%$ A)-%2/1$ I#J2&)#*#413$
K-/2*#41$/)#'1#%$+;$G&H#$:&,>'$52(231$LMNLD
•$ !"#$'21"-)3 $,#>#)'(#% $1"#$ /2))#41$ :'>'41$ E&)#%$ 6&("94($ G')H#1$ '4%$A)-%2/1$ I#J2&)#*#413$
K-/2*#41$/)#'1#%$+;$!&*$6-/'3/&-$52(231$LMNLD$
•$$GF&$5//#33-);$!#394($:0#/&O/'9-4$IP
•$$GF&$5//#33-);$Q')%.')#$:0#/&O/'9-4$IP
•$$GF&$6&/#43&4($Q'4%+--H$I#,#'3#$ILDM+
•$$5//#33-);$?41#)<'/#$:0#/&O/'9-4$IR
•$$500,#$?/-43$C2&%#,&4#3
!
11 of 11
Lightning Adapter
\
11.3."Apple"Lightening"Connector"Adapter
!"#$%&'()'*$+#,-.$/'012)#3$23&4($1"# $500,#$6&("14&4($7-44#/1-)$5%'01#)$&4$/-4824/9-4$$$.&1"$
1"#$ :*')17-44#/1$ 5//#33-);$ 1-$ /-44#/1$ 1-$ '4;$ -<$ 1"#$ 4#.$ 500,#$ &=:$ %#>&/#3 $1"'1$ "'># $'4$
&41#()'1#%$6&("14&4($7-44#/1-)$?41#)<'/#@$32/"$'3$1"#$&A"-4#$B$-)$B1"$C#4#)'9-4$&A-%$1-2/"D
11.4."$"References"
•!"#$ '21"-)3 $,#>#)'(#%$ 1"# $ /2))#41$ &=:$ E&F& $:#120$ 500$ G')H#1$ '4%$ A)-%2/1$ I#J2&)#*#413$
K-/2*#41$/)#'1#%$+;$G&H#$:&,>'$52(231$LMNLD
•$ !"#$'21"-)3 $,#>#)'(#% $1"#$ /2))#41$ :'>'41$ E&)#%$ 6&("94($ G')H#1$ '4%$A)-%2/1$ I#J2&)#*#413$
K-/2*#41$/)#'1#%$+;$!&*$6-/'3/&-$52(231$LMNLD$
•$$GF&$5//#33-);$!#394($:0#/&O/'9-4$IP
•$$GF&$5//#33-);$Q')%.')#$:0#/&O/'9-4$IP
•$$GF&$6&/#43&4($Q'4%+--H$I#,#'3#$ILDM+
•$$5//#33-);$?41#)<'/#$:0#/&O/'9-4$IR
•$$500,#$?/-43$C2&%#,&4#3
!
11 of 11
Lightning Adapter
Micro USB-B to RJ45 Adapter
(SCA-ADPT)
SCA-ADPT
Micro USB-B (female)
to RJ-45 Adapter
SCA-ADPT
Micro USB-B
(male)
To configure your SSL-W002 Wi-Fi network settings using the SmartConnect app when the Wi-Fi
network is not available on an iOS device, do the following.
1. Connect the SmartConnect Accessory (SCA-CONF or SCA-CONFL) to the iOS device.
2. Connect the SCA-ADPT to the SmartConnect Accessory.
3. To ensure that the Station port on the SSL-W002 is configured for External Control, reset the
SSL-W002 to its factory defaults.
4. Plug the RJ-45 of the SCA-ADPT into the port labeled Station.
5. Open the SmartConnect app on the iOS device.
6. In the app, under SSL-W002 Wi-Fi, select the Wi-Fi row.
7. Select a network under Recent networks (recently-used Wi-Fi network of the iOS device) or
select Other… to manually configure the network settings.
8. Enter a network Name.
9. Tap Security and then select an option.
10. Tap Password to open the keyboard and then enter the network password.
11. Tap t h e Join button.
If a static IP address is required, select the Static tab and enter the IP Address, Subnet Mask and
Router information. Tap Apply.
Set Up Wi-Fi Using a Web Browser
To configure the SSL-W002 Wi-Fi network settings using a Web browser on your Savant
Development Environment (SDE), do the following.
1. On the menu bar of your SDE, select the Wi-Fi icon:
2. View the wireless networks.
3. Select the SavantDevices network and wait for it to connect.
4. Open a Savant-supported Web browser.
5. Enter 192.168.1.1 in the URL address bar.
6. If prompted, enter the user name: RPM and password: RPM.
The default webpage will be displayed.
7. Select Network from the options.
8. Under the Wi-Fi Settings section press the Scan button to view wireless networks in range or
type in the network name manually.
9. If security has been enabled on the desired network select the Security Type from the drop
down list and enter the Passphrase. Press the WiFi Set button.
Set Up Wi-Fi Using an iOS Device
To configure your Wi-Fi network settings using an iOS device, do the following.
1. On the iOS device select the Settings icon.
2. Select Wi-Fi.
3. View the wireless networks.
4. Select the SavantDevices network and wait for it to connect.
5. Open your Safari® browser.
6. Enter 192.168.1.1 in the URL address bar.
7. If prompted, enter the user name: RPM and password: RPM.
The default webpage will be displayed.
8. Select Network from the options.
9. Under the Wi-Fi Settings section, press the Scan button to view wireless networks in range, or
type in the network name manually.
10. If security has been enabled on the desired network select the Security Type from the drop-
down list and enter the Passphrase. Press the WiFi Set button.
If a static IP address is required, under Edit IPv4 Settings change Configure IPv4 to
Manually. Enter required information and press the IPv4 Set button.
11. To save the Wi-Fi configuration, press the Commit Changes button. The device will be
rebooted and the configured settings will be set.
Network Changes Require Rebooting SSL-W002
The embedded processor used in the SSL-W002 controller, needs to be rebooted after switching to
a new network with a new IP address range. If you do not reboot, the controller will not recognize
the network and IP address changes. The Status LED on the front panel of the controller will start
to flash.
Additional Documentation
Additional Documentation for the SSL-W002 is available at: dealers.SavantSystems.com:
Dealer Login > Knowledge Base > Savant Hardware >Lighting Control
Savant SmartLighting 2 with Wi-Fi™
(SSL-W002)
Quick Reference Guide
009-0999-01
SSL-W002-00
092313
Copyright © 2013 Savant Systems, LLC. SAVANT and RacePoint Blueprint are trademarks of Savant Systems, LLC.
All brand names, product names and trademarks are the property of their respective owners.
Savant Systems, LLC reserves the right to change product specifications without notice.
SmartConnect Hardware Options
Note!"!Further!product!marke0ng!informa0on!is!pending!and!should!include!an!overview!of!the!
common ! iOS! WiFi ! Setup ! procedures ! across! all ! Savant! WiFi !devices.! This ! informa0on! should!
capture!the!iOS!WiFi!Setup!App!and!SmartConnect!Accessories!in!layman!terms.
!
10 of 11
Micro USB
SmartConnect from Savant Wi-Fi device to iOS device using 30-pin male connector (above)
Note!"!Further!product!marke0ng!informa0on!is!pending!and!should!include!an!overview!of!the!
common ! iOS! WiFi ! Setup ! procedures ! across! all ! Savant! WiFi !devices.! This ! informa0on! should!
capture!the!iOS!WiFi!Setup!App!and!SmartConnect!Accessories!in!layman!terms.
!
10 of 11
Micro USB
SmartConnect from Savant Wi-Fi device to iOS device using eight-pin Lightning™male connector
SmartConnect™ User Guide 4 of 11
091013 009-1046-00 Document based upon target specifications. Specifications subject to change prior to final product release.
Micro USB-B (female)
to RJ-45 Adapter
Micro USB-B
(male)
\
11.3."Apple"Lightening"Connector"Adapter
!"#$%&'()'*$+#,-.$/'012)#3$23&4($1"# $500,# $6&("14&4($7-44#/1-)$5%'01#)$&4$/-4824/9-4 $$$.&1"$
1"#$ :*')17-44#/1$ 5//#33-);$ 1- $ /-44#/1$ 1-$ '4;$ -<$ 1"# $4#.$ 500,#$ &=:$ %#>&/#3 $1"'1$ "'>#$ '4$
&41#()'1#%$6&("14&4($7-44#/1-)$?41#)<'/#@$32/"$'3$1"#$&A"-4#$B$-)$B1"$C#4#)'9-4$&A-%$1-2/"D
11.4."$"References"
•!"#$ '21"-)3 $,#>#)'(#%$ 1"# $ /2))#41$ &=:$ E&F& $:#120$ 500$ G')H#1$ '4% $A)-%2/1$ I#J2&)#*#413$
K-/2*#41$/)#'1#%$+;$G&H#$:&,>'$52(231$LMNLD
•$ !"#$'21"-)3 $,#>#)'(#% $1"#$ /2))#41$ :'>'41$ E&)#%$ 6&("94($ G')H#1$ '4%$A)-%2/1$ I#J2&)#*#413$
K-/2*#41$/)#'1#%$+;$!&*$6-/'3/&-$52(231$LMNLD$
•$$GF&$5//#33-);$!#394($:0#/&O/'9-4$IP
•$$GF&$5//#33-);$Q')%.')#$:0#/&O/'9-4$IP
•$$GF&$6&/#43&4($Q'4%+--H$I#,#'3#$ILDM+
•$$5//#33-);$?41#)<'/#$:0#/&O/'9-4$IR
•$$500,#$?/-43$C2&%#,&4#3
!
11 of 11
Lightning Adapter
Micro USB-B to RJ45 Adapter
(SCA-ADPT)
SCA-ADPT

SCA-ADPT

This manual suits for next models

1

Other Savant Controllers manuals

Savant WIF S104 Series User manual

Savant

Savant WIF S104 Series User manual

Savant SSC-W485 User manual

Savant

Savant SSC-W485 User manual

Savant Pro Host User manual

Savant

Savant Pro Host User manual

Savant QO PBC-1000-10 Quick reference guide

Savant

Savant QO PBC-1000-10 Quick reference guide

Savant FRC-P100-00 User manual

Savant

Savant FRC-P100-00 User manual

Savant Director HST-DIRECTOR User manual

Savant

Savant Director HST-DIRECTOR User manual

Savant S2 User manual

Savant

Savant S2 User manual

Savant CPT-1212 User manual

Savant

Savant CPT-1212 User manual

Savant Super Pro Host v2 SVR-7100S Quick reference guide

Savant

Savant Super Pro Host v2 SVR-7100S Quick reference guide

Savant SmartControl 12 Quick reference guide

Savant

Savant SmartControl 12 Quick reference guide

Savant SmartLighting 18 User manual

Savant

Savant SmartLighting 18 User manual

Savant SmartControl SSC-W003I User manual

Savant

Savant SmartControl SSC-W003I User manual

Savant SmartControl SSC-W002G User manual

Savant

Savant SmartControl SSC-W002G User manual

Savant SSC-002485 Operating instructions

Savant

Savant SSC-002485 Operating instructions

Savant SmartControl 3 Quick reference guide

Savant

Savant SmartControl 3 Quick reference guide

Savant S2 Quick reference guide

Savant

Savant S2 Quick reference guide

Savant SmartControl 2 Quick reference guide

Savant

Savant SmartControl 2 Quick reference guide

Savant SmartControl 2 User manual

Savant

Savant SmartControl 2 User manual

Savant Pro Host Quick reference guide

Savant

Savant Pro Host Quick reference guide

Savant SmartControl 3 User manual

Savant

Savant SmartControl 3 User manual

Savant CPT-1212 User manual

Savant

Savant CPT-1212 User manual

Savant SSC-0008 User manual

Savant

Savant SSC-0008 User manual

Savant SmartControl 25 User manual

Savant

Savant SmartControl 25 User manual

Savant Director Lite HST-DIRECTORLITE User manual

Savant

Savant Director Lite HST-DIRECTORLITE User manual

Popular Controllers manuals by other brands

MA grandMA3 Quick manual

MA

MA grandMA3 Quick manual

Stahl SSC 1 Product information

Stahl

Stahl SSC 1 Product information

Omega DPU91-BC SERIES user guide

Omega

Omega DPU91-BC SERIES user guide

Genius JA383 Use and installation intructions

Genius

Genius JA383 Use and installation intructions

Trinamic TMCM-351 Hardware manual

Trinamic

Trinamic TMCM-351 Hardware manual

MEDENUS R 51 Operating and maintenance instructions

MEDENUS

MEDENUS R 51 Operating and maintenance instructions

Acuster BEAT HF user manual

Acuster

Acuster BEAT HF user manual

Andover Controls DCX 250 installation guide

Andover Controls

Andover Controls DCX 250 installation guide

Regin RDAS5-24C Mounting instructions

Regin

Regin RDAS5-24C Mounting instructions

AMX AXC-SLD reference guide

AMX

AMX AXC-SLD reference guide

Vimar ELVOX KLYS ENM1 Connection and operating manual

Vimar

Vimar ELVOX KLYS ENM1 Connection and operating manual

iNels SA2-04M Manual instructions

iNels

iNels SA2-04M Manual instructions

usi SmartStep X Series Installation, operation and technical manual

usi

usi SmartStep X Series Installation, operation and technical manual

Rockwell powerflex 700s Service manual

Rockwell

Rockwell powerflex 700s Service manual

IPAS PowerBlock o16 Multi Operating and mounting instructions

IPAS

IPAS PowerBlock o16 Multi Operating and mounting instructions

Nabco U30 COMPLETE SETUP AND PROGRAMMING MANUAL

Nabco

Nabco U30 COMPLETE SETUP AND PROGRAMMING MANUAL

AKO D14918 manual

AKO

AKO D14918 manual

Gewiss Chorus GW 90 836A manual

Gewiss

Gewiss Chorus GW 90 836A manual

manuals.online logo
manuals.online logoBrands
  • About & Mission
  • Contact us
  • Privacy Policy
  • Terms and Conditions

Copyright 2025 Manuals.Online. All Rights Reserved.