manuals.online logo
Brands
  1. Home
  2. •
  3. Brands
  4. •
  5. Saxby Lighting
  6. •
  7. Outdoor Light
  8. •
  9. Saxby Lighting 91963 User manual

Saxby Lighting 91963 User manual

Other Saxby Lighting Outdoor Light manuals

Saxby Lighting Hoxton 79195 User manual

Saxby Lighting

Saxby Lighting Hoxton 79195 User manual

Saxby Lighting Inova PIR Wall Manual

Saxby Lighting

Saxby Lighting Inova PIR Wall Manual

Saxby Lighting Triton Spike User manual

Saxby Lighting

Saxby Lighting Triton Spike User manual

Saxby Lighting Bosco 1612T35A Manual

Saxby Lighting

Saxby Lighting Bosco 1612T35A Manual

Saxby Lighting 73716 User manual

Saxby Lighting

Saxby Lighting 73716 User manual

Saxby Lighting Pimlico Bollard Manual

Saxby Lighting

Saxby Lighting Pimlico Bollard Manual

Saxby Lighting Solaris 76925 Manual

Saxby Lighting

Saxby Lighting Solaris 76925 Manual

Saxby Lighting Zone Bollard User manual

Saxby Lighting

Saxby Lighting Zone Bollard User manual

Saxby Lighting 78959 User manual

Saxby Lighting

Saxby Lighting 78959 User manual

Saxby Lighting Odyssey ST5009BK User manual

Saxby Lighting

Saxby Lighting Odyssey ST5009BK User manual

Saxby Lighting Louvre Outdoor Wall Fitting User manual

Saxby Lighting

Saxby Lighting Louvre Outdoor Wall Fitting User manual

Saxby Lighting POLGU10 User manual

Saxby Lighting

Saxby Lighting POLGU10 User manual

Saxby Lighting 40655 Manual

Saxby Lighting

Saxby Lighting 40655 Manual

Saxby Lighting 1818PIR Manual

Saxby Lighting

Saxby Lighting 1818PIR Manual

Saxby Lighting Palin Spike Manual

Saxby Lighting

Saxby Lighting Palin Spike Manual

Saxby Lighting Pati User manual

Saxby Lighting

Saxby Lighting Pati User manual

Saxby Lighting Luminatra Smart RGB User manual

Saxby Lighting

Saxby Lighting Luminatra Smart RGB User manual

Saxby Lighting Midi Wall Manual

Saxby Lighting

Saxby Lighting Midi Wall Manual

Saxby Lighting Equinox Bollard Manual

Saxby Lighting

Saxby Lighting Equinox Bollard Manual

Saxby Lighting Doron Wall Manual

Saxby Lighting

Saxby Lighting Doron Wall Manual

Saxby Lighting 13889 User manual

Saxby Lighting

Saxby Lighting 13889 User manual

Saxby Lighting Severus EL-40108 Manual

Saxby Lighting

Saxby Lighting Severus EL-40108 Manual

Saxby Lighting Seina User manual

Saxby Lighting

Saxby Lighting Seina User manual

Saxby Lighting 13826 User manual

Saxby Lighting

Saxby Lighting 13826 User manual

Popular Outdoor Light manuals by other brands

Kichler Lighting HELEN 37536 instructions

Kichler Lighting

Kichler Lighting HELEN 37536 instructions

Thorn OXANE L installation instructions

Thorn

Thorn OXANE L installation instructions

esotec Solar Globe Light multicolor 20 operating instructions

esotec

esotec Solar Globe Light multicolor 20 operating instructions

mitzi HL200201 ELLIS Assembly and mounting instructions

mitzi

mitzi HL200201 ELLIS Assembly and mounting instructions

HEPER TILA S AFX 3 Module Installation & maintenance instructions

HEPER

HEPER TILA S AFX 3 Module Installation & maintenance instructions

Designplan TRON 180 installation instructions

Designplan

Designplan TRON 180 installation instructions

Sealey LED37 instructions

Sealey

Sealey LED37 instructions

nordlux VEJERS Mounting instruction

nordlux

nordlux VEJERS Mounting instruction

SImx ELITE LED LHTC637 installation instructions

SImx

SImx ELITE LED LHTC637 installation instructions

GEV CAROLINE 10833 manual

GEV

GEV CAROLINE 10833 manual

WE-EF PFL540 LED Installation and maintenance instructions

WE-EF

WE-EF PFL540 LED Installation and maintenance instructions

HEPER DOGO Side LW6048.585-US Installation & maintenance instructions

HEPER

HEPER DOGO Side LW6048.585-US Installation & maintenance instructions

BEGA 84 253 Installation and technical information

BEGA

BEGA 84 253 Installation and technical information

HEPER LW8034.003-US Installation & maintenance instructions

HEPER

HEPER LW8034.003-US Installation & maintenance instructions

HEPER MINIMO Installation & maintenance instructions

HEPER

HEPER MINIMO Installation & maintenance instructions

LIGMAN BAMBOO 3 installation manual

LIGMAN

LIGMAN BAMBOO 3 installation manual

Maretti TUBE CUBE WALL 14.4998.04 quick start guide

Maretti

Maretti TUBE CUBE WALL 14.4998.04 quick start guide

Maxim Lighting Carriage House VX 40428WGOB installation instructions

Maxim Lighting

Maxim Lighting Carriage House VX 40428WGOB installation instructions

manuals.online logo
manuals.online logoBrands
  • About & Mission
  • Contact us
  • Privacy Policy
  • Terms and Conditions

Copyright 2025 Manuals.Online. All Rights Reserved.

www.saxbylighting.com
Instruction manual
91963
Smart Luminatra RGB
Technical data
220-240V~, 50Hz
Supply
Voltage:
Bulb
Type: 2.5W LED module (SMD) RGB
NEUTRAL
SWITCHED LIVE
BLUE (N)
BROWN (L)
SUPPLY LIGHT FITTING
V2 03/12/2021
EU Manufacturer: Brilliant AG,
Brilliantstrasse 1, D-27442 Gnarrenburg
UK Manufacturer: BH17 7BY
Wiring - Terminal Block
Check that...
• You have correctly identified the wires.
• The connections are tight.
• No loose strands have been left out of the
connection block.
• Ensure that all cord grips are tightly secured.
• Ensure that all seals are re-fitted correctly.
We recommend cleaning with a soft dry cloth. Do not use solvents or abrasive cleaners as these could damage the finish.
For your safety, always switch off the power supply before changing lightbulbs, or cleaning.
Care and Safety
Replace Cracked Shade Accessory
92019 10m cable
(purchased separately)
The light source of this luminaire is not replaceable; when the light source reaches its end of life the whole
luminaire shall be replaced.
12V DC 5W Max. Constant Voltage
Output:
This product is suitable for dimming with ‘TUYA’ app, Amazon Echo or Google Home.
Conformity with all relevant EC Directive requirements.
Waste electrical products should not be disposed of with household waste. Please recycle where facilities
exist. Check with your Local Authority or local store for recycling advice.
This product is rated at IP65.
IP
65
Conformity with all relevant UKCA Directive requirements.
The power supply is Double Insulated and does not require connection to an Earth circuit.
This LED's are protected by a plastic lens. The lens part must be replaced immediately should it
become cracked or damaged. This fitting must not be used without the plastic lens in place.
Having correctly identified the wiring from your existing light fitting, connect to the approved outdoor rated or
approved double insulated terminal block (not supplied) in the following way:
If not fitting to a plug then the product must be wired to a IP67 outdoor rated (or highter rated) terminal block in the following
way. (recommended terminal block ref. 90131/ 90132)
Warning
The LED units are Safety Extra Low Voltage and must not be earthed.
Please read these instructions carefully before commencing any work.
This unit must be fitted by a competent and qualified electrician.
Check the pack and make sure you have all the parts listed.
Install in accordance with the IEE Wiring regulations and current Building Regulations.
This system operates at Safety Extra Low Voltage (12V), via an LED driver. Never connect the light fittings directly to the mains
without using the supplied driver.
The mains plug must be situated indoors (e.g. house, garage, shed) in order to protect it from the elements.
To prevent electrocution switch off at mains supply before installing or maintaining this fitting. Ensure other persons cannot
restore the electrical supply without your knowledge. If you are in any doubt, please consult a qualified electrician.
This light fitting should be connected to a circuit.
If replacing an existing fitting, make a careful note of the connections.
This system contains non-replaceable parts and cannot be serviced. If damage occurs the part should be scrapped.
please note: terminal block not included. Installation may require advice from a qualified person.
This product is not suitable for location in or near a marine environment.
The product will not withstand long periods of immersion in water
Waste electrical products should not be disposed of with household waste. Please recycle where facilities exist. Check with
your local authority or retailer for recycling advice.
Thank you for purchasing this light fitting. Please read the instruction carefully before use to ensure safe and satisfactory
operation of this product. Please retain these instruction for future reference.
Layout
Plan the desired layout of this fitting carefully, ensuring the cables will reach the distance between the junction box and the
light fitting.
Avoid locating any cables in positions that would cause a hazard. Position cables and outdoor rated junction boxes
(not supplied) away from areas where they may be at risk from being cut, trapped or damaged.
The mains supply cable must have a minimum cross sectional area of 1.0mm2
Cables must be protected using suitable conduit or plastic trunking.
Installation
This power supply is Double Insulated and does
not require connection to an Earth circuit.
• Wire as detailed Wiring diagram
Existing fittings must be completely removed before installation of a new product. Before removing the existing fitting, carefully
note the position of each set of wires.
Note that the switch is turned off before installation.
Ensure that the screws and cable entry points are sealed to maintain the IP rating of the product.
• Decide on the position of the luminaire. Depending on the location, an approved outdoor rated plug and socket may be
required. Alternatively an approved outdoor rated external terminal block may be used.
• Replace fuse or circuit breaker and switch on. Your light is now ready for use.
Alternatively, the product can be connected to a 3 pin plug.
• The appliance must be connected to a 240 volts AC supply.
• The appliance can be fitted to a rewireable 3 pin plug fitted
with a 3 amp fuse. Should the fuse require replacement, it
must be replaced with a fuse rated at 3 amp and approved
to BS1362.
• If the mains plug is unsuitable for the socket outlet or is
removed for any other reason, then the cut off plug should
be disposed of safely to prevent the hazard of electric shock.
Wiring - Plug
Blue – Neutral
Brown – Live
E
BROWN
Live
L
N
BLUE
Neutral
FUSE
3 Amps
CORD
Clamp
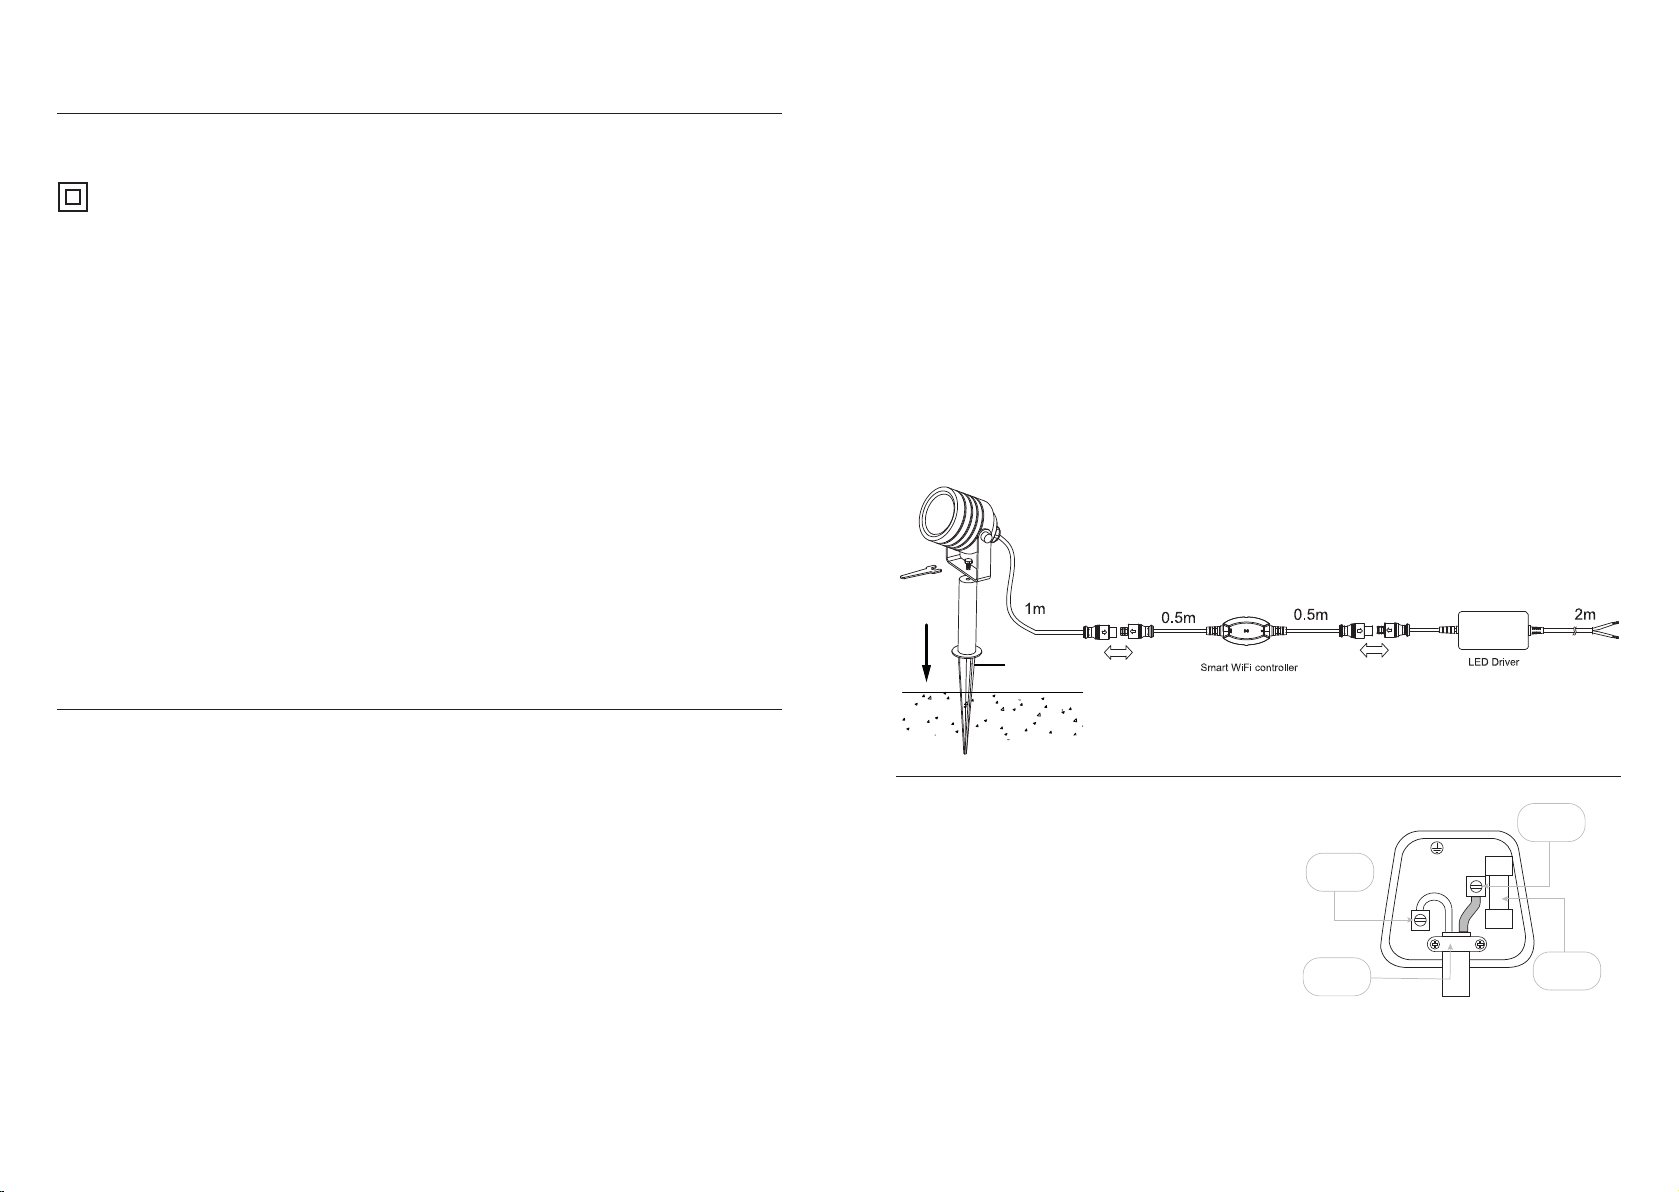
• Cables that are to be in walls and concealed underground must be protected using suitable conduit or plastic trunking.
• Ensure that the ground is suitable for pushing the spike into, and can support the luminaire. Do not install in very wet or
boggy areas.
• Attach the spike to the fitting using the screw and tighten securely.
Spike
The wires in the mains lead on this appliance are coloured in accordance with the following code:
There is a danger of electric shock if the cut off plug is inserted into any 13 amp socket outlet.
This product is suitable for dimming with ‘Tuya’ app, Amazon Echo or Google Home.
We recommend putting the wifi receiver within 20-25 meters of your WI-FI Hub. This will vary depending on the
strength of your WI-FI coverage.
Saxby Smart products are only supported on 2.4G WIFI bands.
We recommend testing the position before full installation.
5W