manuals.online logo
Brands
  1. Home
  2. •
  3. Brands
  4. •
  5. Saxby Lighting
  6. •
  7. Outdoor Light
  8. •
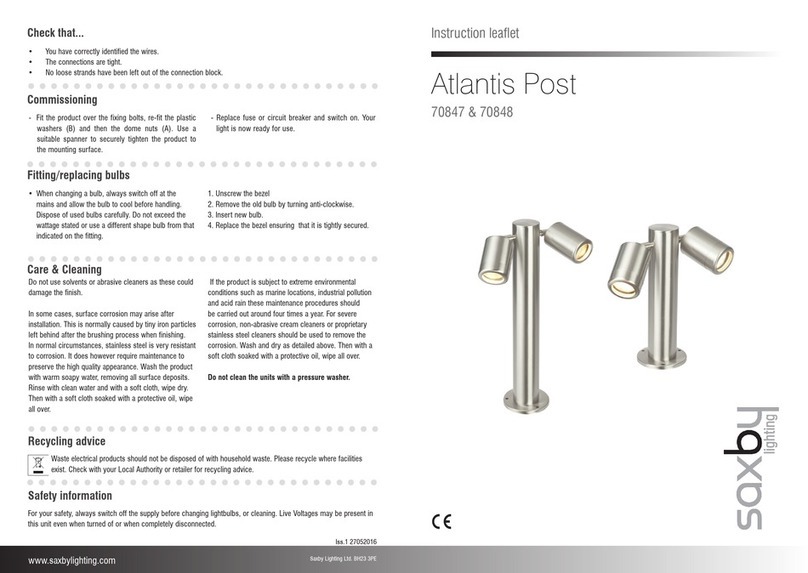
  9. Saxby Lighting Atlantis Post Manual

Saxby Lighting Atlantis Post Manual

Instruction leaflet
Atlantis Post
70847, 70848
Commissioning
For your safety, always switch off the power supply before changing lightbulbs, or cleaning. Live Voltages may be
present in this unit even when turned of or when completely disconnected. This system contains non-replaceable
parts and cannot be serviced. If damage occurs, the part should be scrapped.
Waste electrical products should not be disposed of with household waste. Please recycle where facilities
exist. Check with your Local Authority or retailer for recycling advice.
Recycling advice
Safety information
Do not use solvents or abrasive cleaners as these could
damage the finish.
In some cases, surface corrosion may arise after
installation. This is normally caused by tiny iron particles
left behind after the brushing process when finishing.
In normal circumstances, stainless steel is very resistant
to corrosion. It does however require maintenance to
preserve the high quality appearance. Wash the product
with warm soapy water, removing all surface deposits.
Rinse with clean water and with a soft cloth, wipe dry.
Then with a soft cloth soaked with a protective oil, wipe
all over.
If the product is subject to extreme environmental
conditions such as marine locations, industrial pollution
and acid rain these maintenance procedures should
be carried out around four times a year. For severe
corrosion, non-abrasive cream cleaners or proprietary
stainless steel cleaners should be used to remove the
corrosion. Wash and dry as detailed above. Then with a
soft cloth soaked with a protective oil, wipe all over.
Glass parts: Remove and wash in warm water or just
use a damp cloth. Do not use abrasive materials as
these will damage the finish.
- Refer to Fig. 1. Fit the product over the fixing bolts,
re-fit the plastic washers (B) and then the dome nuts
(A). Use a suitable spanner to securely tighten the
product to the mounting surface.
- Replace fuse or circuit breaker and switch on. Your
light is now ready for use.
Care & Cleaning
When changing a bulb, always switch off at the mains
and allow the bulb to cool before handling. Dispose of
used bulbs carefully. Use a soft cloth to handle bulbs,
avoid directly touching the bulbs as this will shorten their
life. Do not exceed the wattage stated or use a different
shape bulb from that indicated on the fitting.
Check with your retailer re bulb dimming capability before
purchasing replacement bulbs.
1. Unscrew the bezel
2. Remove the old bulb
by turning anti-clockwise.
3. Insert new bulb.
4 Replace the bezel
ensuring that it is
tightly secured.
Fitting/replacing bulb (Max. 7W LED GU10)
7W LED GU10
70848 70847
The shade must be replaced immediately should the shade become cracked or damaged. This fitting
must not be used without the shade in place.
Replace Cracked Shade
V7 08/04/2022
www.saxbylighting.com Saxby Lighting
EU Manufacturer: Brilliant AG,
Brilliantstrasse 1, D-27442 Gnarrenburg
UK Manufacturer: BH17 7BY
• You have correctly identified the wires.
• The connections are tight.
• No loose strands have been left out of the connection block.
Check that...
Thank you for purchasing this light fitting. Please read the instructions carefully before use to ensure safe and
satisfactory operation of this product. Please retain these instructions for future reference.
Warning
This light fitting is Class 1 and must be connected to
an Earth circuit
Please read these instructions carefully before
commencing any work.
This unit must be fitted by a competent and qualified
electrician.
Install in accordance with IEE Wiring regulations and
current Building Regulations.
To prevent electrocution switch off at mains supply
before installing or maintaining this fitting. Ensure
other persons cannot restore the electrical supply
without your knowledge. If you are in any doubt,
please consult a qualified electrician.
This light fitting should be connected to a circuit with a
30mA RCD fitted.
If replacing an existing fitting, make a careful note of
the connections.
Always use the correct type and wattage bulb. Using
the incorrect wattage bulb will damage the bulb and
ballast.
When changing a bulb, always switch off at the mains
and allow the old bulb to cool down before handling.
Dispose of used bulbs carefully and responsibly.
Waste electrical products should not be disposed of
with household waste. Please recycle where facilities
exist. Check with your local authority or retailer for
recycling advice.
This product is rated at IP65.
This product is suitable for dimming.
This product is manufactured from marine grade
stainless steel, making it suitable for application in
coastal environments.
Please note: The entire unit gets hot whilst on for a
period of time.
Specification
Voltage: 220-240V~ 50Hz
Lamp: 2 x Max. 7W LED GU10
IP rating: 65
Layout
• Plan the desired layout of this fitting carefully,
ensuring the cables will reach the distance between
the junction box and the light fitting.
• This product is designed for domestic and light
industrial use. It should not be used to support other
objects or used as a replacement for concrete or
metal pillars.
• Avoid locating any cables in positions that would
cause a hazard. Position cables and outdoor rated
junction boxes (not supplied) away from areas
where they may be at risk from being cut, trapped or
damaged.
• We recommend that you use H05RN-F specification
cable (not supplied) which is an outdoor grade,
rubber sheathed cable. The mains supply cable must
have a minimum cross sectional area of 1.0mm².
• This product must be installed into concrete or
paving slab. It must not be installed into soil.
Installation
Wiring
Existing fittings must be completely removed before
installation of a new product. Before removing the
existing fitting, carefully note the position of each set
of wires.
- Refer to Fig. 1. Using the base plate as a template,
mark the fixing holes onto the mounting surface.
- Drill holes to the necessary size and depth - taking
care not to damage any concealed pipes or wiring
below the mounting surface.
- This product comes complete with expanding
bolt type fixings (C) which are suitable for use on
most surfaces, however alternative fixings may be
required.
- Push the fixing bolts into the mounting holes.
• See Fig. 2. Pull spacing strip from inside of tube.
• Unscrew the 4 screws which attach the black box to the spacing strip.
Open the terminal block case and pull out the terminal block.
Wire as detailed below.
• Push terminal block back into the black box and refit the terminal block
cover.
NEUTRAL
EARTH
SWITCHED LIVE
BLUE (N)
BROWN (L)
GREEN/YELLOW
SUPPLY LIGHT FITTING
A
B
C
Fig. 1
Cable wired to product
Terminal block case
Supply cable
Spacing strip
LIVE
wires
NEUTRAL
wires
EARTH
wire
EARTH
wire
Fig. 2
Having correctly identified the wiring from your existing light fitting, pull the wire throught the bottom of the fitting and
connect to the approved IP67 (or higher rated) terminal block inside the product in the following way (recommended
terminal block Ref. 90131/90132)

This manual suits for next models

2

Other Saxby Lighting Outdoor Light manuals

Saxby Lighting Severus Outdoor Wall EL-40103 User manual

Saxby Lighting

Saxby Lighting Severus Outdoor Wall EL-40103 User manual

Saxby Lighting 73435 Manual

Saxby Lighting

Saxby Lighting 73435 Manual

Saxby Lighting EL-40062 Manual

Saxby Lighting

Saxby Lighting EL-40062 Manual

Saxby Lighting 75270 Manual

Saxby Lighting

Saxby Lighting 75270 Manual

Saxby Lighting Aretz GU10 Recessed User manual

Saxby Lighting

Saxby Lighting Aretz GU10 Recessed User manual

Saxby Lighting 78646 Manual

Saxby Lighting

Saxby Lighting 78646 Manual

Saxby Lighting Ware Outdoor Wall Manual

Saxby Lighting

Saxby Lighting Ware Outdoor Wall Manual

Saxby Lighting Palin Spike Manual

Saxby Lighting

Saxby Lighting Palin Spike Manual

Saxby Lighting 78959 User manual

Saxby Lighting

Saxby Lighting 78959 User manual

Saxby Lighting Odyssey ST5008BK User manual

Saxby Lighting

Saxby Lighting Odyssey ST5008BK User manual

Saxby Lighting Louvre Outdoor Wall Fitting User manual

Saxby Lighting

Saxby Lighting Louvre Outdoor Wall Fitting User manual

Saxby Lighting Midi Wall Manual

Saxby Lighting

Saxby Lighting Midi Wall Manual

Saxby Lighting Doron Wall Manual

Saxby Lighting

Saxby Lighting Doron Wall Manual

Saxby Lighting Odyssey ST5009BK User manual

Saxby Lighting

Saxby Lighting Odyssey ST5009BK User manual

Saxby Lighting Seina User manual

Saxby Lighting

Saxby Lighting Seina User manual

Saxby Lighting Bayswater 40045 User manual

Saxby Lighting

Saxby Lighting Bayswater 40045 User manual

Saxby Lighting Halbury Wall Manual

Saxby Lighting

Saxby Lighting Halbury Wall Manual

Saxby Lighting 13889 User manual

Saxby Lighting

Saxby Lighting 13889 User manual

Saxby Lighting 13826 User manual

Saxby Lighting

Saxby Lighting 13826 User manual

Saxby Lighting Zone Bollard User manual

Saxby Lighting

Saxby Lighting Zone Bollard User manual

Saxby Lighting BLISS 13799 User manual

Saxby Lighting

Saxby Lighting BLISS 13799 User manual

Saxby Lighting POLGU10 User manual

Saxby Lighting

Saxby Lighting POLGU10 User manual

Saxby Lighting Severus EL-40108 Manual

Saxby Lighting

Saxby Lighting Severus EL-40108 Manual

Saxby Lighting Triton Spike User manual

Saxby Lighting

Saxby Lighting Triton Spike User manual

Popular Outdoor Light manuals by other brands

RZB Lighting Alu-Star Instruction

RZB Lighting

RZB Lighting Alu-Star Instruction

RAB Lighting LFLED4LV installation instructions

RAB Lighting

RAB Lighting LFLED4LV installation instructions

Philips 15213/**/16 user manual

Philips

Philips 15213/**/16 user manual

LIGMAN HA-60305-A installation manual

LIGMAN

LIGMAN HA-60305-A installation manual

Malibu Boats HV402WLK Assembling & installation instructions

Malibu Boats

Malibu Boats HV402WLK Assembling & installation instructions

IMT IQL Helios user manual

IMT

IMT IQL Helios user manual

SLV Elektronik BRICK LED 16 operating manual

SLV Elektronik

SLV Elektronik BRICK LED 16 operating manual

Volt 360 Series installation instructions

Volt

Volt 360 Series installation instructions

Endon Carlson instruction manual

Endon

Endon Carlson instruction manual

JONATHAN Y JYL7108 quick start guide

JONATHAN Y

JONATHAN Y JYL7108 quick start guide

Salvatori Urano manual

Salvatori

Salvatori Urano manual

DPM GRD103 manual

DPM

DPM GRD103 manual

Teron Lighting Heritage RND LED Installation & maintenance instructions

Teron Lighting

Teron Lighting Heritage RND LED Installation & maintenance instructions

SLV Elektronik ADJUST QRB111 operating manual

SLV Elektronik

SLV Elektronik ADJUST QRB111 operating manual

TFA 43.2034 instruction manual

TFA

TFA 43.2034 instruction manual

Outsunny 867-153V00 manual

Outsunny

Outsunny 867-153V00 manual

Leader Light LL SPORT D630-NA-I20 user manual

Leader Light

Leader Light LL SPORT D630-NA-I20 user manual

JONATHAN Y JYL2072A/B quick start guide

JONATHAN Y

JONATHAN Y JYL2072A/B quick start guide

manuals.online logo
manuals.online logoBrands
  • About & Mission
  • Contact us
  • Privacy Policy
  • Terms and Conditions

Copyright 2025 Manuals.Online. All Rights Reserved.