manuals.online logo
Brands
  1. Home
  2. •
  3. Brands
  4. •
  5. Schischek
  6. •
  7. Controllers
  8. •
  9. Schischek ExRun Y Series User manual

Schischek ExRun Y Series User manual

EXPLOSIONPROOF
ExRun - ... - Y
ExRun - ... - CTS
www.schischek.com
Schischek GmbH Germany, Muehlsteig 45, Gewerbegebiet Sued 5, 90579 Langenzenn, Tel. +49 9101 9081-0, Fax +49 9101 9081-77, E-Mail [email protected]
ExRun-S-Y_en
V01 – 17-Jan-2014
Subject to change!
Compact. Easy installation. Universal. Cost effective. Safe.
Product views and applications
Description Highlights
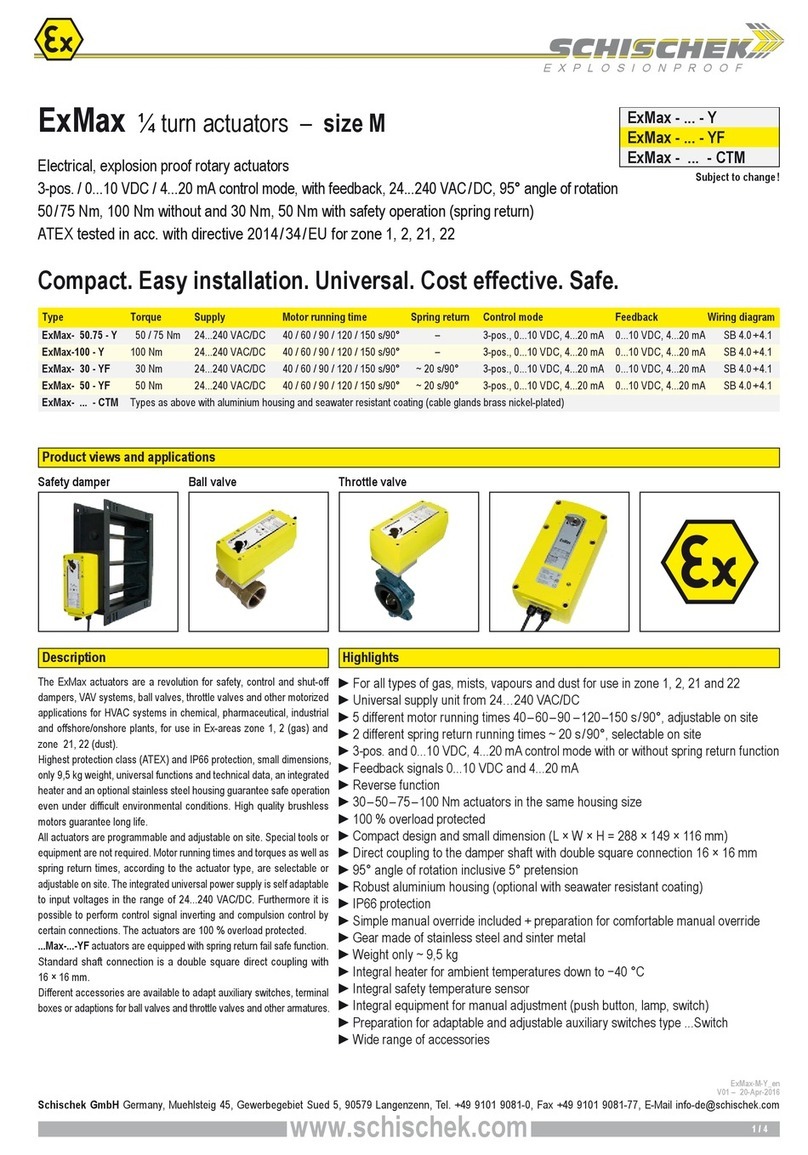
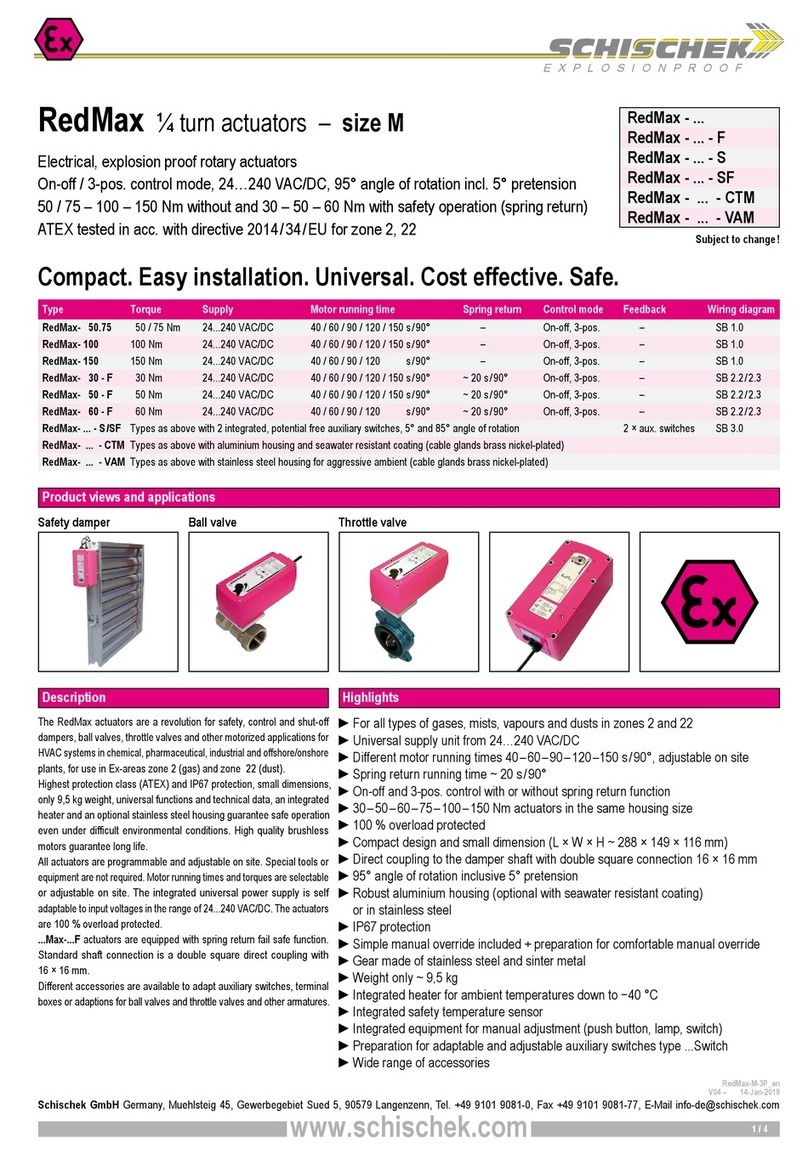
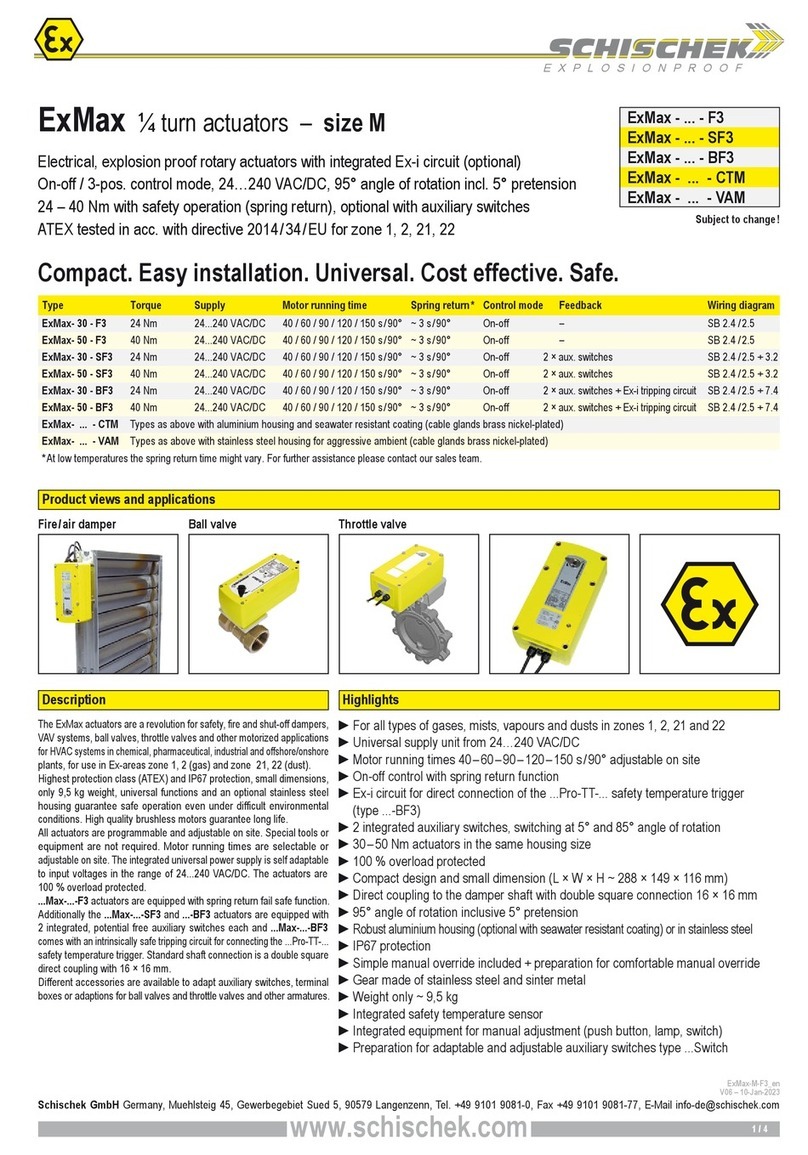
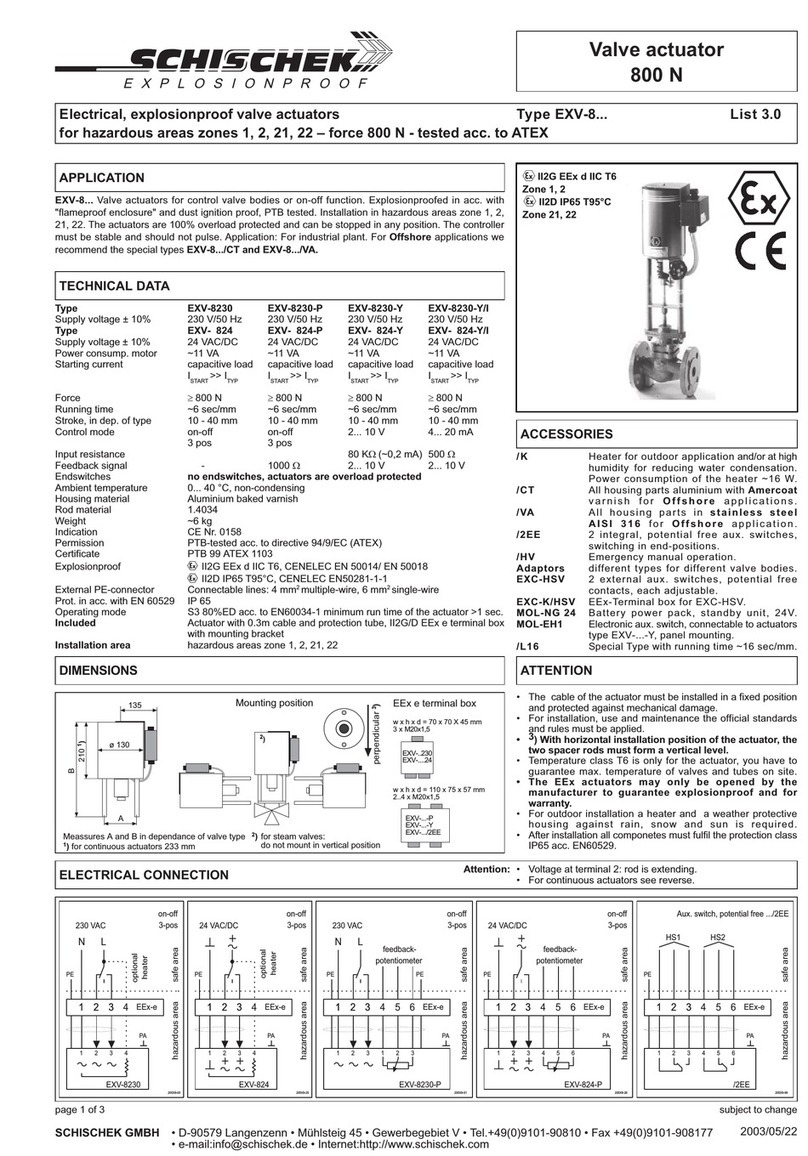
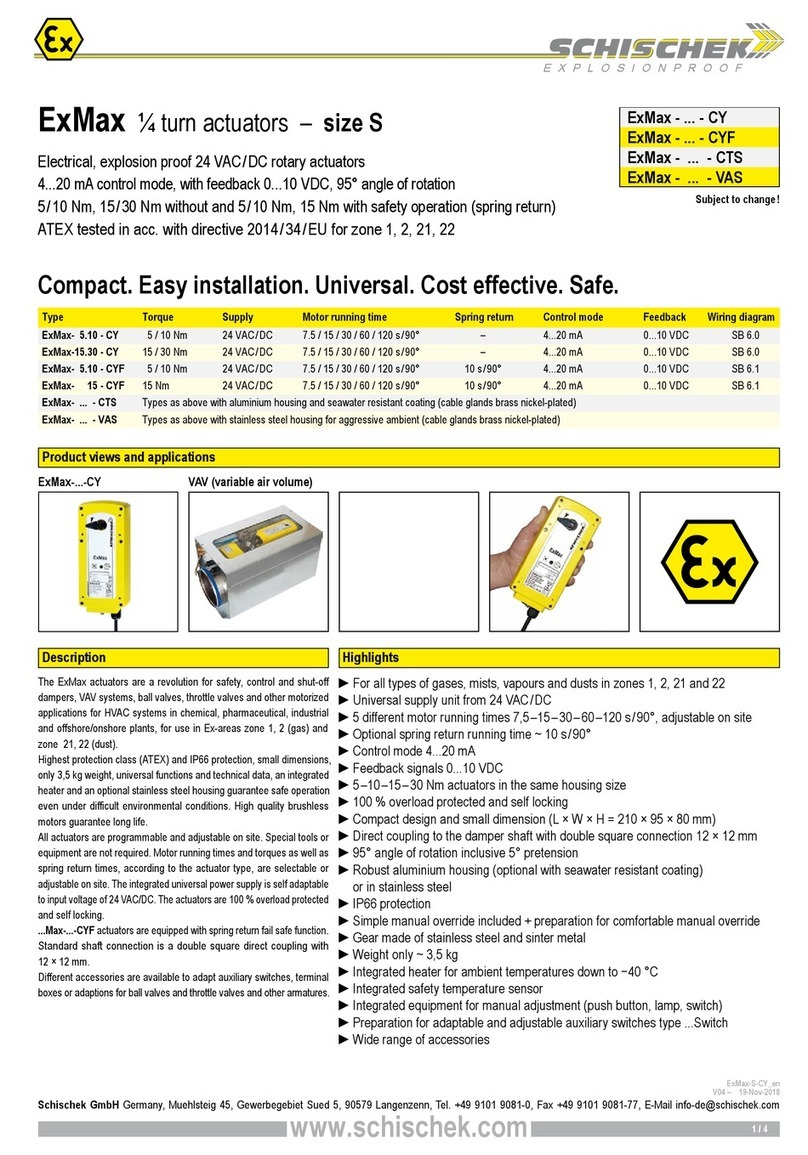
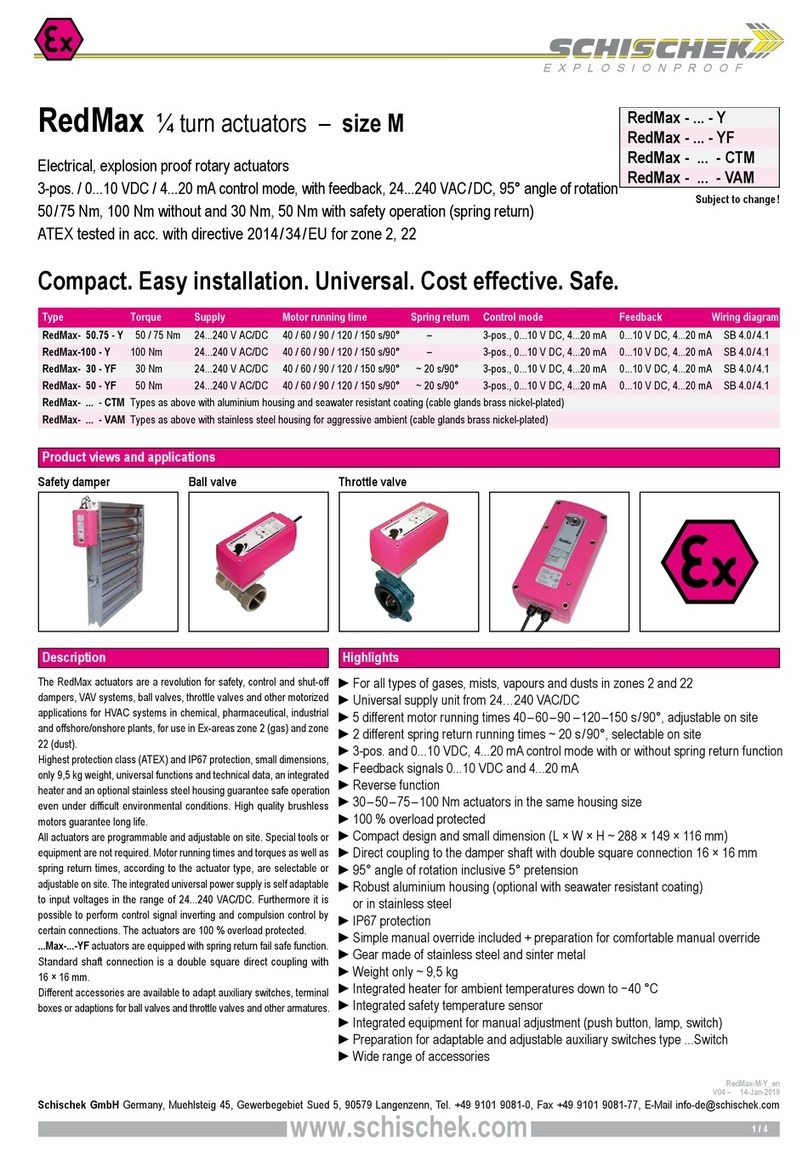
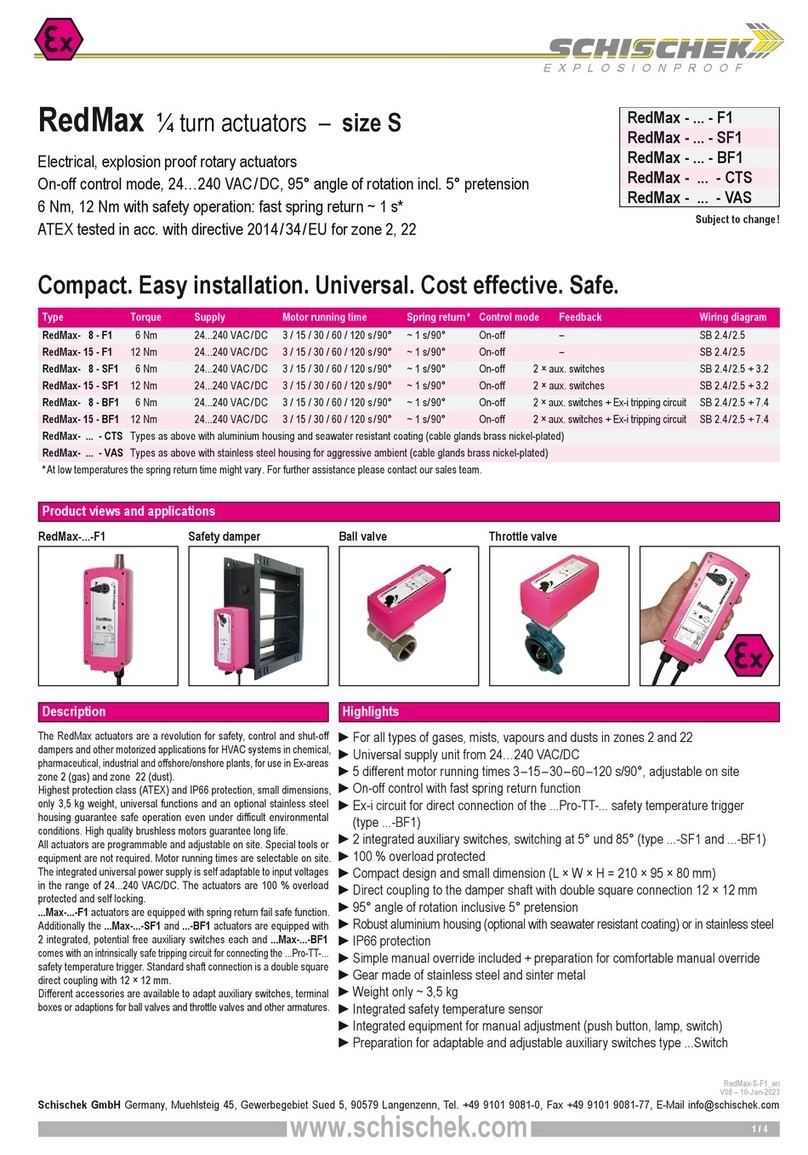
Electrical, explosion proof linear actuators – 500 N to 10,000 N
24...240 VAC/DC, 5...60 mm adjustable stroke
ATEX tested in acc. with directive 94/9/ EC for zone 1, 2, 21, 22
ExRun Valve actuators with continuous control
Type Force Supply Motor running time Control mode Feedback Wiring diagram
ExRun- 5.10 - Y 0,5 kN / 1,0 kN 24...240 VAC/DC 2 / 3 / 6 / 9 / 12 s/mm 0...10 VDC, 4...20 mA 0...10 VDC, 4...20 mA SB 1.0
ExRun- 25.50 - Y 2,5 kN / 5,0 kN 24...240 VAC/DC 2 / 3 / 6 / 9 / 12 s/mm 0...10 VDC, 4...20 mA 0...10 VDC, 4...20 mA SB 1.0
ExRun- 75.100- Y 7,5 kN / 10,0 kN 24...240 VAC / DC 4 / 6 / 9 / 12 / 15 s/mm 0...10 VDC, 4...20 mA 0...10 VDC, 4...20 mA SB 1.0
ExRun- ... - CTS Types as above with aluminium housing and seawater resistant C5-M painting (exterior parts in stainless steel, cable glands brass nickel-plated)
...Run Side view Back view with terminal box ...Run mounted on valve Compact body
ExRun valve actuators are the new generation of electrical, explosion
proof adjustment and control valves and other motorized applications
for HVAC systems in chemical, pharmaceutical, industrial and
offshore/onshore plants, for use in Ex-areas zone 1, 2 (gas) and zone
21, 22 (dust).
Highest protection class and IP66 protection, compact dimensions, little
weight, universal functions and technical data and an integrated heater
guarantee safe operation even under difficult environmental conditions.
High quality brushless motors guarantee long life.
All actuators are programmable and adjustable on site. Special tools
or equipment are not required. Motor running times and forces, accord-
ing to the actuator type, are selectable or adjustable on site. The inte-
grated universal power supply is self adaptable to input voltages in the
range of 24...240 VAC/DC. The actuators are 100 % overload protected
and self locking.
The modular concept offers the possibility to mount adjustable end
switches for signalization.
►For all type of gas, mixtures, vapours and dust for use in zone 1, 2, 21 and 22
►Universal supply unit from 24…240 VAC/DC
►Integrated junction box
►Motor running times 2– 3–4 –6–9–12–15 s/mm, acc. to type
►Continuous control, feedback signals 0...10 VDC and 4...20 mA
►Reverse function
►Forces 500– 1000–2500 –5000– 7500–10000 N, acc. to type
►Feedback gear unit, adjustable in steps 10 / 20 / 30 / 60 mm
►Mechanical stroke limitation, 5...60 mm stroke adjustable
►100 % overload protected and self locking
►Compact design and small dimensions
►Robust aluminium housing (optional marine painting)
►IP66 protection
►Manual override included + preparation for comfortable manual override
►Weight ~ 7 kg
►Integral safety temperature sensor
►Status indication by LED
1 / 4
EXPLOSIONPROOF
www.schischek.com
Schischek GmbH Germany, Muehlsteig 45, Gewerbegebiet Sued 5, 90579 Langenzenn, Tel. +49 9101 9081-0, Fax +49 9101 9081-77, E-Mail [email protected]
ExRun-S-Y_en
V01 – 17-Jan-2014
ExRun-...-Y
Special makes ExRun- ... -CTS
Technical data ExRun- 5.10 -Y ExRun- 25.50 -Y ExRun- 75.100 -Y
Approbations Special solutions and accessories
ATEX tested PTB 09 ATEX 1016 X
IECEx tested IECEx PTB 11.0024X
In acc. with ATEX 94/9/EC
Approval for gas II2(1)G Ex de [ia] IIC T6/T5 zone 1, 2
Approval for dust II2(1)D Ex tD [iaD] A21 IP66 T80°C zone 21, 22
Identification CE No. 0158
EMC 2004/108/EC
Low voltage 2006/95/EC
IP-Protection IP66 in acc. with EN 60529
...-CTS Types in aluminium housing with C5-M finish, parts nickel-plated
ExSwitch-R-L External linear aux. switches, 2 separately adjustable contacts, for
mounting on ...Run’s spindle in zone 1, 2, 21, 22
ExBox/SW Ex-e terminal box for aux. switches ...Switch-R-L
MKK-S Mounting bracket, V2A, for terminal boxes ...Box-... directly on actuator
HV-R Retrofit manual override for ...Run actuators
GBM-1 Rubber bellow, 60 mm
WS-R Weather shield in stainless steel V4A / 316L
Adaptions For fittings and manufacturers on request
Force (nominal) 0,5 / 1,0 kN selectable 2,5 / 5,0 kN selectable 7,5 / 10 kN selectable
Force (blockade) approx. * 0,8 / 1,5 kN 4,0 / 7,5 kN 12 / 16 kN
Force (on the go) approx. * 4,0 / 6,0 kN 8,0 / 12 kN 12 / 16 kN
Supply voltage / frequency 24...240 VAC/DC, ± 10 %, self adaptable, frequency 50...60 Hz ± 20 %
Power consumption max. starting currents see Extra information (in acc. with voltage, I start >> I rated ), 2 A inrush current
Protection class Class I (grounded)
Heater consumption ~ 16 W (motor is not running at this moment), turns on automatically at low ambient temperatures
Stroke 5...60 mm (adjustable)
Motor running times (selectable) 2 / 3 / 6 / 9 / 12 s/mm 2 / 3 / 6 / 9 / 12 s/mm 4 / 6 / 9 / 12 / 15 s/mm
Motor Brushless DC motor
Control mode Y 0...10 VDC, 4...20 mA in acc. with wiring, selectable on site. Galvanic separation between supply and Y-signal
Feedback signal U 0...10 VDC, 4...20 mA in acc. with wiring, selectable on site, both signals are available at the same time
Resistance of Y and U signals Input signal: YU 0…10 VDC at 10 kΩ, YI 4…20 mA at 100 Ω
Feedback signal: UU 0…10 VDC at 1.000…∞ Ω, UI4…20 mA at 0…800 Ω
Reverse function Bridge between terminals 3–4 (signal line) effects a reverse function of input and output signals (Y and U)
Compulsion control In modulation mode an On-off compulsion control can be performed by external connection/wiring independently from the modulating signal
Adjustment of Y und U In case of external mechanical limitation of operating displacement, it is possible to perform an adjustment drive started by touching the button
Electrical connection Ex-e junction box incl. terminals 0,14…4 mm²
Cable gland M20 × 1,5 mm, II2GD Ex-e approved, cable diameter Ø 6…13 mm
Manual override Change from motor to hand mode with red turn-switch on the side, use Allen key’s top side, max. 5 Nm
Housing material Aluminium die cast housing, painted. Optional seawater resistant C5-M marine coating (...-CTS)
Dimensions L × W × H ~ 208 × 115 × 254 mm (types ≤5 kN), 208 × 115 × 298 mm (types ≥7,5 kN), for diagrams see Extra information
Weight ~ 7 kg (standard version without adaption)
Ambients Storage temperature −40...+70 °C, working temperature −20...+40 °C at T6 and −20...+50 °C at T5
Ambient temperature −30 °C −30...+40 °C at T6 / −30...+50 °C at T5, reduced forces approx. 60 % of rated value, e.g. 5 kN ≙3 kN (max.). Avoid icing!
Humidity 0...90 % rH, non condensing
Operation mode S3/50 % ED (ED = duty cycle), max. 300 operating cycles / h
Accuracy mechanically < 1 mm stroke (hysteresis)
Accuracy electrically ~ 200 steps acc. to stroke adjustment “Gear belt adjustment” (page 4)
Wiring diagrams SB 4.0 For adjusting control and feedback signal UV/ UmA acc. to stroke setting please note page 4
Delivery Actuator with integrated junction box, Allen key for manual override
Parameter at delivery 500 N, 6 s/mm 2,5 kN, 6 s/mm 7,5 kN, 9 s/mm
* Note also the chapter on dimensioning!
2 / 4
EXPLOSIONPROOF
! !
ExRun- 5.10-Y ►
ExRun-25.50-Y ►
ExRun-75.100-Y►
500 N
2.500 N
▼
1.000 N
5.000 N
▼
10.000 N
▼
7.500 N
▼
2 s/mm ►
3 s/mm ►
6 s/mm ►
9 s/mm ►
12 s/mm ►
4 s/ mm ►
6 s/ mm ►
9 s/ mm ►
12 s/mm ►
15 s/mm ►
00
01
02
03
04
05
06
07
08
09
05
06
07
08
09
00
01
02
03
04
1 12 23 34 45 6
S
T
PE
PA
4 41 152 263 3
a b
24...240 VAC / DC
+
~
−
~
T
VDC/mA UmA
YmA UVDC
YVDC
Invers
4...20 mA
4...20 mA
0...10 V
0...10 V
GND
www.schischek.com
Schischek GmbH Germany, Muehlsteig 45, Gewerbegebiet Sued 5, 90579 Langenzenn, Tel. +49 9101 9081-0, Fax +49 9101 9081-77, E-Mail [email protected]
ExRun-S-Y_en
V01 – 17-Jan-2014
ExRun-...-Y
Special makes ExRun- ... -CTS
Electrical connection
Parameters, adjustments and failure indication
Parameter selection
Functions, adjustments and parameters
Type
Running times
Running timesPosition of switch S
Position of switch
Forces Forces
Example:
ExRun-25.50
Requested parameter:
Force 5.000 N
Running time 6 s/mm
Result:
Switch position 07
A) Self adjustment of stroke:
Push button (T) for minimum 3 seconds. The actuator will drive into both end positions
to be adjusted. LED indicates GREEN.
Adjustment drive can be applied in any switch (S) position.
B) Selection of running time and force:
Put switch (S) into the correct selected position in acc. to above table. The selected
parameter will work at next operation of the actuator. Adjustment can be done even
without supply voltage. If supply voltage is available turn switch only if actuator is
not running.
C) Force control:
a closed, b open = rod goes in
b closed, a open = rod goes out
a and b closed = motor doesn’t work, no function
a and b opened = motor doesn’t work, no function
1. Switch off the power
2. Open cover of junction box
3. Put cable through cable gland into junction box
4. Strip wires approx. 7 mm
5. Connect wires acc. to wiring diagram and
type. Note: Wrong wiring expires guarantee
and warranty
6. Connect protection earth PE
7. Fix wires, screw terminals
8. Close cable entries tighten (IP66)
9. Close cover junction box (regard gasket)
analog in (1– 3)
analog out (3–6)
Supply (1–2)
IN/OUT control (3–4)
Integrated junction box
Switch – Push button – Lamp
for adjustment
(behind the blanking plug)
10-position switch (S)
Push button (T)
3-colour LED
Dimensioning
Force in blocking position
The force in the end positions could be much more than the nominal force.
Generally the valve is to check together with actuator and construed accordingly.
Note the values in the “Technical Data”.
Force on the go
The force in mid travel could be much more than the nominal force.
Generally the valve is to check together with actuator and construed accordingly.
Note the values in the “Technical Data”.
Self adjustment
To protect the valve/armature and the actuator in the end positions a self adjust-
ment has to be performed, always.
All actuators are equipped with a universal supply unit working at a voltage range from
24...240 VAC/DC. The supply unit is self adjusting to the connected voltage!
Device must be fuse protected max. 5 AT.
Note current consumption acc. to running time and applied voltage (min. 2 A).
Continuous control (...Run-...-Y) SB 4.0
Self adjustment:
To adjust the signal input/output to the stroke of the
valve the button (T) must be pushed for min. 3 sec.
Note gear belt setting 0–10– 20–30–60 mm
(see instructions page 4)
Function:
▪a closed – rod goes in
▪b closed – rod goes out
Attention
At initial operation a self adjustment has to be executed.
Control
Control reverse (bridge 3– 4)
Function:
Switch control a closed
Output
Control signal (feedback) signal
10 V 10 V
20 mA 20 mA
– Rod goes in
Function:
Switch control a closed
Output
Control signal (feedback) signal
10 V 10 V
20 mA 20 mA
– Rod goes out
Function:
Switch control b closed
Output
Control signal (feedback) signal
0 V 0 V
4 mA 4 mA
– Rod goes out
Function:
Switch control b closed
Output
Control signal (feedback) signal
0 V 0 V
4 mA 4 mA
– Rod goes in
3 / 4
EXPLOSIONPROOF
!
M
10 mm
20 mm
30 mm
60 mm
www.schischek.com
Schischek GmbH Germany, Muehlsteig 45, Gewerbegebiet Sued 5, 90579 Langenzenn, Tel. +49 9101 9081-0, Fax +49 9101 9081-77, E-Mail [email protected]
ExRun-S-Y_en
V01 – 17-Jan-2014
ExRun-...-Y
Special makes ExRun- ... -CTS
Important information for installation and operation
Stroke and gear belt adjustment
Extra information (see additional data sheet)
Additional technical information, dimensions, installation instruction, illustration
and failure indication
Ex area –
zone 1, 2, 21, 22 Safe area
Supply *
24...240 VAC/DC ± 10 %
* electrical wiring see diagrams
Control / feedback signal
0...10 V / 4...20 mA
Manual override
When operating the manual override in case of failure it is possible that the gear
decouples. It can be seen that the selector switch is turned on “motor”, but when
controlled the actuator does not execute any stroke movement.
The blockade is resolved by simultaneously rotating the motor-hand switch and
turning the Allen key in the hexagon shaft. The gear engages.
1. Actuator must be in stop position
2. Turn red switch to change from motor to hand mode
3. Turn to required stroke with Allen key (top side):
▪ clockwise = rod out
▪ counterclockwise = rod in
4. Upon completion turn back to motor mode
Motor mode Hand mode
Allen key
Stroke adjustment
Switch off power
1. Demount cover:
Loosen 5 srews,
Remove cover
2. Adjust/limitate stroke:
Stroke can be adjusted by thread nut
from min. 5 mm to 60 mm.
Thread nutStroke indication
Open feedback gear’s cover bracket
3. Open cover bracket of feedback gear,
thereby gear belt’s tension is removed –
not till then slide belt by hand to the right
setting acc. to stroke. Do not use any
tools.
Due to repeated movements of the red
bar the setting of the gear belt gear can
be changed. The position is corrected by
closing the cover and starting a re-adjust-
ment drive.
4. Position gear belt acc. to set stroke.
Do not use any sharp tools, manual
operation only. Mind positioning.
Set acc. to stroke.
Feedback signal
By gear belt setting the feedback signal
0...10 V / 4...20 mA is adjusted to stroke.
Example:
For stroke of 26 mm follows gear belt set-
ting to position 30 mm. Start adjustment
drive by pushing button (T) for 3 s.
Thereby the feedback signal is setting
stroke automatically to 26 mm (see also
above “2. Stroke adjustment”).
Stroke
Gear belt setting
Gear belt adjustment (for feedback signal U)
5. Note right position of gear belt!
Close bracket, thereby the gear belt is
automatically tensioned.
Close cover bracket of feedback gear
Remount cover
6. Note: cover gasket must be fit
in the groove while mounting!
Tighten 5 screws
Switch on power
▪ Do not open the cover when circuits are live
▪ Regard all (inter-)national standards, rules and regulations
▪ Supply cables must be installed in a fixed position and protected against
mechanical damage
▪ For wiring use the integrated junction box
▪ Connect potential earth
▪ Ambient temperature −20...+40 °C at T6 / −20...+50 °C at T5
▪ Avoid temperature transfer from valve to actuator (note ambient temperature Ta!)
▪ Close all openings with min. IP66
▪ Flameproof enclosure is protected against mechanical damages acc. to EN 60079-ff
▪ For outdoor installation a protective housing against rain, snow and sun should be applied
▪ Actuators are maintenance free, an annual function test is recommended
▪ Clean only with damp cloth, avoid dust accumulation
4 / 4

This manual suits for next models

4

Other Schischek Controllers manuals

Schischek InMax CTM Series User manual

Schischek

Schischek InMax CTM Series User manual

Schischek RedMax F1 Series User manual

Schischek

Schischek RedMax F1 Series User manual

Schischek ExMax CTS Series User manual

Schischek

Schischek ExMax CTS Series User manual

Schischek ExMax User manual

Schischek

Schischek ExMax User manual

Schischek ExMax CY Series User manual

Schischek

Schischek ExMax CY Series User manual

Schischek RedMax User manual

Schischek

Schischek RedMax User manual

Schischek InMax SF3 Series User manual

Schischek

Schischek InMax SF3 Series User manual

Schischek ExMax BF User manual

Schischek

Schischek ExMax BF User manual

Schischek ExReg-V CT Series User manual

Schischek

Schischek ExReg-V CT Series User manual

Schischek RedMax F Series User manual

Schischek

Schischek RedMax F Series User manual

Schischek Redmax Series Quick start guide

Schischek

Schischek Redmax Series Quick start guide

Schischek InMax-8-F1 User manual

Schischek

Schischek InMax-8-F1 User manual

Schischek InMax-8-F1 User manual

Schischek

Schischek InMax-8-F1 User manual

Schischek ExMax CTM Series User manual

Schischek

Schischek ExMax CTM Series User manual

Schischek ExMax F3 Series User manual

Schischek

Schischek ExMax F3 Series User manual

Schischek ExMax CTM Series User manual

Schischek

Schischek ExMax CTM Series User manual

Schischek RedMax-Y Series User manual

Schischek

Schischek RedMax-Y Series User manual

Schischek InMax Series User manual

Schischek

Schischek InMax Series User manual

Schischek InMax-100 User manual

Schischek

Schischek InMax-100 User manual

Schischek RedMax BF Series User manual

Schischek

Schischek RedMax BF Series User manual

Schischek ExMax Series User manual

Schischek

Schischek ExMax Series User manual

Schischek RedMax CTM Series User manual

Schischek

Schischek RedMax CTM Series User manual

Schischek RedMax-8-F1 User manual

Schischek

Schischek RedMax-8-F1 User manual

Schischek RedMax S Series User manual

Schischek

Schischek RedMax S Series User manual

Popular Controllers manuals by other brands

Keyprocessor Orion installation manual

Keyprocessor

Keyprocessor Orion installation manual

LSIS S100 Series troubleshooting manual

LSIS

LSIS S100 Series troubleshooting manual

Warner Instruments CL-200A user manual

Warner Instruments

Warner Instruments CL-200A user manual

Smartgen HAT160 user manual

Smartgen

Smartgen HAT160 user manual

Linak ACTUATOR LA36 Connection diagram

Linak

Linak ACTUATOR LA36 Connection diagram

Ledj VersiLED 6 user manual

Ledj

Ledj VersiLED 6 user manual

Eltorque QT2500 Technical notes

Eltorque

Eltorque QT2500 Technical notes

Sfere WDH-31-531 user manual

Sfere

Sfere WDH-31-531 user manual

Norac UC4 Plus Rogator 1286C installation manual

Norac

Norac UC4 Plus Rogator 1286C installation manual

Bender CC613 manual

Bender

Bender CC613 manual

Banner Sure Cross DXM100-Bx instruction manual

Banner

Banner Sure Cross DXM100-Bx instruction manual

Acuity Brands gotham Renaissance Lighting Rhapsody instruction manual

Acuity Brands

Acuity Brands gotham Renaissance Lighting Rhapsody instruction manual

MR TAPCON 230 VC operating instructions

MR

MR TAPCON 230 VC operating instructions

Re T-one ULS user manual

Re

Re T-one ULS user manual

Belimo SY 3-T Series manual

Belimo

Belimo SY 3-T Series manual

LINK-MI LM-TV14 user manual

LINK-MI

LINK-MI LM-TV14 user manual

Emerson Alco Controls FSX Series Operating	 instruction

Emerson

Emerson Alco Controls FSX Series Operating instruction

TWR Lighting D-1LVS manual

TWR Lighting

TWR Lighting D-1LVS manual

manuals.online logo
manuals.online logoBrands
  • About & Mission
  • Contact us
  • Privacy Policy
  • Terms and Conditions

Copyright 2025 Manuals.Online. All Rights Reserved.