Schweizer eMag 200 User manual

User’s Guide
for Desktop Magnifier
Mode d‘emploi du pupitre de lecture à écran eMag 200
Handleiding voor beeldschermloep eMag 200

Contents .Contenu .Inhoudstabel
GB Instruction manual english page 3
FManuel d’utilisation francais page 29
NL Handleiding nederlandse bladzijde 55

3
GB
eMag200 Desktop Magnifier
User’s Guide
Lieferant:
A. SCHWEIZER GmbH
Hans-Böckler-Str. 7
91301 Forchheim
www.schweizer-optik.de
Congratulations on your purchase of the desktop magnifier eMag200. This electronic device enables you
to magnify printed text and objects from 2.3 to 60 times their original size. The eMag200 is equipped with
a wide screen (format 16:9) with a 50.5 cm (20“) screen diagonal. Wehope you enjoy using this high-quality
device.
Information in this document is subject to change without notice. No part of this publication may be repro-
duced or transmitted in any form or any means, electronic or mechanical, for any purpose, without the ex-
press written permission of A. SCHWEIZER GmbH.
Copyright © 2015 A. SCHWEIZER GmbH. All Rights Reserved.

4

5
GB
Table of Contents
Transporting and Moving the eMag200.................................................6
Setting up the eMag200.............................................................9
Advanced Video Controls ...........................................................15
Focus Lock . . . . . . . . . . . . . . . . . . . . . . . . . . . . . . . . . . . . . . . . . . . . . . . . . . . . . . . . . . . . . . . . . . . . . 15
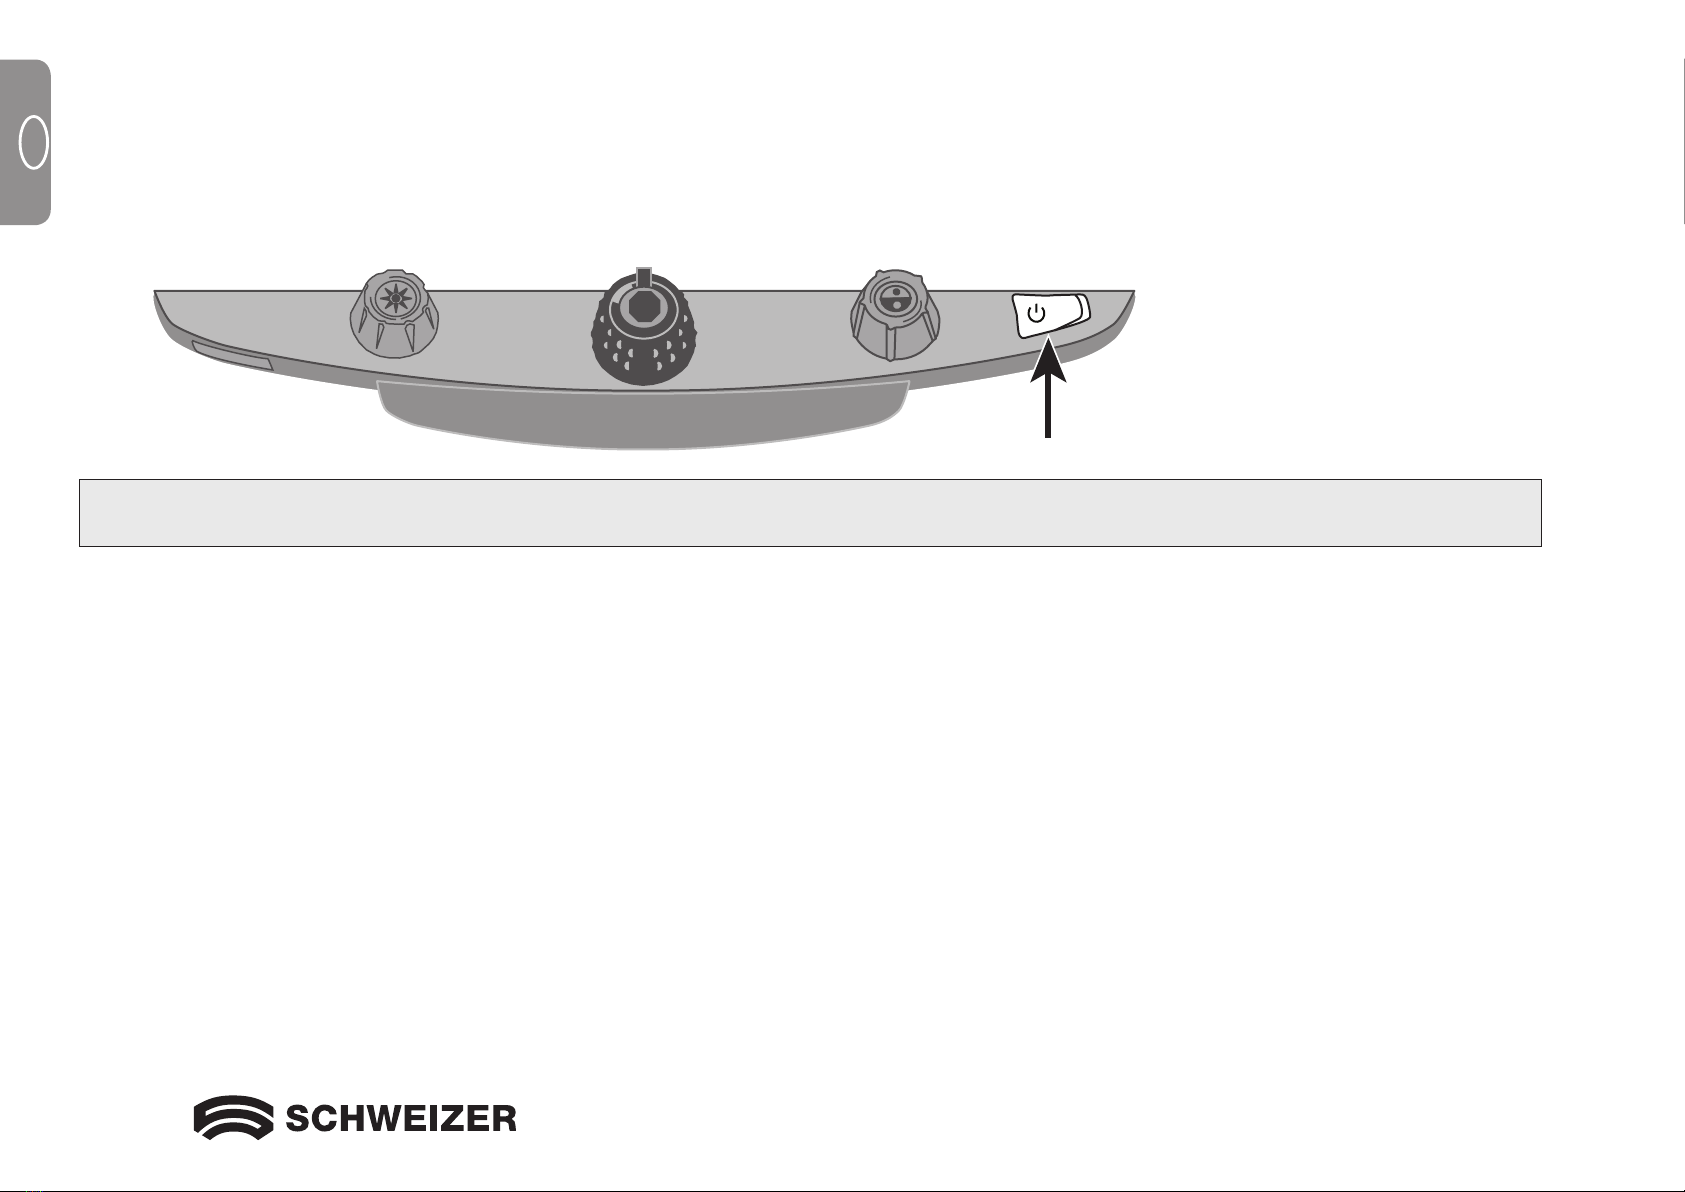
Turning LED Reading Lights On or Off .................................................16
Using the eMag200 Reading Line ....................................................17
Changing the Basic Configuration of the eMag200 ......................................18
Settings ........................................................................18
Opening Configuration Mode and Editing Settings........................................18
Customizing Magnification Settings ...................................................21
Selecting a Magnification Range .....................................................22
Changing the Zoom Position Display ..................................................23
Resetting Factory Default...........................................................25
Displaying Firmware Version Number..................................................26
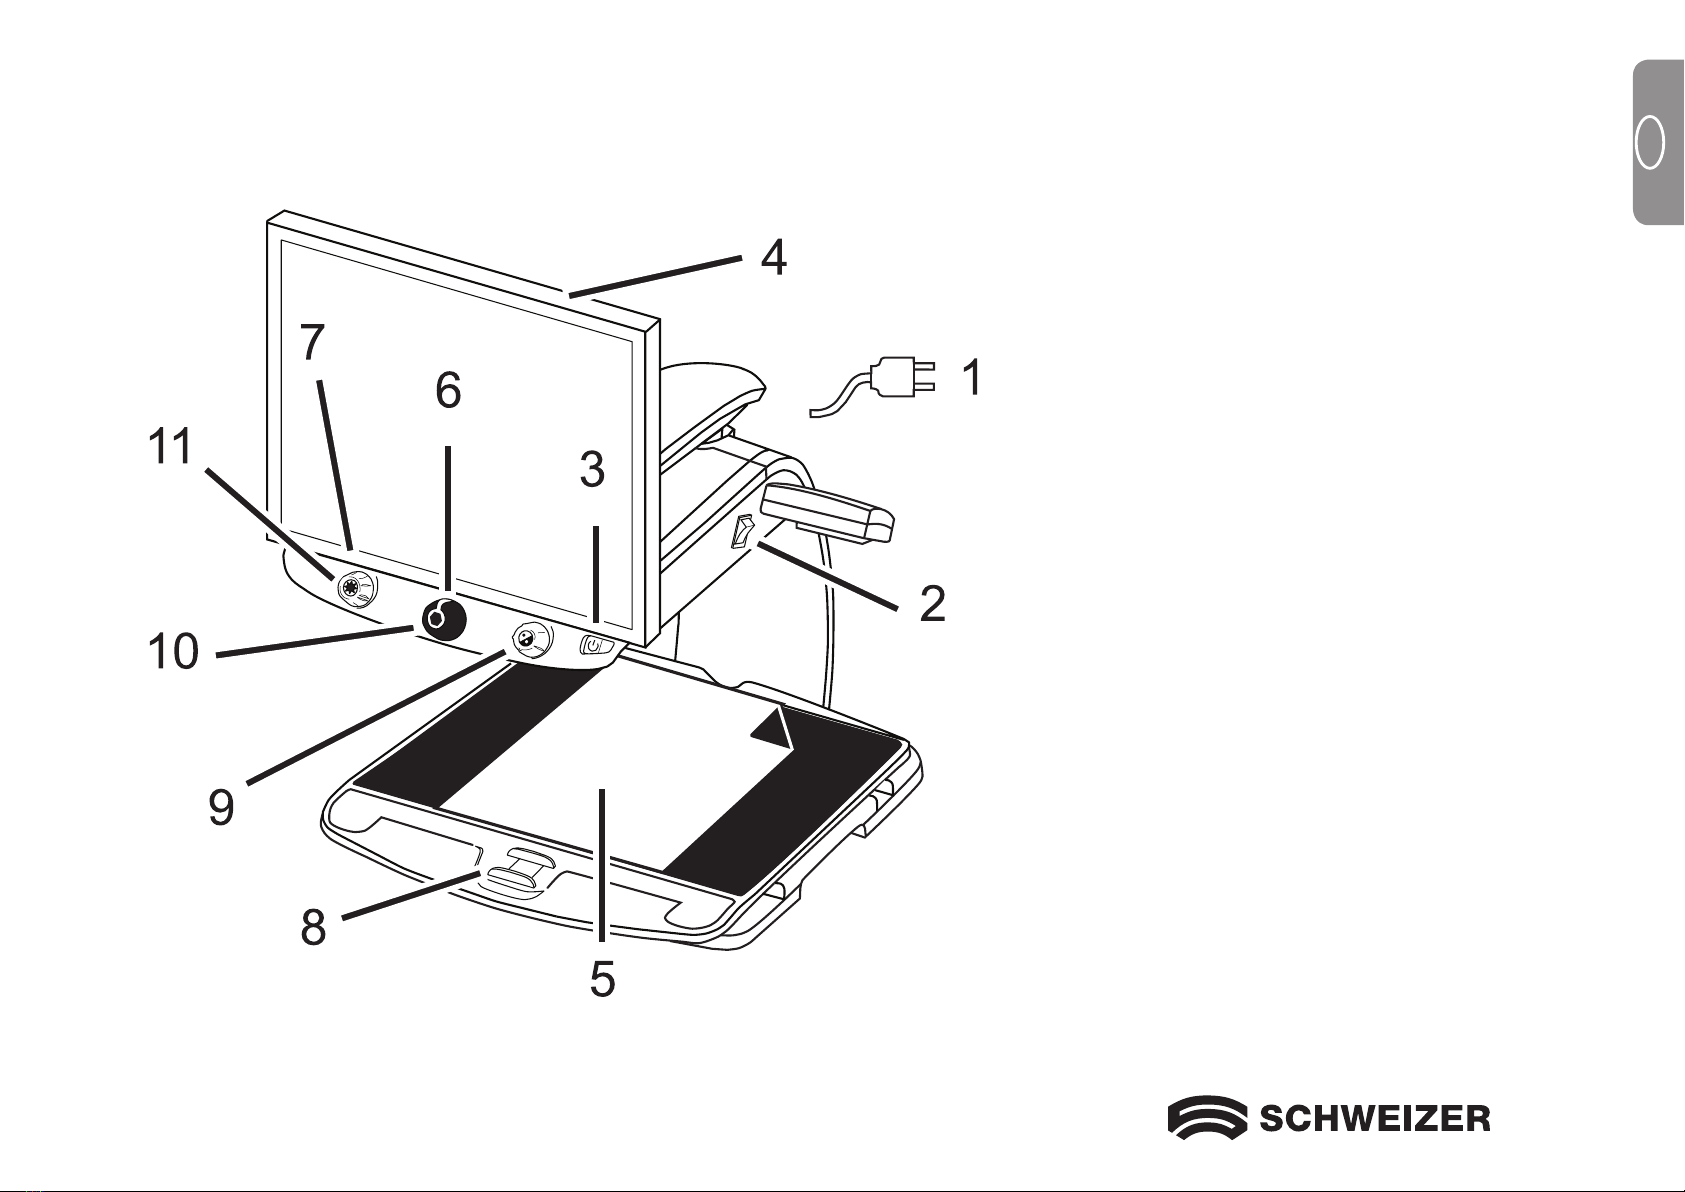
Connectors on the back of the unit ...................................................27
Important Safety information ........................................................28

6
GB
Transporting and Moving the eMag200
This image and the information on pages 7 and 8 will show how you can lift, carry and position the
eMag200.
Monitor arm lock
Camera support
Reading table
lock slider
Repositioning grips
Caution: Never hold
by the reading
lights!

7
GB
1. Lock the monitor arm to prevent the monitor from moving to the left or right.
2. Lock the reading table in position using the red lock slider.
3. Lift the eMag200 by the rear post to move it to a stable surface such as a table, desk or work-
top. Thebest way to do this is to wrap your forearm around the post from the rear and then lift the
eMag200.
Important: Do NOT hold the unit by the LED reading lights – only touch the camera support.
Pull out pin to lock
Push pin in to release
Note: The monitor arm must be
in center position before
the pin engages.

8
GB
4. Once you have placed the eMag200 on a stable surface, you can use the repositioning grips on both
sides of the reading table to move and position it to your liking.
Use the repositioning grips
to move the eMag200 to
a different location
To lift and transport:
Reach around the camera
support from behind
Caution: Never hold
by the reading
lights!

9
GB
Setting up the eMag200
This image and the text on pages 10 to 14 show you step by step how to set up the eMag200.
1 Power cable
2 Master power switch
3 Power button
4 Monitor
5 Document on the reading table
6 Magnification dial
7 Brightness dial
8 Reading table lock slider
9 Color select dial
10 Freeze frame button
11 Find button

10
GB
1.
Connect the power cable: from the middle power connector on the back of the eMag200 to a wall outlet.
2. Press the white master power switch, which is located near the LED reading light on the right side of the
eMag200.
3. Press the green power switch on the right side of the control panel.
Note: If the screen remains blank, check that the monitor is turned on.
4. Hold the sides of the monitor with both hands and move it up or down to change the height, or turn the
monitor left or right to adjust the angle for the best view.
If the monitor will not move to the left or right, make sure that the arm lock located at the base of the
monitor arm is released (push the locking pin in). Also, make sure that the monitor is raised so that it can
be moved freely from left to right.
For further information on the monitor arm lock, see the section Transporting and Moving the eMag200
as already mentioned in this document.

11
GB
Push the monitor upward and release the monitor arm lock before turning the monitor to the left or right.
Monitor up Monitor down
Monitor left Monitor right

12
GB
5. Place the document that you want to magnify onto the center of the reading table. Move the document
back so that it touches the rear of the reading table. To read the text on a rounded object such as a pill
bottle, place it in the indentation in the rear of the reading table. This prevents the object from rolling on
the table.
6. Turn the black magnification dial to adjust the magnification.
7. Turn the yellow brightness dial to adjust the brightness.

13
GB
8. Unlock the reading table by pulling the slider toward you. Now you can move the reading table with the
document back and forth to make reading easier.
9. Turn the blue color select dial to choose the color combination that best suits your vision needs. The
default color settings are: full color, black on white, white on black, yellow on blue and yellow on black.
locked
released

14
GB
10. Press the freeze frame button located in the center of the black magnification dial to freeze the current
image on the screen. Press it again to return to the live view.
11. Press and hold the find button located in the center of the yellow brightness dial to zoom out and see
more of your document. A set of crosshairs is displayed on the screen. Move the reading table and use
the crosshairs to center and view a new area of the document.
Release the find button to turn off the crosshairs and display the new area of the document on the
screen in the original magnification.

15
GB
Advanced Video Controls
Focus lock
By default, the camera automatically focuses on the closest object in view. However, if you want it to focus on
a specific object such as the document on the reading table, you can turn on the focus lock feature. This pre-
vents the camera from accidentally focusing on your hand or any other item that moves in front of the camera.
During normal operation, we recommend that you leave the focus lock feature off.
1. Press the red focus lock button once to turn on focus lock. The padlock icon appears on the screen:
2. Press the button a second time to turn off the focus lock. The camera now focuses automatically again.

16
GB
Turning LED Reading Lights On or Off
Note: The eMag200 has two reading lights designed to illuminate documents and other items you place
on the reading table. This lighting is diffused to reduce glare and reflections. However, some items,
such as photographs or glossy magazine pages, may be too shiny or reflective toview easily. When
viewing such items, you can turn off the reading lights if you like.
1. To turn off the LED reading lights, press the button in the center of the yellow brightness dial and the red
focus lock button simultaneously.
2. Press both again when you want to turn the reading lights on.

17
GB
Using the eMag200 Reading Line
The reading line is a horizontal line that is displayed on the screen to help you keep your place while reading
adocument. It is useful when using the reading table to scroll your document across the screen.
To use the reading line, proceed as follows:
1. Press the button in the center of the blue color select dial on the eMag200 control panel to place
ahorizontal line across the screen. The line is displayed approximately one third of the way up from
thebottom of the screen.
2. Now move the reading table to the right to continue reading the text. To read the next line, move the
reading table away from you until the reading line is under the next line of text. Now you can move the
reading table to the left to continue reading.
3. To remove the reading line from the screen, press the center of the blue color select dial again.
Reading line

18
GB
Changing the Basic Configuration of the eMag200
Settings
The eMag200 can be configured for up to 12 color combinations saved under positions 1 through 12.
Specific color combinations are selected to show text for best readability, for example, yellow text against
a blue background.
Positions 1 through 3 are full color (true color), black on white and white on black. The color settings for
these positions cannot be changed.
Positions 4 through 12 can be customized or turned off. By default, positions 4 and 5 are yellow on blue
and yellow on black, but they can be changed.
Opening Configuration Mode and Editing Settings
1. When configuring color settings, it is best to have a page of text and a color photo to hand; place the
document under the camera.
2. Press and hold the red focus lock button for approximately 10 seconds to enter the configuration menu.
(Press and hold the button again at any time to exit the configuration menu and save your settings.)
Hollow outline:
Colors cannot be changed
Solid:
All settings can be edited

19
GB
The letter T, which stands for Text Enhancement, appears in the lower left corner of the screen. Position1
always appears first. A hollow T is displayed for positions 1 through 3. This means that color settings can-
not be changed; however, other settings can be edited for these positions. A solid T is displayed for posi-
tions that can be edited. The position number is also displayed on the screen: on the outside right.
3. Turn the blue color select dial to select the customizable positions 4 through 12.
4. Turn the yellow brightness dial to view all 33 available color settings. There are 30 two-color text en-
hancement modes, as well as true color (which is position 1), grayscale, and high color. When you have
set the mode you wish to assign to this position, confirm ( ) by pressing the button in the center of the
black magnification dial. An X icon ( ) means that the settings at this position are not saved.
5. Press the red focus lock button to switch to freeze frame mode: . You can switch off the freeze frame
function by pressing the button in the center of the black magnification dial: the check box becomes
anX icon.
6. Press the red focus lock button to turn on focus lock: . You can switch off the focus lock function by
pressing the button in the center of the black magnification dial: the check box becomes an X icon.
7. Press the red focus lock button again to jump to the magnification levels: . The default setting is
1. Setting 2 gives you finer adjustment in the lower magnification range (positions 1 through 5); Setting 3
gives you finer adjustment in the medium magnification range (positions 6 through 10). Press the center
of the black magnification dial to select setting 1, 2, or 3.

20
GB
8. Press the red focus lock button again to jump to the numbers for the magnification ranges: . Press the
button in the center of the black magnification dial to select how the magnification level is displayed on
the screen:
Position number (1 through 16)
No display
X value (magnification power – 3.5x, 6x, 10x and so on)
9.
Press and hold the red focus lock button for 10 seconds to exit configuration mode and save the changes.
Table of contents
Languages:
Other Schweizer Magnifier manuals

Schweizer
Schweizer EMAG 120 HD User manual

Schweizer
Schweizer ERGO-Style User manual

Schweizer
Schweizer eMag 70 HD User manual

Schweizer
Schweizer ERGO-Style User manual

Schweizer
Schweizer eMag 50 HD User manual

Schweizer
Schweizer ERGO-Lux i mobil User manual

Schweizer
Schweizer eMag 70 User manual

Schweizer
Schweizer eMag 43 HD User manual

Schweizer
Schweizer ERGO-Lux i mobil User manual

Schweizer
Schweizer eMag 34 User manual