Schweizer eMag 50 HD User manual

Instructions for use
for the electronic magnifier
Notice d'utilisation de la loupe électronique eMag 50 HD
Gebruiksaanwijzing voor de elektronische loep eMag 50 HD

2
Contents .Sommaire .Inhoud
GB Instructions for use english page 03
FManuel d’utilisation francais page 36
NL Gebruiksaanwijzing nederlandse bladzijde 68

3
GB
GB
Instructions for use
Distributor:
A. SCHWEIZER GmbH
Hans-Böckler-Str. 7
91301 Forchheim, Germany
www.schweizer-optik.de
Congratulations on purchasing the eMag 50 HD. This handheld video magnifier enables you to magnify
texts and objects from 2 to 14 times the original size. The eMag 50 HD features a 5" (12.7 cm) LCD
widescreen (16:9). We hope you enjoy using this high-quality device.
The information and data contained in this document are subject to change without notice. No part of
this document may be reproduced or transmitted in any form or by any means, electronic or mechanical,
or for any purpose, without the express written approval of A. SCHWEIZER GmbH.
Copyright © 2016 A. SCHWEIZER GmbH. All rights reserved.
Handheld video magnifier

4
GB
GB

5
GB
GB
Table of contents
Please read before first use 6
Overview 7
Your eMag 50 HD 8
Quick start 10
Charging the eMag 50 HD 12
Battery status LED 13
Description of buttons 14
Opening and closing the handle 15
Opening the reading stand 16
Functions 17
Magnifying live images 17
Magnifying captured and
saved images 17
Changing colour modes 18
Changing between the last colour mode
used and true full colour 18
Adding/removing colour modes 19
Restoring default colour modes 20
Colour modes 20
Default colour modes 20
Optional colour modes 21
Capturing an image 22
Switching off LED lights 22
Using reading line or reading mask 23
Displaying the reading line 23
Displaying the reading mask 24
Storage mode 25
Storage mode icons 25
Viewing saved images 26
Saving and deleting an image 26
Saving and deleting an image
when memory is full 27
Transferring images to a computer
via USB cable 28
Transferring images to the eMag 50 HD
via USB cable 29
Troubleshooting 30
Technical data 32
Safety and maintenance 33
Cleaning the eMag 50 HD housing 33
Cleaning the eMag 50 HD LCD screen 34
Service and support 35
Battery safety instructions 35

6
GB
GB
Please read before first use
Make sure the batteries are fully charged before using the eMag 50 HD for the first time.
It takes about 3.5 hours to fully charge the batteries.
Under Charging the eMag 50 HD –> on page 12, you will find instructions on how to charge the batteries.
Under Battery status LED –> on page 13, you will find a description of the battery status LED indicators.
See Quick start –> on page 10 for all the basic information you need to start using your eMag 50 HD.
Please read these instructions for use carefully to gain a general overview of your eMag 50 HD.

7
GB
GB
Overview
Thank you for choosing the eMag 50 HD!
The eMag 50 HD is a portable, handheld video magnifier that can magnify an object from 2 to 14 times its
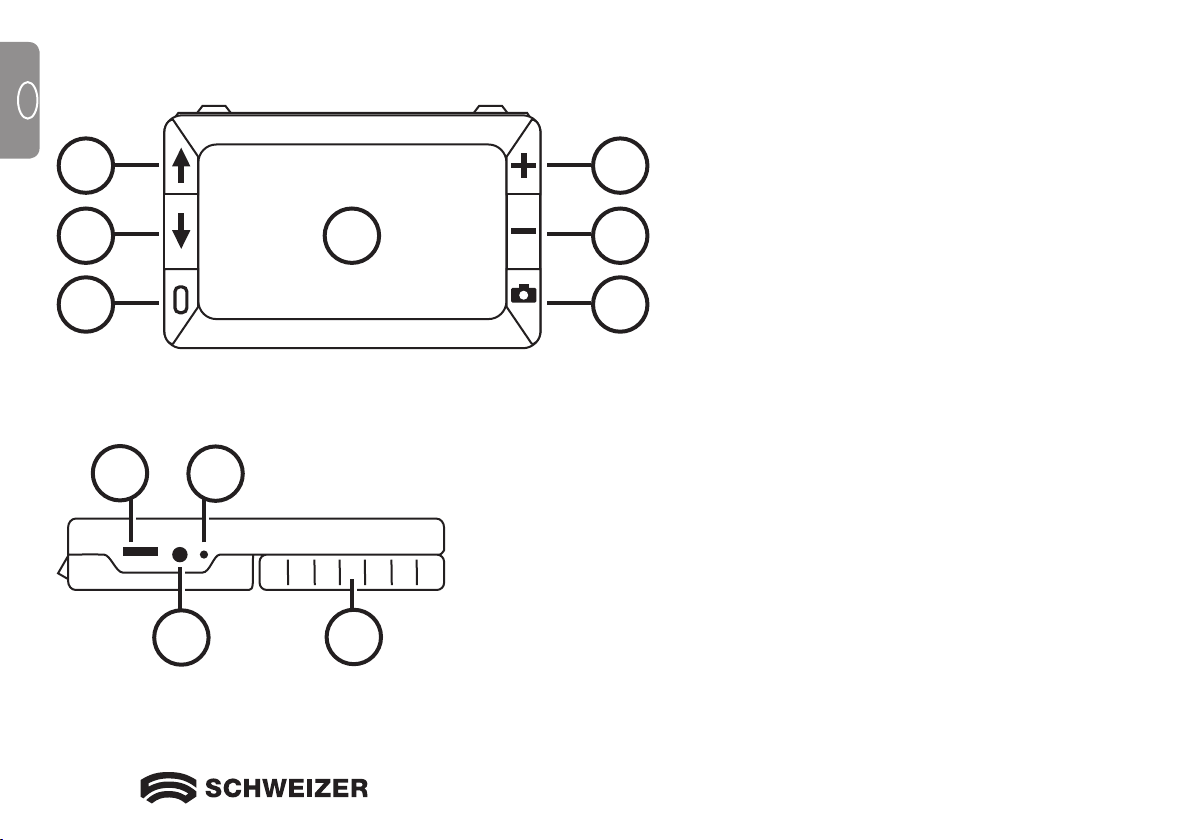
original size. The integrated 5 MP auto-focus camera provides sharp HD quality images that are easily
viewed on its full-colour, 5" LCD screen. The eMag 50 HD supports 5 default colour modes and 15 addtional
contrast colour modes that can be easily activated.
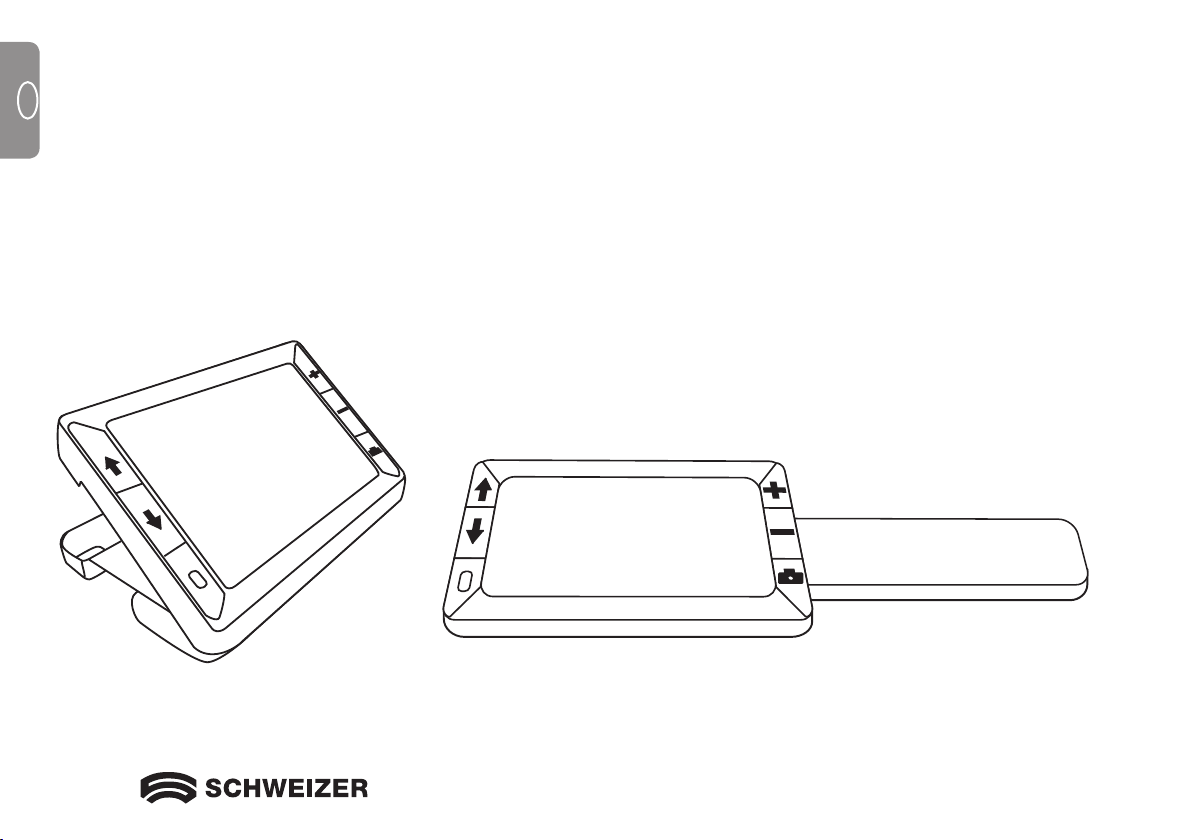
The eMag 50 HD has both an integrated folding handle and a reading stand. The handle allows you to
hold the magnifier close to an object, press the magnification button for continuous zoom from 2 to 14 times
the original size and then capture the image on the screen. If you want, you can then adjust the magnification
as required. This is ideal for reading clothing labels, prescriptions, price tags, receipts, business cards etc.
With the reading stand opened, you can place the eMag 50 HD directly on a document and read printed
text or images in magazines, catalogues, menus, photos or other printed matter.
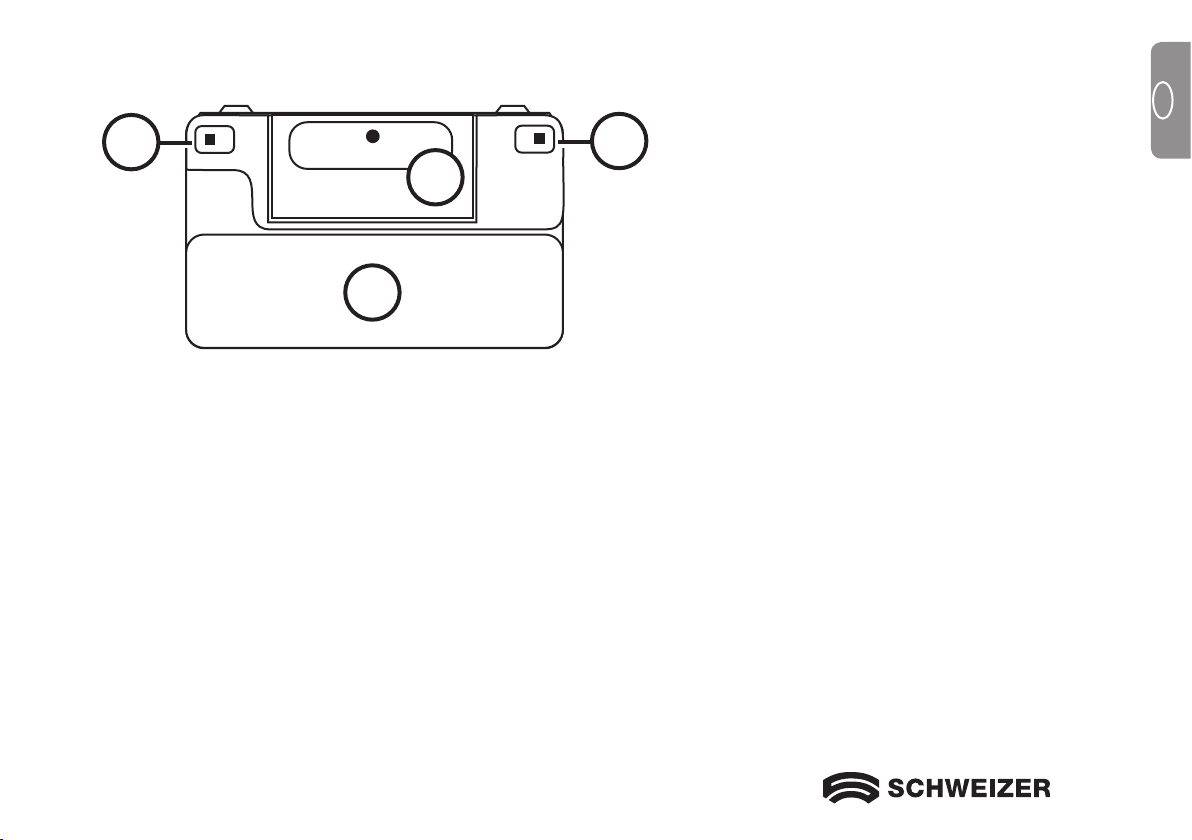
The eMag 50 HD can save and store up to 80 images, which can be copied to a computer via a simple USB
connection.
In addition, the eMag 50 HD
has a reading line and reading mask feature that you can turn on and use to
quickly locate and maintain your place while viewing an image or reading text on the LCD screen
.

8
GB
GB
5
4
3
2
1
6
7
810
911
Your eMag 50 HD
1. Colour mode scroll up (blue)
2. Colour mode scroll down (blue)
3. Power on/off (green/yellow)
4. Increase magnification (yellow)
5. Decrease magnification (yellow)
6. Capture image (red)
7. LCD screen
8. USB port (micro USB)
9. Power adapter port (5V; 2.4A)
10. Battery status LED
11. Handle in closed position

9
GB
GB
12
12
13
11
11. Handle in closed position
12. LED lights
13. Camera (5 MP)

10
GB
GB
Quick start
This section explains how to quickly set up the eMag 50 HD and use it for the first time.
1. Make sure that the device is fully charged. –> See page 12/13.
2. Switch on the eMag 50 HD by pressing the green/yellow button . –> See page 14.
3. Select one of the following options:
• Turn and extend the handle to hold and use the eMag 50 HD like a magnifying glass. This is useful if
you need to magnify and read labels or small print on tins, packaging, medication etc.
–> See page 15.
• Open the reading stand and place the eMag 50 HD on a flat document, such as a newspaper or
magazine, an invoice or a receipt, a letter etc. –> See page 16.
4. Adjust the level of magnification with the yellow buttons (
or
). –> See page 17.
5. Select a colour mode ( or ) for contrasting colours that best suit your viewing needs.
–> See page 18/19.
6. Capture the image on the LCD screen so that you can take the time you need to see the details in
the image. –> See page 22.
7. Save the image or return to live view . –> See page 26.

11
GB
GB
As soon as you feel comfortable with the basic functions of the eMag 50 HD, try out the following
advanced functions:
• Turn the LED reading lights on and off to avoid glare and reflections when looking at photos or glossy
magazines. –> See page 22.
• Use the reading line or reading mask to help you maintain your place in the text you are reading.
–> See page 23/24.
• You can save and view images and also delete images saved on the eMag 50 HD.
–> See page 26/27.
• For additional memory space, copy the images from the eMag 50 HD to your computer.
–> See page 28.

12
GB
GB
Charging the eMag 50 HD
1. Plug one end of the power adapter into the eMag 50 HD and the other end into the wall outlet (1).
2. The battery status LED flashes green to show that the battery is charging (2).
3. As soon as the battery is fully charged, the LED stops flashing and remains green.
Unplug the eMag 50 HD power adapter. The battery status LED turns off. You can now use the eMag
50 HD continuously for approximately 3 hours. When the battery is running low, the battery status LED
flashes red. Connect the power adapter and plug it in to recharge the battery.
Note: You must use the supplied power adapter to charge the eMag 50 HD. It cannot be charged via the
USB port on a computer.
Note: The eMag 50 HD switches to power save mode after 30 minutes (screen switches off) if
no button is pressed during this time. Press the green/yellow power button to reactivate the
eMag 50 HD.
1
2

13
GB
GB
Battery status LED
Green – solid: Batteries are charged – power adapter connected.
Green – flashing: Batteries are charging – power adapter connected.
Red – flashing: Low battery status.
Red – solid: Error; disconnect power adapter, wait a few seconds and then reconnect it.

14
GB
GB
Description of buttons
On/Off (green/yellow): Press once to switch on,
press again to switch off.
Magnification (yellow): Press and HOLD for continuous zoom magnification with live view. When
viewing captured images, press and release to incrementally increase or
decrease magnification.
Colour mode (blue): Press to scroll through the default colour modes and 15 additional colour
combinations.
For a complete overview –> go to page 20/21.
Capture image (red): Press to capture the current image. Press the button again to turn off the
"Capture image" mode and return to live view.

15
GB
GB
Opening and closing the handle
The handle can be opened in 2 positions, allowing you to hold the eMag 50 HD like a magnifying glass.

16
GB
GB
Opening the reading stand
The eMag 50 HD also has a reading stand, which – as soon as it is positioned on a document –
allows you to read an item from a constant and convenient distance.
1
2a 2b
1. Slide the upper edge of the eMag 50 HD screen
in one direction with one thumb while pushing one of
the buttons (2a or 2b) in the opposite direction with
your other thumb.
2. A spring opens the eMag 50 HD to the full read-
ing position. If the eMag 50 HD is switched off, it is
automatically switched on as soon as you open the
reading stand.
3. Now place the eMag 50 HD on a flat item, for
example a photo or document, to view and read it.
4. When you close the reading stand, the device
automatically turns off.

17
GB
GB
Magnifying live images
When viewing live images, you can use the continuous zoom function to magnify live images from 2x to 14x
the original size.
• Press and HOLD the yellow PLUS button to zoom in.
• Press and HOLD the yellow MINUS button to zoom out.
Magnifying captured and saved images
You can capture an image on the LCD display and save it. When viewing captured or saved images, you can
zoom in and out in incremental steps by pressing the yellow buttons (
or
).
For steps to capture an image, refer to Capturing an image –> on page 22.
To access saved images, see Saving and deleting an image –> on page 26.
Functions

18
GB
GB
Changing colour modes
Colour modes are preset colour combinations (for example, yellow text on a blue background) that you can
individually select when using the eMag 50 HD.
The eMag 50 HD offers 5 default colour modes and 15 additional colour combinations. For a complete list,
refer to Colour modes –> on page 20/21.
Press the blue arrow buttons ( or ) to change the current colour combination on the LCD screen. The blue
UP arrow scrolls in one direction through the colour combination list, while the blue down arrow scrolls in
the other direction.
Switching between last colour mode used and true full colour
The eMag 50 HD allows you to switch quickly and comfortably between the last colour mode used and full
colour – or vice versa. This shortcut is handy when viewing a live image (for example, when holding and
reading a document) and using a colour mode that provides the best contrast for you. If you need to move
the eMag 50 HD to a different part of the document, it may be easier for you to switch to full colour mode,
move to the new position in the document and then return to the selected colour mode to continue reading.
To do this, proceed as follows:
• Press and HOLD the green/yellow button and press the blue DOWN arrow .
The monitor switches from one mode to the other.
• To switch back, repeat the same button sequence.

19
GB
GB
Adding/removing colour modes
The eMag 50 HD has 5 default colour modes. You can also activate and choose from a variety of 15 other
colour modes. As soon as a colour mode is available, you can easily scroll to it using the blue arrow buttons
(or ).
To add or remove other colour modes:
1. Press and HOLD the green/yellow button and then press the blue UP arrow to access the colour
mode selection menu.
The tick in the checkbox indicates that the current colour mode is activated.
2. To delete the current colour mode, press the blue DOWN arrow while STILL holding the green/yellow
button pressed. This button sequence clears the checkbox £.
3. To select the next colour mode, press the blue UP arrow while STILL holding the green/yellow button
pressed.
• If the checkbox is selected , the colour mode is activated.
• If the checkbox is empty , the colour mode is deactivated.
4. To activate or deactivate a colour mode, press the blue DOWN arrow while cholding the green/yellow
button to select
or clear the checkbox.
5. Repeat steps 3 and 4 to add or remove further colour modes.
6. When you have finished loading colour modes, release all buttons. Any colour mode changes made will be
saved and the device will return to normal operating mode.

20
GB
GB
Restoring default colour modes
If you have added or removed optional colour modes, you can always reset the eMag 50 HD to its 5 default
colour modes:
Press and HOLD the green/yellow button and the blue UP arrow simultaneously for 15 seconds.
Colour modes
There are 5 default colour modes and 15 optional colour modes that you can activate yourself.
Default colour modes
1. True full colour (always available, cannot be deactivated)
2. Black on white
3. White on black
4. Yellow on blue
5. Yellow on black
Table of contents
Languages:
Other Schweizer Magnifier manuals

Schweizer
Schweizer eMag 43 User manual

Schweizer
Schweizer eMag 43 HD User manual

Schweizer
Schweizer eMag 43 HD User manual

Schweizer
Schweizer ERGO-Style User manual

Schweizer
Schweizer eMag 70 HD User manual

Schweizer
Schweizer eMag 200 User manual

Schweizer
Schweizer EMAG 120 HD User manual

Schweizer
Schweizer eMag 34 User manual

Schweizer
Schweizer eMag 100 HD Speech User manual

Schweizer
Schweizer EMAG 150 HD User manual