Sealey TSTVRK User manual
Instructions for:
Tyre Valve Removal/Installation Tool
Model No: TSTVRK
Thank you for purchasing a Sealey Product. Manufactured to a high standard this product will, if used according to these instructions and properly maintained,
give you years of trouble free performance.
IMPORTANT: PLEASE READ THESE INSTRUCTIONS CAREFULLY. NOTE THE SAFE OPERATIONAL REQUIREMENTS, WARNINGS
AND CAUTIONS. USE THIS PRODUCT CORRECTLY AND WITH CARE FOR THE PURPOSE FOR WHICH IT IS INTENDED. FAILURE TO
DO SO MAY CAUSE DAMAGE AND/OR PERSONAL INJURY, AND WILL INVALIDATE THE WARRANTY. PLEASE KEEP INSTRUCTIONS
SAFE FOR FUTURE USE.
1. SAFETY INSTRUCTIONS
WARNING! Ensure Health and Safety, local authority and
general workshop practice regulations are adhered to
when using tools.
WARNING! DO NOT use this tool on an inflated tyre,
ensure that all air pressure has been expelled before
attempting to replace the tyre valve.
Ensure that a vehicle which has been jacked up is
adequately supported with axle stands.
DO NOT use tools if damaged.
Maintain tools in good and clean condition for best and
safest performance.
Wear approved eye protection. A full range of personal
safety equipment is available from your Sealey dealer.
Wear suitable clothing to avoid snagging. DO NOT wear
jewellery and tie back long hair.
DO NOT use on wheels with inner tubes.
DO NOT use on alloy wheels.
DO NOT use this tool when you are tired, under the
influence of alcohol, drugs or intoxicating medication.
DO NOT use this tool for any purpose other than that for
which it is designed.
DO NOT use this tool if any part of it is damaged.
DO NOT allow untrained persons to use this tool.
When not in use, clean and store in a safe, dry, childproof
area.
WARNING! The warnings, cautions and instructions in
this manual cannot cover all possible conditions and
situations that may occur. It must be understood that
common sense and caution are factors which cannot
be built into this product, but must be applied by the
operator.
2. INTRODUCTION & CONTENTS
2.1 Introduction
Remove and install leaking tyre valves without having to
remove the tyre. Works on steel wheels and especially good
for valves on motorcycles or agricultural wheels. Time saving
tool. Not suitable for high pressure valves.
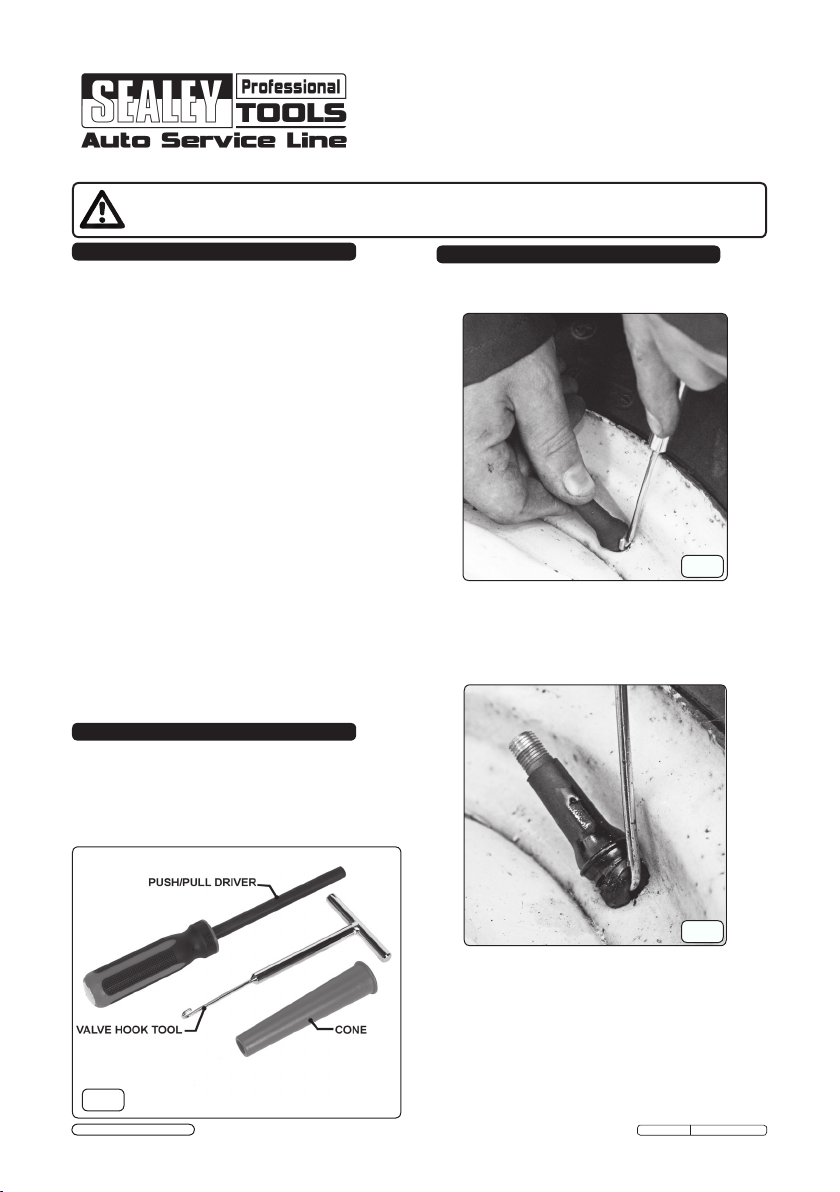
2.2 Contents (g.1)
Original Language Version TSTVRK Issue: 1 - 23/07/12
© Jack Sealey Limited 2012
g.1
3.1.3 Turn the valve hook tool 90° clockwise so that the hook
is under the tyre valve.
3.1.4 Lift the valve hook tool and pull the tyre valve from the
wheelrim(g.3).
3. OPERATION
WARNING! Ensure that you read, understand and
apply Section 1 safety instructions.
3.1 Removing Tyre Valve from Wheel
3.1.1 Using a suitable lubricant, lubricate the valve hook tool
and the area around the tyre valve.
3.1.2 Push the tyre valve body to one side and insert the
valve hook tool between the tyre valve and the valve
holeinthewheelrim(g.2).
g.2
g.3

NOTE: It is our policy to continually improve products and as such we reserve the right to alter data, specifications and component parts without prior notice.
IMPORTANT: No liability is accepted for incorrect use of this product.
WARRANTY: Guarantee is 12 months from purchase date, proof of which will be required for any claim.
INFORMATION: For a copy of our latest catalogue and promotions call us on 01284 757525 and leave your full name and address, including postcode.
01284 757500
01284 703534
sales@sealey.co.uk
Sole UK Distributor, Sealey Group,
Kempson Way, Suffolk Business Park,
Bury St. Edmunds, Suffolk,
IP32 7AR
www.sealey.co.uk
Web
email
Original Language Version
© Jack Sealey Limited 2012 TSTVRK Issue: 1 - 23/07/12
3.2.6 Pull the tyre valve upwards until it seats in the wheel rim
(g.7).
3.2.7 Unscrew the push/pull driver from the tyre valve and
remove the cone.
3.2.8Inatethetyreandcheckforleaksaroundthevalve
body.
3.2 Fitting Replacement Tyre Valve (g.4)
3.2.1 Where necessary, remove any dirt and corrosion from
the area around the valve hole in the wheel rim.
3.2.2 Screw the replacement tyre valve to the push/pull
driver(g.4).
3.2.3 Generously lubricate the tyre valve body and the inside
of the cone with a suitable rubber lubricant.
Note: DO NOT use mineral oil or grease as this will
cause the tyre valve body to deteriorate.
3.2.4 Place the thin end of the cone into the valve hole in the
wheelrimandalignthetyrevalve(g.5).
3.2.5 Use the push/pull driver to force the tyre valve all the
way through the cone until it has entered the wheel
(g.6).
g.4
g.5
g.6
g.7
Other Sealey Tools manuals

Sealey
Sealey CPG18V User manual

Sealey
Sealey RE101.V3 User manual

Sealey
Sealey SX299 User manual

Sealey
Sealey VS0220 User manual

Sealey
Sealey WORKSAFE 9602L User manual

Sealey
Sealey AK4403 User manual

Sealey
Sealey POWER TOOLS SA52 User manual

Sealey
Sealey Adblue ADB06 User manual

Sealey
Sealey SUPERSNAP RE83/4 User manual

Sealey
Sealey SCR16 User manual

Sealey
Sealey MS0381 User manual

Sealey
Sealey AK49 User manual

Sealey
Sealey SA11.V3 User manual

Sealey
Sealey TP200.V3 User manual

Sealey
Sealey TD1202SR User manual

Sealey
Sealey SA88.V5 User manual

Sealey
Sealey AK505 User manual

Sealey
Sealey VS555 User manual

Sealey
Sealey CV040 User manual

Sealey
Sealey VSE6000 User manual


