manuals.online logo
Brands
  1. Home
  2. •
  3. Brands
  4. •
  5. Sealey
  6. •
  7. Tools
  8. •
  9. Sealey VS8625 User manual

Sealey VS8625 User manual

Other Sealey Tools manuals

Sealey VS779KIT User manual

Sealey

Sealey VS779KIT User manual

Sealey VS0202.V3 User manual

Sealey

Sealey VS0202.V3 User manual

Sealey TD1202SR User manual

Sealey

Sealey TD1202SR User manual

Sealey GSA12 User manual

Sealey

Sealey GSA12 User manual

Sealey TP200.V3 User manual

Sealey

Sealey TP200.V3 User manual

Sealey VS0204A User manual

Sealey

Sealey VS0204A User manual

Sealey SM46.V3 User manual

Sealey

Sealey SM46.V3 User manual

Sealey AK2952 User manual

Sealey

Sealey AK2952 User manual

Sealey VS0202.V2 User manual

Sealey

Sealey VS0202.V2 User manual

Sealey VS1205 User manual

Sealey

Sealey VS1205 User manual

Sealey TS01 User manual

Sealey

Sealey TS01 User manual

Sealey AUTO SERVICE LINE VS2005 User manual

Sealey

Sealey AUTO SERVICE LINE VS2005 User manual

Sealey PFT15 User manual

Sealey

Sealey PFT15 User manual

Sealey PS980.V2 User manual

Sealey

Sealey PS980.V2 User manual

Sealey RE97/10.V3 User manual

Sealey

Sealey RE97/10.V3 User manual

Sealey BSL102 User manual

Sealey

Sealey BSL102 User manual

Sealey E5885/50 User manual

Sealey

Sealey E5885/50 User manual

Sealey HRCHD User manual

Sealey

Sealey HRCHD User manual

Sealey TC904 User manual

Sealey

Sealey TC904 User manual

Sealey VSE127H User manual

Sealey

Sealey VSE127H User manual

Sealey AK481 User manual

Sealey

Sealey AK481 User manual

Sealey SA90 User manual

Sealey

Sealey SA90 User manual

Sealey SA84.V2 User manual

Sealey

Sealey SA84.V2 User manual

Sealey VSE135.V3 User manual

Sealey

Sealey VSE135.V3 User manual

Popular Tools manuals by other brands

AGI Westfield MKX16 Assembly manual

AGI

AGI Westfield MKX16 Assembly manual

GYS HAND-DUCTION 056923 Translation of the original instructions

GYS

GYS HAND-DUCTION 056923 Translation of the original instructions

Grizzly H7583 instruction manual

Grizzly

Grizzly H7583 instruction manual

Makita HR2650 instruction manual

Makita

Makita HR2650 instruction manual

Forza 1100H Series manual

Forza

Forza 1100H Series manual

Aventics EBS-PI operating instructions

Aventics

Aventics EBS-PI operating instructions

Martor SECUNORM 175 quick start guide

Martor

Martor SECUNORM 175 quick start guide

jbc N4473 instruction manual

jbc

jbc N4473 instruction manual

FEINMETALL FZWZ-SET-001 quick start guide

FEINMETALL

FEINMETALL FZWZ-SET-001 quick start guide

Worx Professional Sonicrafter WU676 Original instructions

Worx Professional

Worx Professional Sonicrafter WU676 Original instructions

Gage Bilt GB713SH Original instructions

Gage Bilt

Gage Bilt GB713SH Original instructions

Hilti DX 9-ENP Original operating instructions

Hilti

Hilti DX 9-ENP Original operating instructions

norbar NORTRONIC 34399 Operator's manual

norbar

norbar NORTRONIC 34399 Operator's manual

BGS technic 8578 manual

BGS technic

BGS technic 8578 manual

axing BWZ 5-02 Operation instructions

axing

axing BWZ 5-02 Operation instructions

Makita DHR241 instruction manual

Makita

Makita DHR241 instruction manual

Motor Guard JMB-1250 instructions

Motor Guard

Motor Guard JMB-1250 instructions

Power Adhesives 805-12 operating instructions

Power Adhesives

Power Adhesives 805-12 operating instructions

manuals.online logo
manuals.online logoBrands
  • About & Mission
  • Contact us
  • Privacy Policy
  • Terms and Conditions

Copyright 2025 Manuals.Online. All Rights Reserved.

INSTRUCTIONS FOR
SERVICE LIGHT & EPB RESET TOOL
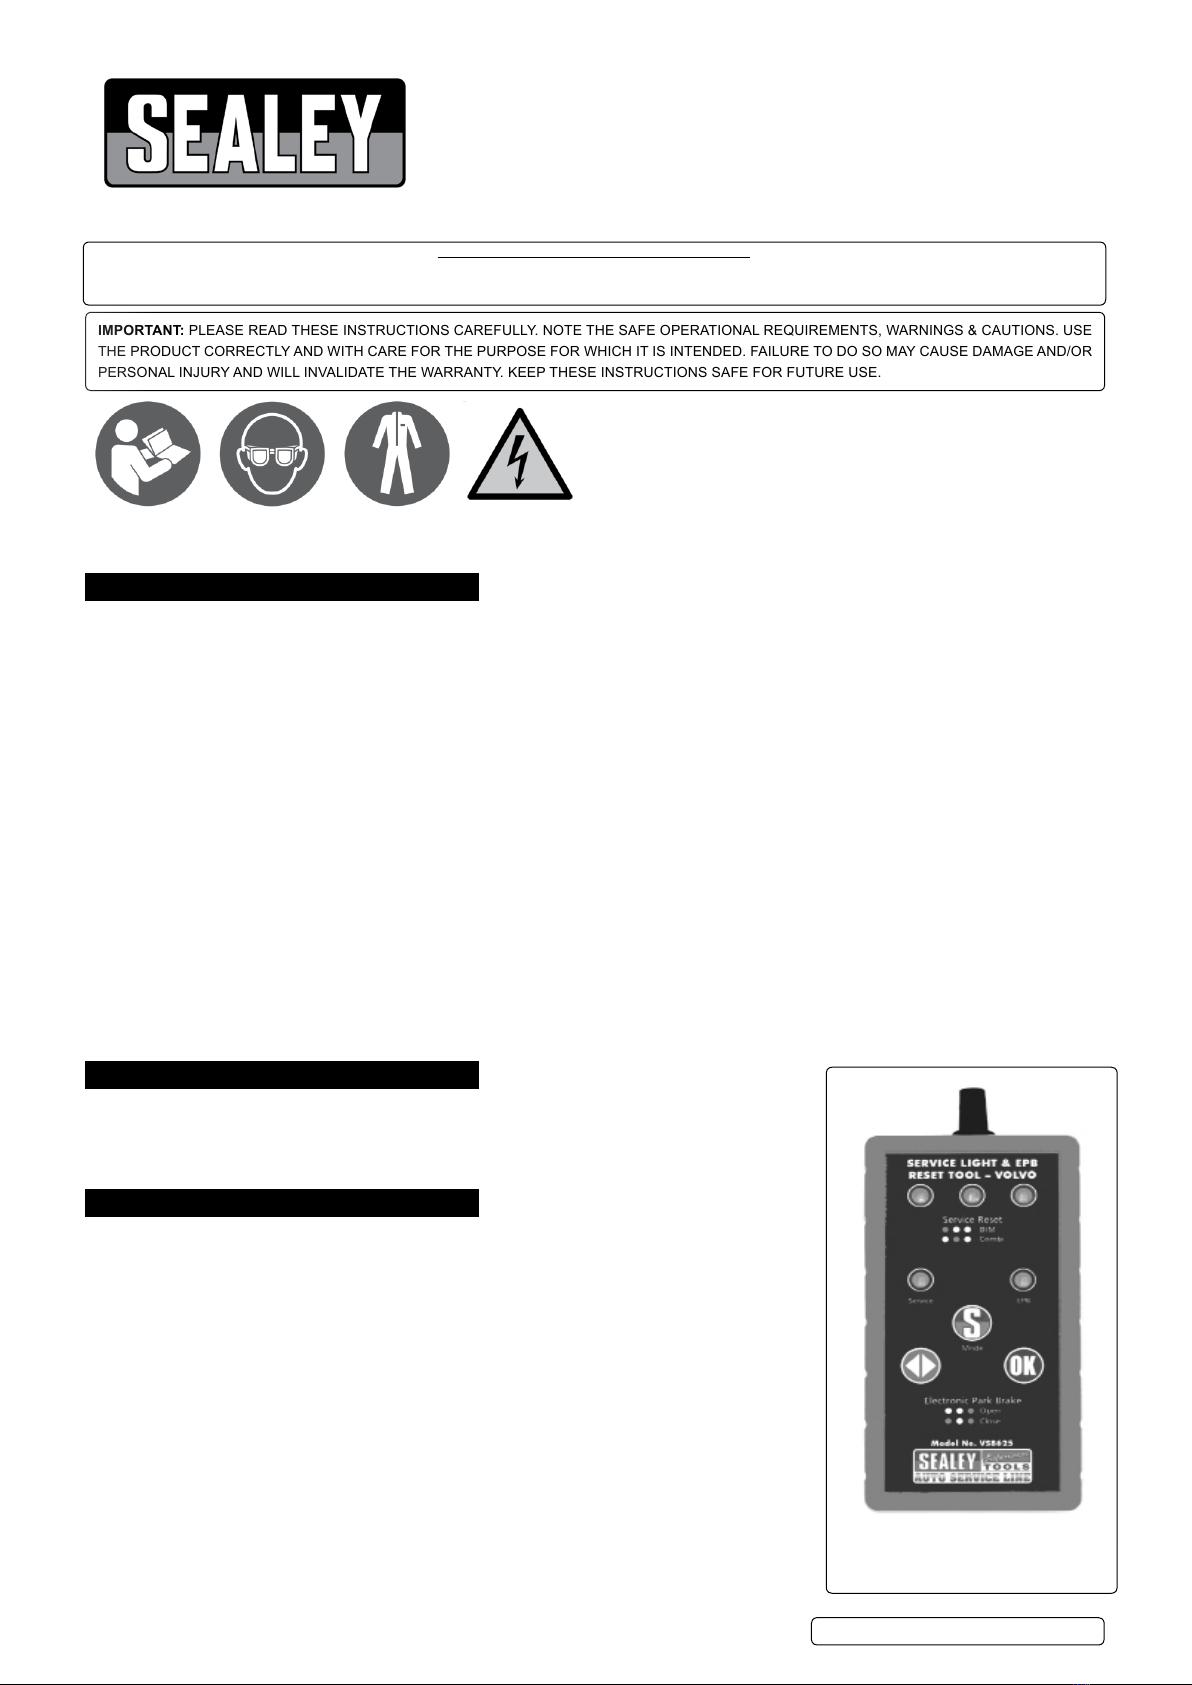
MODEL NO: VS8625
Thank you for purchasing a Sealey product. Manufactured to a high standard, this product will, if used according to these
instructions, and properly maintained, give you years of trouble free performance.
IMPORTANT: PLEASE READ THESE INSTRUCTIONS CAREFULLY. NOTE THE SAFE OPERATIONAL REQUIREMENTS, WARNINGS & CAUTIONS. USE
THE PRODUCT CORRECTLY AND WITH CARE FOR THE PURPOSE FOR WHICH IT IS INTENDED. FAILURE TO DO SO MAY CAUSE DAMAGE AND/OR
PERSONAL INJURY AND WILL INVALIDATE THE WARRANTY. KEEP THESE INSTRUCTIONS SAFE FOR FUTURE USE.
1. SAFETY
WARNING! Ensure that Health and Safety, local authority and general workshop practice regulations are strictly adhered to.
8DO NOT use the unit if it, or any attachment, is damaged.
9Maintain tester in good and clean condition for best and safest performance.
9If required, ensure that the vehicle to be worked on is adequately supported with axle stands or ramps and is chocked.
9Put transmission in PARK (for automatic transmission) or NEUTRAL (for manual transmission) and make sure the parking brake is
engaged.
9Wear approved eye protection. A full range of personal safety equipment is available from your Sealey dealer.
9Wear suitable clothing to avoid snagging. Do not wear jewellery and tie back long hair.
WARNING! Use extreme caution when working around the ignition coil, distributor cap, ignition wires and spark plugs. These
components create hazardous voltages when the engine is running.
8DO NOT connect or disconnect any test equipment with ignition on or engine running.
9Keep a re extinguisher nearby, which is suitable for gasoline/chemical/electrical res.
9Account for all tools and parts being used and do not leave any in the engine bay.
9Keep reset tool dry, clean and free from oil, water and grease. Use a mild detergent on a clean cloth to clean the outside of the tool.
9Operate the vehicle in a well-ventilated work area; exhaust gases are poisonous.
9IMPORTANT: Always refer to the vehicle manufacturer’s service instructions to establish the current procedure and data. These
instructions are provided as a guide only.
WARNING! The warnings and instructions discussed in this manual cannot cover all possible conditions and situations that may occur.
It must be understood that common sense and caution are factors which cannot be built into this product, but must be applied by the
operator.
9When not in use, store tester away in its box, in a cool, dry, childproof location.
2. INTRODUCTION
Designed for resetting Electronic Parking Brake (EPB) and extinguishing the service interval lights,
including the service interval messages, that are displayed in the Driver Information Module after
carrying out routine maintenance on Volvo vehicles. Simple push button application. Powered by
connection to the vehicle.
3. OPERATION
3.1. The VS8625 tool:
• is compatible with the latest CAN vehicles.
• enables service and repair functions to be carried out on EPB systems.
3.2. The new VS8625 Volvo SLR and EPB tool has been designed to allow users to
extinguish the service light following the servicing of a vehicle. It also allows for the
servicing and replacement of brake pads and components used in the new
Electronic Parking Brake systems which have been introduced to the Volvo range.
3.3. SLR Functions
Reset Service Light –This tool will extinguish the service light on the dashboard after a
service has been carried out.
Reset Service– Reset the Service Interval Messages displayed on the Driver Information
Module.
EPB Open –This Tool allows the callipers to be retracted allowing the brake pads to be
removed for service. This also provides assistance in tting new Park Brake
motors, brake calipers and discs, as well as replacing wheel hubs as the callipers
are retracted, releasing braking components.
EPB Close – After servicing, the callipers can be advanced to their original position without the
current calibration being effected.
VS8625 | Issue 2 29/06/16
Original Language Version
© Jack Sealey Limited
Refer to
Instructions
Electrical
Shock
Hazard
Wear Eye
Protection
Wear Protective
Clothing
TECHNICAL HELP LINE No. 01284 757505
Please register your product with Sealey by completing the registration form on-line at www.sealey.co.uk
Navigate to Register Product. By registering your product you can take advantage of Sealey product and technical updates via email.
VS8625 | Issue 2 29/06/16
Original Language Version
© Jack Sealey Limited
3.4. MODE Selection for selecting Service Functions.
3.5. MODE Selection for selecting EPB Functions.
3.6. Function Buttons
3.7. Vehicle Set-Up.
3.7.1. Ensure that the vehicle’s ignition is turned off and that the vehicle is on a level surface.
3.7.2. Connect the tool to the correct diagnostic socket on the vehicle, refer to the vehicle owner’s manual
for it’s location.
3.7.3. Turn on the vehicle’s ignition and start the engine. For button (Start/Stop) type. insert the key, press start
button for at least 2 seconds until the ignition is on (ensure the brake or clutch pedals are NOT pressed).
3.8. Service Reset - Combi.
3.8.1. Press Mode button to select correct mode (Service).
3.8.2. Press the Function button to select the required reset function.
3.8.3. Press the OK button to perform the function.
3.8.4. Once the function has completed, the function LED will ash
to indicate a successful reset.
3.2.5. If the function is unsuccessful, the Service Mode LED will ash.
Function
Button
Service
LED
EPB
LED
OK
Button
Mode
Button
VS8625 | Issue 2 29/06/16
Original Language Version
© Jack Sealey Limited
3.9. Service Reset - DIM.
3.9.1. Press Mode button to select correct mode (Service).
3.9.2. Press the Function button to select the required reset function.
3.9.3. Press the OK button to perform the function.
3.9.4. Once the function has completed, the function LED will ash
to indicate a successful reset.
3.9.5. If the function is unsuccessful, the Service Mode LED will ash.
3.10. EPB Open Function.
3.10.1. Press the Mode button to select correct mode (EPB).
3.10.2. Press the Function button to select the ‘OPEN’ function.
3.10.3. Ensure the park brake is released.
3.10.4. Press the OK button and the pistons can be heard retracting
(The Mode LED will ash during this process).
3.10.5. Once the process is complete, the EPB LED will ash.
NOTE: Wait until the EPB LED ashes and the callipers have stopped
moving before carrying out any work on the braking system.
3.11. EPB Close Function
3.11.1. Press the Mode button to select correct mode (EPB).
3.11.2. Press the Function button to select the ‘CLOSE’ function.
3.11.3. Press the OK button and the pistons can be heard advancing
(The function LED will ash during this process).
3.11.4. Once the process is complete, the EPB LED will ash.
NOTE: Any codes that are not able to be cleared will remain on the
Module. Use the Sealey VST Electronic Auto Service and Diagnostic tool to
determine what these codes are and what steps need to be taken to resolve
the problem.
4. APPLICATION LIST
Volvo Service Reset for: Fuel Pistons Dates
850 All Variants P/D All 96-98 Combi
C30 All Variants P/D All 07-11 Driver info. Module (DIM)
S40 All Variants P/D All 96-04 Combi
C40(040) All Variants P/D All 04-11 Driver info. Module (DIM)
S60 All Variants P/D All 00-10 Driver info. Module (DIM)
S60(11-) All Variants P/D All 10-14 Driver info. Module (DIM)
S60L(11-) All Variants P/D All 10-14 Driver info. Module (DIM)
S70 All Variants P/D All 97-01 Combi
S80(99) All Variants P/D All 99-06 Driver info. Module (DIM)
S80(07) All Variants P/D All 07-14 Driver info. Module (DIM)
S80L(07) All Variants P/D All 09-14 Driver info. Module (DIM)
V40 All Variants P/D All 96-04 Combi
V40 All Variants P/D All 04-05 Driver info. Module (DIM)
V40(13-) All Variants P/D All 13-14 Driver info. Module (DIM)
V40 Cross Country (13-) All Variants P/D All 13-14 Driver info. Module (DIM)
V50 All Variants P/D All 04-11 Driver info. Module (DIM)
V60 All Variants P/D All 10-14 Driver info. Module (DIM)
V70 All Variants P/D All 97-00 Combi
V70(00) All Variants P/D All 00-08 Driver info. Module (DIM)
V70(08) All Variants P/D All 08-14 Driver info. Module (DIM)
V70XC All Variants P/D All 99-00 Combi
V70XC(01-) All Variants P/D All 01-07 Driver info. Module (DIM)
XC60 All Variants P/D All 09-14 Driver info. Module (DIM)
XC70 All Variants P/D All 01-07 Driver info. Module (DIM)
XC70(08-) All Variants P/D All 08-14 Driver info. Module (DIM)
XC90 All Variants P/D All 03-11 Driver info. Module (DIM)
C70 Coupe All Variants P/D All 99-02 Combi
C70 Conv All Variants P/D All 99-05 Combi
C70(06) All Variants P/D All 07-11 Driver info. Module (DIM)
Volvo EPB
S60 All Variants P/D All 10-14
S60L All Variants P/D All 13-14
S80(07-) All Variants P/D All 07-14
V80L All Variants P/D All 09-14
V60 All Variants P/D All 10-14
V70 All Variants P/D All 08-14
XC60 All Variants P/D All 09-14
XC70(08) All Variants P/D All 08-14
NOTE: It is our policy to continually improve products and as such we reserve the right to alter data, specications and component parts without prior notice.
IMPORTANT: No liability is accepted for incorrect use of this product.
WARRANTY: Guarantee is 12 months from purchase date, proof of which will be required for any claim.
Sole UK Distributor, Sealey Group.
Kempson Way, Suffolk Business Park,
Bury St. Edmunds, Suffolk.
IP32 7AR
www.sealey.co.uk
sales@sealey.co.uk
01284 757500
01284 703534
Environmental Protection
Recycle unwanted materials instead of disposing of them as waste. All tools, accessories and packaging should be
sorted, taken to a recycling centre and disposed of in a manner which is compatible with the environment.
When the product becomes completely unserviceable and requires disposal, drain off any fluids (if applicable)
into approved containers and dispose of the product and the fluids according to local regulations.
WEEE Regulations
Dispose of this product at the end of its working life in compliance with the EU Directive on
Waste Electrical and Electronic Equipment (WEEE). When the product is no longer required, it must be disposed
of in an environmentally protective way. Contact your local solid waste authority for recycling information.
VS8625 | Issue 2 29/06/16
Original Language Version
© Jack Sealey Limited