manuals.online logo
Brands
  1. Home
  2. •
  3. Brands
  4. •
  5. Server
  6. •
  7. Commercial Food Equipment
  8. •
  9. Server CP-RP User manual

Server CP-RP User manual

CP REMOTE PUMP,
TALL, SHORT CYLINDER
Series 10A
85951
01884-REVB-062512
PUMP PARTS
IMPORTANT INSTRUCTIONS
GAGING COLLARS (Portion Control)
Each collar added reduces
portion served by .25 oz
KNOB
LOCKING COLLAR
HEAD TUBE
HEAD INSERT
SPRING
WASHER
PISTON
SEAL ASSEMBLY SEAL
SEAL O-RING
LID
CYLINDER O-RING
(1 5/16” D)
CYLINDER
VALVE BODY
DISCHARGE TUBE
DISCHARGE TUBE NUT
DISCHARGE TUBE O-RING (1”D)
.125 oz
MODEL:
CP-RP
PUMP DISASSEMBLY
BEFORE FIRST USE AND AFTER USE DAILY, DISASSEMBLE
AND CLEAN PUMP.
1 PUMP OUT ALL (IF ANY) REMAINING FOOD PRODUCT
FROM INSIDE PUMP BODY.
2 WASH AND RINSE OFF OUTSIDE OF PUMP BODY.
3 FLUSH OUT AND RINSE THROUGH INSIDE OF PUMP.
• Place lower end of pump into container full of
water and operate pump until all (if any) remaining
product is expelled and only warm water ows from
discharge tube. Then remove pump from container
of water to disassemble.
• Use a container to collect small parts of pump to
prevent any loss.
4REMOVE PLUNGER ASSEMBLY AND LID FROM
PUMP BODY BY TURNING LOCKING COLLAR AND
DISCHARGE TUBE NUT COUNTERCLOCKWISE.
5REMOVE CYLINDER AND DISCHARGE TUBE FROM
VALVE BODY BY ROTATING COUNTERCLOCKWISE TO
RELEASE FROM SLOTS IN VALVE BODY.
6REMOVE LARGE O-RING FROM VALVE BODY.
7REMOVE SMALL O-RING FROM DISCHARGE TUBE.
• Be careful not to damage o-ring when prying it off
of discharge tube.
8REMOVE KNOB FROM PLUNGER ASSEMBLY BY
ROTATING COUNTERCLOCKWISE.
• Firmly hold head tube towards piston head while
unscrewing knob. Pressure on spring will release
and push knob off rapidly.
9REMOVE LOCKING COLLAR FROM HEAD TUBE.
• Remove gaging collar(s), if used, from head tube by
sliding them off.
JREMOVE HEAD INSERT FROM INSIDE HEAD TUBE.
KREMOVE SPRING FROM PISTON.
LREMOVE WASHER FROM PISTON.
MREMOVE SEAL ASSEMBLY FROM PISTON HEAD.
• Be careful not to damage seal when prying it off of
piston head.
NREMOVE O-RING FROM INSIDE SEAL
• Be careful not to damage o-ring when prying it out
of seal.
PUMP CLEANING
BEFORE FIRST USE AND AFTER USE DAILY, DISASSEMBLE
AND CLEAN PUMP.
STAINLESS STEEL PARTS CAN CORRODE.
IT IS IMPORTANT TO CLEAN, RINSE, SANITIZE, AND DRY
THESE PARTS DAILY AND PROPERLY.
FAILURE TO COMPLY WITH ANY OF THESE
INSTRUCTIONS MAY VOID UNIT WARRANTY.
1 SEE PUMP DISASSEMBLY.
2 WASH AND SCRUB ALL PARTS WITH DISHWASHING
DETERGENT AND HOT WATER DAILY.
• Wash small parts in a pan or other container
to prevent part loss.
• Use supplied brushes to clean all conned
areas. Maintain a clean and efcient pump
by using the brushes supplied with pump to
prevent product build up inside pump.
• IMPORTANT PUMP AREAS TO CLEAN: Clean
inside cylinder thoroughly with brush 82049.
Clean inside discharge tube and valve body
thoroughly with brush 82526.
• Do not use abrasive cleansers, scrapers, steel pads,
steel wool, or other cleaning tools that can scratch
surfaces.
• A general purpose, nonabrasive cleaner may be
used on hard to remove food deposits.
• Do not use cleansing agents with high
concentrations of acid, alkaline or chlorine.
These agents can corrode stainless steel.
• Do not use ammonia to clean pump parts.
Ammonia can damage plastic parts.
• A nontoxic glass cleaner may be used for cleaning
any stainless steel parts.
3 FULLY RINSE ALL PARTS THOROUGHLY WITH CLEAR
WATER.
• Fully rinsing all parts can help prevent corrosion.
4 DRY ALL STAINLESS STEEL PARTS WITH A CLEAN
SOFT CLOTH.
• Various elements and minerals, such as chlorides in
tap water, can accumulate on stainless steel parts
and create corrosion.
• To prevent corrosion on any stainless steel parts,
it is important to fully dry with a clean soft cloth
regularly.
5 SANITIZE PARTS FOLLOWING YOUR LOCAL
SANITIZATION REQUIREMENTS.
ALL PARTS IN CONTACT WITH FOOD MUST BE
SANITIZED.
• Allow parts to fully air dry after sanitization.
• Dishwasher safe.
IMPORTANT PUMP AREAS TO CLEAN:
CLEAN INSIDE DISCHARGE TUBE AND
TAPERED END OF DISCHARGE TUBE
CLEAN-IN-PLACE PROCEDURE
FOR PUMPS
CLEAN-IN-PLACE IS A BASIC FOUR STEP PUMP FLUSHING
PROCESS: CLEAN, RINSE, SANITIZE, AND RINSE.
CLEAN:
1 PUMP OUT ALL (IF ANY) REMAINING FOOD PRODUCT
FROM INSIDE PUMP BODY.
2 WASH AND RINSE OFF OUTSIDE OF PUMP BODY.
3 FLUSH OUT AND RINSE THROUGH INSIDE OF PUMP.
• Place lower end of pump into container full of
water and operate pump until all (if any) remaining
product is expelled and only warm water ows from
discharge tube.
4 MIX 2 OZ (5 ML) OF DISHWASHING DETERGENT
(DAWN DISHWASHING LIQUID) WITH 1 QUART
(.95 L) OF HOT TAP WATER (APPROXIMATELY
110°F/43°C).
5 PLACE LOWER END OF PUMP INTO THIS CLEANING
MIXTURE AND REPEATEDLY OPERATE PUMP UNTIL
ALL CLEANING MIXTURE IS PUMPED THROUGH PUMP.
RINSE:
6 PLACE LOWER END OF PUMP INTO 2 CUPS (.5 L) OF
HOT TAP WATER (APPROXIMATELY 110°F/43°C) AND
REPEATEDLY OPERATE PUMP UNTIL ALL TAP WATER
IS PUMPED THROUGH PUMP.
SANITIZE:
7 MIX ONE 1 OZ (30 ML) PACKET OF KAY-5
SANITIZER/CLEANER (EPA REG NO. 5389-15) WITH
2.5 GALLONS (9.5 L) OF TAP WATER (APPROXIMATELY
ROOM TEMPERATURE).
8 PLACE LOWER END OF PUMP INTO THIS SANITIZING
MIXTURE AND REPEATEDLY OPERATE PUMP UNTIL
1 QUART (.95 L) SANITIZING MIXTURE IS PUMPED
THROUGH PUMP.
RINSE:
9 PLACE LOWER END OF PUMP INTO 1 CUP (.24 L) OF
HOT TAP WATER (APPROXIMATELY 110°F/43°C) AND
REPEATEDLY OPERATE PUMP UNTIL ALL TAP WATER
IS PUMPED THROUGH PUMP.
BRUSH 82526 (21”)
BRUSH 82049 (1 1/4” D)
FOOD EQUIPMENT
LUBRICANT 40179
IMPORTANT PUMP AREAS TO CLEAN:
CLEAN INSIDE VALVE BODY,
ALL SIDES OF STAINLESS STEEL BALLS,
ALL VALVE BODY PASSAGEWAYS, AND
ALL VALVE BODY OPENINGS
CLEAN-IN-PLACE:
FLUSH PUMP WITH SOAP, SANITIZER, AND
HOT WATER
 Server Products Inc.
3601 Pleasant Hill Road
Richfield, WI 53076 USA

262.628.5600

800.558.8722

262.628.5110

[email protected]

www.server-products.com
GENERAL SERVICE, REPAIR, OR
RETURNS
Before sending any item to Server Products for service,
repair, or return, contact Server Products customer
service to request a Return Authorization Number.
Merchandise must be sent to Server Products with this
number.
Merchandise being returned for credit must be in new
and unused condition and not more than 90 days old and
will be subject to a 20% (percent) restocking charge.
Electrical parts (thermostats, heating elements etc.) are
not returnable.
Server Products maintains a fully staffed service
department with highly skilled factory trained personnel.
Service is extremely prompt. Under normal circumstances,
a repaired unit is shipped out the day after it is received.
Labor charges are reasonable.
SERVICE
Contact your dealer or Server Products Inc.
customer service department for the following:
ORDERING REPLACEMENT PARTS
Be prepared to give this information:
• Model Letters/Name/Numbers
• Part Numbers- P/N
• Series Numbers/Letters
• Part Description
This information and other important data is stamped on
the lid or cylinder of pumps or on the bottom or back side
of every unit.
TROUBLESHOOTING
PROBLEMS WITH PUMP OPERATION AND/OR FLOW:
• Clean pump.
PUMP DISPENSES LITTLE OR NO PRODUCT.
• Product may be too stiff or contain a solid
that will not pass through pump.
PORTION CONTROL IS NOT CONSISTENT.
• Inspect gaging collar for any damage and/or
proper installation.
PUMP PLUNGER DOES NOT RETURN TO TOP OF STROKE
AFTER DISPENSING PRODUCT.
• Inspect spring for any damage; bent or
broken. Replace spring if necessary.
PUMP DRIPS.
• Clean discharge tube with supplied cleaning
brushes.
• Ensure product is not being heated by any
external source(s) causing product to expand
and drip from pump.
SERVER PRODUCTS
LIMITED WARRANTY
All Server Products equipment is backed by a
two-year limited warranty against defects in materials and
workmanship. For complete warranty information go to:
www.server-products.com
SCOPE OF WARRANTY:
Server Products Inc. (“Server Products”) warrants that,
for a period of two (2) years from the date of purchase
(the “Warranty Period”), the equipment manufactured by
it will be free from defects in workmanship and materials
provided the equipment is used in the manner and in the
environment for which they were manufactured.
DISCLAIMERS AND LIMITATIONS:
Other than as set forth above, Server Products specically
disclaims all express and implied warranties, including but
not limited to, warranties of merchantability and/or tness
for a particular purpose or use.
This warranty does not extend to repairs or alterations
undertaken without the prior written consent of Server
Products or for goods that are misused, abused or
neglected or if the goods are not properly stored,
maintained, installed or operated.
Server Products shall not be liable for incidental, special,
indirect, exemplary, punitive or consequential damages
resulting from the use of the good or arising out of any
breach of this warranty; including but not limited to
damage to property or loss of prots or revenue.
CLAIMS ADMINISTRATION:
All warranty claims must be made by calling our customer
service department for a return authorization during the
Warranty Period and any alleged defective unit must be
returned to Server Products factory, freight prepaid.
Upon receipt of any defective unit, Server Products, at its
option, may either: (i) replace any equipment proved to be
defective, (ii) remedy or repair such defect or (iii) refund
the purchase price of the defective equipment in the form
of a credit applicable to future purchases. Server Products
obligation and Buyer’s sole remedy will be limited to these
options. In the case of units or parts purchased by Server
Products from a third-party supplier: Server Products’
obligation and Buyer’s sole remedy against Server Products
or Server Products’s suppliers shall not exceed the
settlement which Server Products is able to obtain from its
supplier.
SAFETY GUIDELINES WHEN
USING THIS PUMP:
According to food and safety regulations, most foods must
be stored and/or served at certain temperatures or they
could become hazardous. Check with your local food and
safety regulators for specic guidelines.
Be aware of the product you are serving and the
temperature the product is required to maintain.
Server Products, Inc. can not be responsible for the
serving of potentially hazardous product.
NSF International lists this pump as:
“Not acceptable for dispensing potentially
hazardous foods.”
Stainless steel is one of the best materials for food
serving and storage, but there are many products which
can corrode it. If you notice corrosion beginning on
any stainless steel surface, you may need to change
the cleansing agent, sanitizing agent, or the cleaning
procedures you are using.
• Products containing: acids, alkalines, chlorine,
or salt can corrode stainless steel.
• Sauerkraut and Au Jus sauces corrode stainless
steel. Server Products, Inc. regrets that we can not
honor warranty claims on stainless steel parts that
have been affected by sauerkraut
or Aus Jus.
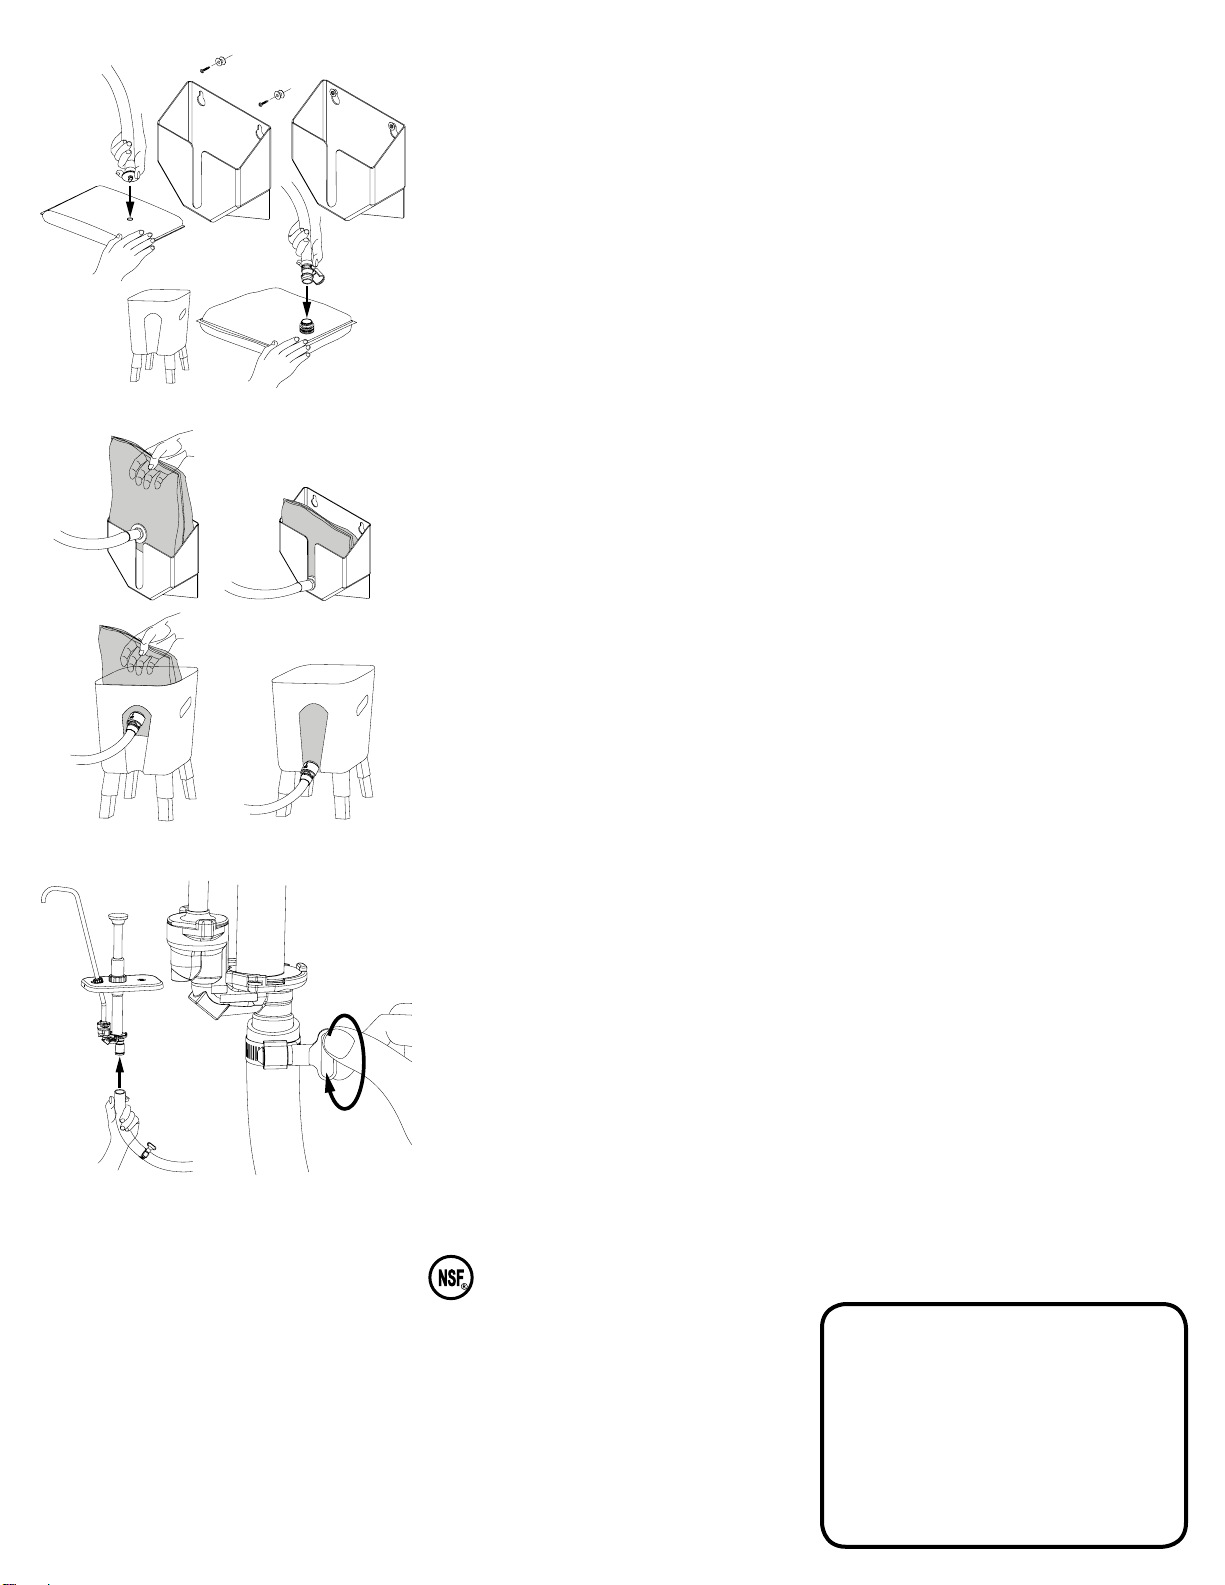
1ATTACH HOSE TO PRODUCT POUCH
2INSTALL PRODUCT POUCH INTO HOLDER
3ATTACH HOSE TO PUMP: SECURE BY ROTATING
TURN KEY CLAMP ON HOSE CLOCKWISE TO TIGHTEN
CLAMP AROUND HOSE AND VALVE BODY.

This manual suits for next models

1

Other Server Commercial Food Equipment manuals

Server 67770 IRS-2 User manual

Server

Server 67770 IRS-2 User manual

Server 85150 User manual

Server

Server 85150 User manual

Server FS-2 User manual

Server

Server FS-2 User manual

Server 82093 User manual

Server

Server 82093 User manual

Server TWIN FS User manual

Server

Server TWIN FS User manual

Server 07A Series User manual

Server

Server 07A Series User manual

Server Extreme 07518 User manual

Server

Server Extreme 07518 User manual

Server EZ-Topper Short EZT User manual

Server

Server EZ-Topper Short EZT User manual

Server 07A Series User manual

Server

Server 07A Series User manual

Server Touchless Express SE-3-T User manual

Server

Server Touchless Express SE-3-T User manual

Server Krispy Kreme SPPG User manual

Server

Server Krispy Kreme SPPG User manual

Server CSM 94000 User manual

Server

Server CSM 94000 User manual

Server SUPREME FS-20SS User manual

Server

Server SUPREME FS-20SS User manual

Server ConserveWell CW-T User manual

Server

Server ConserveWell CW-T User manual

Server TWIN FS 81220 Installation instructions manual

Server

Server TWIN FS 81220 Installation instructions manual

Server SBH-1 User manual

Server

Server SBH-1 User manual

Server PPO-5 User manual

Server

Server PPO-5 User manual

Server 07A Series User manual

Server

Server 07A Series User manual

Server PPO-3 User manual

Server

Server PPO-3 User manual

Server 99H Series User manual

Server

Server 99H Series User manual

Server CONSERVEWELL 13E Series User manual

Server

Server CONSERVEWELL 13E Series User manual

Server 67000 User manual

Server

Server 67000 User manual

Server 93I Series User manual

Server

Server 93I Series User manual

Popular Commercial Food Equipment manuals by other brands

Royal Catering RCFW-110D-PRO user manual

Royal Catering

Royal Catering RCFW-110D-PRO user manual

Antunes DCH-100 owner's manual

Antunes

Antunes DCH-100 owner's manual

VEVOR FP23 user manual

VEVOR

VEVOR FP23 user manual

MAKFRY pan 202 user manual

MAKFRY

MAKFRY pan 202 user manual

PANA FM.22 Manual book

PANA

PANA FM.22 Manual book

RoboLabs SugarLips 100 Technical manual

RoboLabs

RoboLabs SugarLips 100 Technical manual

Bartscher 60L-1F manual

Bartscher

Bartscher 60L-1F manual

Maxima Sous Vide 28L operating manual

Maxima

Maxima Sous Vide 28L operating manual

IBE 650F instruction manual

IBE

IBE 650F instruction manual

Princess Raclette Pure 4 instruction manual

Princess

Princess Raclette Pure 4 instruction manual

Bunn ULTRA-2 PAF CLEANING

Bunn

Bunn ULTRA-2 PAF CLEANING

Scholl 26060 Series Instructions for use

Scholl

Scholl 26060 Series Instructions for use

GASER SUPER-MAXI manual

GASER

GASER SUPER-MAXI manual

KBS BKTF 4020 M user manual

KBS

KBS BKTF 4020 M user manual

Groen DH-20C Operator's manual

Groen

Groen DH-20C Operator's manual

Rondo Rondomat 4000 SSO6404 operating manual

Rondo

Rondo Rondomat 4000 SSO6404 operating manual

STODDART W.CVP.C.18 Specification, installation and operation manual

STODDART

STODDART W.CVP.C.18 Specification, installation and operation manual

Wisco Industries 791 quick start guide

Wisco Industries

Wisco Industries 791 quick start guide

manuals.online logo
manuals.online logoBrands
  • About & Mission
  • Contact us
  • Privacy Policy
  • Terms and Conditions

Copyright 2025 Manuals.Online. All Rights Reserved.