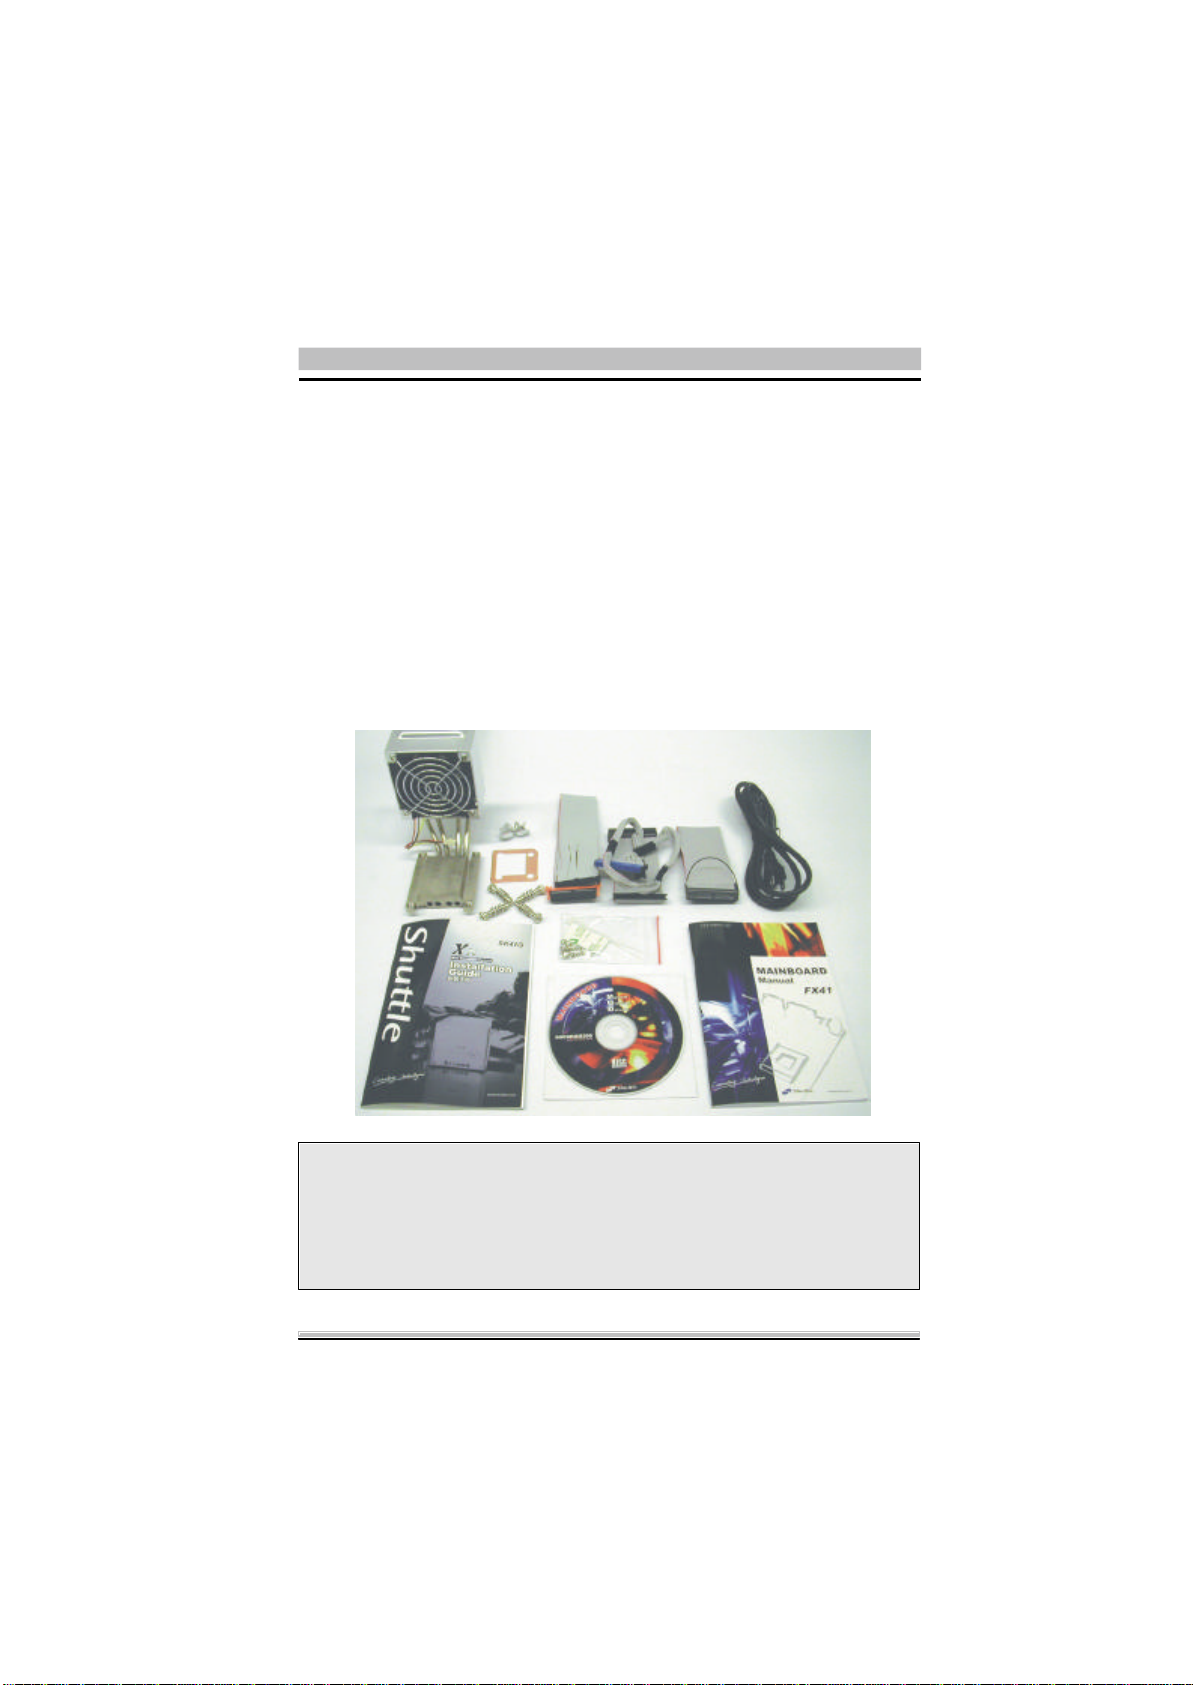
Shuttle SK41G User manual

XPCInstallation Guide
XPC準系統安裝手冊
Use for(適用機種): SK41G
M645

Shuttle®
XPCInstallation Guide
Copyright
Copyright©2002 byShuttle®Inc.All RightsReserved.
Nopartofthispublication maybereproduced,transcribed,storedinaretrievalsystem,
translatedintoanylanguage,ortransmittedinanyformorbyanymeans,electronic,
mechanical, magnetic,optical, chemical, photocopying,manual, orotherwise,without
priorwrittenpermission fromShuttle®Inc.
Disclaimer
Shuttle®Inc.shallnotbeliableforanyincidentalorconsequentialdamagesresultingfrom
theperformanceoruseofthisproduct.
Thiscompanymakesnorepresentationsorwarrantiesregardingthecontentsofthismanual.
Informationinthismanualhasbeencarefullycheckedforreliability;however,no guaran-
tee isgivenastothecorrectness ofthecontents.Intheinterestofcontinuedproduct
improvement, thiscompanyreservestherighttorevisethemanualorincludechangesin
thespecificationsoftheproductdescribedwithinit atanytimewithoutnoticeand without
obligation tonotifyanyperson ofsuchrevision orchanges.Theinformation containedin
thismanualisprovidedforgeneralusebythecustomers.
ThisdevicecomplieswithPart15 oftheFCCRules,Operation issubjecttothefollowing
twoconditions:
1.Thisdevicemaynotcauseharmfulinterference.
2.Thisdevicemustacceptanyinterferencereceived,includinginterferencethatmay
causeundesiredoperation.
Trademarks
ShuttleisaregisteredtrademarkofShuttleInc..
AMD,Athlon XP/Duron areregisteredtrademarksofAMDCorporation.
PS/2isaregisteredtrademarkofIBMCorporation.
AWARDisaregisteredtrademarkofAwardSoftwareInc..
Microsoft and WindowsareregisteredtrademarksofMicrosoft Corporation.
GeneralNotice
Otherbrand and productnamesusedhereinareforidentificationpurposesonlyand may
betrademarksoftheirrespective owners.

Shuttle®
XPC準系統安裝手冊
FCC(聯邦通信委員會)通告
本設備已通過測試。測試結果證明它符合FCC規定第15部分的B類數位設備標準。FCC
的這項規定可提供合理的保護標準,使得符合標準的設備在室內安裝但不會導致有害
的干擾。本設備可能會產生射頻能量,若不按指示安裝會對無線電通信造成有害的干
擾。但是某些特殊的安裝也會導致干擾的出現。如果本設備干擾無線電或電視的接
收,使用者應該使用下述的一種或多種方法排除干擾:
▓更改接收天線的方向和位置。
▓增加電腦和接收器之間的距離。
▓把電腦和接收器的電源線路分開,不使用同一個插座。
▓請經銷商或有經驗的無線電∕電視技術人員給予幫助。
版權
Copyright©2002 byShuttleInc.All RightsReserved.
未經浩鑫同意,本使用說明手冊所有內容,禁止未經授權或局部修改之複製、銷售、
租借、發表等事項。
告示
版權申明:2002版權所有手冊。
本手冊內提及之其餘品牌及產品名稱為各相應品牌所用人之商標或註冊商標。
浩鑫生產廠商可對本手冊內所有資料,文書及規格未經事先告示及做出修改。
浩鑫對本文件內之錯誤與疏失無需負責,且未對文件資料更新作出承諾。
商標
Windows95,Windows98,WindowsME,Words
為Microsoft Corporation 之商標。
IBM為InternationalBusiness MachinesCorporation 之商標。
AMD為AMDCorporation 之商標。
本手冊內提及之其餘品牌及產品名稱為各相應品牌所用人之商標或註冊商標。

▓2.8Complete/完成組裝.................................... 17
▓1.1XPCIntrodution /XPC特色介紹................................................ 1
Contents
▓1.2XPCFunction Illustration /XPC功能說明............................. 2
▓1.3Accessories /配件內容................................................................. 3
▓2.2.1Open ChassisCover/移開機殼上蓋.................................................... 5
▓2.2.2RemoveHDD /FDD /CD-ROMRack /移開硬體週邊支架.................... 5
▓2.2.3Install FDD Cable/安裝軟碟機排線..................................................... 6
▓2.2StartTo Install /開始安裝............................................................ 5
▓2.3.1SK41GSeries系列................................................................................. 7
▓2.3CPUAnd CoolerInstallation /安裝處理器及散熱風扇 7
▓2.4Install DDR SDRAM/安裝記憶體模組..................................... 9
▓2.5.1Install HDD Cable/安裝硬碟排線.......................................................... 10
▓2.5.2Install CD-ROMCable/安裝光碟機排線................................................. 10
▓2.5.3Install Rack /安裝支架.......................................................................... 11
▓2.5Install Cables And Rack /安裝排線及支架............................ 10
▓2.6Install Peripherals/安裝周邊裝置............................................ 14
▓2.8.1Closethe ChassisCover/安裝機殼上蓋................................................. 17
▓2.8.2Complete/組裝完成.............................................................................. 17
▓2.1.1Mainboard/主機板介紹. ....................................................................... 4
▓2.1HardwareInstallation /硬體安裝............................................. 4
▓2.7Install Accessories /安裝附件 . .................................................... 15
▓2.7.1Install frontfeet/安裝造形前腳座......................................................... 15
▓2.7.2Install AGP/PCICard/安裝 AGP/PCI介面卡............................................ 16

1
Compact, Light, Stylish
XPCisprobablythesmallest&thelightestsystemcurrentlyavailablein
themarkettoday.It isalsoquitestylishwitha“cube” shapethatiskind of
cute.Thechassisismadeoutof100%aluminumwithcoolsilvercolor.
Shuttlecallsthesecube-shapedminibare-bonesystemXPC(nextgene-
ration PC)duetothefactthatShuttlebelievesthenextgeneration PC
shouldbesmall, lightweight, easytouseand shouldlookdistinctively
differentfromthetraditionalPCand runscool.
ShuttleXPCincludeschassis,powersupply,mainboardand itsacces-
sories.
XPCSK41GcansupportthelatestAMDAthlon XP/Duron processors.
精簡,輕巧,有型
浩鑫XPC是現今市場上最小巧, 最輕盈的系統, “cube”狀的特殊造型搭
配上全鋁銀白機殼賦予此系列獨樹一格,傲視傳統電腦的獨特身段。
浩鑫迷你準系統概念迥異於傳統電腦,其輕巧、多功能、造型精緻、散熱
良好、容易安裝和使用等優點,符合使用者對次世代電腦的期待,因此,
浩鑫公司將此系列迷你電腦以XPC(nextgeneration PC)的概念加以推展。
XPC主要組成元件包含機殼、電源供應器、主機板和相關配件。
XPCSK41G可支援最新的AMDAthlon XP/Duron 處理器。
▓1.1XPCIntrodution /XPC特色介紹

2
▓Back/背面構造
▓Front/正面構造
▓1.2XPCFunction Illustration /XPC功能說明
HDD LED/
硬碟指示燈
Power LED/
電源指示燈
Power Switch/
開關機按鈕
Reset/
系統覆置按鈕
Mic/
麥克風插孔
SPDIF-Out
USB/USB
插座
1394/1394
連接埠
Earphone/
耳機
Central/Bass/
主聲道重低音輸出
/
Surround(R/L)/Line-In/
/
環繞音效輸出音訊輸入
Front(R/L)/
左右聲道輸出
Power Code AC/
電源線插座
COM1,2/
串列埠
1,2
VGA/VGA
連接埠
1394/1394連接埠
LAN Port/
乙太網路
連接埠
10/100Base-T
USB/USB
插座
PS/2 Keyboard/
PS/2
鍵盤連接埠
PS/2Mouse/
PS/2
滑鼠連接埠
Optional Parallel Port /
預留印表機連接埠
AV&S-Video/
AV&S-Video
連接埠

3
▓1.3Accessories/配件內容
1.I.C.E.techSocket462 1. 熱導管散熱片 x1,螺絲 x4,CPU保護
heat-pipex1,screwsx4,&銅片x1
coppershimX1
2.Frontfeetx22.前腳座 x2
3.FDD cablex1 3.軟碟機排線 x1
4.CD-ROMIDEcablex1 4.光碟機IDE排線 x1
5.HDD IDEcablex1 5.硬碟IDE排線 x1
6.Powercordx1 6.電源線 x1
7.XPCinstallation guidex1 7.XPC安裝手冊 x1
8.MainboardCDx1 8.主機板驅動程式光碟片 x1
9.Mainboardmanualx1 9.主機板使用手冊 x1
10.Installation kit (screws...etc.) x110.零件包(螺絲…等) x1
Note:Accessorieswill bealittledifferentinappearancebymodels.
Pleasecontactourlocalagentforhelpif thereissomethingmissing.
注意:實際配件會依購買機型不同而有些微外觀差異,若有短少或損壞
情形,請洽當地代理商家處理。
1
2
3
4
5
6
7
8
9
10

4
▓2.1HardwareInstallation /硬體安裝
▓2.1.1Mainboard/主機板介紹
Note:1:Theorientation ofCPUorMemorymodulesmustbeidentical
toitssocketorslots.
2:TheRed-lineofcables(ex:FDD,HDD...) and “1”markedon the
socketorslots,allstandforthefirstpin.Pleasemakesurebefore
fabricate.
注意:1: 注意中央處理器與腳座,記憶體模組與插槽的方向要一致。
2: 排線上的紅線與主機板插座上標有的字皆為第一隻腳,安裝時
方向要正確。
Back Panel/
背板連接埠
Floppy Connector/
軟碟機連接埠
CPU Socket/
處理器腳座
DDR DIMMs/
DDR
記憶體插槽
IDE1 Connector (HDD)/
IDE1 ()
連接埠硬碟
IDE2 Connector (CD-ROM)/
IDE2 ()
連接埠光碟機
PCI Slot/
PCI
插槽
AGP Slot/
AGP
插槽

5
1.Remove 3screwsofchassiscover.
鬆開三顆背板固定螺絲。
▓2.2StartTo Insatll /開始安裝
▓2.2.1OpenChassisCover/移開機殼上蓋
2.Remove thecover.
移開機殼上蓋。
▓2.2.2Remove HDD /FDD /CD-ROMRack/移開硬體週邊支架
1.Remove 4screwsofrack.
鬆開支架上的擋板固定螺絲。
2
1
2.Remove therack.
取下支架。

6
2.PlugFDD cabletotheFDD connector.
安裝軟碟機排線於主機板的軟碟機連接埠口。
3.FoldFDD cableunderpowersupply.
反折軟碟機排線於電源供應器下方。
4.FixFDD cableontothepowerand chassisrail withadhesive fromacces-
sorypack.
用零件盒內附雙面膠固定排線於power側面,固定軟碟機排線於power下
方。
▓2.2.3Install FDD Cable/安裝軟碟機排線
1.FDD cable.
軟碟機排線。
4.Remove all frontcovers.
取下所有擋板。
3.Loosn4screwsoftheRack.
鬆開四顆支架螺絲。

7
3.PlaceyourCPUinthesocket.
將CPU放入腳座。
1.AMDSocket462 AthlonXP/Duron processor.
AMDSocket462 AthlonXP/Duron 處理器。
2.Pull up theCPUsocketleverto90-degree
angle.
找到主機板上的 Socket462 CPU腳座。
將腳座旁的拉桿往外推出並向上 90 度拉起。
Note:SK41GsupportsAMD®Socket462 Athlon®XP/Duron processor.
PleasefollowourstepstocompletetheCPUinstallation.
注意:SK41G系列使用 AMD®Athlon®XP/Duron 處理器。安裝程序請
依照下圖說明進行。
▓2.3CPUAnd CoolerInstallation /
安裝處理器及散熱風扇
▓2.3.1SK41GSeries/SK41GSeries系列
4.Applythermalgreaseon thetop ofCPUdie.
將散熱膏均勻地塗抹於CPU上。

8
6. Insertthefourscrewsintheholeson theheat-
pipe’sfourcutedges;laterplacetheheat-pipe
on theCPUsocketand matchthescrewswith
theholeson thesocket.
先將四顆螺絲放入熱導管四個切角孔內。
把熱導管置於CPU腳座上,並將螺絲對齊腳座
孔洞後置入。
7.Screwingtheheat-pipeon theCPUsocket.
Notethatpress downthediagonalcutedge as
screwingorunscrewingtheother.
Note:Settheweightunder4KGasusingan
electricscrewdriver.
將螺絲鎖入CPU腳座或將螺絲自CPU腳座鬆
開時,請按壓其對角線端,再將螺絲一一鎖入
或鬆開。
注意: 使用電動螺絲起子時,請將重力設於
4KG以下。
8.Plugthefan’spowertotheCPUfanconnector
on themainboard.
將風扇電源線插入主機板上之CPU風扇插座。
9.Screwingtheheat-pipetotheback-panel.
用所附的4顆螺絲將熱導管固定於機殼背板
上。
5.Placethecoppershimon top ofCPUdie.
Followthedirectionalword,“UP”asmounting.
將CPU保護銅片置於CPU上,安裝時請注意
銅片上之字樣 “UP”必須朝向腳座上之“SOCKET
462”字樣。
UP

9
1. UnlocktheDIMM latch.
將DIMM兩側卡榫向外扳開。
2.PlugDDRmoduleintotheDIMM slotand lockthelatch.
安插DDR於插槽上,並確認方向是否有誤。
3.Checkif theDDRmoduleiswell installed.
檢查DIMM兩側卡榫是否已完全定位。
Install theDDRmoduletotheDIMM1/DIMM2.
安裝記憶體於主機板上的記憶體插槽。
▓2.4Install DDRSDRAM/安裝記憶體模組

10
2.PlugHDD cabletotheIDE1connector.PlacetheothersideofHDD cableas
pictureshows.
安裝排線於主機板的IDE連接埠口(IDE1),將排線另一端置系統機殼上緣,
以利光碟機 (IDE2)排線的安裝。
▓2.5.2Install CD-ROMCable/安裝光碟機排線
1.CD-ROMcable.
光碟機排線。
▓2.5Install CablesAnd Rack/安裝排線及支架
▓2.5.1Install HDD Cable/安裝硬碟排線
1. HDD cable.
硬碟排線。
2.PlugthecabletotheIDE2connector.
安裝排線於主機板上的IDE2連接埠口。
Note:RemembertolocateIDE2cableunderUSB/IEEE1394 cables.
注意:IDE2排線應於I/OUSB線材下方穿入。

11
Note:Pleaseleave theredline(1stpin)closetofrontpanel.
注意:排線第一pin(即有紅色印字面為第一pin)面向面板。
3.Followthepicturetosecurethecabletothechassis.
將排線嵌入磁架側方的定位夾,以固定排線(排線固定方式如下所示)。
4.Letthecablethroughthereservedhole.
將排線穿過磁架定位孔。
5.Leave thecableaspictureshows.
穿過定位孔後,將排線按右圖方式擺放。
▓2.5.3Install Rack/安裝支架
1.PlaceCD-ROM,FDD &HDD on therack.
安裝光碟機,軟碟機與硬碟於支架。
1st pin
the reserved hole/
定位孔
螺絲 2
(HDD)
螺絲 1
(FDD/CD-ROM)

12
Note:PleasekeepthecableidenticalorinnertotheRack,justtoavoid
cabledamagedwhenchassisclose.
注意:請將排線緊貼於支架,以避免關閉上蓋時,造成排線受損。
2.Tightenall thedeviceswiththeirownscrews.
鎖上螺絲,將光碟機、軟碟機與硬碟固定於支架上。
3.Pleasetightenthescrewson thestandardlinetomakesurethatFDD/CD-ROM
will beinthesamelevelwithfrontpanel.
為確保軟/光碟機安裝後能對齊面板,請按照右圖中之標準線鎖上軟/光碟
機。
4.Leave thecableaspictureshowstomake installingrackmucheasier.
參照右圖,將排線向外拉出,並將電源線預先安裝於散熱裝置旁,以利硬碟及
軟碟機安裝。
CD-ROM cable/
光碟機排線
Floppy cable/
軟碟機排線
HDD cable/
硬碟機排線

13
6.Tightentherackwith2screws.
對齊螺絲孔位後,鎖上兩顆螺絲以固定支架。
5.Puttherackintothechassis.
連同光/軟碟機與硬碟,將支架安裝入系統機殼內。

14
4.ConnectFDD Powerconnectorand cabletotheFDD.
安裝軟碟機電源線及排線於軟碟機插槽。
3.ConnectHDD powerconnectorand cabletotheHDD.
安裝硬碟電源線及硬碟排線於硬碟插槽。
2.PutHDD powerconncotorintherackClip.
拉出並固定硬碟電源線於支架下方固定夾。
1.PutHDD cableintherackclip.
拉出並固定硬碟排線於支架下方固定夾。
▓2.6Install Peripherals/安裝周邊裝置
HDDcable
Powerconnector
Power
connector
FDDcable

15
Note:Remembertominimize theIDEcableand secureit withwhen
fabricatetheCD-ROMcable.
注意:組裝光碟機時,線材長度應自行整理至最短,並用束線帶固定之,
以免影響系統運作。
5.PlugIDEcableand powerconnectortoCD-ROM.
安裝排線與電源線於光碟機插槽。
CD-ROM
cable
Power
connector
▓2.7Install Accessories/安裝附件
▓2.7.1Install frontfeet/安裝造形前腳座
1.Take out2frontfeetfromaccessorybox.
從零件盒中取出前腳座2顆。
2.Tightenfrontfeettobaseofchassis.
並固定於機殼底座。

16
▓2.7.2Install AGP/PCICard/安裝AGP/PCI介面卡
1.Take AGPCardforexampletoinstall expansion card.
以AGP卡為例,說明擴充卡之安裝步驟。
2.Remove 2screwsfrombackpanelbracketand lift up AGP/PCIdoor.
先鬆開2顆背面擋板螺絲,並扳開AGP/PCI閘門。
3. Install AGPCardintoAGPslotand tighten itwithscrews.
插入AGP介面卡於AGP插槽,鎖上AGP/PCI閘門背板螺絲。
PCI
AGP
Table of contents
Other Shuttle Motherboard manuals

Shuttle
Shuttle Spacewalker AV40S User manual

Shuttle
Shuttle HOT-597 User manual

Shuttle
Shuttle HOT-679 User manual

Shuttle
Shuttle FB51 User manual

Shuttle
Shuttle AB60P User manual

Shuttle
Shuttle HOT-559 User manual

Shuttle
Shuttle AE23 User manual

Shuttle
Shuttle Spacewalker AK31 User manual

Shuttle
Shuttle Spacewalker ME17 User manual

Shuttle
Shuttle FV24 User manual

Shuttle
Shuttle AT30 User manual

Shuttle
Shuttle ME21 User manual

Shuttle
Shuttle Spacewalker MS50 User manual

Shuttle
Shuttle AK37GT User manual

Shuttle
Shuttle av61 User manual

Shuttle
Shuttle FB95 User manual

Shuttle
Shuttle FB61 User manual

Shuttle
Shuttle AB48 User manual

Shuttle
Shuttle FB54 User manual

Shuttle
Shuttle FX83 User manual