SIGE 258 User manual
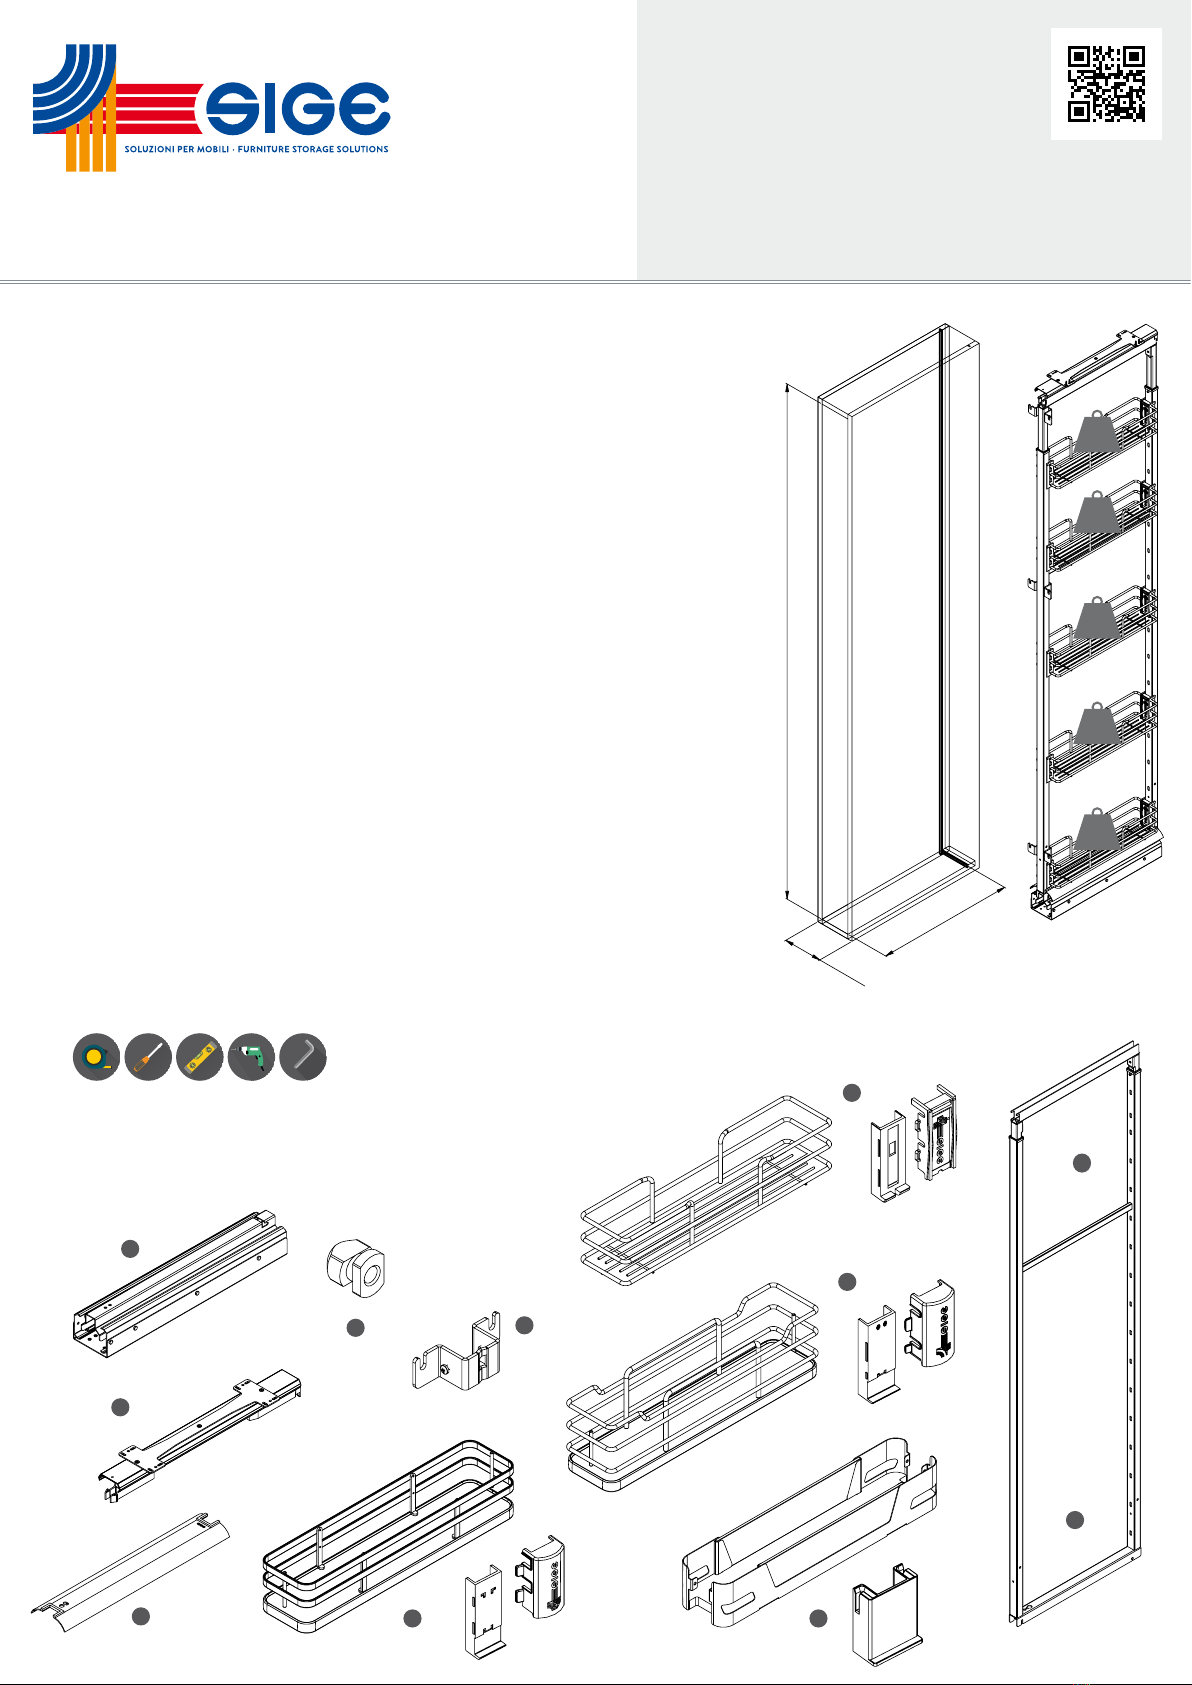
Min.500
150-200
1880-2180
CARATTERISTICHE • FEATURES • CARACTÉRISTIQUES • CARACTERÍSTICAS
Meccanismo per colonna estraibile con Kit guide ad estrazione totale con soft, portata 80 kg,
completo di stae fissaggio antina.
Mechanism for pull-out larder with kit of full extension slides with soft, capacity 80 kg,
complete with brackets for fixing door.
Mécanisme pour une colonne extractible avec kit de glissières à extraction totale avec amortisseur,
capacité de charge 80 Kg, complet de ferrures de fixation.
Mecanismo para columna extraíble con set de guías de extracción total con amortiguador, carga 80kg,
completo de escuad para ajustar la puerta.
MINUTERIA INTERNA • FITTINGS • FERRURE • FERRETERIA
N° 24 3,5x18 24 Viti autofilettante / Self-tapping screws / Vis auto-taraudeuses / Tornillos autorroscantes
N°1 M6x16 Vite / Screw / Vis / Tornillo
N°1 M6x25 Vite / Screw / Vis / Tornillo
N°3 M5x15 Vite / Screw / Vis / Tornillos
N°6 6.2x13.5 Eurovite / Eurovite / Eurovite / Eurovite
N°1 Ø3 Chiave esagonale / Key exagonal / Clés exagonal / Llave hexagonal
COMPONENTI • PARTS • COMPOSANTS • COMPONENTES
A. N°1 Telaio inferiore / Bottom frame / Chassis inferieur / Bastidor inferior
B. N°1 Telaio superiore / Top frame / Chassis supérieur / Bastidor superior
C. N°1 Guida inferiore / Bottom slide / Glissière inferieure / Guía inferior
D. N°1 Guida superiore / Top Slide / Glissière supérieure / Guía superior
E. N°3 Staa attacco antina / Door bracket / Équerre de façade / Escuadra para ajuste puerta
F. N°2 Inserto speciale di serraggio / Fixing support / Support spécial de fixation / Soporte de fijación
G. N°1 Cover / Cover / Couverture / Cobertura
H. Kit cesto ed attacco cesto green line / Green line basket and basket support kit / Kit panier et clips de fixation
panier Green Line / Kit cesto y fijación para cesto Green Line
I. Kit cesto ed attacco cesto Infinity line / Infinity line basket and basket support kit / Kit panier et clips de fixation
panier Infinity Line / Kit cesto y fijación para cesto Infinity Line
J. Kit cesto ed attacco cesto Infinity Plus / Infinity Plus basket and basket support kit / Kit panier et clips de fixation
panier Infinity Plus / Kit cesto y fijación para cesto Infinity Plus
K. Kit cesto ed attacco cesto Materia / Materia basket and basket support kit / Kit panier et clips de fixation panier
Materia / Kit cesto y fijación para cesto Materia
UTENSILERIA • TOOLS • OUTILS • INSTRUMENTOS
MANUTENZIONE/ MAINTENANCE/ ENTRETIEN/ MANTENIMIENTO
Pulire con un panno morbido ed asciutto. Evitare l’uso di solventi e/o abrasivi.
Clean with a soft, dry cloth. Avoid using solvents or abrasive.
Nettoyez avec un chion sec et doux. N’utilisez pas aucun solvant ou produit abrasif.
Limpiar con paño suave y seco. Evitar el uso de solventes y/o abrasivos.
REV 00.2018
F0IST000004
ART 258
PRODOTTO ED ASSEMBLATO IN ITALIA / MADE AND ASSEMBLED IN ITALY / FABRIQUÉ ET ASSEMBLÉ EN ITALIE / HECHO Y MONTADO EN ITALIA
SIGE non Sarà rESponSabIlE dI EvEntualI dannI occorSI pEr utIlIzzo dEl prodotto dIfformE da quEllo pEr Il qualE èStato concEpIto. SIGE wIll not bE rESponSIblE for any EvEntual damaGE duE to adIffErEnt uSE from thE onE It haS bEEn madE.
SIGE nE SEra paS rESponSablE pour touS lES dommaGES àcauSE d’un dIfférEnt utIlIzatIon du produIt pour lEquEl Il aété fabrIqué. SIGE no SEra rESponSablE para cualquIEr daño dEbIdo al uSo dIfErEntE dE lo por El cual un producto ha SIdo rEalIzado.
16
KG
16
KG
16
KG
16
KG
16
KG
A
B
C
D
G
FE
SIGE S.P.A.
60020 POLVERIGI AN ITALY
TEL +39 071 90 90 000 R.A. FAX +39 071 90 90 804
WWW.SIGESPA.IT INFO@SIGESPA.IT
H
I
J K

10
28
16 16
416
32 32
40
40
= =
10
96
13,50
301
13,50
72
= =
72
12 12
Installare la guida inferiore C e la guida superiore D, con le apposite viti 3.5x18,
come mostrato.
Install the bottom slide C and the top slide D, with the 3.5x18 screws, as shown.
Installez la glissière inférieure C et la glissière supérieure D, avec les vis 3,5x18,
comme illustré.
Instale la corredera inferior C y la corredera superior D con los tornillos 3.5x18,
como se muestra.
Premontare le viti M6x16 e M6x24 come mostrato.
Pre-assemble the M6x16 and the M6x24 screws as shown.
Pré-assembler les vis M6x16 et M6x24 comme indiqué.
Premonte los tornillos M6x16 y M6x24 como se muestra.
N°20 3.5x18
N°1 M6x16 N°1 M6x24
1
2

Installare il telaio A,B sulla guida inferiore C, fissare il teaio A,B sulla guida infe-
riore C serrando la vite M6X24, come mostrato.
Install the A,B frame in to the bottom slide C, fix the A,B frame on the bottom
slide C by tightening the M6x24 screw, as shown.
Installez le chassisA, B dans la glissière inférieure C, fixez le chassis A, B sur la
glissière inférieure C en serrant la vis M6x24, comme illustré.
Instale el bastidor A, B en la guía inferior C, fije el bastidor A, B en la guía inferior
C apretando el tornillo M6x24, como se muestra.
Allentare i due grani “n” (sul telaio A) e far scorrere il telaio B.
Bloccare il telaio B alla quota indicata tirando i grani “n”.
far scorrere il telaio A,B sulla guida superiore D fino al “!click!” per installare.
Loosen the grains “n” (on the frame A) and slide up the frame B.
Block the frame B at the indicated measure by tightening the grains “n”.
Slide the frame A,B into the top slide D until “!click!” to install.
Desserrez les grains “n” (sur le cadre A) et faites glisser le chassis B.
Bloquez le chassis B à la mesure indiquée en serrant les grains “n”.
Faites glisser le cadre A, B dans la glissière supérieure D jusqu’à ce que “!click!”
à installer.
Afloje los granos “n” (en el marco A) y deslice hacia arriba el bastidor B.
Bloquee el bastidor B en la medida indicada apretando los granos “n”.
Deslice el bastidor A, B en la guía superior D hasta “!click!” instalar.
3
4
28
CLICK! OK!
N

Montare l’inserto speciale di serraggio F, come mostrato.
Mount the fixing support F, as shown.
Montez le support spécial de fixation F, comme indiqué.
Monte el soporte de fijación F, como se muestra.
6
Scegliere l’altezza della staffa attacco antina E intermedia (vedi quota L), quindi
preforare l’antina, Ø5x12mm, rispettando le quote indicate.
Premontare le euroviti 6.2x13.5.
Choose the position of the middle door bracket E (see measure L), then pre drill,
Ø5x12mm, the door according to the measure given.
Pre-assemble the 6.2x13.5 eurovite.
Choisissez la position du équerre du milieu de façade E (voir mesure L), puis
pré-percer, Ø5x12mm, la porte selon la mesure donnée.
Pré-assembler l’eurovite 6.2x13.5.
Elija la posición del soporte del medio de la puerta E (vea la medida L), luego
pretaladre, Ø5x12mm, la puerta de acuerdo con la medida dada.
Preensamble el Eurovite 6.2x13.5.
N°6 6.2x13.5
5
W
L
X
= Sormonta / Overlay
= Vedi tabella / See tabel
W
X
80
130
N
N
X
5 X12
= =
237 +N
N
N
X
5 X12
= =
85 +N
L 150
L 200
237
396
495
594
693
792
891
990
1089
1188
1287
1346
1425
85
L

Montare le staffe attacco antina E, fissare con le viti M5x15.
Mount the door bracket E, fix with the M5x15 screws.
Montez les équerre de façade E, fixez avec les vis M5x15.
Monte las escuadras para ajuste puerta E, fije con los tornillos M5x15.
Montare l’antina sulle staffe attacco antina E, quindi serrare le sei euroviti 6.2x3.5
Mount the door on the door brackets E, then tighten the six 6.2x3.5 eurovite.
Montez la porte sur les équerre de façade E, puis serrez les six 6.2x3.5 eurovite.
Monte la puerta en las escuadras para ajuste puerta E, luego apriete los seis
6.2x3.5 eurovite.
Agire sulle viti laterali della staffa attacco antina E per regolare l’antina a destra ed
a sinistra.
Work on the side screws of the door bracket E to adjust the door right and left.
Travailez sur les vis latérales du les équerre de façade E pour régler la porte à droite
et à gauche.
Trabaje con los tornillos laterales del las escuadras E para ajustar la puerta a derecha
e izquierda.
N°3 M5x15
7
8
9

Agire sulla vite eccentrica presente sul telaio inferiore A per regolare
l’antina su e giù.
Work on the eccentric screw on the bottom frame A to adjust the door
up and down.
Travaillez sur les vis excentriques sur le chassis inferieur A pour régler la porte
de haut en bas.
Trabaje con los tornillos excéntricos en el bastidor inferior A para ajustar la puer-
ta hacia arriba y hacia abajo.
Agire sulle viti M6x16 e M6x24 presenti sulla guida inferiore C per regolare l’angolo
dell’antina.
Work on the M6x16 e M6x24 screw on the bottom Slide C to adjust the angle of
the door.
Travaillez sur la vis M6x16 et M6x24 sur le glissière inférieure C pour ajuster l’angle
de la porte.
Trabaje con el tornillo M6x16 e M6x24 en la guía inferior C para ajustar el ángulo
de la puerta.
Inserire il cover G come mostrato.
Put the cover G as shown.
Placez le couverture G comme indiqué.
Coloque la cobertura G como se muestra.
10
11
12

Montaggio cesti.
Basket mounting.
Montage du panier.
Montaje de cesta.
Smontaggio cesti.
Basket removing.
Enlever le panier.
Retirar la cesta.
13

LA SIGE SPA SI RISERVA IL DIRITTO DI APPORTARE VARIAZIONI SENZA PREAVVISO SIGE SPA HAS THE RIGHT TO MAKE CHANGES ON IT WITHOUT NOTICE
SIGE SPA A LE DROIT D’APPORTER DES VARIATIONS SANS PRÉAVIS SIGE SPA SE RESERVA EL DERECHO DE REALIZAR CAMBIOS SIN PREVIO AVISO.
Montaggio cesti Materia.
Materia basket mounting.
Montage du panier Materia.
Montaje de cesta Materia.
14
Smontaggio cesti Materia.
Materia basket removing.
Enlever le panier Materia.
Retirar la cesta Materia.
Other SIGE Indoor Furnishing manuals

SIGE
SIGE Nuvola SG371 User manual

SIGE
SIGE 560 48LT User manual

SIGE
SIGE 340 User manual

SIGE
SIGE 002PRO User manual

SIGE
SIGE PRO LINE 999PRO User manual

SIGE
SIGE WASTEBIN 300 User manual

SIGE
SIGE wilson&bradley ART 511U-513U User manual

SIGE
SIGE wilson & bradley KAOS ART K100 User manual

SIGE
SIGE INFINITY 350 User manual

SIGE
SIGE ART 004M User manual


Popular Indoor Furnishing manuals by other brands

Regency
Regency LWMS3015 Assembly instructions

Furniture of America
Furniture of America CM7751C Assembly instructions

Safavieh Furniture
Safavieh Furniture Estella CNS5731 manual

PLACES OF STYLE
PLACES OF STYLE Ovalfuss Assembly instruction

Trasman
Trasman 1138 Bo1 Assembly manual

Costway
Costway JV10856 manual


