Skyrc PC1260 User manual

L i P o F A S T C H A R G E
1 2 . 0 A O F F - L I N E
SkyRC PC1260 is a dual channel LiPo battery charger, which is capable of balance charging 2 packs of 12 cell LiPo
batteries simultaneously. There are three working modes, fast charge, balance charge and storage.
PC1260 is easy to operate, and its Master-Slave mode can help avoid unnecessary settings. With this mode available,
pieces of PC1260 charger units are able to be connected and controlled for synchronous settings through data cables,
thus significantly saving time for setting. In addition, PC1260 has short-circuit, reverse polarity and over-heat
protection to ensure maximum safety.
Instruction Manual
INTRODUCTION
-1-
SK-100138
Power on: connect to the power source and turn on the power switch. A beep sound will be heard,
and the LCD screen will be displayed as below:
Battery connection: Please connect your batteries to PC1260 charger as below:
(Note: Be aware that the Lithium battery to be charged should be 12 cells. Make sure the battery
balance lead and charging lead are connected correspondingly to the charger)
1)
2)
OPERATION PROCEDURE
Battery Type(LiPo/LiHV)
Charging Current (1.0-12.0A)
Working modes (fast charge,
balance charge & storage)
Synchronous status
(Off-line, Master, Slave)
FEATURES
Support charging 2 packs of 12s LiPo batteries simultaneously
Support LiPo high voltage (LiHV) battery
Memorizing last charging current
Three working modes: fast charge, balance charge & storage
Mater-Slave mode available
Synchronize 2 or more chargers via data cable
Maximum safety: short circuit protection, reverse polarity protection
& over heat protection
-2-
Version: 1.0
Handle
LCD Display of Second Channel
LCD Display of First Channel
Balance Socket
XT90 Battery Port
Anti-Dust Air Intake
Control Button
Power Switch
PC Link
Data Link
AC Input 100V-240V
Cooling Fan
Dual Channel 12S LiPo Professional Balance Charger
Connect to the 12S battery balance board Connect to the battery
12S LiPo
12S LiPo
SPECIFICATIONS
Adjustable charge current (1.0-12.0A)
2x16 LCD screen
Battery voltage meter
Battery internal resistance meter
Firmware upgrade via USB port
Input Voltage: 100-240V
Output Power: 1260W (630W*2)
Discharge Power: 100W (50W*2)
Charge Current: 1.0-12.0A*2
Balance Current: 1.5A
Battery Type: LiPo/LiHV
Battery Cell: 12S*2
Working Mode: Fast charge / Balance charge / Storage
Size: 272*202*118.6mm
Weight: 4.88kg

L i H V F A S T C H A R G E
1 2 . 0 A O F F - L I N E
L i P o F A S T C H A R G E
1 2 . 0 A O F F - L I N E
L i P o 1 . 0 A 5 0 . 2 1 V
S T O 000:2 300007
L i P o F A S T C H A R G E
1 2 . 0 A O F F - L I N E
L i P o 1 0 . 2 A 3 8 . 1 2 V
B A L 003:0 701105
L i P o B A L A N C E C H G
1 0 . 0 A O F F - L I N E
L i P o B A L A N C E C H G
1 2 . 0 A O F F - L I N E
L i P o F A S T C H A R G E
1 2 . 0 A O F F - L I N E
SWITCH BETWEEN LIPO AND LIHV
Press and hold and at the same time for 5 seconds until the corresponding battery type
appears on the screen.
Note: This function must be used with caution, as charging incorrect type of battery will
damage the battery, or even cause fire or explosion.
PC1260 supports LiPo, terminal voltage of which is 4.2V and LiHV, terminal voltage of which is 4.35V.
How to switch between LiPo and LiHV?
SYNCHRONIZATION
PC1260 charge can be synchronized via data cables. Below illustrates how to charge 8 batteries of the same type.
Make sure all the chargers are set to “OFF-LINE” first. If a certain channel is selected as “MASTER” channel, then the
other channels will be “SLAVE”. The settings on “MASTER” can be applied to all the chargers, which saves your time
significantly.
-3- -4-
STORAGE
If a Lithium battery is not used for long time, it's highly recommended to charge or discharge the battery to 3.9V with
STORAGE mode so as to extend the battery Life. If the battery voltage is higher than 3.9V, the charger will discharge the
battery; If the battery voltage less then 3.9V per cell, the charger will charge the battery under STORAGE mode.
Press or to select STORAGE mode
Press , the charging mode will blink
One-Button-Charge Operation:
3)
Press and hold button for 2 seconds, fast charge starts
3 . 1 8 3 . 1 9 3 . 1 8 V
3 . 2 0 3 . 1 8 3 . 1 9 V
F u e l = 5 2 %
C e l l = 3 . 1 9 V
LCD screen shows battery voltage, current, charge mode, charging time and
recharged capacity.
Parameters Settings:
4)
Press button, the working mode will be blinking
Press button again, the current option will start blinking; Press or
button to set the charging current within the range of 1.0A-12.0A
Press button again to choose synchronous mode. Press or
button to set “OFF-LINE” or “MASTER”. Either of the channels is MASTER,
the other will automatically change to “SLAVE”. All the settings must be
done through “MASTER”
Press and hold button for 2 seconds to start charging
Press or button to select FAST CHARGE, BALANCE CHARGE or STORAGE
6)
Stop: During the charging process, press button if you like to terminate the charging. Under
Master-Slave mode, any operation must be carried out through the Master channel.
Finish: In charging mode, when the charging process finishes, the screen will be displayed as below:
5)
[ E N D : F I N I S H ]
5 0 . 4 0 V 1 6 5 0 0 m A h
[ T I M E:0 1:4 5:3 6 ]
5 0 . 4 0 V 1 6 5 0 0 mAh
charge current and time
Press and hold , STORAGE mode starts
3 . 1 8 3 . 1 9 3 . 1 8 V
3 . 2 0 3 . 1 8 3 . 1 9 V
Single cell battery voltage
L i P o 1 0 . 2 A 3 8 . 1 2 V
F A S 003:0 701105
L i P o F A S T C H A R G E
1 2 . 0 A O F F - L I N E
L i P o F A S T C H A R G E
1 2 . 0 A O F F - L I N E
L i P o B A L A N C E C H G
1 0 . 0 A O F F - L I N E
Press button to check the battery voltage.
L i P o S T O R A G E
1 2 . 0 A O F F - L I N E

SK-600125-01
G 1 2 2 0
Press button to enter into G1220*
interface, then connect G1220 charging hub
to PC1260 charger.
* G1220 is an optional part, which is not
included in the package.
G1220 CHARGING HUB
-5- -6-
SYSTEM SETUP
Press few times until the screen displays the system setup.
Key Tone
(ON/OFF)
ERRORS
Message Analysis
BATTERY VOLTAGE METER
Press few times until the screen displays the battery meter. This function can detect the remaining
capacity, battery voltage per cell, total voltage, highest voltage & lowest voltage
3.9 73.9 93.9 5 V
3.9 93.9 93.9 7 V
total
voltage
BATTERY RESISTANCE METER
Press few times until the screen displays the battery resistance meter. This function can detect internal resistance
per cell and total resistance.
6 5 6 mΩ
667mΩ
Total: 3 6mΩ
M A I N : 2 3 .86V
H: 3.993 L: 3.9 4 6 V
highest
voltage
Battery resistance is a major technical index of battery performance. Normally low resistance means great discharge
capacity, or the otherwise.
After long-term usage, activity of internal chemicals will decrease, while internal resistance will increase. Detecting
battery internal resistance could help better understand battery health condition.
3.9 73.9 93.9 5 V
3.9 93.9 93.9 7 V
6 5 6 mΩ
667mΩ
PACKAGING CONTENT
Pc1260 Charger Unit *1
Power Cord *1
Data Cable *1
12S Battery Balance Board *2
Instruction Manual *1
Instruction
Manual
5
5
OPTIONAL PARTS *(Below parts are excluded in the package)
SK-600119-03 SK-600119-04
AS150 (Female connector with male case)
SK-600119-05
AS150 (Female connector with male case)
+XT150 Male connector
AS150 (Male connector with female case)
lowest
voltage
Check if the connection between battery main port and charger is correct
Check if the battery main port voltage is normal
Check if the voltage of battery main port and balance port is normal
Check if the connection between battery balance port and charger is correct
Check if the balance port voltage is normal
Check if the battery is already fully charged
Check if the battery polarity is reversed
Check if the fan works normally, or the environmental temperature is high
Charging capacity is beyond default setting or user setting
Charging time is beyond default setting or user setting
B A T T E R YM E T E R F U E LG A U G E
76%
B AT T R E SIS T A NC E
S Y S T E M SETUP
S a f e t yT i m e r
O N1 2 0 M i n
C a p a c i t y O u t - O f f
O N30000mAh
K e y B e e p O N
B u z z e r O N
Press and hold for 3
seconds to
restore factory setting
L o a d F a c t o r y S e t
E N T E R
Charger version checking
V e r s i o n
H W : 1 . 2 S W : 1 . 0 5
Charging Time
Protection
(1-720 minutes)
Charging Capacity
Protection
(1-50000mAh)
N O B A T T D E T E C T E D
C E L L S V O L T A G E H I
C H E C K M A I N P O R T
B A T T E R Y W A S F U L L
R E V E R S E P O L A R I T Y
O V E R T I M E L I M I T
I N T . T E M P T O O H I
O V E R C H A R G E
C A P A C I T Y L I M I T
C O N N E C T E R R O R
C H E C K M A I N P O R T

Warranty and service
We guarantee this product to be free of manufacturing and assembly defects for a period of one year from the time of
purchase. The warranty only applies to material or operational defects, which are present at the time of purchase.
During that period, we will repair or replace free of service charge for products deemed defective due to those causes.
This warranty is not valid for any damage or subsequent damage arising as a result of misuse, modification or as a result
of failure to observe the procedures outlined in this manual.
The warranty service is valid in China only.
If you need warranty service overseas, please contact your dealer in the first instance, who is responsible for
processing guarantee claims overseas. Due to high shipping cost, complicated custom clearance procedures
to send back to China. Please understand SkyRC can't provide warranty service to overseas end user directly.
If you have any questions which are not mentioned in the manual, please feel free to send email to
Note:
1.
2.
3.
This charger is designed and approved exclusively for use with the types of battery stated in this Instruction
Manual. SkyRC accepts no liability of any kind if the charger is used for any purpose other than that stated.
We are unable to ensure that you follow the instructions supplied with the charger, and we have no control over
the methods you employ for using, operating and maintaining the device. For this reason we are obliged to deny
all liability for loss, damage or costs which are incurred due to the incompetent or incorrect use and operation of
our products, or which are connected with such operation in any way.Unless otherwise prescribed by law, our
obligation to pay compensation, regardless of the legal argument employed, is limited to the invoice value of
those SkyRC products which were immediately and directly involved in the event in which the damage occurred.
Liability exclusion
Manufacturedby
SKYRCTECHNOLOGYCO.,LTD.
www.skyrc.com
RoHS
Electromagnetic Compatibility - Requirements for household appliances,
electric tools and similar apparatus - Part 1: Emission
Electromagnetic compatibility – Requirements for household appliances,
electric tools and similar apparatus – Part 2: Immunity Product Family Standard
Electromagnetic Compatibility (EMC) Part 3-2: Limits for harmonic current
emissions(Equipment input current up to and including 16A per phase)
Electromagnetic compatibility (EMC) - Part 3-3: Limitation of voltage
supply systems for equipment with rated current ≤16 A.
EN 55014-1:2006+
A1:2009+A2:2011
EN 55014-2:2015
EN 61000-3-2:2014
EN 61000-3-3:2013
Test Standards Title Result
Conform
Conform
Conform
Conform
Conform
Conform
Conform
EN 60335-1: 2012
+A11: 2014
EN 60335-2-29:
2004+A2: 2010
EN 62233: 2008
Requirements for household appliances, electric tools and similar
apparatus - Safety - Part 1: General requirements
Requirements for household appliances, electric tools and similar apparatus -
Safety - Part 2-29: Particular requirements for battery chargers
Measurement methods for electromagnetic fields of household appliances and
similar apparatus with regard to human exposure
PC1260 satisfy all relevant and mandatory CE directives and FCC Part 15 Subpart B: 2016. For EC directives:
The product has been tested to meet the following technical standards:
CONFORMITY DECLARATION
This symbol means that you must dispose of electrical from the General household waste when it reaches the end of its useful life.
Take your charger to your local waste collection point or recycling centre. This applies to all countries of the European Union, and to
other European countries with a separate waste collection system.
-7- -8-
During the charge process, a specific quantity of electrical energy is fed into the battery. The charge capacity is
calculated by multiplying charge current by charge time. The maximum permissible charge current varies
depending on the battery type or its performance, and can be found in the information provided by the battery
manufacturer. Only batteries that are expressly stated to be capable of quick-charge are allowed to be charged at
rates higher than the standard charge current.
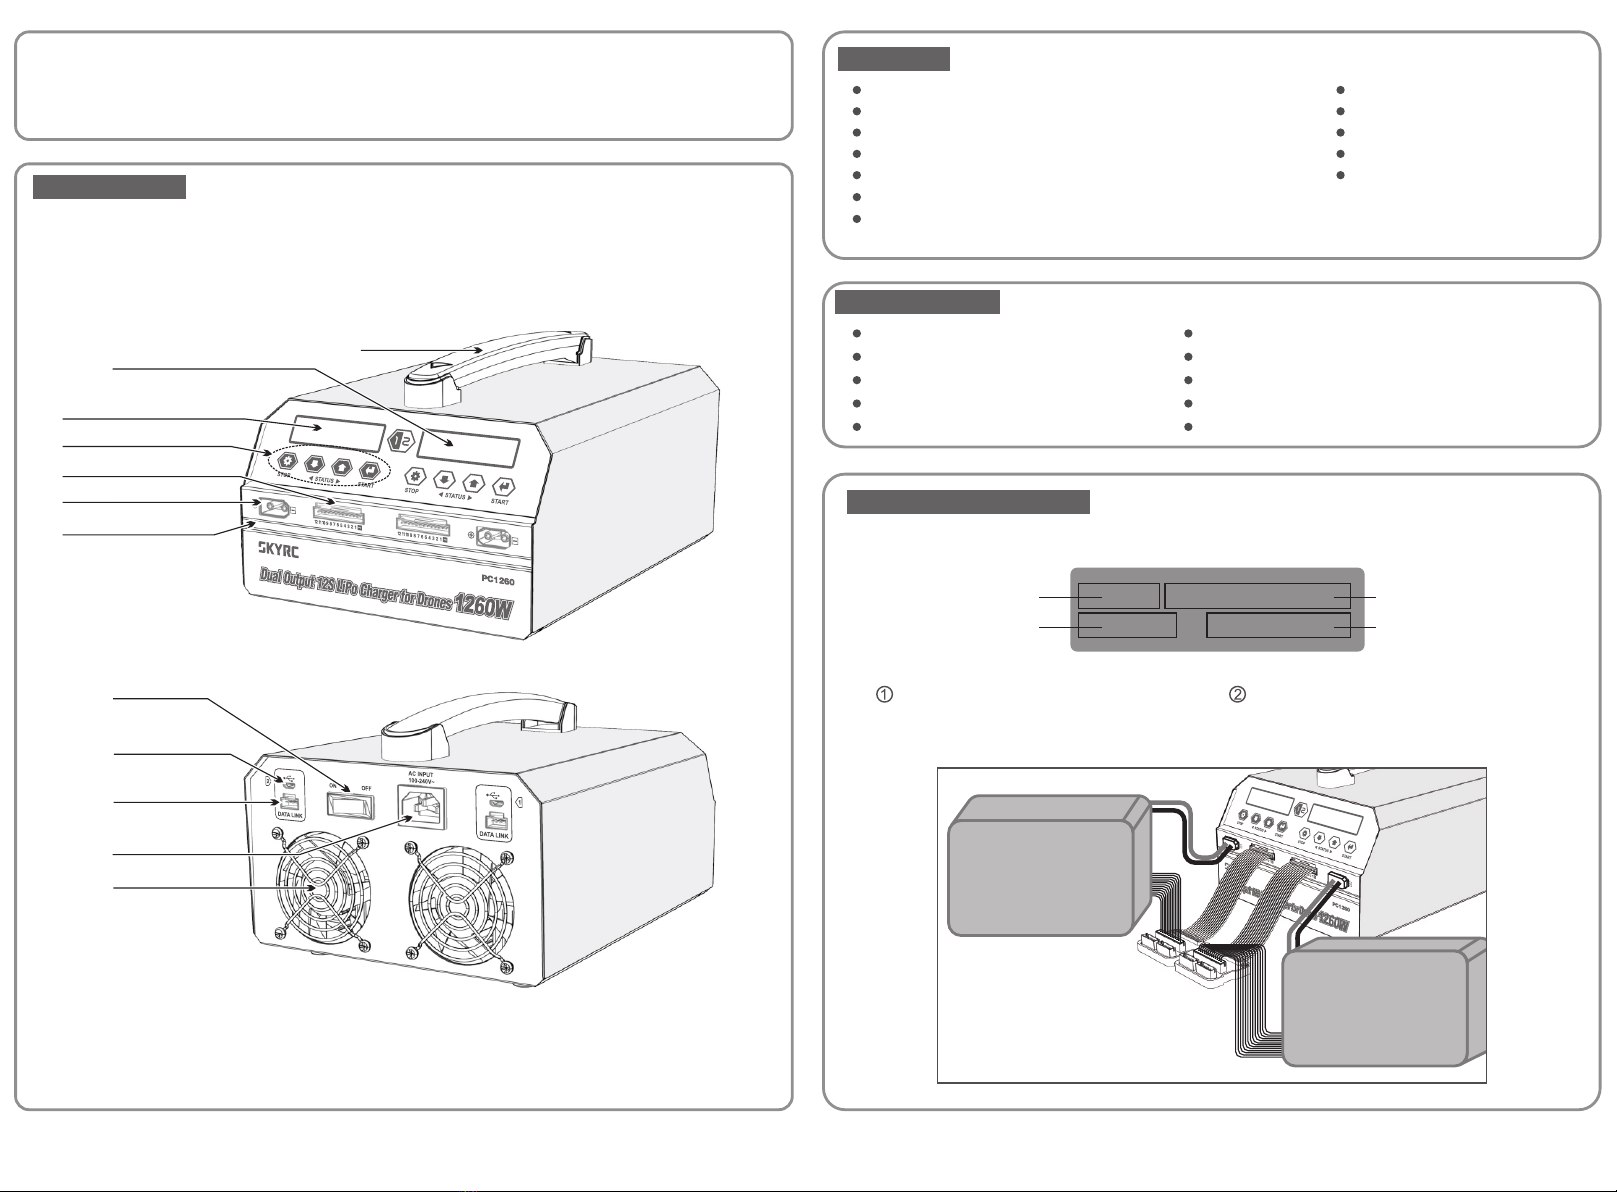
Connect the battery to the terminal of the charger. Red is positive and black is negative. Due to the difference
between resistance of cable and connector, the charger cannot detect resistance of the battery pack. The
essential requirement for the charger to work properly is that the charge lead should be of adequate conductor
cross-section and that high quality connectors which are normally gold-plated should be fitted to both ends.
Always refer to the manual by the battery manufacturer about charging methods, recommended charging current
and charging time. Especially, the lithium battery should be charged strictly according to the charging instruction
provided by the manufacturer.
Special attention should be paid to the connection of lithium battery.
Do not attempt to disassemble the battery pack arbitrarily.
Be aware that lithium battery packs can be wired in parallel or in series. When the battery is connected in parallel,
its capacity is calculated by multiplying the single battery capacity by the number of cells with the total voltage
staying the same. Voltage imbalance may cause fire or explosion. Lithium battery is recommended for charging in
series.
The charger is not suitable for children under 14 years old. People with behavior disturbance, mental disorder or
no experience should use it under the supervision and guidance . Children are forbidden to play with it. They are
also NOT allowed to clean and maintain the device without the supervision.
If the power cord is damaged, please return it back to the factory, supplier or technicians for replacement for fear
of danger.
Charging
Please bear in mind the following points before beginning charging:
Did you select the appropriate program suitable for the type of battery you are charging?
Did you set up adequate current for charging?
Have you checked that all connections are firm and secure?
Make sure there are no intermittent contacts at any point in the circuit.
Never attempt to charge or discharge the following types of batteries
A battery pack which consists of different types of cells (including different manufacturers)
A battery already fully charged or just slightly discharged
Non-rechargeable batteries (Explosion hazard)
A battery requires a different charge technique
A faulty or damaged battery
A battery fitted with an integral charge circuit or a protection circuit.
Batteries installed in other devices or connected to other parts.
Batteries that are not expressly stated by the manufacturer to be suitable for the currents the charger delivers
during the charge process.
These warnings and safety notes are particularly important. Please follow the instructions for maximum safety.
Otherwise the charger and the battery can be damaged or at worst it can catch fire.
Never leave the charger unattended when it is connected to its power supply. If any malfunction is found,
TERMINATE THE PROCESS AT ONCE and refer to the operation manual.
Keep the charger well away from dust, moist, rain, heat, direct sunshine and vibration.
Never drop it.
The allowable AC input voltage is AC 100-240V.
This charger and the battery should be put on a heat-resistant, non-inflammable and non-conductive surface.
Never place them on a car seat, carpet or the like. Keep all the inflammable and volatile materials away from
the operating area.
Make sure you know the specifications of the battery to be charged or discharged to ensure it meets the
requirements of this charger. If the program is set up incorrectly, the battery and charger may be damaged. It
can cause fire or explosion due to overcharging.
WARNING AND SAFETY PRECAUTIONS
All specifications and datas are subject to change without notice. 7504-1058-01
Table of contents
Other Skyrc Batteries Charger manuals

Skyrc
Skyrc e3 User manual

Skyrc
Skyrc MC3000 User manual

Skyrc
Skyrc SK-100079 User manual

Skyrc
Skyrc e8 User manual

Skyrc
Skyrc E455 User manual

Skyrc
Skyrc SK-100051 User manual

Skyrc
Skyrc e680 User manual

Skyrc
Skyrc Ultimate 1000W 40A User manual

Skyrc
Skyrc e4Q User manual

Skyrc
Skyrc B6AC+ DUAL POWER User manual