Skyrc e680 User manual

Multi-Chemistry Charger / Discharger / Power Supply
680
Instruction Manual
[Version 1.1]

Introduction
Special Features
Warning and Safety Notes
Program Flow Chart
Explanation of Buttons
Power and Battery Connection
Charge Operation
Lithium Battery Program (LiPo/LiFe/Lilon/LiHV)
NiMH/NiCd Battery Program
Pb Lead-acid Battery Program
Dji Mavic Battery Program
DC Power Supply
Battery Memory Set and Call Out
System Setting
Battery Voltage Meter
Battery Resistance Meter
Warning and Error Message
The Set Contains
Recommended Accessories
Specification
Conformity Declaration
Commonly Used Terms
Warranty and Service
01
03
05
08
09
10
12
13
16
20
23
24
25
27
29
30
31
32
33
34
35
36
37
Table of Contents
This charger is not intended for use by persons (including children) with reduced
physical, sensory or mental capabilities, or lack of experience and knowledge, unless
they have been given supervision or instruction concerning use of the appliance by a
person responsible for their safety.
Children should be supervised to ensure that they do not play with the charger.
Do not recharge non-rechargeable batteries!
During charging, the battery must be placed in a well-ventilated area!
Never leave the charger unattended when charging the battery.
WARNING:

Congratulations on your choice of SKYRC e680 Multi-Chemistry
Charger/Discharger/Power Supply. This unit is simple to use, but the
operation of a sophisticated automatic charger such as SKYRC e680
does require some knowledge on the part of the user. These operating
instructions are designed to ensure that you quickly become familiar with
its functions. It is therefore important that you read right through the
Operating Instructions, Warning and Safety Notes before you attempt to
use your new charger for the first time. We hope you have many years of
pleasure and success with your new battery charger.
SkyRC e680 is a high-performance, micro processor control charge /
discharge / power supply with battery management suitable for use with
all current battery types. It is with integral equalizer for six-cell Lithium-
Polymer (LiPo), Lithium iron phosphate (LiFe), Lithium-ion (LiIon) and
Lithium High Voltage (LiHV) battery with max. 8A charge current and 80W
charge power. For PB battery, e680 adds AGM and cold charge modes. It
can charge AGM battery, and Pb battery can be charged in cold charge
mode in cold days.
This charger can be powered by 11-18V DC or 100-240V AC power
source via the built in switch-mode power supply. Besides that, e680 is
able to power DC equipment such as tire sander, LED pit light and motor
checker, etc. The new features and functions will be listed and explained
in detail in the following pages.
Please BE SURE to read these INSTRUCTIONS, WARNING and
SAFETY NOTES before you use the charger for the first time.
Introduction
01 ·
e680
Mishandling batteries and battery
chargers is extremely dangerous,
which may cause fire and explosion.

Please read this entire operating manual completely and attentively before
using this product, as it covers a wide range of information on operating
and safety. Or please do use this product in company with a specialist!
· 02 e680
Output Socket
4mm Banana
Plug
Balance
Lead Socket
Temperature Sensor Port
LCD Display
AC Socket 100-240V
DC Input
Cooling Fan
Resume or Start
Charge Processes
Scroll Through the Main Menu
Stop Any Charge Processes
Alter Values
See the Status of Individual
Cells in Balance Charge Mode
Introduction

Special Features
Optimized Operating Software
SkyRC e680 features the so-called AUTO function that set the feeding current during
the process of charging or discharging. Especially for lithium batteries, it can prevent
the overcharging which may lead to an explosion due to the user's fault. It can
disconnect the circuit automatically and alarm once detecting any malfunction. All
the programs of this product were controlled through two way linkage and
communication, to achieve the maximum safety and minimize the trouble. All the
settings can be configured by users!
Battery Memory (Data Store/Load)
The charger can store up to 10 different charge/discharge profiles for your
convenience. You can keep the data pertaining to program setting of the battery of
continuous charging or discharging. Users can call out these data at any time
without any special program setting.
Internal Independent Lithium Battery Balancer
SkyRC e680 employs an individual-cell-voltage balancer. It isn't necessary to
connect an external balancer for balance charging.
Balancing Individual Cells Battery Discharging
During the process of discharging, SkyRC e680 can monitor and balance each cell
of the battery individually. Error message will be indicated and the process will be
ended automatically if the voltage of any single one cell is abnormal.
Adaptable to Various Type of Lithium Battery
SkyRC e680 is adaptable to various types of lithium batteries, such as LiPo, LiIon,
LiFe and the new LiHV batteries.
03 ·
e680
Terminal Voltage Control(TVC)
The charger allows user to change the end voltage. (for expert user only)
DC Power Supply
SkyRC e680 Charger is integrated with DC power supply function, whose output is
13.8V, and output power ranges from 10W to 80W.
Support Charging DJI Mavic Battery
SkyRC e680 charger supports charging DJI Mavic battery.
PB AGM and Cold Charge
For PB battery, e680 adds AGM and cold charge modes. It can charge AGM battery,
and Pb battery can be charged in cold charge mode in cold days.

Cyclic Charging/Discharging
1 to 5 cyclic and continuous process of charge > discharge or discharge > charge is
operable for battery refreshing and balancing to stimulate the battery's activity.
Re-Peak Mode of NiMH/NiCd Battery
In re-peak charge mode, the charger can peak charge the battery once, twice or
three times in a row automatically. This is good for making certain the battery is fully
charged.
Delta-peak Sensitivity for NiMH/NiCd
Delta-peak sensitivity for NiMH/NiCd battery: The automatic charge termination
program based on the principle of the Delta-peak voltage detection. When the
battery's voltage exceeds the threshold, the process will be terminated automatically.
Automatic Charging Current Limit
You can set up the upper limit of the charging current when charging your NiMH or
NiCd battery, it is useful for the NiMH battery of low impedance and capacity in the
'AUTO' charging mode.
Capacity Limit
The charging capacity is always calculated as the charging current multiplied by
time. If the charging capacity exceeds the limit, the process will be terminated
automatically when you set the maximum value.
Temperature Threshold*
The battery's internal chemical reaction will cause the temperature of the battery to
rise. If the temperature limit is reached, the process will be terminated.
This function is available by connecting optional temperature probe, which is not included in the package.
*
Processing Time Limit:
You can also limit the maximum process time to avoid any possible defect.
Battery Meter
The user can check battery voltage and battery internal resistance.
· 04 e680
Fast and Storage Mode of Lithium Battery
Purposes to charge lithium battery varies, 'fast' charge reduce the duration of
charging, whereas 'store' state can control the final voltage of your battery, so as to
store for a long time and protect useful time of the battery.
Battery Internal Resistance Meter
The user can check battery's total internal resistance and each cell's internal resistance.
Special Features

These warnings and safety notes are particularly important. Please follow the
instructions for maximum safety; otherwise the charger and the battery can be
damaged or at worst it can cause a fire.
Never leave the charger unattended when it is connected to its power supply. If
any malfunction is found, TERMINATE THE PROCESS AT ONCE and refer to
the operation manual.
Keep the charger well away from dust, damp, rain, heat, direct sunshine and
vibration. Never drop it.
The allowable AC input voltage is 100~240V AC and DC 11-18V.
This charger and the battery should be put on a heat-resistant, noninflammable
and nonconductive surface. Never place them on a car seat, carpet or similar.
Keep all the inflammable volatile materials away from operating area.
Make sure you know the specifications of the battery to be charged or
discharged to ensure it meets the requirements of this charger. If the program is
set up incorrectly, the battery and charger may be damaged .It can cause fire or
explosion due to overcharging.
Be very careful to choose the correct voltage for different types of battery otherwise
you may cause damage to the batteries. Incorrect settings could cause the cells to
fire or explode.
Warning and Safety Notes
05 ·
e680
Standard Battery Parameters
3.7V/cell
Nominal
Voltage
Min. Discharge
Voltage
Max Charge
Voltage
Storage
Voltage
Allowable
Fast Charge
3.7V/cell
4.2V/cell
3.8V/cell
≦1C
LiPo LiIon
3.6V/cell
4.1V/cell
≦1C
3.3V/cell
3.6V/cell
3.3V/cell
≦4C
LiFe
3.0-3.3V/cell 2.9-3.2V/cell 2.6-2.9V/cell
1.2V/cell
1.5V/cell
n/a
1C-2C
NiCd
1.2V/cell
1.5V/cell
n/a
1C-2C
NiMH
2.0V/cell
2.46V/cell
n/a
≦0.4C
Pb
0.1-1.1V/cell 0.1-1.1V/cell
1.8V/cell
LiHV
3.7V/cell
4.35V/cell
3.85V/cell
≦1C
3.1-3.4V/cell

A battery pack which consists of different types of cells (including different
manufacturers)
A battery that is already fully charged or just slightly discharged.
Non-rechargeable batteries (Explosion hazard).
Batteries that require a different charge technique from NiCd, NiMh, LiPo or Gel
cell (Pb, Lead acid).
A faulty or damaged battery.
A battery fitted with an integral charge circuit or a protection circuit.
Batteries installed in a device or which are electrically linked to other
components.
Batteries that are not expressly stated by the manufacturer to be suitable for the
currents the charger delivers during the charge process.
Please bear in mind the following points before commencing charging:
Did you select the appropriate program suitable for the type of battery you are
charging?
Did you set up adequate current for charging or discharging?
Have you checked the battery voltage? Lithium battery packs can be wired in
parallel and in series, i.e. a 2 cell pack can be 3.7V (in parallel) or 7.4V (in
series).
Have you checked that all connections are firm and secure?
Make sure there are no intermittent contacts at any point in the circuit.
Charging
During charge process, a specific quantity of electrical energy is fed into the
battery. The charge quantity is calculated by multiplying charge current by charge
time. The maximum permissible charge current varies depending on the battery
type or its performance, and can be found in the information by the battery
manufacturer. Only batteries that are expressly stated to be capable of quick-
charge are allowed to be charged at rates higher than the standard charge
current.
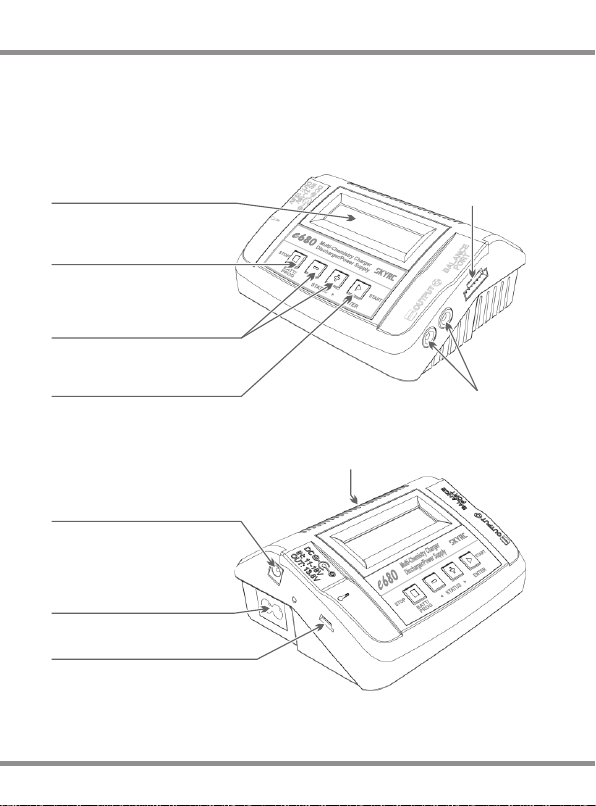
Connect the battery to the terminal of the charger: red is positive and black is
negative. Due to the difference between resistance of cable and connector, the
charger can not detect resistance of the battery pack, the essential requirement
for the charger to work properly is that the charge lead should be of adequate
conductor cross-section, and high quality connectors which are normally gold-
plated should be fitted to both ends.
Always refer to the manual by battery manufacturer about charging methods,
recommended charging current and charging time. Especially, the lithium battery
should be charged according the charging instruction provided by the
manufacturer strictly.
Never attempt to charge or discharge the following types of batteries.
· 06 e680
Warning and Safety Notes

Discharging
The main purpose of discharging is to clean residual capacity of the battery, or to
reduce the battery voltage to a defined level. The same attention should be paid
to the discharging process as charging. The final discharge voltage should be set
up correctly to avoid deep-discharging. Lithium battery can not be discharged to
lower than the minimum voltage, or it will cause a rapid loss of capacity or a total
failure. Generally, lithium battery doesn't need to be discharged. Please pay
attention to the minimum voltage of lithium battery to protect the battery.
Some rechargeable batteries have a memory effect. If they are partly used and
recharged before the whole charge is accomplished, they remember this and will
only use that part of their capacity next time. This is a memory effect. It is said
that NiCd and NiMH batteries are suffering from memory effect. NiCd has more
memory effect than NiMH.
Attention should be paid to the connection of lithium battery especially.
Do not attempt to disassemble the battery pack arbitrarily.
Please get highlighted that lithium battery packs can be wired in parallel and in
series. In the parallel connection, the battery s capacity is calculated by
multiplying single battery capacity by the number of cells with total voltage stay
the same. The voltages imbalance may cause fire or explosion .Lithium battery is
recommended to charge in series.
07 ·
e680
Warning and Safety Notes

Program Flow Chart
· 08 e680
BATT/PROGRAM
BATT MEMORY ENTER
[ BATT MEMORY 1 ]
ENTER SET-> ENTER
BATT TYPE
LiPo
BATT VOLTAGE
7.4V ( 2S )
CHARGE CURRENT
4.9A
DISCHG CURRENT
2.2A
DISCHG VOLTAGE
3.0V/CELL
TVC=YOUR RISK
4.20V
ENTER
ENTER
BATT/PROGRAM
SYSTEM SETTING->
Rest Time
CHG>DCHG 10Min
ENTER
Safety Timer
ON 120Min
Capacity Cut-Off
ON 5000mAH
Temperature Unit
Celsius
Key Beep ON
Buzzer ON
Stop
BATT PROG
SAVE PROGRAM
ENTER
SAVE PROGRAM
SAVE….
[ BATT MEMORY 1 ]
LiPo 7.4V (2S )
[ BATT MEMORY 1 ]
C:4.9A D:2.2A
ENTER CHARGER
LOAD……
LiPo BALANCE CHG
4.9A 7.4V(2S)
LiPo CHARGE
4.9A 7.4V(2S)
LiPo FAST CHG
4.9A 7.4V(2S)
LiPo STORAGE
4.9A 7.4V(2S)
LiPo DISCHARGE
2.2A 7.4V(2S)
BATT TYPE
NiMH
BATT VOLTAGE
2.4V (2S)
ENTER
CHARGE CURRENT
3.3A
TRICKLE
100mA
PEAK DELAY
1Min
DISCHG CURRENT
2.2A
DISCHG VOLTAGE
1.1V/CELL
SAVE PROGRAM
ENTER
ENTER
BATT TYPE
Pb
BATT VOLTAGE
4.0V (2P)
CHARGE CURRENT
3.3A
DISCHG CURRENT
1.5A
DISCHG VOLTAGE
1.7V/CELL
SAVE PROGRAM
ENTER
BATT/PROGRAM
Pb BATT
Pb DISCHARGE
0.1A 2.0V (1P)
BATT/PROGRAM
NiCd BATT
NiCd CHARGE
CURRENT 2.0A
ENTER
NiCd DISCHARGE
0.1A CUT: 1.0V
NiCd CYCLE
CHG>DCHG 1
BATT/PROGRAM
NiMH BATT ENTER
NiMH CHARGE
CURRENT 2.0A
NiMH DISCHARGE
0.1A CUT: 1.0V
NiMH CYCLE
CHG>DCHG 1
BATT/PROGRAM
LiPo BATT
LiPo BALANCE CHG
2.0A 7.4V (2S)
LiPo CHARGE
2.0A 7.4V (2S)
LiPo FAST CHG
2.0A 7.4V (2S)
LiPo STORAGE
2.0A 7.4V (2S)
LiPo DISCHARGE
2.0A 7.4V (2S)
ENTER
BATT/PROGRAM
LiFe BATT
Lilo BALANCE CHG
2.0A 7.2V (2S)
Lilo CHARGE
2.0A 7.2V (2S)
Lilo FAST CHG
2.0A 7.2V (2S)
Lilo STORAGE
2.0A 7.2V (2S)
Lilo DISCHARGE
2.0A 7.2V (2S)
ENTER
BATT/PROGRAM
LiIo BATT
LiFe BALANCE CHG
2.0A 6.6V (2S)
LiFe CHARGE
2.0A 6.6V (2S)
LiFe FAST CHG
2.0A 6.6V (2S)
LiFe STORAGE
2.0A 6.6V (2S)
LiFe DISCHARGE
2.0A 6.6V (2S)
ENTER
ENTER
BATT/PROGRAM
BATT METER
NiCd RE-PEAK
1
NiMH RE-PEAK
1
NiMH Auto CHARGE
CURRENT 2.0A
NiCd Auto CHARGE
CURRENT 2.0A
BATT/PROGRAM
BATT RESISTANCE ENTER
5 3 3 mΩ
5 0 0 mΩ
TATAL: 16mΩ
Temp Cut-Off
ON 50°C 122°F
Version
HW:1.00 FW: 1.00
Load Factory Set
Enter
ENTER
ENTER>3Seconds
NiMH Sensitivity
D.Peak 4mV
NiCd Sensitivity
D.Peak 4mV
DC Input Low
Cut-Off 11.0V
SAVE PROGRAM
SAVE…. ENTER
[ BATT MEMORY 2 ]
NiMH 2.4V (2S )
[ BATT MEMORY 2 ]
C:1.0A D:1.0A
ENTER>3Seconds
ENTER CHARGER
LOAD……
NiMH CHARGE
CURRENT 1.0A
NiMH Auto CHARGE
CURRENT 1.2A
NiMH DISCHARGE
1.0A CUT: 2.0V
NiMH RE-PEAK
2
NiMH CYCLE
DCHG>CHG 1
[ BATT MEMORY 2 ]
ENTER SET->
[ BATT MEMORY 3 ]
ENTER SET->
SAVE PROGRAM
SAVE…. ENTER
[ BATT MEMORY 3 ]
Pb 4.0V (2P )
[ BATT MEMORY 3 ]
C:3.3A D:1.5A
ENTER CHARGER
LOAD……
Pb DISCHARGE
1.5A 4.0V(2P)
BATT/PROGRAM
LiHV BATT
LiHV BALANCE CHG
2.0A 7.6V (2S)
LiHV CHARGE
2.0A 7.6V (2S)
LiHV FAST CHG
2.0A 7.6V (2S)
LiHV STORAGE
2.0A 7.6V (2S)
LiHV DISCHARGE
2.0A 7.6V (2S)
ENTER
BATT/PROGRAM
DJI Mavic BATT ENTER
LH3S CHARGE
TURN ON BATTERY
LH3S STORAGE
TURN ON BATTERY
4.20 4.19 4.19 V
0.00 0.00 0.00 V
MAIN 12.58V
H4.20V L4.19V
DC SUPPLY: 10W
CHARGE POWER: 50W
ENTER
Pb NORMAL CHG
2.0A 2.0V (1P) DEC
INC Pb AGM CHG
0.1A 2.0V (1P) DEC
INC Pb COLD CHG
0.1A 2.0V (1P)
Pb NORMAL CHG
2.0A 2.0V (1P)
Pb AGM CHG
0.1A 2.0V (1P) DEC
INC Pb COLD CHG
0.1A 2.0V (1P)

Explanation of Buttons
When you are willing to alter the parameter value in the program, press the
START/ENTER button to make it blink then change the value by pressing DEC and
INC button. The value will be stored by re-pressing the START/ENTER button. If
there is another parameter can be altered in the same screen, when you confirm the
first parameter value, the next parameter value will start to blink which means it is
ready to alert.
When you are willing to start the progress, press and hold the START/ENTER button
for 3 seconds. When you are willing to stop the progress or go back to previous
step/screen, press the BATT PROG/STOP button once.
When you power on the charger, it will enter LiPo Battery balance program directly.
You could change the mode (balance mode, normal charge mode, fast charge mode,
store mode or discharge mode), enter the desired charging/discharging mode, set
the referred parameter and start the progress.
If you have no request for LiPo Battery program, please press the BATT
PROG/STOP button to enter BATT PROGRAM screen.
BATT PROG / STOP Button:
It is used to stop the progress or go back to previous step/screen
DEC Button:
It is used to go through the menus and decrease the parameter value
INC Button:
It is used to go through the menus and increase the parameter value
ENTER / START Button:
It is used to enter parameter or store parameter on screen.
09 ·
e680

· 10 e680
12V DC Battery / DC power supply connection.
XT60
1. Connecting to power source
There are two kinds of inputs for SKYRC e680, DC 11-18V and AC 100-240V.
AC 100-240V power source connection.
Power and Battery Connection

Lithium Battery Pack
8
NiMH
11 ·
e680
Power and Battery Connection
1) LiPo Battery Connection
2) NiMH/NiCd or Pb Battery Connection
TO AVOID SHORT CIRCUITS, ALWAYS CONNECT THE CHARGE
LEADS TO THE CHARGER FIRST, AND THEN TO THE BATTERY.
REVERSE THE SEQUENCE WHEN DISCONNECTING THE PACK.
WARNING!
2. Connecting the battery
The balance wire of the battery must be connected to the charger. Always
remember to keep right polarity in the connection. Please refer to the wiring
diagram above,which shows a correct way for your LiPo battery connection in
the balance charge mode.
In the other modes, there is no request to connect the balance wire to the
balance socket in the charger.
But we suggest to charge your battery in balance mode for better performance.

· 12 e680
NiMH
NiCd
RE-PEAK
CYCLE
Pb
Batt
Type
Operation
Program Description
This charging mode is for charging LiPo/LiHV/LiFe/LiIon battery in normal mode.
This program is for charging or discharging lithium battery which will not be
used for long time.
The charging capacity may be a bit smaller than normal charging but the
process time will be reduced.
This mode is for balancing the voltage of lithium-polymer battery cells while
charging.
The charger will charge NiMH and NiCd batteries using the charge current
set by the user.
In this program the charger detects the condition of the battery which is
connected to the output and automatically charges the battery.
Note: you should set up the upper limit of the charge current to avoid
damage by excessive feeding current. Some batteries of low
resistance and capacity can lead to higher current.
In re-peak charge mode, the charger can peak charge the battery once,
twice or three times in a row automatically. This is good for confirming the
battery is fully charged, and for checking how well the battery receives fast
charges.
1 to 5 cyclic and continuous process of charge>discharge or
discharge>charge is operable for battery refreshing and balancing to
stimulate the battery's activity.
LiPo
LiHV
Lilon
LiFe
CHARGE
DISCHARGE
STORAGE
FAST CHG
BAL CHARGE
CHARGE
AUTO CHG
DISCHARGE
COLD CHG
DISCHARGE
Charging Program
Depends on different battery type, the operation programs are different.
This mode is for discharging LiPo/LiHV/LiFe/LiIon battery.
This mode is for discharging NiMH/NiCd battery.
This mode is for charging Pb battery in cold days when the temperature is
5℃ to -20℃.
This mode is for discharging Pb battery.
NORMAL CHG
This mode is for charging Pb battery.
AGM CHG
This mode is for charging AGM battery.
Charge Operation

13 ·
e680
A memory profile is available for setting and storing pertinent information for 10
different program sets. Once a battery program is stored into memory, it will be
retained until changed again manually. Recalling a program memory number
makes the charger instantly ready to go!
If you do not wish to use the battery program memories, this charger can be
manually set before each use.
(1)
(2)
The following flowchart shows how the program is set manually:
BATT/PROGRAM
LiPo BATT
LiPo BALANCE
2.0A 11.1V (3S)
LiPo BALANCE
2.0A 11.1V (3S)
LiPo BALANCE
2.0A 11.1V (3S)
LiPo BALANCE
2.0A 11.1V (3S)
BATT/PROGRAM Select
Mode Select
Program Start
Press INC and DEC to go through all the programs and
press START/ENTER to enter LiPo BATT Program.
Battery Setting
Press INC and DEC to go through all the modes and press
START/ENTER to enter LiPo Balance Charge Mode.
Press START/ENTER, the present value will start to blink.
Press INC and DEC to change the value and press
START/ENTER to confirm your setting.
At the same time, the battery pack’s cell count will start to
blink, press INC and DEC to change the value and press
START/ ENTER to confirm your setting.
Press and hold START/ENTER for 3 seconds to start the
program.
START/ENTER
START/ENTER
START/ENTER
START/ENTER
START/ENTER
> 3 Seconds
Lithium Battery Program (LiPo/LiFe/Lilon/LiHV)

· 14 e680
R:3SER S:3SER
CONFIRM(ENTER)
Lp3s 1.5A 12.14V
BAL 000:50 00022
START/ENTER
R shows the number of cells detected by the charger and S is
the number of cells set by you on the previous screen. If the
two numbers are identical, press START/ENTER to start the
charging process.
Charging Status Monitor
During charge process, real-time status will be shown as seen
on the left.
Program Stop
During the charging process, press STOP to stop the charging process.
Program Complete
Lithium Battery Program(LiPo/LiFe/Lilon/LiHV)
BATTERY CHECK
WAIT... The charger is detecting the battery cell.
R shows the number of cells detected by the charger and S
is the number of cells set by you on the previous screen. If
the two numbers are not identical, press STOP to go back
to the previous screen to recheck the number of cells of the
battery pack that you set before going ahead.
R:3SER S:3SER
CANCEL(STOP)
[ END: FINISH ]
16.8V 2600mAh
[ Time: 00: 45: 32 ]
16.8V 2600mAh
Once the battery is fully charged, the screen will read “END:
FINISH” and the charger will emit a ringing sound. The
charger also displays battery voltage, charged capacity and
elapsed time.
Please scan and watch the tutorial
video about how to charge LiPo
battery in balance mode.
Video
Tutorial

Lithium Battery Program (LiPo/LiFe/Lilon/LiHV)
VARIOUS INFORMATION DURING THE PROCESS
Press INC or DEC during the charging or discharging process to view further
pertinent information on the LCD screen.
Lp3s 1.5A 12.14V
BAL 000:50 00022
4.07 4.06 4.11 V
0.00 0.00 0.00 V
Fuel= 90%
Cell= 4.10V
INC
INC
Lp3s 1.5A 12.14V
BAL 000:50 00022
Ext. Temp ----
Int. Temp 37°C
DEC
Temp Cut-Off
50C
DEC
Final voltage when the program ends.
Input voltage.
Safety timer ON and duration of time in minutes.
Capacity cut-off ON and value of the set capacity limit.
Voltage of each cell in the battery pack when the battery is
connected with balance lead.
Internal temperature.
Temperature probe needs to be connected to show
external temperature.
Charged capacity percentage and average cell voltage of
the battery pack.
Real-time status: battery type, battery cell count, charge
current, battery pack total voltage,working mode, elapsed
time and charged capacity.
Cut-off temperature.
DEC
DEC
DEC
DEC
End Voltage
12.6V(3S)
IN Power Voltage
12.56V
Safety Timer
ON 200min
Capacity Cut-Off
ON 5000mAh
15 ·
e680

NiMH/NiCd Battery Program
NiMH CHARGE
CURRENT 2.0A
Press the ENTER button and the amp rate value will begin
blinking. Use the DEC or INC button to adjust the value to the
desired rate. Follow the instructions provided on your battery
when setting the charge current.
Press and hold the ENTER button for 3 seconds to start
charging.
Once charging has commenced, the charger will display the
following real-time information: battery type, charging current,
battery voltage, working mode, elapsed time and charged
capacity. Once the battery is fully charged, the screen will
read "END: FINISHED" and the charger will emit a ringing
sound. You can press the STOP button at any time during the
charging process to stop charging.
NiMH 2.0A 5.42V
CHG 002:22 00106
NiMH/NiCd:
This program is only suitable for charging/discharging NiMH/NiCd batteries. The
e680 offers the following NiMH/NiCd charge modes: Charge, Auto Charge,
Discharge, Re-Peak and Cycle.
Selecting the Battery Type:
After powering on the e680, press the INC or DEC button repeatedly until you reach
the appropriate program for the battery type you wish to charge. For this example we
have chosen the “NiMH BATT“ or “NiCd BATT” program. Now press the ENTER
button to enter the desired program.
NiMH/NiCd Charge Mode:
BEFORE YOU BEGIN CHARGING YOUR BATTERY, MAKE SURE YOU HAVE
READ AND UNDERSTOOD ALL OF THE WARNINGS AND SAFETY
INFORMATION CONTAINED ON PAGES 05-07.
After selecting the correct battery type, if the screen does not read “CHARGE”,
use the DEC or INC buttons to change it to the “CHARGE” mode.
NiMH/NiCd Auto Charge Mode:
In this mode, the charger automatically detects the connected NiMH or NiCD battery
and determines the proper full charge and cut-off thresholds. Setting the upper charge
current limit for safe levels based on your battery specifications will ensure safe
charging of your specific battery. If you are unsure of the maximum allowable charge
rates, set the charger to a maximum of 1C (battery mAh/1000, e.g. 3200mAh = 3.2A).
BEFORE YOU BEGIN CHARGING YOUR BATTERY, MAKE SURE YOU
ARE CHARGING NIMH/NICD BATTERIES. CHARGING LIPO BATTERY
UNDER NIMH/ NICD BATTERY PROGRAM WILL CAUSE FIRE.
WARNING!
START/ENTER
· 16 e680

NiMH/NiCd Battery Program
After selecting the correct battery type, use the INC or DEC
button to change the charge mode to the “Auto CHARGE”
setting.
Press the START button and the amp rate value will begin
flashing. Use the INC or DEC button to adjust the value to
the desired rate. Follow the instructions provided on your
battery when setting the upper charge amperage rate.
Press and hold the START button for 3 seconds to start charging.
Once charging has commenced, the charger will display the
following real-time information: battery type, charging
current, battery voltage, elapsed time and charged capacity.
Once the battery is fully charged, the screen will read “END:
FINISHED” and the charger will emit a ringing sound. You
can press the STOP button at any time during the charging
process to stop charging.
NiMH/NiCd Discharge Mode:
After selecting the correct battery type, use the INC or DEC
button to select the “DISCHARGE” mode. Press the START
button and the amp rate value will begin flashing. Use the
INC or DEC buttons to adjust the value to the desired
discharge rate. Press the START button again and the
voltage cut-off will begin to flash. Use the INC or DEC button
to adjust the value to the desired rate.
NiMH Auto CHARGE
CURRENT 1.3A
NiMH 1.3A 5.42V
AUT 002:22 00106
NiMH DISCHARGE
1.3A CUT:9.6V
Follow the instructions provided on your battery when setting
the voltage cut-off. The e680 will stop discharging when the
battery has reached the preset voltage cut-off.
Press and hold the START button for 3 seconds to start
discharging. Once discharging has commenced, the charger
will display the following real-time information: battery type,
discharging current, battery voltage, working mode,elapsed
time and discharged capacity.
NiMH 1.3A 10.42V
AUT 002:22 00106
START/ENTER
17 ·
e680

NiMH/NiCd Battery Program
When discharging is complete, the screen will read “END:
CUTOFF-VOL” and the charger will emit a ringing sound.
The charger will display the elapsed time, end voltage and
the discharged capacity in mAh.
You can press the STOP button at any time during the
discharging process to stop the discharge process.
NiMH/NiCd Re-Peak Mode:
Applicable to NiMH and NiCD batteries only, in re-peak mode the charger can peak-
charge the battery once, twice, or three times in a row automatically. This process is
good for confirming that the battery is fully charged and for verifying how well the
battery can accept a fast charge. A five-minute cool-down delay occurs after each re-
peak charge.
IN RE-PEAK MODE, THE e680 USES THE CHARGE AMPERAGE AND VOLTAGE
SETTINGS ENTERED IN CHARGE MODE.
After selecting the correct battery type, use the INC or DEC
button to select the “RE-PEAK” mode. Press the START
button and the Re-peak cycle number 1 begins to flash on
the screen. Use the INC or DEC button to scroll through the
cycle count and set a number between 1 and 3.
Press and hold the START button for 3 seconds to start the
re-peak process.
[ TIME: 00:04:04 ]
9.6V 00640mAh
NiMH RE-PEAK
2
Once the Re-Peak process has begun, the charger
will display the following real-time information: battery
type, charging current, battery voltage, elapsed time
and charged capacity.
Once the Re-Peak process has completed, the
screen will read “END: RE-PEAK” and the charger
will emit a ringing sound. The charger will display the
charge/discharge capacity for each cycle. Using the
+ and - buttons, you can scroll through the history
data of each cycle.
NiMH 1.3A 10.42V
RPC 004:04 00686
START/ENTER
· 18 e680
Table of contents
Other Skyrc Batteries Charger manuals

Skyrc
Skyrc imax C-403 User manual

Skyrc
Skyrc Maestro T1000 User manual

Skyrc
Skyrc D100 User manual

Skyrc
Skyrc D100 V2 User manual

Skyrc
Skyrc T6200 User manual

Skyrc
Skyrc SK-100079 User manual

Skyrc
Skyrc T200 User manual

Skyrc
Skyrc NC2600 User manual

Skyrc
Skyrc Ultimate Duo 400W AC/DC User manual

Skyrc
Skyrc B6AC neo User manual