ENGLISH
OPERATING MANUAL FOR
RECESSED CEILING LUMINAIRE
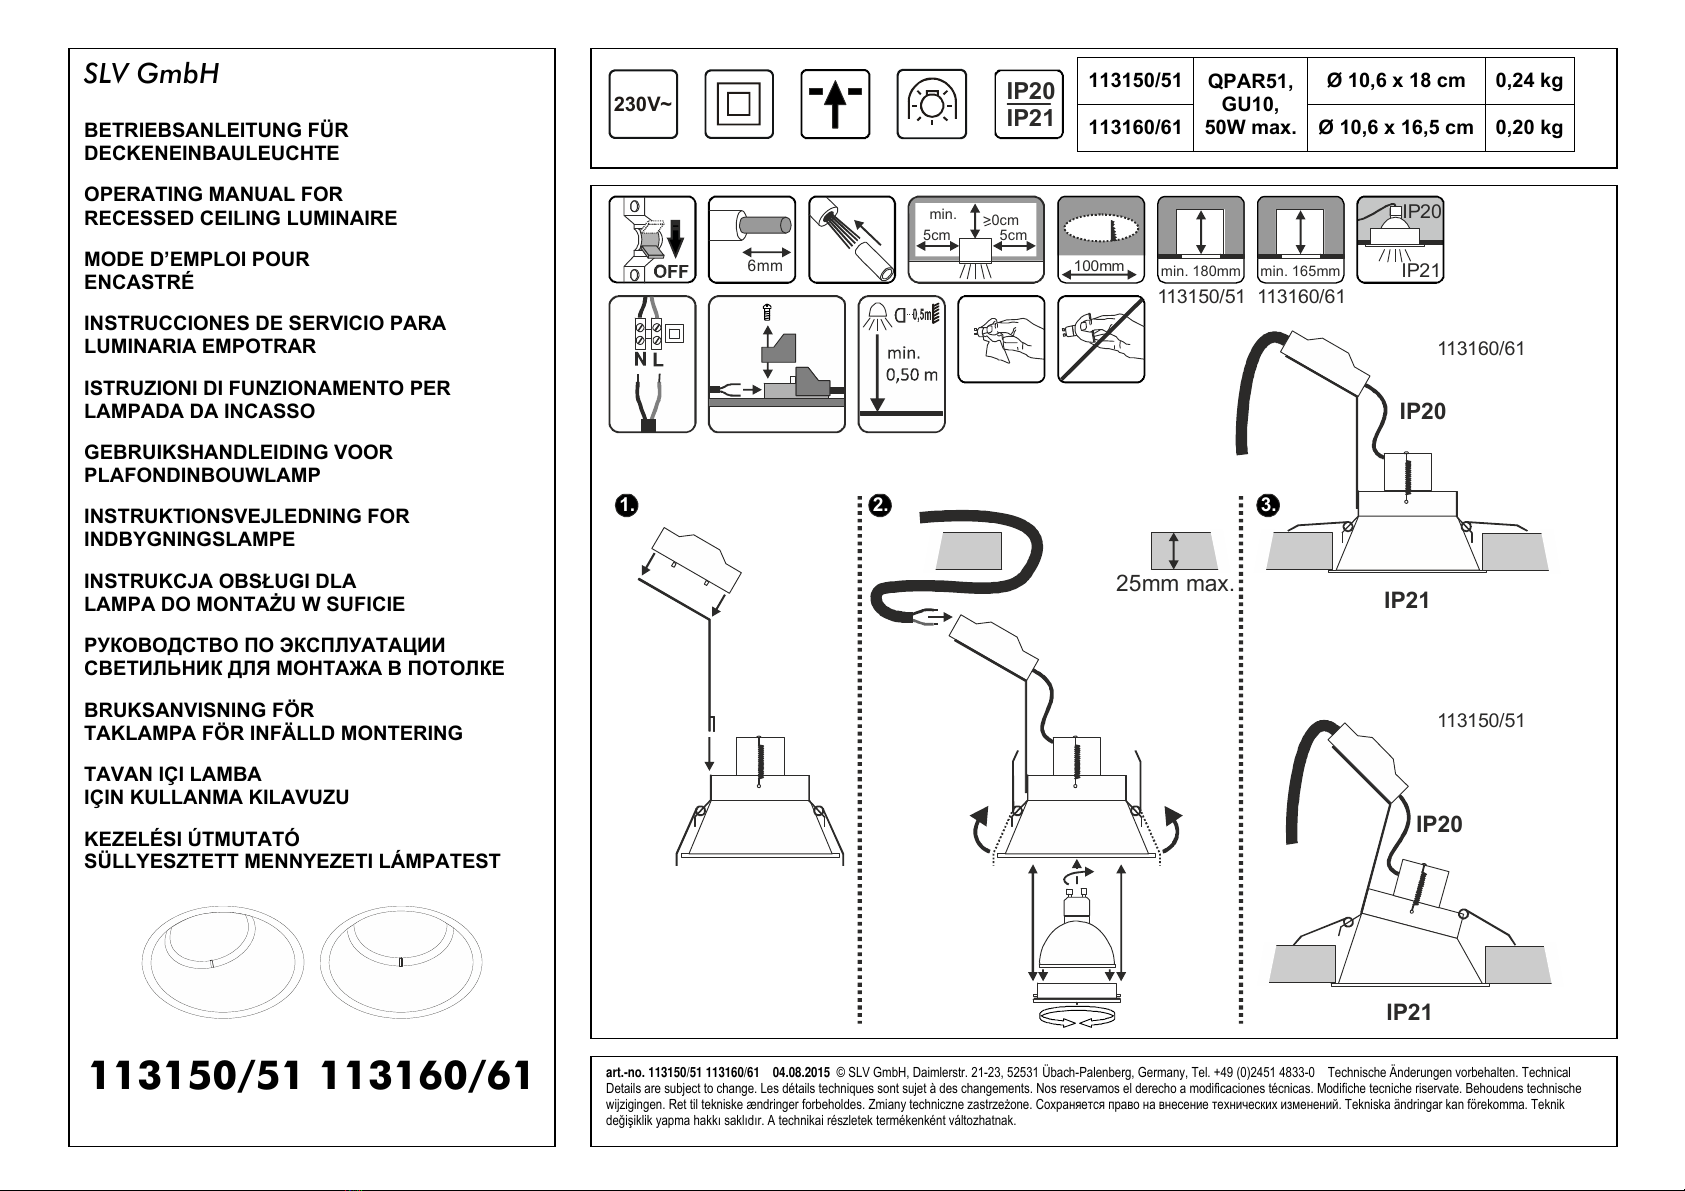
113150/51 113160/61
Read this short manual carefully and keep it accessible for further
reference!
SAFETY MESSAGES
Disregard of the safety messages may lead to danger of life, burning or
fire!
Installation, mounting or works on the electrical connection may only be
carried out by an approved electrician.
The product may not be modified or converted.
Do not hang or fasten anything on the product, especially no decoration.
Do not cover the product - provide free air circulation.
The luminaire may only be operated with a complete and intact protection
glass.
In case of a malfunction you may NOT touch the product or operate it
further. Disconnect the product from the power supply by an external
switch or by the fuse.
A malfunction exists when:
visible damages appear.
the product does not work properly (e.g. flickering).
smoke, steam or crackling sounds appear.
smell of burning is recognisable.
an overheating is recognisable (e.g. by discolouration of adjacent
surfaces).
Operate the product only after maintenance and examination by an
approved electrician!
This product is not intended to be used by children. Ensure that children do
not suffer any harm e.g. by burns from hot surfaces or by electrical shock.
Additional safety messages are indicated by this symbol: .
USE AS DIRECTED
This product serves exclusively lighting purposes and may:
only be used with a voltage of 230V ~50Hz.
only be installed according to safety class II (two).
only be operated when firmly mounted on a stable, even and tilt-fixed
surface.
only be operated on normally or not flammable surfaces.
not be exposed to strong mechanical loads or to strong contamination.
OPERATION
The distance between the light source and the illuminated surface must
be at least 0,5 m. Pay special caution to easily inflammable objects (e.g.
curtains, fabrics, foliage, etc.).
MAINTANANCE AND CARE
Light source
Exchange the light source always before it reaches its lifespan, to avoid
personal injuries, or damages of the luminaire or other objects.
Disconnect the product from the power supply, before you exchange the
light source. Let the light source cool down before replacement.
Use only light sources that are suitable for the product. Suitable light
sources are indicated on the type label.
Suitable light sources: QPAR51, GU10, 50W max.
Replacing the light source
Loosen the bulb keeping device.
Remove the used light source.
Insert the new light source with a slight-turn to the right.
Insert the new light source into the bulb holder.
Reattach the bulb keeping device.
Check and clean the gasket after each opening of the luminaire. The bearing
surface of the gasket must be free of dirt. These measures ensure that the IP
class is maintained.
Note the proper fit for the gasket.
Care
The following enviromental influences may have unwanted effects on the
surface of the product:
acid rain and sour soil, high salt content in the air
cleaning agents, fertilizer especially in flowerbeds
thawing salt, other chemical substances (e.g. herbicides)
Protect the product by adequate means to avoid unwanted changes of the
surface.
Disconnect the product from the power supply and let it cool down, before
you clean the product.
Clean the product on a regular basis using a slightly moistened, soft and fluff-
free cloth. Please also note additional supplied notes on maintanance and
care.
STORAGE AND DISPOSAL
Storage
The product must be stored in a dry and clean environment. Do not strain
the product mechanically during storage.
After a damp or soiling storage the product may only be installed after
checking its condition by an approved electrician.
Disposal (European Union)
Do not dispose the product with the regular household waste! Products
marked with this sign must be disposed according to the directive(WEEE,
2003/108) on electrical and electronic devices at local collection points for
such devices!
INSTALLATION (only by an approved electrician)
Switch off the mains or respectively the connection lead before doing any
works!
Use only parts, which are supplied with the product or are described as
accessories!
Inspect the product for loose parts inside the housing. When there are loose
parts inside the housing and these are not explicitly described the product may
not be installed or operated.
Use the supplied fastening material only when it is suited for the installation
background. If this is not the case use only fastening material suiting the
installation background.
Unpacking
Carefully take the product out of the packaging removing any transport
safeguards.
Before disposal of the packaging material make sure that all components
of the product are removed.
Installation place
The product is solely suited for recessed installation in dry cavity ceilings.
Note the security advice on the distance to the illuminated surface in the
chapter OPERATION.
The product may only be utilized according to IP20/IP21.
IP20: Protection against foreign objects > Ø 12,5mm - No protection against
water.
IP21: Protection against foreign objects > Ø 12,5mm - Protection against
vertically falling water drops.
Note the minimum distances in the ceiling. Minimum distance to each side:
5 cm.
Keep a sufficient distance to flammable surfaces. The indicated recess
depth is the minimum depth. Depending on the installation situation the
needed recess depth may be larger. This is especially the case, when there
are flammable materials above the luminaire or to ensure the sufficient
ventilation.
Do not cover the product, especially not with insulating
materials: .
Prepare the power supply lead according to valid rules for outdoor
installations.
Do not seal the product yourself, using additional silicon or another
sealant.
Installation steps (read completely before installation)
Install the luminaire as shown in the figure.
Mark and cut the opening. Do not damage the mains lead. The
measurements for the openings are:
Ø: 10 cm
Remove the cover on top of the connection clamp.
Electrical Connection
The product must be able to be separated by an all pole separation
from the current supply.
For electric connection attach the black or brown wire (live conductor)
of the connection lead with the clamp L and the blue wire (neutral
conductor) of the connection lead with the clamp N.
Attach the cover back on the connection clamp.
Direct the luminaire into the opening, with the retaining springs pointing
upwards.
Inserting the light source
Insert the light source into the luminaire as shown on the figure.
Note the proper fit for the gasket. Tighten the screws in a cross-wise order,
to achieve an even pressure on the gasket.
Check if the product functions properly and is securely fixed!
art.-no. 113150/51 113160/61 © 04.08.2015 SLV GmbH,
Daimlerstr. 21-23, 52531 Übach-Palenberg, Germany,
Tel. +49 (0)2451 4833-0
Technical Details are subject to change.
Powered by TCPDF (www.tcpdf.org)Powered by TCPDF (www.tcpdf.org)