Sony PLM-A55E User manual

SERVICE MANUAL
GLASSTRON
AEP Model
UK Model
SPECIFICATIONS
PLM-A55E
9-928-101-31

– 2 –
TABLE OF CONTENTS
1. GENERAL
Glasstron is a brand-new concept in visual display ......... 3
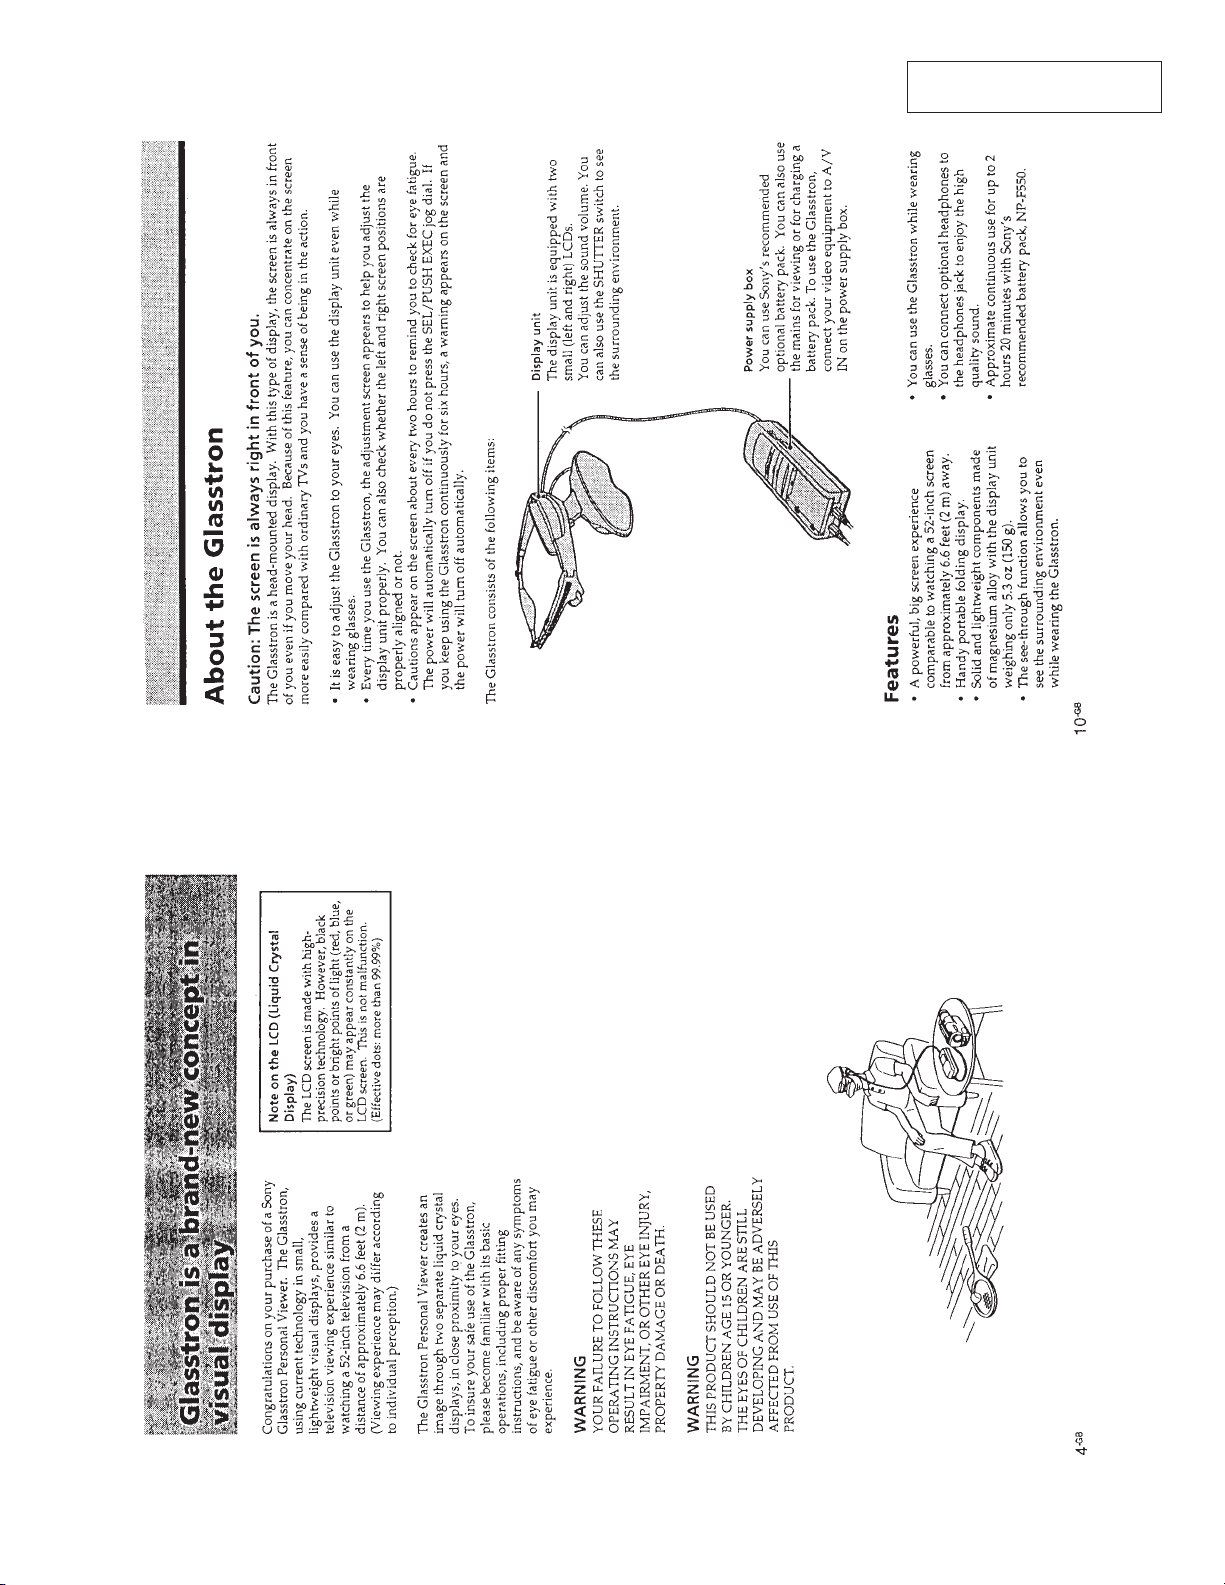
About the Glasstron .......................................................... 3
Checking the supplied accessories ................................... 4
Locating the parts and controls......................................... 4
Connecting the Glasstron.................................................. 5
Wearing the Glasstron....................................................... 6
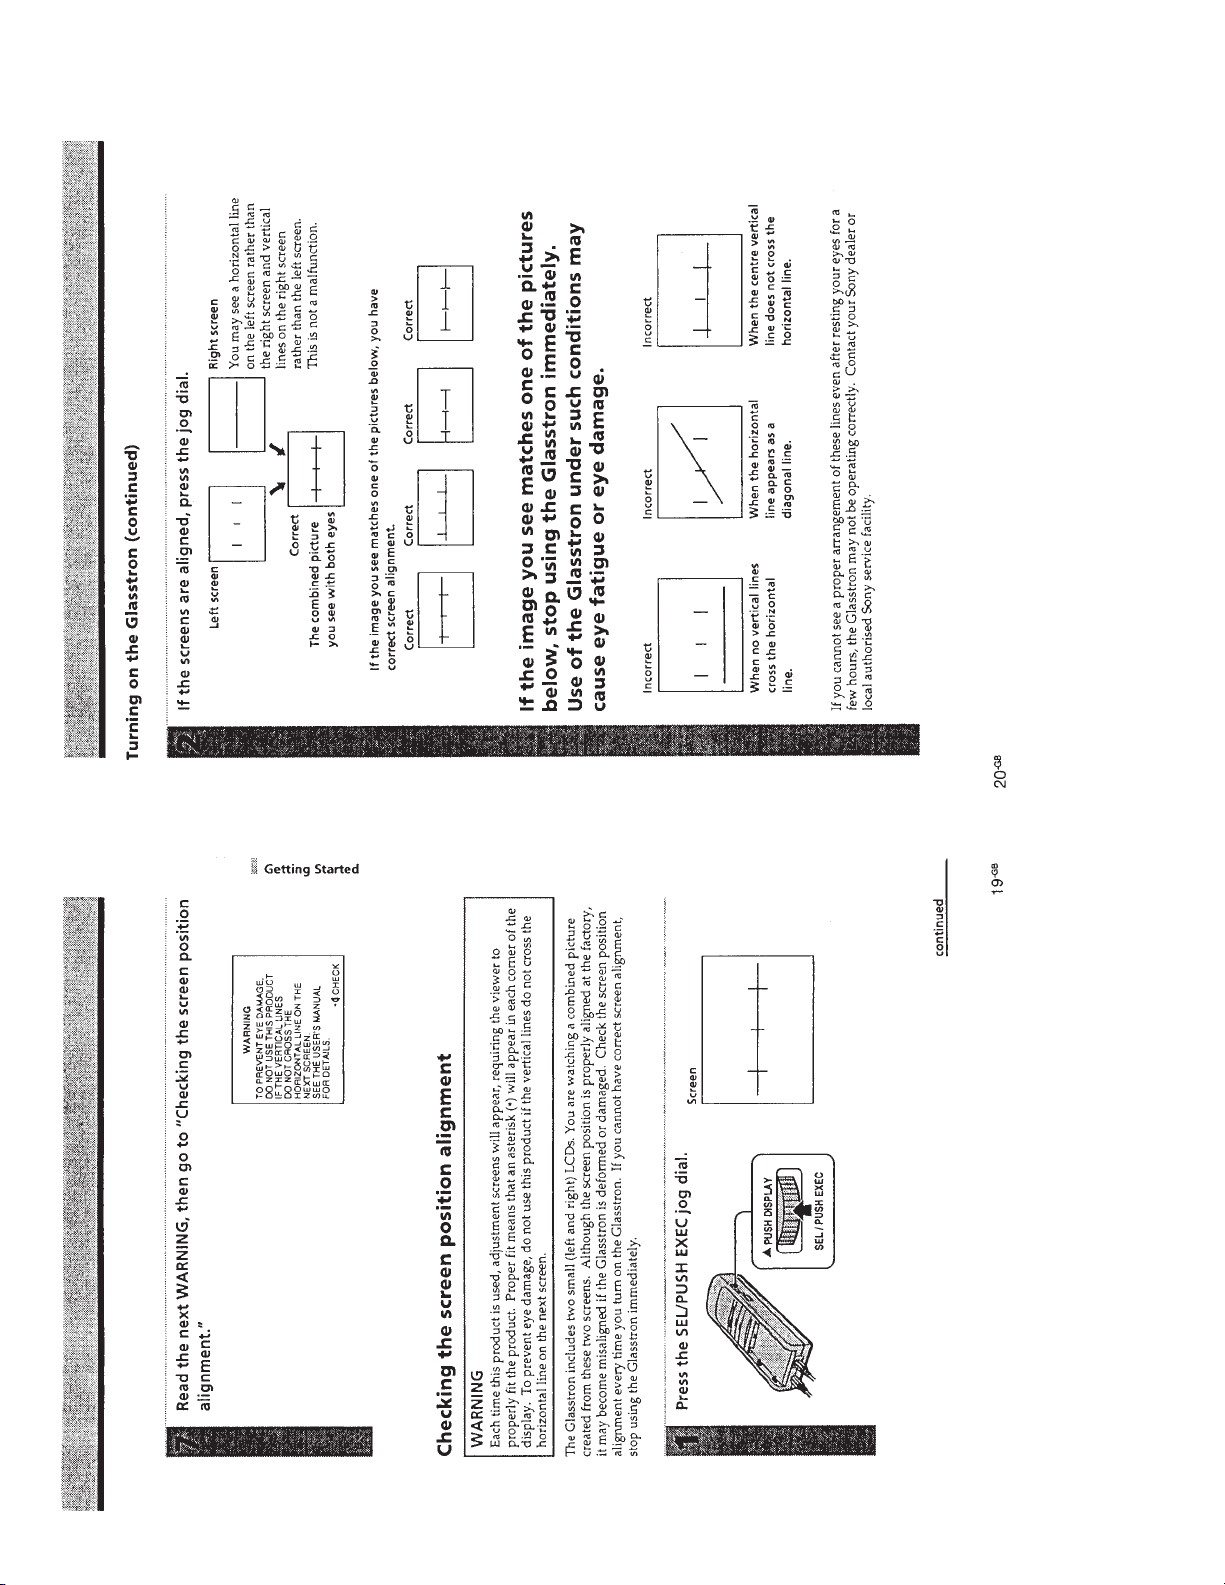
Turning on the Glasstron .................................................. 7
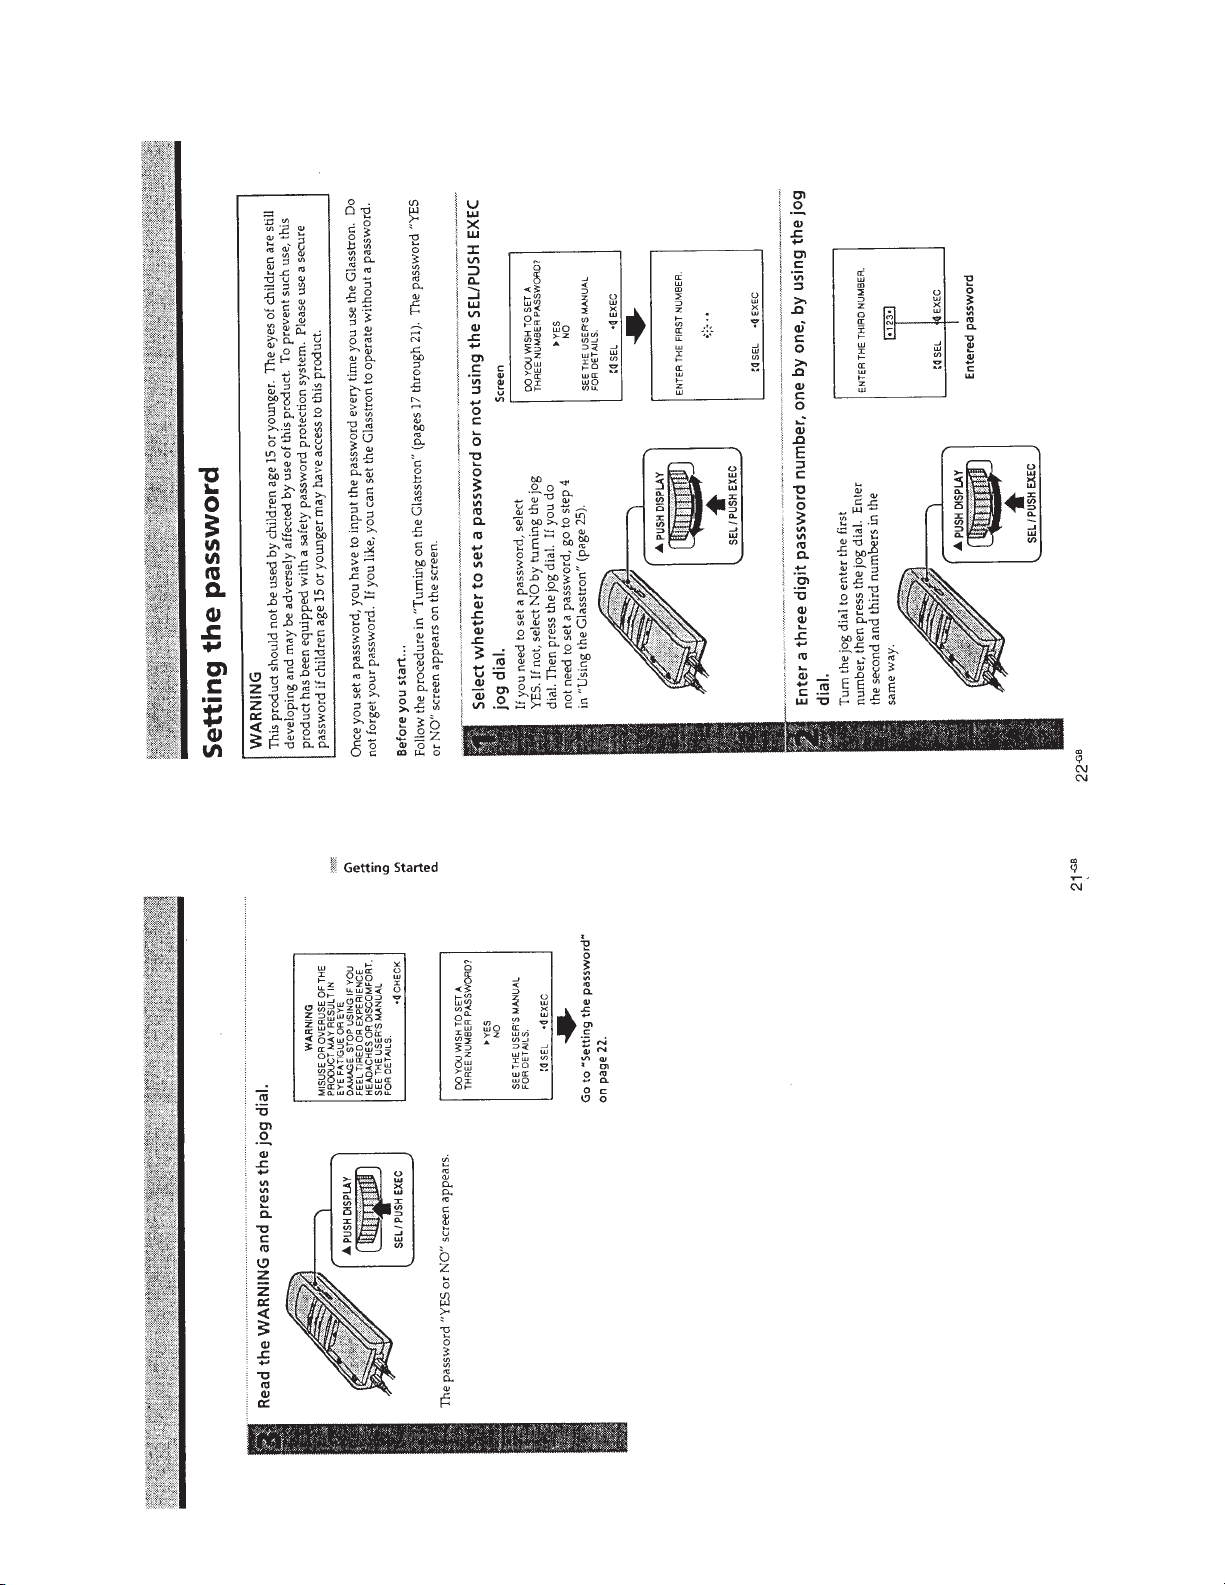
Setting the password ......................................................... 9
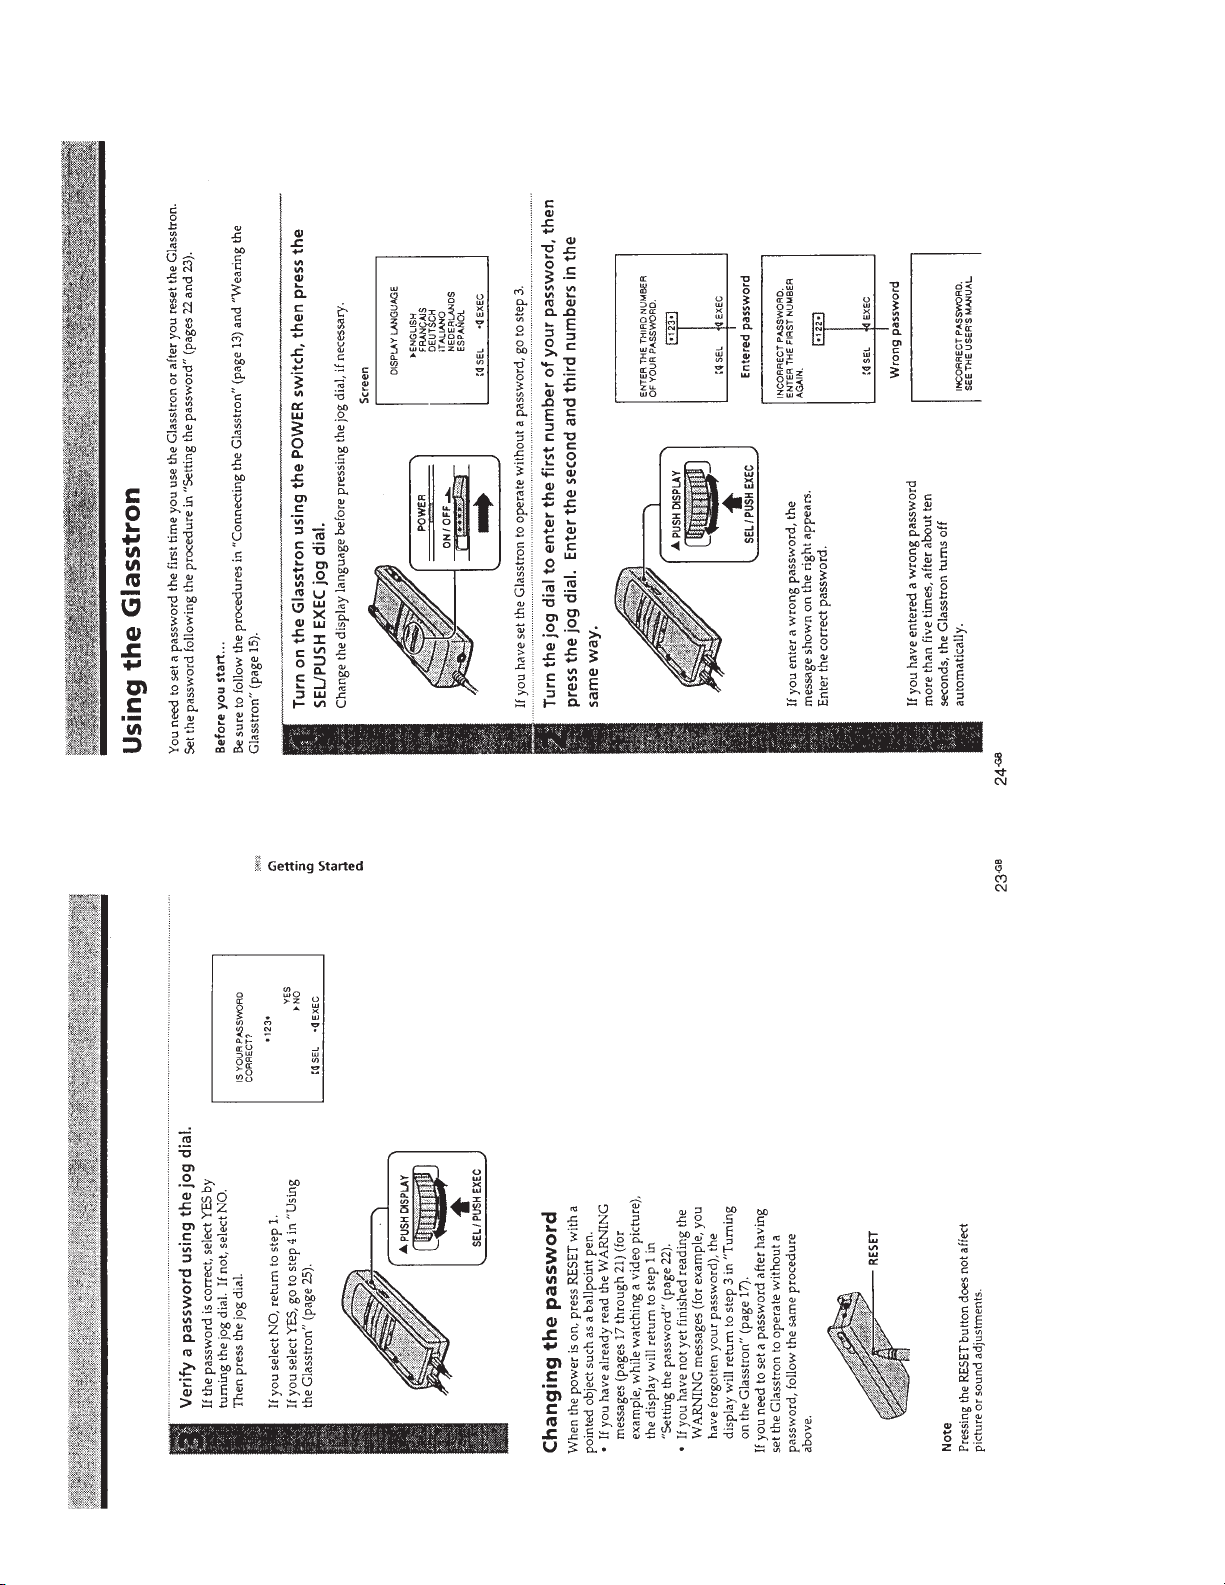
Using the Glasstron........................................................... 10
Viewing the surrounding environment
(See-through) .................................................................... 12
Adjusting the sound and picture ....................................... 12
Using with power sources other than
the AC adapter................................................................... 14
2. DISASSEMBLY ........................................................... 15
3. ELECTRICAL ADJUSTMENTS........................... 17
Power Supply Block ......................................................... 18
Video Block....................................................................... 26
LCD Block ........................................................................ 27
4. DIAGRAMS
4-1. IC Pin Function Description ............................................. 34
4-2. Block Diagram – MAIN Section – .................................. 41
4-3. Block Diagram – AUDIO/KEY CONTROL Section –... 43
4-4. Block Diagram – DISPLAY Section – ............................ 45
4-5. Block Diagram – POWER SUPPLY Section – ............... 47
4-6. Notes For Printed Wiring Board and
Schematic Diagram ........................................................... 49
4-7. Printed Wiring Boards
–YM-11P Board/SW-312P Board – ................................. 50
4-8. Schematic Diagram –YM-11P Board (1/3) – .................. 53
4-9. Schematic Diagram
–YM-11P Board (2/3)/SW-312P Board – ........................ 57
4-10. Schematic Diagram – YM-11P Board (3/3) – .................. 61
4-11. Schematic Diagram – SA-52P Board – ............................ 64
4-12. Printed Wiring Board – SA-52P Board – ........................ 67
4-13. Printed Wiring Board – RG-46P Board –........................ 69
4-14. Schematic Diagram – RG-46P Board –........................... 71
5. EXPLODED VIEWS.................................................. 83
6. ELECTRICAL PARTS LIST ................................. 86
Notes on chip component replacement
• Never reuse a disconnected chip component.
• Notice that the minus side of a tantalum capacitor may be dam-
aged by heat.
Flexible Circuit Board Repairing
• Keep the temperature of the soldering iron around 270 ˚C during
repairing.
• Do not touch the soldering iron on the same conductor of the
circuit board (within 3 times).
• Be careful not to apply force on the conductor when soldering or
unsoldering.
SAFETY-RELATED COMPONENT WARNING!!
COMPONENTS IDENTIFIED BY MARK !OR DOTTED
LINE WITH MARK !ON THE SCHEMATIC DIAGRAMS
AND IN THE PARTS LIST ARE CRITICAL TO SAFE
OPERATION. REPLACE THESE COMPONENTS WITH
SONY PARTS WHOSE PART NUMBERS APPEAR AS
SHOWN IN THIS MANUAL OR IN SUPPLEMENTS PUB-
LISHED BY SONY.

– 3 –
SECTION 1
GENERAL This section is extracted from
instruction manual.

– 4 –

– 5 –

– 6 –

– 7 –

– 8 –

– 9 –

– 10 –

– 11 –

– 12 –

– 13 –

– 14 –

– 15 –
OPTICS OVERALL SECTION
RG-46 BOARD
Note: Follow the disassembly procedure in the numerical order given.
SECTION 2
DISASSEMBLY
1
screw
(M1.4
×
3.0)
1
three screws
(M1.4
×
3.0)
2
FP30 flexible board
(CN405)
3
optics overall section
4
1
front panel
6
RG-46 board
5
flexible board
(CN402)
2
connector
(CN401)
3
screw (M1.7)
5
flexible board (CN403)
5
FP-29 flexible board
(CN406)

– 16 –
BACK LIGHT UNIT
OPTICS BLOCK ASS’Y
1
connector
2
screw (M1.7)
3
back light unit
4
connection (MR) cor
d
1
screw
(M1.7
×
4)
2
washer
3
optics black ass’
y
4
boss
4
boss
6
torsion spring
5
shutter

– 17 –
SECTION 3
ELECTRICAL ADJUSTMENTS
Precautions on adjustment:
1. Perform the adjustment in the given order.
2. Power supply voltage: DC 9.0 V
3. Equipment required
Electrical adjustment requires the following measuring equip-
ment.
(1) Oscilloscope: 2 phenomena, band 30 MHz or more, with de-
lay mode (use 10 : 1 probe unless otherwise specified)
(2) Pattern generator
(3) Digital voltmeter
(4) Frequency counter
(5) Connector for adjustment
4. Measurement points for adjustment are located at CN102 on
theYM-11P board for VIDEO block, and at CN404 on the RG-
46P board for LCD block. The pin No. and signal name of
CN102 and CN404 are listed below.
• YM-11P Board, CN102
• RG-46P Board, CN404
5. Setting Method of External Video Input Mode
Turn the POWER switch on, and operate the SEL/PUSH EXEC
jog dial, so that the EXT. VIDEO IN mode becomes active.
(Refer to item 9 on page 22)
Preparation:
Connect all electrical blocks as shown below.
Pin No. Signal Name
1 T.GND
2 FREE RUN ON
3 LANC SIG
4VIN
5 CHK BL+B
Pin No. Signal Name
6 HAFC
7 POWER SW
8Y
9 VCLVL
10 SC OUT
Pin No. Signal Name
1 GND
2 EAC OFF
3 HP L
4 G OUT
5 HP R
Pin No. Signal Name
6BOUT
7 HP RET
8ROUT
9 PCO
10 N.C
6. Setting up Input Signals
In adjusting this set, video signals obtained from the pattern
generator are used, and therefore these video output signals must
satisfy the specification. Connect the oscilloscope to the VIDEO
IN terminal, and confirm that the sync signal amplitude of video
signals is approximately 0.3 V, the amplitude of video part is
approximately 0.7 V, burst signal amplitude is approximately
0.3 V and flat, and the level ratio of burst signal to “red” signal
is 0.30 : 0.66.
Where “chroma signal, and color bar signal with burst signal
turned off” is specified in the text, enter chroma signal and color
bar signal of which burst signal is turned off to the VIDEO IN
terminal as video input signals for adjustment.
S702
VIDEO
SG
AUDIO
SG
DC 9.0 V
S703
SA-52P
FFC
CN903 CN401 CN405
CN404
RG-46P
LCDLCD
FP-29
CN902
CN102
CN301
S701
SW-312P
YM-11P
J101
J301
CN406
IF BOX Upper Cabinet
Back Light Unit
Headphone L,R load 16
Ω
×
2
suitable
Fig. 3-1. Pattern generator's color bar signals
White (100%)
approx.
0.3 V
approx.
0.7 V
approx.
0.3 V
• When color bar signals are entered
Red Burst signal (flat)
Horizontal sync signal
• Chroma signal and color bar signal (Y signal) when burst
signal is turned off
No burst signal
Horizontal sync signal
approx.
0.7 V
approx.
0.3 V
White (100%)

– 18 –
POWER SUPPLY BLOCK
[Power supply voltage check] (YM-11P board)
1. Turn the POWER switch on, and confirm that the POWER LED
(green) lights up.
2. Confirm that the voltage at each check land (CL) on the YM-
11P board satisfies the specification value in Table below. As
the ground, use J101 pin 1GND.
Input No signal input
Measuring equipment Digital voltmeter
V 5.0 V check
Measurement point CL305
Specification value 4.85 ± 0.10 V
D 5.0 V check
Measurement point CL307
Specification value 4.95 ± 0.10 V
13.5 V check
Measurement point CL306
Specification value 13.50 ± 0.20 V
AU 2.0 V check
Measurement point CL308
Specification value 1.85 ± 0.10 V
BL 7.0 V check
Measurement point CL310
Specification value 7.00 ± 1.00 V
3. Press the battery detection switch (S705) on the SW-312P board.
(Switch with fixed pawl at the lower right of battery)
Or, short CN903 pin 1and pin 2on the YM-11P board.
(CHARGE mode becomes active.) At this time, confirm that
the CHARGE LED (orange) lights up.
4. Under this condition, confirm that the voltage of CN301 pin 1
on theYM-11P board is 8.4 ± 0.1V.
5. After checking, remove a jumper wire used for short in step 3.
Check Parts:
CN702
S705
[SW-312P board]
(Component side)
CN301
CN903
5
1
12
[YM-11P board]
(Component Side)
J101
CL308
CL307
CL310
CL306
L310
Q391
Q392
LND305
L307
CN301
[YM-11P board] (Component Side)
CL305
L601
Q261
Q254
FL252

– 19 –
[Preparation for Preset Data Writing, Battery Down
Adjustment, and ChargeThreshold Level Adjustment]
1“Preset Data Writing”, “Battery Down Adjustment”, “Charge
Threshold Level Adjustment” and all adjustments of “Video
Block” must be performed, if IC901 (EEPROM) on the YM-
11P was replaced.
2“Battery Down Adjustment” and “Charge Threshold Level Ad-
justment” must be performed, if IC902 (5 V REG.) or IC903
(microprocessor) on theYM-11P was replaced.
3All adjustments of “Video Block” must be performed, if IC101
(OSD), IC103 (Y/C separation), IC201 (Y/R-Y/B-Y decoder)
on the YM-11P board, or IC401 (LCD driver) on the RG-46P
board, or LCD (optical block) was replaced.
1. Service Jigs
(1) Adjusting remote commander (RM-95-modified)
Note 1: J-6082-053-B
(2) Extension cable (for remote commander plug converter)
J-6082-291-A
Note 1: The page will not be changed over, unless the microprocessor in
the adjusting remote commander is a new one (UPD7503-G-C56-
12). In such a case, replace with new microprocessor (8-759-148-
35).
2. Adjusting Remote Commander
For the adjustment, the adjustment data saved in the nonvolatile
memory (EEPROM) must be rewritten, and for this purpose the
adjusting remote commander is used.
The adjusting remote commander makes two-way communica-
tion with the product using a remote control signal line (LANC).
The adjusting remote commander transmits pages, addresses,
and data up/down commands to the product.The product trans-
mits pages, addresses, and data to the adjusting remote com-
mander.
3. How to Use Adjusting Remote Commander
(1) Connect the adjusting remote commander to the CN902 onYM-
11P board via extension cable (J-6082-291-A).
At this time, set the switch of extension cable to OFF
(OPEN) position.
Turn ON the power on the set.
(2) Set the HOLD switch on the adjusting remote commander to
the HOLD (SERVICE) position.
If connection is normal, the LCD display on the adjusting re-
mote commander will be as shown in Fig.3-2.
Fig. 3-2
()
Page Data Address
HOLD START/
STOP
WIDE
ZOOM
TELE
REC
REVIEW FOCUS
POWER
AUTO/MAN
EDIT SEARCH
COUNTER
RESET DISPLAY FRAME SLOW
REC PAUSE
REW FF
RM-95
STOP
PB
Adjusting Remote Commander RM-95 (J-6082-053-B)
Address
change
NORMAL/SERVICE
mode selection
Page change
Data change
Data writing
Fig. 3-3

– 20 –
(3) Operate the adjusting remote commander as follows:
• Page change
Press the EDIT SEARCH + button to increase the page.
Press the EDIT SEARCH – button to decrease the page.
There are 16 pages from 0 to F.
• Address change
Press the FF ()) button to increase the address.
Press the REW (0) button to decrease the address.
There are 256 addresses from 00 to FF.
• Data change (data setting)
Press the PLAY (() button to increase the data.
Press the STOP (p) button to decrease the data.
There are 256 data from 00 to FF.
• Adjustment data writing
The PAUSE button must be pressed to write adjustment data
(D page) to the nonvolatile memory (EEPROM). (Unless
the PAUSE is pressed, new data are not saved in the non-
volatile memory.)
(4) Select page: 1, address: 00, and set 01 data. Thus, the data
input to page: D, address: 00 – 1A is enabled.
(5) After the adjustment finished, select page: 1, address: 00, and
set 00 data. Thus, the data change on page D is disabled.
(6) After all adjustments finished, turn OFF the main power sup-
ply (9.0 V) once.
4. Precaution on Use of Adjusting Remote Commander
Misoperation of the adjusting remote commander could erase
correct data. To prevent this, it is recommended to make a note
of data from address 00 to 4B on page D before adjust-ment,
and also to make a note of new adjustment data each time the
adjustment of one item is finished.
Hexadecimal numbers
LCD display
Decimal conversion
0123456789ABCDEF
10 23 456789 A b c d E F
10 2 3 4 5 6 7 8 9 10 11 12 13 14 15
Table of contents
Other Sony 3D Glasses manuals

Sony
Sony TDG-BR100 User manual

Sony
Sony TDGBT500A User manual

Sony
Sony TDG-500P User manual

Sony
Sony BKM-30GM User manual

Sony
Sony TDG-BR250 User manual

Sony
Sony BKM-31GM User manual

Sony
Sony HMZ-T1 User guide

Sony
Sony STW-C140GI User manual

Sony
Sony HMZ-T1 Use and maintenance manual

Sony
Sony HMZ-T1 User manual

Sony
Sony TDG-500P User manual

Sony
Sony TDG-BR100 User manual

Sony
Sony TDG-BR250 User manual

Sony
Sony TDG-BR250 User manual

Sony
Sony HMZ-T1 User manual

Sony
Sony TDG-BR750 User manual

Sony
Sony HMZ-T2 User manual

Sony
Sony TDG-PJ1 User manual

Sony
Sony HMZ-T1 Quick start guide

Sony
Sony SmartEyeglass SED-E1 Service manual