Sony MSZ-2100G User manual

© 2019 Sony Corporation
Smart Agriculture Solution
Operation Guide
MSZ-2100G MULTISPECTRAL SENSING UNIT
FFA-PCW Fast Field Analyzer
D-829-100-12 (1)
GB

002
Table of Contents
Read This First
Read This First ....................................................................3
Chapter 1 Overview
What is Smart Agriculture Solution?.................................4
Basic Configuration............................................................ 6
Items Necessary for Smart Agriculture Solution...............7
Operating Process (Workflow)..........................................8
Recommended Flight Conditions...................................... 9
Chapter 2 Installing the Software (for the first time)
Installing Software on a Computer .................................10
Downloading an App.......................................................11
Chapter 3 Preparation
Configuring the Drone .....................................................12
Creating a Flight Plan.......................................................14
Preparing MSZ-2100G.....................................................17
Sample Flight Plan Setting .............................................18
Chapter 4 Shooting
Before Shooting ...............................................................19
Shooting...........................................................................21
Checking Flight Success...................................................25
Checking Crop Health ......................................................28
Generating Reports..........................................................32
Displaying Mobile Device Data........................................33
Chapter 5 Appendix
Updating the firmware....................................................34
Troubleshooting...............................................................35
Maintenance and Usage Precautions..............................37
Glossary............................................................................39 Trademarks
Microsoft, Windows, and Excel are registered
trademarks of the Microsoft Corporation in the
United States and/or other countries.
iPad is the registered trademark of Apple Inc. in
the United States and other countries.
TM and ©2018 Apple Inc. All rights reserved.
Intel and Intel Core are the trademarks of
the Intel Corporation in the U.S.A. and other
countries.
“Google”, the “Google logo”, “Google Maps”,
“Android”, and “Google Earth” are the
trademarks or registered trademarks of Google
LLC.
OpenStreetMap and the magnifying glass
logo are the registered trademarks of the
OpenStreetMap Foundation.
DJI and DJI GO are trademarks of DJI.
SD and microSD are trademarks of SD-3C, LLC.
AIRDATA UAV is the trademark of Airdata UAV,
Inc.
All other system names and product names are
registered trademarks or trademarks of their
respective owners. Further, the ® or ™ symbols are
not used in this document.

003Read This First
Read This First
Information on this manual
This operation guidebook assumes that the
product is mounted on a DJI drone.
Copyrights
In some cases, the approval of the copyright
holder may be required for images recorded using
this product. To protect copyright, observe the
following points carefully when using the product.
Carefully observe laws relating to copyright.
The distribution of images for which the
copyright is held by a third party, or otherwise
permitting private or public access without the
permission of the copyright holder is prohibited
by law.
Images recorded on this product
This product is intended to check the vegetation
conditions of agricultural fields. Do not use images
recorded on this product for any other purposes.
NDVI information
The NDVI is calculated with Sony original
processing methods. Values may change
depending on shooting conditions.
Product information
This product is not dust or splash resistant.
Drone use
Make sure to check the relevant laws that apply to
your area.
Follow the drone manual for information on drone
operation and precautions. When attaching the
product (MULTISPECTRAL CAMERA (hereafter
referred to as “camera”) and GNSS SENSOR UNIT
(hereafter referred to as the “sensor unit”) to a
drone, system integrator and user intentions are
outside the realm of Sony responsibility, and Sony
accepts no responsibility whatsoever if the drone
that the product is attached to crashes.
Points to check before use
Perform a test recording, and verify that it was
recorded successfully.
Images used in this manual
The images used in this manual are created to aid
in explaining operations. The actual images that
are displayed during operations may differ.
Data backup
Back up data frequently to prevent data loss. Sony
will not be liable for loss of data resulting from
circumstances of any kind.

004Chapter 1 Overview
What is Smart Agriculture Solution?
Smart Agriculture Solution is a solution that helps identify abnormal areas and lets you check vegetation using the Fast Field Analyzer dedicated software to quickly analyze flight data
recorded on the MSZ-2100G MULTISPECTRAL SENSING UNIT (camera, sensor unit) mounted on a drone.
Mobile device
Computer with Fast Field Analyzer
Flight path
Field flight images are quickly
stitched to be used to check
problem areas and analyze
vegetation status.
Point Of Interest (hereafter referred to
as “POI”) and Region of Interest
(hereafter referred to as “ROI”) can be
viewed in the viewer app.
Growth problem
here
GPS satellite/GLONASS satellite
(see Glossary)
Drone with MSZ-2100G
The camera simultaneously photographs
in the RED range (red wavelength
range)/NIR range (near infrared range),
and RGB range (visible light range).
A GNSS (see Glossary) signal is
acquired and position, altitude,
and attitude information is
added to recorded images.
Overlapped images are
efficiently captured.

Chapter 1 Overview : What is Smart Agriculture Solution?
005
Fast stitching
You can record images that efficiently overlap
the drone’s flight route on each side. Because the
process can be completed by capturing a minimal
number of images, the processing time for image
stitching is significantly reduced. After the flight is
complete, you can check whether or not the flight
and shooting was successful on the spot, and check
the status of vegetation.
Efficiently overlapped and photographed
Centralized management of multiple
farms
Using the Fast Field Analyzer specialized software,
you can define “Farms” (see Glossary) and define
multiple areas in the farm that you wish to stitch
together as “Fields” (see Glossary) for managing
vegetation analytics. Images recorded according
to the drone flight plan are stitched within the
scope of the field definition and displayed. You can
register multiple farms in Fast Field Analyzer.
Field
Farm
Flight plan
Generating stitched images
You can quickly generate stitched images from flight data recorded with the camera to check vegetation
status. You can set POI or ROI at spots or areas in your concern. It is also possible to show NDVI and RGB
images in side-by-side view.
NDVI color map
You can adjust the NDVI (see Glossary) stitched image
color to make it easier to understand vegetation status.
Stitched image
Flight data recorded by the drone-
mounted camera is stitched and displayed.
POI, ROI
You can specify spots and areas of concern in stitched images.
NDVI image RGB image
Viewing original images recorded by
the camera
You can zoom in and display the original images
used for stitched images to view details of
vegetation status in areas of concern.
Compare past stitched data
In Fast Field Analyzer, you can compare past
stitched images and analytics results to view
trends in vegetation status. You can also compare
the surface area of abnormal zones.
Convert to data for creating
orthoimages
If you want to use flight data with third party
image processing software, you can convert it to
data for creating orthoimages (see Glossary).

Chapter 1 Overview
006
Basic Configuration
Smart Agriculture Solution is used on the following hardware and software.
For details on devices and software, see “Items Necessary for Smart Agriculture Solution” (page 7).
Sensor unit1)
Mobile
battery
microSD card
Camera1)
Drone
Drone controller Computer
GeoJSON (see Glossary)/
GPX/KML Viewer
Transfer via email attachment, etc.
iPad
Mobile
device
Flight plan creation app Fast Field Analyzer2)
Manuals
The manuals for this product consist of the following three documents.
Operating Instructions (separate manual)
Includes information on handling the product, precautions, and
specifications. Make sure to read this first.
Operation Guide (this document)
Includes information on how to operate the product, software installation,
troubleshooting, and general operations.
Fast Field Analyzer User’s Guide (PDF)
This guide contains information on how to use the Fast Field Analyzer.
1) MULTISPECTRAL SENSING UNIT MSZ-2100G (camera, sensor unit)
2) MULTISPECTRAL SENSING UNIT MSZ-2100G software

Chapter 1 Overview
007
Items Necessary for Smart Agriculture Solution
The following hardware and software are required
to run Smart Agriculture Solution.
Hardware
Shooting
MSZ-2100G MULTISPECTRAL SENSING UNIT
– Camera
– Sensor unit
– Connecting cable
The MSZ-2100G is mounted to the drone using
a dedicated bracket.
Drone set
– Drone body
– Propellers
– Controller
– Battery
– Battery charger
Landing pad
Mobile battery (for powering the camera)
Mobile battery cable (for connecting the camera
and mobile battery)
Controller cable (for connecting the iPad and
drone controller)
microSD card
– Use an SDHC, Class 10 card (Maximum 32GB)
– Use the card with sufficient free space (32GB
recommended) after formatting it to FAT 32
SD card adapter (for reading and writing to the
microSD card on a computer)
Creating a flight plan and running missions
(seeGlossary)
iPad
Follow the app for supported OS and models.
Analyzing and viewing flight data
Computer (for Fast Field Analyzer)
Mobile device (smartphone, tablet PC, etc.)
Software
Dedicated software
Fast Field Analyzer
Apps required for creating flight plans
DJI GO4 (Only when used with a DJI brand
drone)
Map Pilot for DJI - Business (recommended)
Apps required for viewing POI/ROI information
(recommended)
POI and ROI can be output in the following
formats.
GeoJSON
GPX
KML
Make sure to use the apps provided by each
manufacturer according to the format.
App required for checking flight logs
Airdata HD Sync (Airdata UAV)

Chapter 1 Overview
008
Operating Process (Workflow)
Preparing to use the system
for the first time
Installing the software
Computer
Fast Field Analyzer (dedicated software)
iPad
DJI GO4
Map Pilot for DJI - Business (recommended app
for creating flight plans)
Mobile device
GeoJSON/ GPX/KML viewer app
See “Chapter 2 Installing the Software (for the first time)”
(page 10).
Configuring Fast Field Analyzer
Define farms and configure fields (areas
photographed by the camera).
Farms (multiple farms can be registered)
Fields (displays flight data)
If there is an instruction from the integrator, go to
the application menu [Edit] - [Preferences] and set
[Camera Pitch Offset].
Refer to the Fast Field Analyzer User’s Guide (PDF).
Creating a flight plan
1 Set a flight path for efficiently photographing
the agricultural field using a flight plan
creation app, then create a flight plan
(mission).
2 Confirm that the mission you created has been
added to the list.
See “Creating a Flight Plan” (page 14).
Shooting
1 Check the weather and connect the required
equipment.
See “Before Shooting” (page 19).
2 Execute the mission and shoot.
See “Shooting” (page 21).
3 Confirm that the flight and shooting have
been successful, then generate a stitched
image.
See “Checking Flight Success” (page 25), and “Generating
stitched images” (page 26).
Checking crop health
conditions
1 Adjust the display for viewing clearly, then
check for uneven growth, stress or any other
abnormal areas.
See “Checking Crop Health” (page 28).
2 Set POI and ROI in spots and areas of concern.
POI ROI
See “Setting POI/ROI” (page 30).
3 Export POI and ROI information to generate a
report or view it on a mobile device.
See “Generating Reports” (page 32), and “Displaying
Mobile Device Data” (page 33).

Chapter 1 Overview
009
Recommended Flight Conditions
The appropriate time to execute a flight differs
depending on the area and season. Execute flights
during times and weather conditions that fulfill the
following requirements.
Time of day
Execute a flight during a time of day when the
sunlight angle of incidence is 30° or higher in
relation to the sensor unit.
Light sensor
(White upper section)
Sunlight incident angle
of 30° or more
Cross-section view of sensor unit
Weather
Execute a flight during clear, slightly cloudy,
and cloudy weather conditions when the
illumination is at 15,000 lux or higher.
Clear weather
Slightly cloudy
Cloudy
Sundown
100 lux
15,000 lux
30,000 lux
100,000 lux
Available
range of
use
No
Make sure to execute flights in environments
that do not have a mix of clear and cloudy
weather conditions in the same flight area.
If these conditions are mixed, later image
processing may not be applied correctly.
Flights are not possible in rainy weather.
Wind speed
Wind speed in the air: within 7m/s
Shooting objects
Avoid photographing the following. Later
image processing may not be applied correctly
otherwise.
Multiple mixed vegetation types
White objects (flowers, soil, etc.)

010 Chapter 2 Installing the Software (for the first time)
Installing Software on a Computer
Download Fast Field Analyzer from the Sony
Professional web site, purchase a license, then
install it on a computer to check and analyze flight
data.
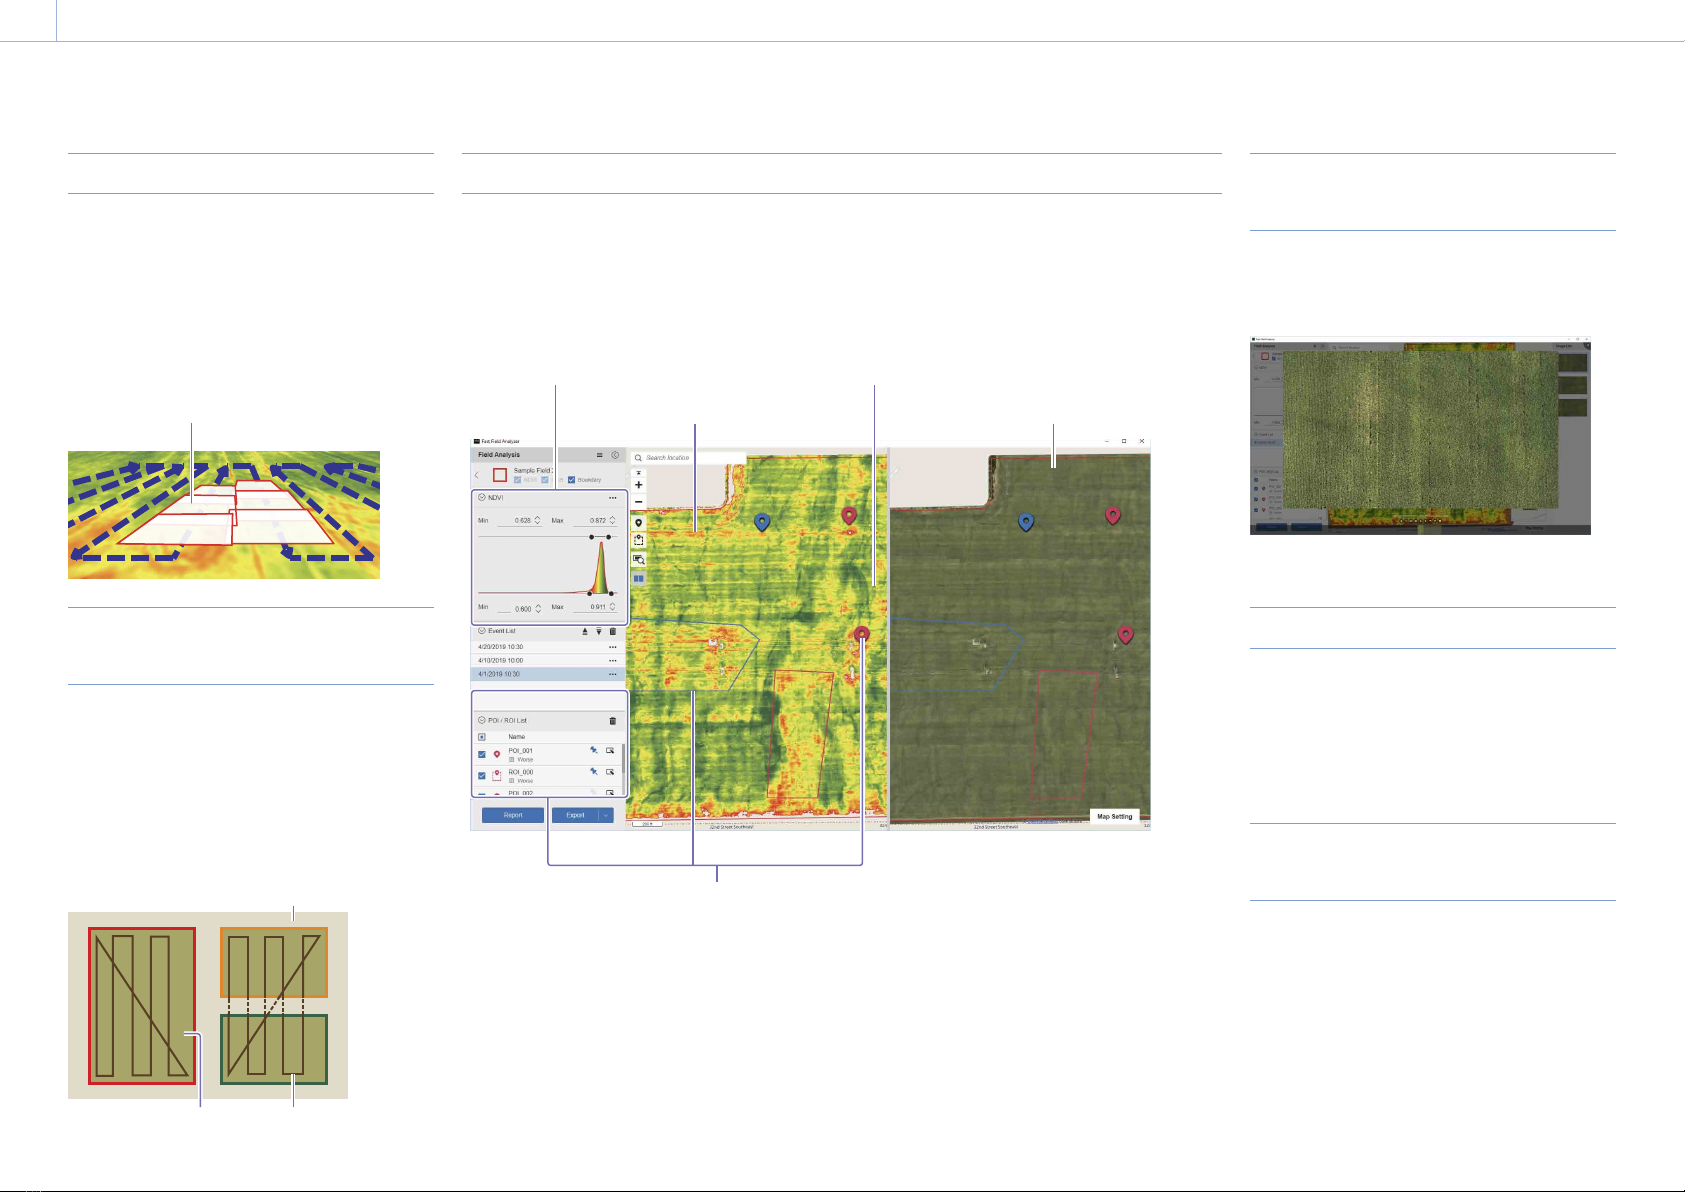
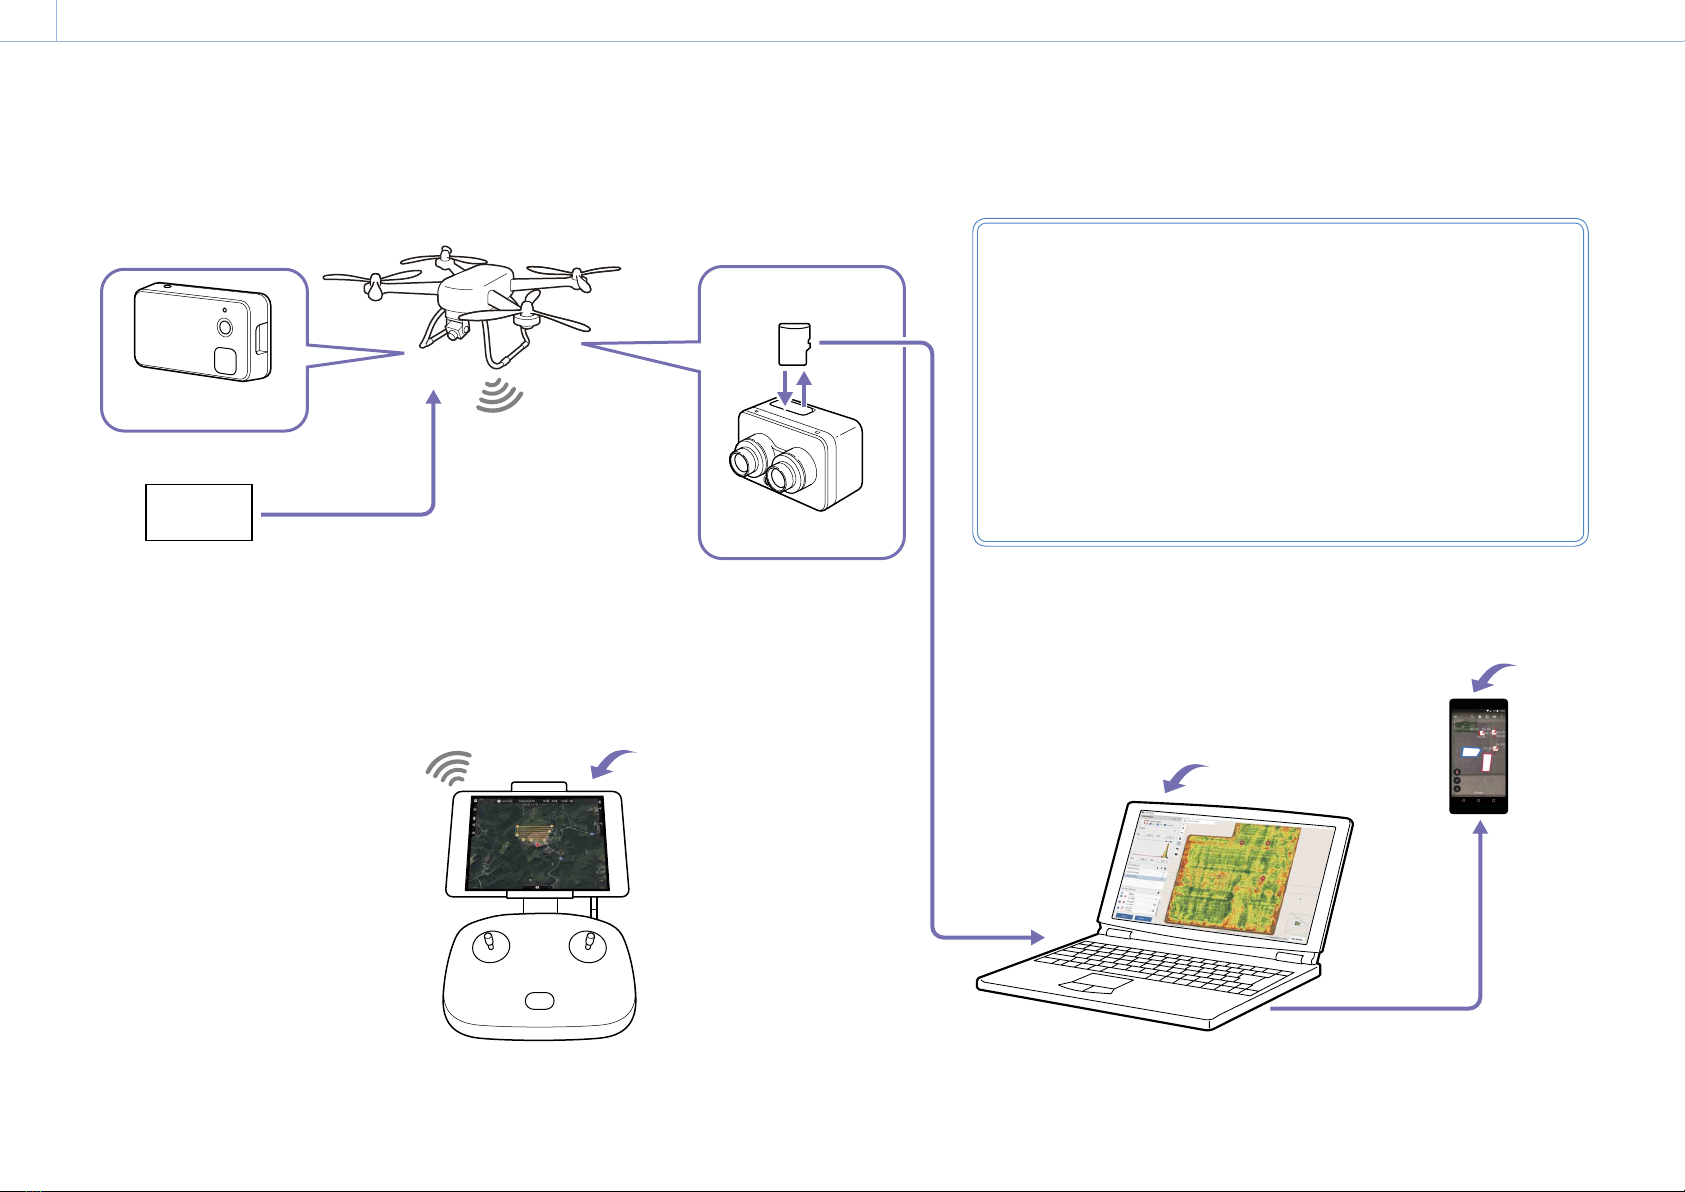
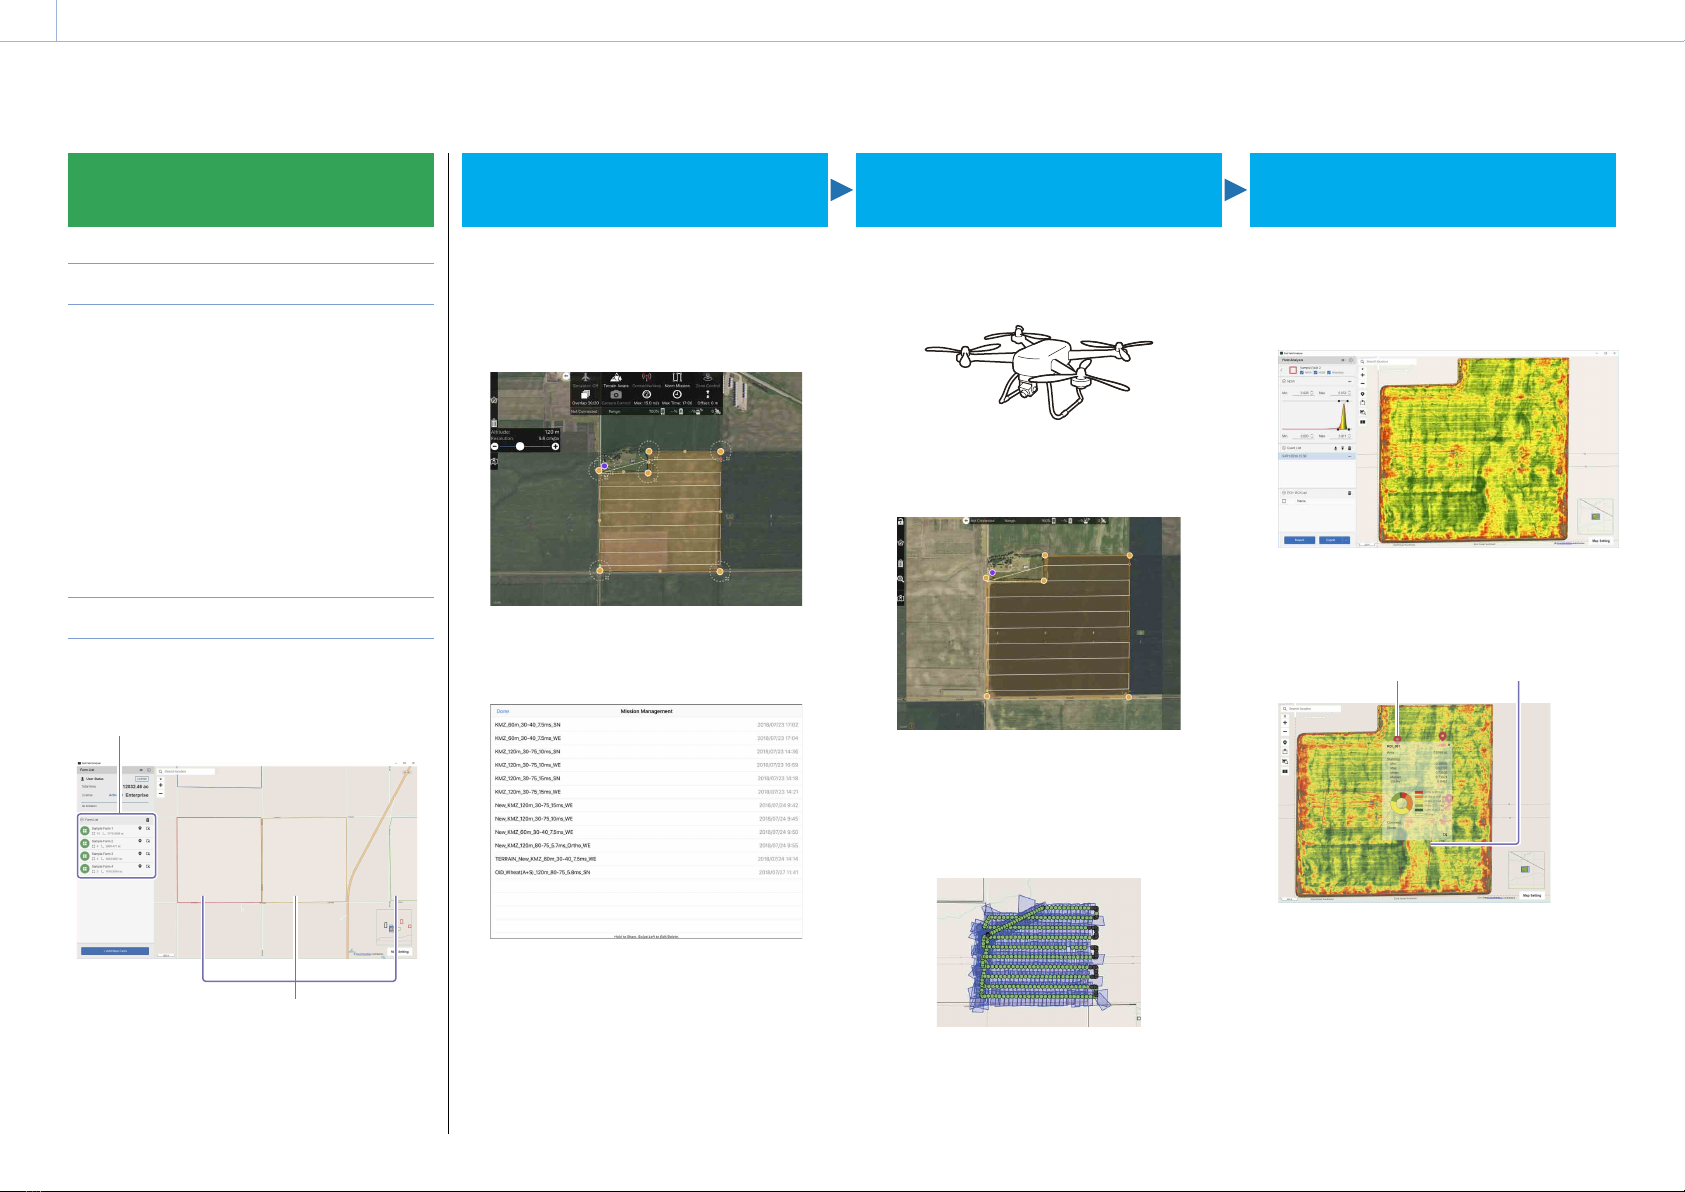
Fast Field Analyzer is software that generates
stitched images from flight data of agricultural
fields recorded on the drone-mounted camera
for analyzing vegetation status and identifying
problem areas.
For instructions on how to use Fast Field Analyzer, refer to the
Fast Field Analyzer User’s Guide (PDF).
[Notes]
You can also purchase a license after setting fields in Fast
Field Analyzer and checking the total farm size.
Recommended computer
Operating system: Windows 10 Pro 64bit (English
version)
Antivirus software: Windows Defender (Included as
standard on Windows 10)
CPU: Intel Core i7 quad core or higher
Memory: 16GB or more
Storage: 512GB SSD or higher
Display: Full HD (1920 x 1080) or higher
Downloading Fast Field Analyzer
1 Access the Sony Professional web site from the
following URL.
https://pro.sony/products/aerial-cameras-
software/ffa-pcw
2 Access [Resources and downloads] on the
above page and download Fast Field Analyzer.
Purchasing a license
1 Access the Sony Professional web site from the
following URL.
https://pro.sony/products/aerial-cameras-
software/ffa-pcw
2 Select [Buy now] on the page to be navigated
to the Fast Field Analyzer page in the Sony
Creative Software web site.
3 If you do not have an account of Sony Creative
Software web site, click [Register] on the top
right of the screen and follow the on-screen
instructions to create an account.
If you have an account, log in.
4 Select a license, and follow the on-screen
instructions to purchase the license.
[Notes]
The license must be activated after launching Fast Field
Analyzer.
For information on how to activate the license, see the Fast
Field Analyzer User’s Guide (PDF).
Installing Fast Field Analyzer
1 Double click “fastfieldanalyzer_setup_XXX.exe”
(“XXX” is the version number).
The installer is launched.
2 Follow the on-screen instructions to complete
the installation.
Once Fast Field Analyzer is installed, a shortcut
is created on the desktop.
The following folder is created for storing flight
data and logs.
C:/Computer/Documents/Fast Field Analyzer
How to uninstall Fast Field Analyzer
1 Click “Start”, [All apps] > [Control Panel] >
[Programs] > [Uninstall a program].
2 Right click “Fast Field Analyzer” and select
[Uninstall].
3 Follow the on-screen instructions to uninstall.
4 If you want to delete the flight data and logs,
delete the storage folder specified in Fast Field
Analyzer.

Chapter 2 Installing the Software (for the first time)
011
Downloading an App
Download an app required for creating flight plans
and viewing POI/ROI information.
This section explains how to download the
recommended app.
Downloading the app for creating
flight plans
Download the following app from the App Store
on an iPad.
DJI GO4
This is an app required for DJI brand drone
configuration, flight, and drone firmware
updates.
Map Pilot for DJI - Business (recommended)
This is an app for creating flight plans and
executing missions.
Downloading a viewer app
Download the required app for viewing POI/ROI
information on a mobile device.
Setup flight log recording
Create an AIRDATA UAV account for viewing flight
logs.
AIRDATA UAV is a service that automatically
uploads drone flight logs for detailed analysis.
To use the service, you must register at AIRDATA
UAV and create an account. See the following URL
for further details.
https://airdata.com/
1 Access the following URL, register at AIRDATA
UAV, and create an account.
[Notes]
The user token you are issued is required for setting
basic information in Map Pilot for DJI - Business, so make
sure to keep it handy.

012 Chapter 3 Preparation
Configuring the Drone
Use DJI GO4 to update the drone firmware to the
latest version and set the maximum flight altitude
and RTH (see Glossary) altitude.
Launching DJI G04
1 Attach the remote control to the iPad, then
use the controller cable to connect the remote
control to the iPad.
2 Attach the battery to the drone and turn the
drone on.
3 Turn the remote control power on.
4 Launch DJI G04 on the iPad.
If the drone, remote control, and iPad are
connected correctly, the setting status list
currently specified on the drone appears as a
pop-up.
5 Check the current status and close the pop-up
window.
6 Tap [...] on the top right of the screen.
A window for configuring settings appears.
Select the item you want to configure in the
menu bar on the left side of the menu
window.
Menu bar
For details on items and how to congure settings, refer to
the manual provided by DJI.
https://store.dji.com/guides/dji-go-4-manual/
Updating the drone firmware
Update the drone firmware to the latest version.
For further details, refer to the drone manual.
Configuring the drone
Correctly set the maximum flight altitude and
return to home altitude (RTH altitude). Refer to
the bracket manual and change the obstacle
avoidance sensor settings when necessary.
[Notes]
Before each day’s flight, check to make sure the DJI GO4
settings are exactly as you want them to ensure a safe flight.
How to set the flight altitude
Select (Main Controller Settings) on the menu
bar and configure the following items.
[Return-to-Home Altitude]: Set to 120m or less.
[Set Max Flight Altitude]: 120 m
[Notes]
If an automatic flight is designed and executed at a setting
that is less than the RTH altitude, the drone will climb to the
RTH altitude and return home during RTH.

Chapter 3 Preparation : Configuring the Drone
013
How to configure the obstacle avoidance sensor
1 Select (Visual Navigation Settings) on the
menu bar and turn [Enable Visual Obstacle
Avoidance] off.
2 Tap [Advanced Settings] and turn [RTH
Obstacle Check] off.
[Caution]
With the obstacle avoidance sensor activated, the
product-mounted drone may engage in unexpected
and unstable behavior during automatic flights.
3 Close the menu window.
4 Confirm that the icon and message indicating
that the obstacle avoidance sensor has been
disabled is displayed in the main screen.

Chapter 3 Preparation
014
Creating a Flight Plan
This section describes how to create a flight
plan using the recommended Map Pilot for DJI -
Business.
For parameter settings, see “Parameter setting” (page 18).
[Notes]
The images in this section are taken from the Map Pilot
for DJI - Business 3.1.4 version. The actual images that are
displayed during operations may differ.
Precautions when creating a flight plan
The base map must be downloaded from the
network before creating a flight plan. Make sure
you are connected to the network when creating
a flight plan.
Configuring basic information
Set the camera functions and other basic
information.
1 Launch Map Pilot for DJI - Business.
The home screen appears.
2 Tap [Settings].
The “Settings” screen appears.
3 Tap [FLIGHT CAMERA] > [Model].
The “Model” screen appears.
4 Select [Sony MSZ-2100G] and tap [Settings].
The “Settings” screen reappears.
5 Select the following application settings.
[Metric]: On
[Movable Home Point]: Off
[Point Down to Aid Landing]: On
[Show Image Footprint]: On
[Show Nearby Cached Missions]: Off
[Show Aircraft According to Light
Conditions]: Off
6 Enter the AIRDATA UAV user token in [FLIGHT
LOG STORAGE] > [Airdata User Token].
This is required for viewing the flight record in
AIRDATA UAV.
For details on AIRDATA UAV, see “Setup ight log recording”
(page 11).
7 When all settings are complete, tap [Done] on
the upper right of the screen.
Creating a new mission
Set a flight path for efficiently photographing the
agricultural field and create a mission.
1 In the Map Pilot for DJI - Business home screen,
tap [Create New Mission].
The mission creation screen appears.
2 Set waypoints (see Glossary) for the agricultural
field you want to photograph.
Set them slightly larger than the actual
agricultural field so that shooting is accurate.
3 Set a preliminary home point.
If you set a home point (purple), the flight path
is automatically created.
[Notes]
The preliminary home point is used to create the
mission, and does not need to be an accurate position.
The actual home point is reset using the location
received by GNSS when the flight is started.
4 Adjust the flight path as necessary.
Adjust the flight path direction according to
the shape and ridge direction of the
agricultural field.

Chapter 3 Preparation : Creating a Flight Plan
015
5 Set the recording altitude (flight altitude).
Raising and lowering the recording altitude
changes the resolution value. Adjust the
recording altitude to achieve the necessary
resolution.
For other recommended values, see “Sample Flight Plan
Setting” (page 18).
6 Set the overlap rate (recorded image overlap).
Recommended value (front/side)
For fast stitching: 30%/30%
For orthoimage: 80%/75%
For other recommended values, see “Sample Flight Plan
Setting” (page 18).
7 Check the flight speed and lower it according
to the recording altitude.
For other recommended values, see “Sample Flight Plan
Setting” (page 18).
8 Check the flight area, estimated flight time,
and required number of batteries for the
drone.
9 Save the mission.
10Tap on the top of the screen to end mission
creation and return to the home screen.
11Tap [Saved Missions].
The “Mission Management” screen appears.
12Confirm that the mission you created has been
added.
[Notes]
The mission name includes GNSS positioning
information, area size, and the number of drone
batteries.
13Change the mission name to something that is
easy to remember.
[Notes]
Once the mission is saved, details cannot be changed.
If you would like to change the details, create a new
mission using the instructions in “Using an existing
mission to create another” (page 16).
How to send a mission to another device
Touch and hold the mission name and tap the
desired mission in the control panel that appears.
How to load a mission
You can load save mission files in Map Pilot for DJI
- Business.
1 Open the drive where the file you want to load
is saved.
2 Load a mission.

Chapter 3 Preparation : Creating a Flight Plan
016
Using an existing mission to create
another
You can use an existing mission to create a new
one.
1 In the Map Pilot for DJI - Business home screen,
tap [Saved Missions].
The “Mission Management” screen appears.
2 Select the mission you want to use.
3 Unprotect the mission and edit it.
For further instructions, see “Creating a new mission”
(page 14).
4 When you finish editing, save the mission.
5 Tap on the top of the screen to end mission
creation.
[Notes]
The mission name includes GNSS positioning
information, area size, and the number of drone
batteries.
6 Change the mission name to something that is
easy to remember.

Chapter 3 Preparation
017
Preparing MSZ-2100G
Prepare the microSD card used for shooting and
charge the mobile battery.
Preparing the microSD card
Memory cards that can be used with this product
microSD cards (SDHC, Class 10)
[Caution]
Only use a card with sufficient capacity (32GB are
recommended) after it has been formatted using FAT 32.
Operation is not guaranteed on all memory cards that
fulfill the above requirements.
If a microSD card containing flight data is inserted on a
device that does not support this type of card, the format
screen may appear, but you do not format the card. Doing
so will erase all data.
Periodically reformat the microSD card in order to
defragment it (about every 10 missions).
microSD card folder configuration
The file/folder configuration on the microSD card
is as follows.
Sony [20190301100000]
[20190307103000]
[20190314102000]
[20190321110000]
cong.csv
Flight data folder
Recorded flight data is saved here.
An initialized folder name is attached based on
the GNSS time.
Folder name: YYYYMMDDhhmmss
Configuration file
This is a CSV file that records camera settings.
The configuration file is generated
automatically when the microSD card is
inserted in the camera and the product is
turned on.
Configuration file
The following parameters are included in the
automatically generated configuration file (config.
csv).
Only “ShutterInterval” (see the following red text)
can be changed when necessary.
Parameter information
NDVIgain: 0 (dB) (must not be changed)
NDVIexposure: 500 (µs) (must not be changed)
RGBgain: 12.2 (dB) (must not be changed)
RGBexposure: 369 (µs) (must not be changed)
ShutterInterval (Can be changed)
– Default value: 3.0 (seconds) (for fast stitching)
– Adjusted by flight speed/overlap rate
– Minimum value: 2.2 (seconds) (for
orthoimage)
For other recommended values, see “Sample Flight Plan Setting”
(page 18).
Charging the mobile battery
Charge the mobile battery necessary for shooting.
Follow the instructions in the manual for the
battery and charger.
[Caution]
Only use a supported charger to charge the battery.
Make sure to charge the drone, drone controller, and iPad
batteries.

Chapter 3 Preparation
018
Sample Flight Plan Setting
Parameter setting
Camera function setting
Shutter interval: 2.2 s (minimum value)
Flight speed and overlap rate
For high-altitude flight
For fast stitching: 120m (394ft.): 30%/30%,
15m/s (33.6mph)
For orthoimage: 120m (394ft.): 80%/75%,
5.7m/s (12.8mph)
For mid-altitude flight
For fast stitching: 60m (197ft.): 30%/30%,
7.5m/s (16.8mph)
For orthoimage: 60m (197ft.): 80%/75%,
2.8m/s (6.3mph)
Shutter speed (fixed value)
RGB: 369µs (default value)
NDVI: 500µs (default value)
Sample setting
Purpose Altitude Airspeed Overlap rate
(front/side)
Low-speed photography Resolution Single flight range
(10 min.)
No. of shots
(15 min.)
RGB NDVI
Fast stitching 120m 15m/s 30% / 30% 1) 3.0s 4.9cm/pixel 11.8cm/pixel 150 ac (60.7 ha) 300
60m 7.5m/s 30% / 30% 1) 3.0s 2.5cm/pixel 5.9cm/pixel 32 ac (12.9 ha) 300
Orthoimage 120m 5.7m/s 80% / 75% 2.2s 4.9cm/pixel 11.8cm/pixel 28 ac (11.3 ha) 409
60m 2.8m/s 80% / 75% 2.2s 2.5cm/pixel 5.9cm/pixel 8 ac (3.2 ha) 409
40m 2.0m/s 80% / 75% 2.2s 1.6cm/pixel 3.9cm/pixel 1.6 ac (4 ha) 409
1) If the wind condition is not stable, increase the front and side lap.
Sample setting by purpose
Purpose Estimated settings Comments
Checking state of vegetation For fast stitching: altitude of 60 m or 120 m (according to growth stage),
NDVI/RGB image.
Set the size of the manageable area in the
VRT (see Glossary) application as follows.
Quantitative plant population survey,
distribution, replanting assessment
For fast stitching: altitude of 60m, NDVI/RGB image. Third party software is required for
statistical estimation.
Yield estimation (biomass/crops) For fast stitching: altitude of 60 m or 120 m (according to growth stage),
NDVI/RGB image.
Othoimages are also used for canopy
height calculation.
Weed and pest detection and
classification
For fast stitching: altitude of 60 m or 120 m (according to growth stage),
NDVI/RGB image.

019 Chapter 4 Shooting
Before Shooting
This section describes what to prepare on the day
you want to shoot.
Checking the microSD card
Make sure there is sufficient free space on the
microSD card (32GB recommended).
It is also recommended to format the microSD
card if the card is used more than 10 times or so,
to secure stable picture file storing.
Change “ShutterInterval” if necessary.
For details on the configuration file, see “Configuration file”
(page 17).
When conducting long flights
Check the following when conducting long flights
(approximately 40minutes).
Make sure there is sufficient free space on the
microSD card. Approximately 15GB is required
for RAW data.
Make sure auto sleep on the computer using
Fast Field Analyzer is disabled.
Make sure the computer using Fast Field
Analyzer has sufficient storage space.
Approximately 30GB is required for stitch data.
Installing the mobile battery
Insert a fully charged mobile battery.
Make sure the mobile battery is oriented correctly
and install it fully.
For information on how to insert it, refer to the bracket manual.
[Caution]
Only use the designated mobile battery. Using any other
battery could cause it to rupture.
Inserting the microSD card in the
camera
1 Put a fingernail under the microSD card cover,
and lift it in the direction indicated by the
arrow.
Put a fingernail under and lift.
[Caution]
Do not pull on the cover excessively. Doing so could
damage the cover.
2 Make sure the microSD card is oriented
correctly and press it in until you hear a click.
Insert it with the printed side up.
Printed surface
[Caution]
Forcibly inserting a microSD card in the improper
orientation may damage the microSD card or microSD
card slot.
3 Close the microSD card cover.
How to remove the microSD card
Lightly push the microSD card once and pull it out.
[Caution]
Be careful to avoid dropping the microSD card when
inserting or removing it.
Do not remove the microSD card or disconnect the cables
while the access indicator is flashing. Doing so could
corrupt the data on the microSD card.
[Notes]
When finished, close the microSD card cover.

020 Chapter 4 Shooting : Before Shooting
Connecting the camera and sensor
unit
Check the connection between the camera and
sensor unit, and follow the instructions below to
connect the two if the cable has been removed.
1 Make sure the connecting cable is oriented
correctly and connect it to the camera EXT
terminal.
DC IN 5V EXT
2 Make sure the other end of the connecting
cable is oriented correctly and connect it to
the sensor unit HOST terminal.
Make sure it is securely connected with a
clicking sound.
HOST
[Caution]
Connect the camera and mobile battery after the drone has
been powered on. Do not connect the camera and mobile
battery yet.
Preparing the drone
Attach the battery and propellers to the drone and
connect the iPad and controller.
Begin operations after you have confirmed that
the drone battery, controller, and iPad are fully
charged.
For details on how to attach these items, refer to the drone
manual.
1 Securely attach the battery to the drone.
2 Securely attach the propellers to the drone.
3 Attach the iPad to the controller and make
sure it is secured.
4 Use the controller cable to connect the iPad
and controller.
Table of contents
Other Sony Measuring Instrument manuals

Sony
Sony DCR-PC115 User manual

Sony
Sony DVCAM DSR-80 User manual

Sony
Sony Ipela NSR-S20 User manual

Sony
Sony PCM-D100 Reference guide

Sony
Sony XDCAM EX PMW-EX30 User manual

Sony
Sony MZ-NH600 User manual

Sony
Sony TC-366-4 Setup guide

Sony
Sony STR-DA30ES - Fm Stereo/fm-am Receiver User manual

Sony
Sony DNW-A100 User manual

Sony
Sony SVT-N72P User manual