stayer VVAC2075 User manual

www.grupostayer.com
ES
IT
GB
P
PL
Manual de instrucciones
Istruzioni d’uso
Operating instructions
Manual de instruções
Instrukcja obsługi
Área Empresarial Andalucía - Sector 1
C/ Sierra de Cazorla, 7
28320 - Pinto (Madrid) SPAIN
Email: sales@grupostayer.com
Email: info@grupostayer.com
VVAC2075

1
10
9
11
3
1
2
8
5
10
4
6

2

3
1
1
2
3
4

1
2
3
4

5
1
2
3

1
2
3
4
6

ENGLISH
8
8
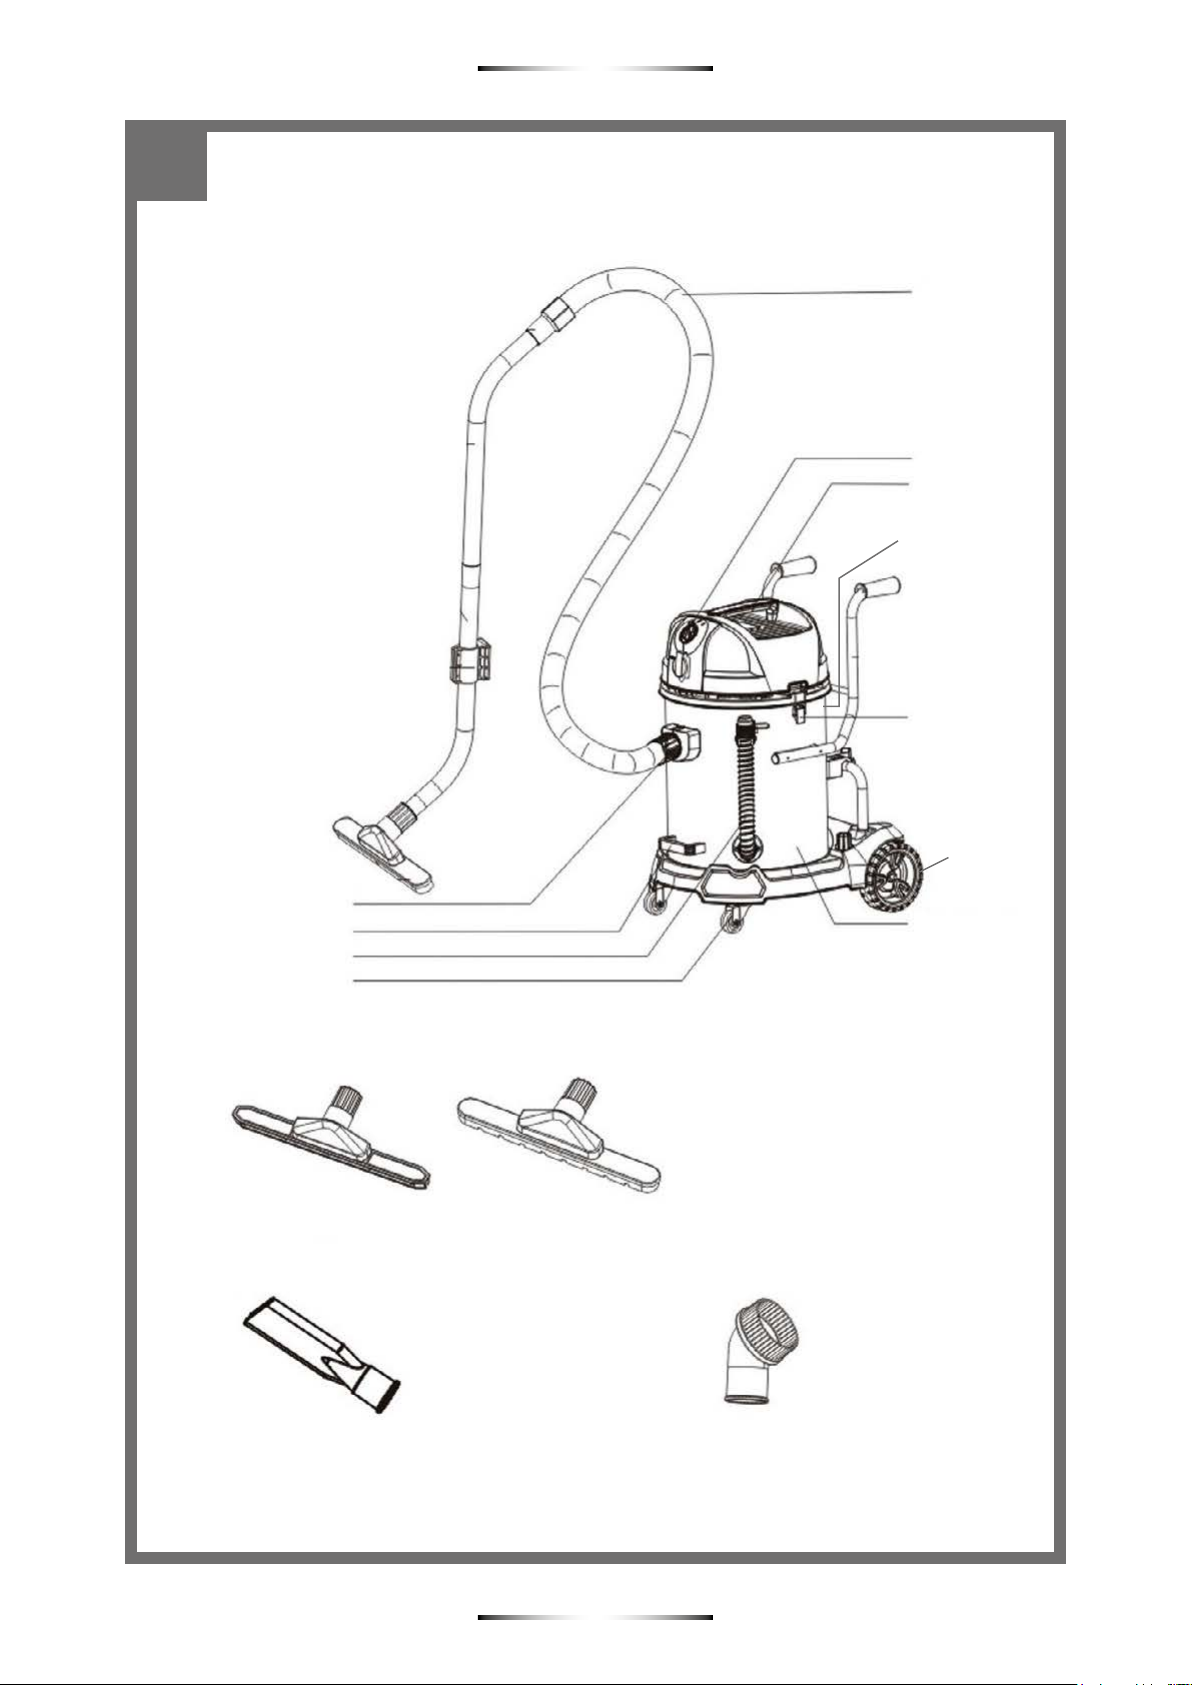
FUNCTIONAL DESCRIPTION (FIG.1)
1. Tank Cover Latch
2. Rear Wheels
3. Exhaust/Blower Port
4. Front Lower Hand Grip
5. Wheels
6. Hose Port
7. Power Cable Storage
8. Tank Cover
9. Top Handle
10. Hose- With Rubber Power Tool Connector
11. Automatic start power socket.
Power 1.200 W
Connected power tool max load 2.200 W
Total connected load (vacuum
cleaner plus connected tool) 3.400 W
Airow, max 4000 L/min (141 cu. ft./min)
Suction, max 17.5kPa
Dust Capacity 75L
Weight 20 kg
Sound pressure level Lpa 81
Acoustic power level Lwa 92
K=1.5m/s2ah m/s2< 2,5
SAFETY INSTRUCTIONS
READ ALL INSTRUCTIONS BEFORE
USING THIS DEVICE.
To reduce the risk of re, electric shock, or injury:
1.- Do not leave this device unattended when plugged in.
Unplug when not in use and before servicing.
2.- To reduce the risk of electric shock. Do not expose to
rain or immerse in water. Store indoors.
3.- Do not allow to be used as a toy. Careful attention is
necessary when used by or near children or animals.
4.- Use only as described in this manual. Use only
manufacturer recommended attachments.
5.- Do not use with a damaged power supply cord or
plug. If the device is not working properly, has been
dropped, damaged, left outdoors, or immersed in or
dropped into water, bring it to a service center.
6.- Do not pull or carry by the power supply cord, use the
power supply cord as a handle, close a door on power
cord, or pull power cord around sharp edges or comers.
Keep power cord away from heated surfaces.
7.- Do not unplug by pulling on power cord. To unplug,
grab the plug, not the cord.
8.- Do not handle plug or appliance with wet hands.
9.- Do not use the device with any opening blocked; keep
openings free of solid objects or anything that will impede
airow.
10.- Keep hair, loose clothing, ngers, and all parts of
body away from openings and moving parts.
11.- Turn o switch before unplugging.
12.- Use extra care when operating on stairs.
13.- Do not use this machine to vacuum ammable
liquids, or vacuum in areas where these may be present.
14.-Connect to a properly grounded outlet only. See
Grounding Instructions.
15.- Do not vacuum anything that is burning or smoking,
such as cigarettes, matches, or hot ashes. Do not use
this device to extract ammable or explosive dusts (such
as magnesium, aluminum, etc.). RISK OF EXPLOSION!
16.- Do not use to vacuum up caustic or corrosive liquids
(e.g. acids, alkalis, solvents).
17.- Protect the power cord against heat, oil and sharp
edges.
18.- Check the plug and power cord regularly and have
them replaced by a qualied technician if damaged.
19.-Use only approved accessories.
Use masks, helmets and glasses.
GROUNDING INSTRUCTIONS
This appliance must be grounded. If it should
malfunction or break down while in use,
grounding provides a path of least resistance
for the electric current and reduces the risk of
electric shock to the operator.
This appliance has a power cord with
equipmentgrounding conductor and grounding plug. The
plug must be inserted into an appropriate outlet that is
properly installed and grounded in accordance with all
local codes and ordinances.
Improper connection of the equipment-grounding
conductor can result in a risk of electric shock. Check
with a qualied electrician or service person if you are in
doubt as to whether the outlet is properly grounded.
Do not modify the plug provided with the machine. If it
will not t the outlet, have a proper outlet installed by
a qualied electrician. Various dust created by power
sanding, sawing, grinding, drilling and other construction
activities contains chemicals known to cause cancer,
birth defects or other reproductive harm.

ENGLISH
9
9
Some examples of these chemicals are:
Lead from lead-based paints, crystalline silica from bricks
and cement and other masonry products, and arsenic
and chromium from chemically-treated lumber. The risk
from these exposures varies, depending on how often
you do this type of work.
To reduce your exposure to these chemicals: work in
a well ventilated area, and work with approved safety
equipment, such as dust masks that are specially
designed to lter out microscopic particles.
INTENDED USE
This vacuum cleaner is primarily designed to operate
in conjunction with power tools which require dust
extraction, such as sanders, saws, wall chasers,
scouring machines, etc. This machine extracts
nondangerous dusts, dirt, shavings etc.
This machine may also be used to vacuum water and
other non-ammable and non corrosive liquids.
The end user/operator is solely responsible for any
damage or accident should the machine be used for any
use other than its intended purpose.
PREPARATION AND INITIAL OPERATION
Electrical connection.
The operating voltage shown on the rating plate must
correspond to the voltage of the power supply. Make
sure that the vacuum cleaner is switched o when you
plug the power supply.
This machine must ALWAYS be plugged
into a properly grounded outlet. NEVER
operate the m a c hine if it is not grounded.
This will result in a static electrical build-up
which will destroy the machine’s electronic
components.
ASSEMBLY
Follow the sequences in Figures 2 and 3.
OPERATION
Follow the sequence shown in gure 4. You can use the
suction brush held by your hands (g 4.1) or attached by
the machine (g 4.3).
SWITCH MODES: ON/OFF
This machine has a multi-mode On/O Switch.
In position “OFF” the vacuum cleaner is switched o
but there is always current to the Integrated Switching
Appliance Socket.
Dierent modes of operation are possible:
1.- SWITCH POSITION “MANUAL”: The cleaner motor
starts immediately and runs continuously.
2.- SWITCH POSITION “AUTO –AC”: The Integrated
Switching Appliance Socket is live. The cleaner motor
starts only when the tool connected to the appliance
socket is switched on.
There is a 1 second delay in the vacuum starting (to
avoid tripping the circuit breaker) and a 10 second delay
in shutting o (to clear the hose of dust) followed by a
cycle of the lter shaker.
Before turning the switch to the “AUTO –AC” position,
ensure that the tool connected to the appliance socket is
switched o.
Observe the maximum connected load of 2200W for the
Integrated Switching Appliance Socket.
Automatic Filter Shaker Function.
This machine is equipped with an automatic
electromagnetic lter shaker device. It operates
automatically with a cycle every 20 seconds to shake
accumulated dust from the Diaphragm Filter. It will also
cycle when the switch is switched o (both in manual and
automatic modes) It is fully automatic and only operates
when the Diaphragm Filter is in place. When it engages,
there will be a slight noise. This noise is normal and
does not indicate any malfunction of the machine. To
minimize noise, always install the Diaphragm Filter with
the exposed metal side of the anvil facing downwards.
EMPTYING THE DEPOSIT
Follow the sequence in gure 5.
If liquid was sucked use pipe 10 (g 5.2) to empty by
gravity.
MAINTENANCE
Follow the sequence in gure 6.
You can use water (g.6.3) to clean the lter.
Vacuum dry media
Not suitable to vacuum hazardous or toxic
substances such as asbestos. The lters m
ay not be able to capture all particles
and may exhaust them back into the
environment.
Before using the vacuum cleaner to extract dry
materials, the machine must set up in a dry vacuuming
conguration.
The pair of Main Pleated Filters must always be in place.
The Filter bag and Diaphragm Filters must both be
mounted at all times.
Note: It is not recommended to dry vacuum when there
is liquid in the tank or if the tank and f i l t ers are still wet.
Severe caking of dust and possible damage will occur.

ENGLISH
10
10
Whenever transitioning from wet to dry vacuuming,
ensure the entire tank and lter system is clean and dry.
If it is necessary to transition often between dry and wet
vacuuming, it is best to have 2 sets of rst stage and
main lters.
Vacuuming liquids.
Never attempt to vacuum ammable or corrosive
liquids!
CAUTION: Never begin wet vacuuming
when there is dry dust in the tank. Severe
caking of dust and possible damage to the
machine may occur. Always clean the tank
before beginning.
DECLARATION OF CONFORMITY
We declare under our sole responsibility that the product
described under “Technical Data” is in conformity with the
following standards or standardization documents:
EN60335-2-69: 1998 according to the provisions of the
directives 2006/42/CE, 2014/30/EU, 2011/65/EU
Ramiro de la Fuente
Director Manager
January 2017

www.grupostayer.com
Área Empresarial Andalucía - Sector 1
C/ Sierra de Cazorla, 7
28320 - Pinto (Madrid) SPAIN
Email: sales@grupostayer.com
Email: info@grupostayer.com
Table of contents
Other stayer Vacuum Cleaner manuals

stayer
stayer BC1200D User manual

stayer
stayer CV12B User manual

stayer
stayer CV12B User manual

stayer
stayer VAC1200 User manual

stayer
stayer VAC 2050 User manual

stayer
stayer BC1200B User manual

stayer
stayer CV12B User manual

stayer
stayer VAC2050C User manual

stayer
stayer VAC2030 User manual

stayer
stayer VAC2030 User manual
Popular Vacuum Cleaner manuals by other brands

Abicor Binzel
Abicor Binzel FEC operating instructions

Exido
Exido 240-110 user guide

Black & Decker
Black & Decker Dustbuster PV9605N Original instruction

Dyson
Dyson DC02 operating manual

Craftsman
Craftsman 32724611 - 12 Gal. HP Wet/Dry Vac owner's manual

Nilfisk-Advance
Nilfisk-Advance VHS120 L Instructions for use