STONEX S900+ User manual


Stonex S900+GNSS Receiver –User Manual 1
Contents
1. Introduction................................................................................................................................................................... 3
2. Receiver appearance.................................................................................................................................................... 4
2.1 Front view............................................................................................................................................................... 4
2.2 Bottom view ........................................................................................................................................................... 5
3. Web Interface ............................................................................................................................................................... 6
3.1 Dashboard............................................................................................................................................................... 7
3.2 Satellites .................................................................................................................................................................. 8
3.3 Static Survey........................................................................................................................................................... 9
3.4 Download Raw Data...........................................................................................................................................10
3.5 Working Mode.....................................................................................................................................................12
3.5.1 Rover .................................................................................................................................................................12
3.5.1.1 UHF Radio...............................................................................................................................................13
3.5.1.2 Network...................................................................................................................................................14
3.5.1.3 External (Serial) ......................................................................................................................................16
3.5.1.4 Bluetooth.................................................................................................................................................16
3.5.2 Base ...................................................................................................................................................................17
3.5.2.1 UHF Radio...............................................................................................................................................18
3.5.2.2 Network...................................................................................................................................................19
3.5.2.3 External (Serial) ......................................................................................................................................21
3.5.2.4 Bluetooth.................................................................................................................................................21
3.6 Satellite Settings ..................................................................................................................................................22
3.7 Device Settings ....................................................................................................................................................22
3.8 Save Backup & Logs............................................................................................................................................25
3.9 Information ...........................................................................................................................................................26
3.10 Management ........................................................................................................................................................28
3.10.1 Firmware Update .......................................................................................................................................28
3.10.2 Device Registration....................................................................................................................................29
3.10.3 Security ........................................................................................................................................................29
3.10.4 Tools .............................................................................................................................................................30
4. IMU Technology .........................................................................................................................................................31
4.1 IMU with Stonex Cube-a ...................................................................................................................................32
4.1.1 Sensor Activation and Configuration..........................................................................................................32
4.1.2 Calibration ........................................................................................................................................................33

Stonex S900+GNSS Receiver –User Manual 2
4.1.3 Initialization......................................................................................................................................................34
5. Accessories ..................................................................................................................................................................35
5.1 Standard accessories ..........................................................................................................................................35
6. Technical specification ..............................................................................................................................................36
7. Appendix 1: UHF radio technical details ...............................................................................................................39
7.1 Default channel frequencies .............................................................................................................................39
7.2 Protocol tables .....................................................................................................................................................40
7.2.1 TRM101............................................................................................................................................................40
7.2.2 TRM121............................................................................................................................................................41
7.2.2.1 Fixed frequency .....................................................................................................................................41
7.2.2.2 Hopping ...................................................................................................................................................41
8. Appendix 2: Copyrights, warranty, and environmental recycling.....................................................................42
8.1 Copyrights and trademarks ...............................................................................................................................42
8.2 Release Notice .....................................................................................................................................................42
8.3 Standard Limited Warranty ...............................................................................................................................42
8.4 Shipping policy.....................................................................................................................................................43
8.5 Return policy Dead on Arrival instruments....................................................................................................43
8.6 Firmware/Software warranty ...........................................................................................................................43
8.7 Over Warranty repair(s) policy .........................................................................................................................43
8.8 Disclaimer and Limitations ................................................................................................................................44
8.9 Environmental Recycling....................................................................................................................................45
9. Appendix 3: Safety Recommendations ..................................................................................................................46
9.1 Warnings and Cautions ......................................................................................................................................46
9.2 Wireless Module Approval ................................................................................................................................46
9.3 Instrument Approval...........................................................................................................................................46
9.4 General Antenna Installation Warning............................................................................................................47
9.5 Bluetooth/Wi-Fi radio Module.........................................................................................................................48

Stonex S900+GNSS Receiver –User Manual 3
1. Introduction
This document is the user guide for S900+and it’s intended to introduce how to use the receiver correctly.
S900+is a multiple-frequency receiver designed for GNSS surveying applications. It can work as a base station
or as a rover, the configuration can be switched freely whenever and wherever is needed, offering maximum
versatility in the system configuration to meet your specific requirements. At the same time, the S900+receiver
can be upgraded easily to continually meet new demand.
The integrated design of the receiver makes the S900+only 1.3 kg, which is light and portable. The internal
antenna supports signals from GPS, GLONASS, Beidou, Galileo, and QZSS satellite systems.
The use of tilt correction doesn’t require calibration at every start-up thanks to the integrated Sensor Fusion
system. In this way, the surveyor can start to record points after a very quick initialization after obtaining a
Fixed solution.
S900+GSM modem is enabled to work with Worldwide LTE, UMTS, and GSM based networks.
The Key Features of S900+are:
•Multi-frequency and multi-constellation satellites reception
•4G/3G/2G Network connectivity
•2.1+EDR/5.0 Bluetooth
•Easy configuration using Stonex Cube-a Android application and Web User Interface
•Double removable battery
•Rugged housing
•IP67
•UHF datalink with internal TX/RX 1W radio module (optional)
•Tilt correction IMU sensor (optional)

Stonex S900+GNSS Receiver –User Manual 4
2. Receiver appearance
2.1 Front view
Num.
Item
Description
1
Satellite indicator
Off: no satellite tracked
Flashing red: satellites tracked, a position not calculated
Flashing green: position calculated without a fixed solution
Green: fixed solution
Flashing green and red alternately: GNSS board abnormal
2
Datalink indicator
Green: datalink setting success
Flashing green: data in normal transmission
Flashing blue: raw data recording, flashing frequency according to the
sampling interval
3
Power button
Power on: keep pressed until you hear a beep. After three short beeps, the
device is ready to work
Current working mode: short press, if the speaker is enabled the device will
describe the current working mode.
Power off: keep pressed until all LED start to flash, release then short press
Self test: keep pressing until all LED start to flash, release then long press
until the LED stops flashing. The device will test the internal modules. If an
error is found the device will start to beep, to stop it short press the power
button. Please contact your local dealer if this happens.
4
Battery indicator
Green: charge level between 30% and 100%
Flashing green: charge level between 10% and 30%
Flashing red: charge level lower than 10% with a warning beep
Device off while charging:
Green: charge completed
Red: in charge
5
Bluetooth indicator
Blue: connected
Off: no connection

Stonex S900+GNSS Receiver –User Manual 5
2.2 Bottom view
Num.
Item
Description
1
Serial Number
Serial number of the device
2
5/8’ connector
Screw connector for support
3
Battery slot A
Battery locks in by sliding toward the metal connector so that it would
not fall if the cover were opened while the receiver is mounted on a pole.
The cover is removed by pressing the lateral button and can be locked.
4
Battery slot B
Battery locks in by sliding toward the metal connector so that it would
not fall if the cover were opened while the receiver is mounted on a
pole. The cover is removed by pressing the lateral button and can be
locked.
5
External memory
slot
MicroSD card can be used to expand the memory up to 32Gb, the card
is locked in by sliding the metal cover. The plastic cover is held by
pressure.
6
Sim card slot
Slot for Nano SIM Card, the card must not have a PIN code, insert the
card while the device is off. The card is locked in by sliding the metal
cover. The plastic cover is held by pressure.
7
TNC connector for
UHF antenna
Screw connector for UHF module external antenna. The plastic cover is
held by pressure.
8
5-pin LEMO port
Can be used to connect an external power source, batteries are not
needed. Batteries in the device will not be charged up.
Can also be used for differential correction serial transmission to/from
external devices such as UHF.
9
7-pin LEMO port
Can be used to access the device’s internal memory if connected to a
PC using the USB connector of the provided cable.
Can also be used for NMEA message serial transmission.

Stonex S900+GNSS Receiver –User Manual 6
3. Web Interface
S900+Web User Interface (WebUI) functionality allows managing the receiver by connecting to its Wi-Fi
hotspot. The name of the Stonex GNSS receiver hotspot is the receiver serial number.
Once connected with a smartphone or PC, using any internet browser the WebUI is found at the IP address:
192.168.10.1
The standard credentials to access the WebUI are:
User: admin
Password: password

Stonex S900+GNSS Receiver –User Manual 7
3.1 Dashboard
It’s a summary of the status of the receiver, the top line is shared with all the other pages, it contains the serial
number of the device, the battery charge status, the language selection button, the power options, and the
device model.
The language selected modify the language of the WebUI and, if available, the language of the voice messages.
The second section contains the current working mode, the number of satellites used for positioning, and the
expiration date of the current activation code.
The third section recaps current WGS84 coordinates, Receiver time, and quality of the solution.
Local time refers to the time zone set on the device setting page.

Stonex S900+GNSS Receiver –User Manual 8
3.2 Satellites
Here are shown the satellites tracked in the form of a Table and Skyplot. In both views, constellations are
color coded. Satellites shown in grey are tracked but not used for positioning. It’s also possible to set the cut-
off angle, every satellite with a lower elevation will not be considered as not tracked.
Stonex S900+GNSS Receiver –User Manual 9
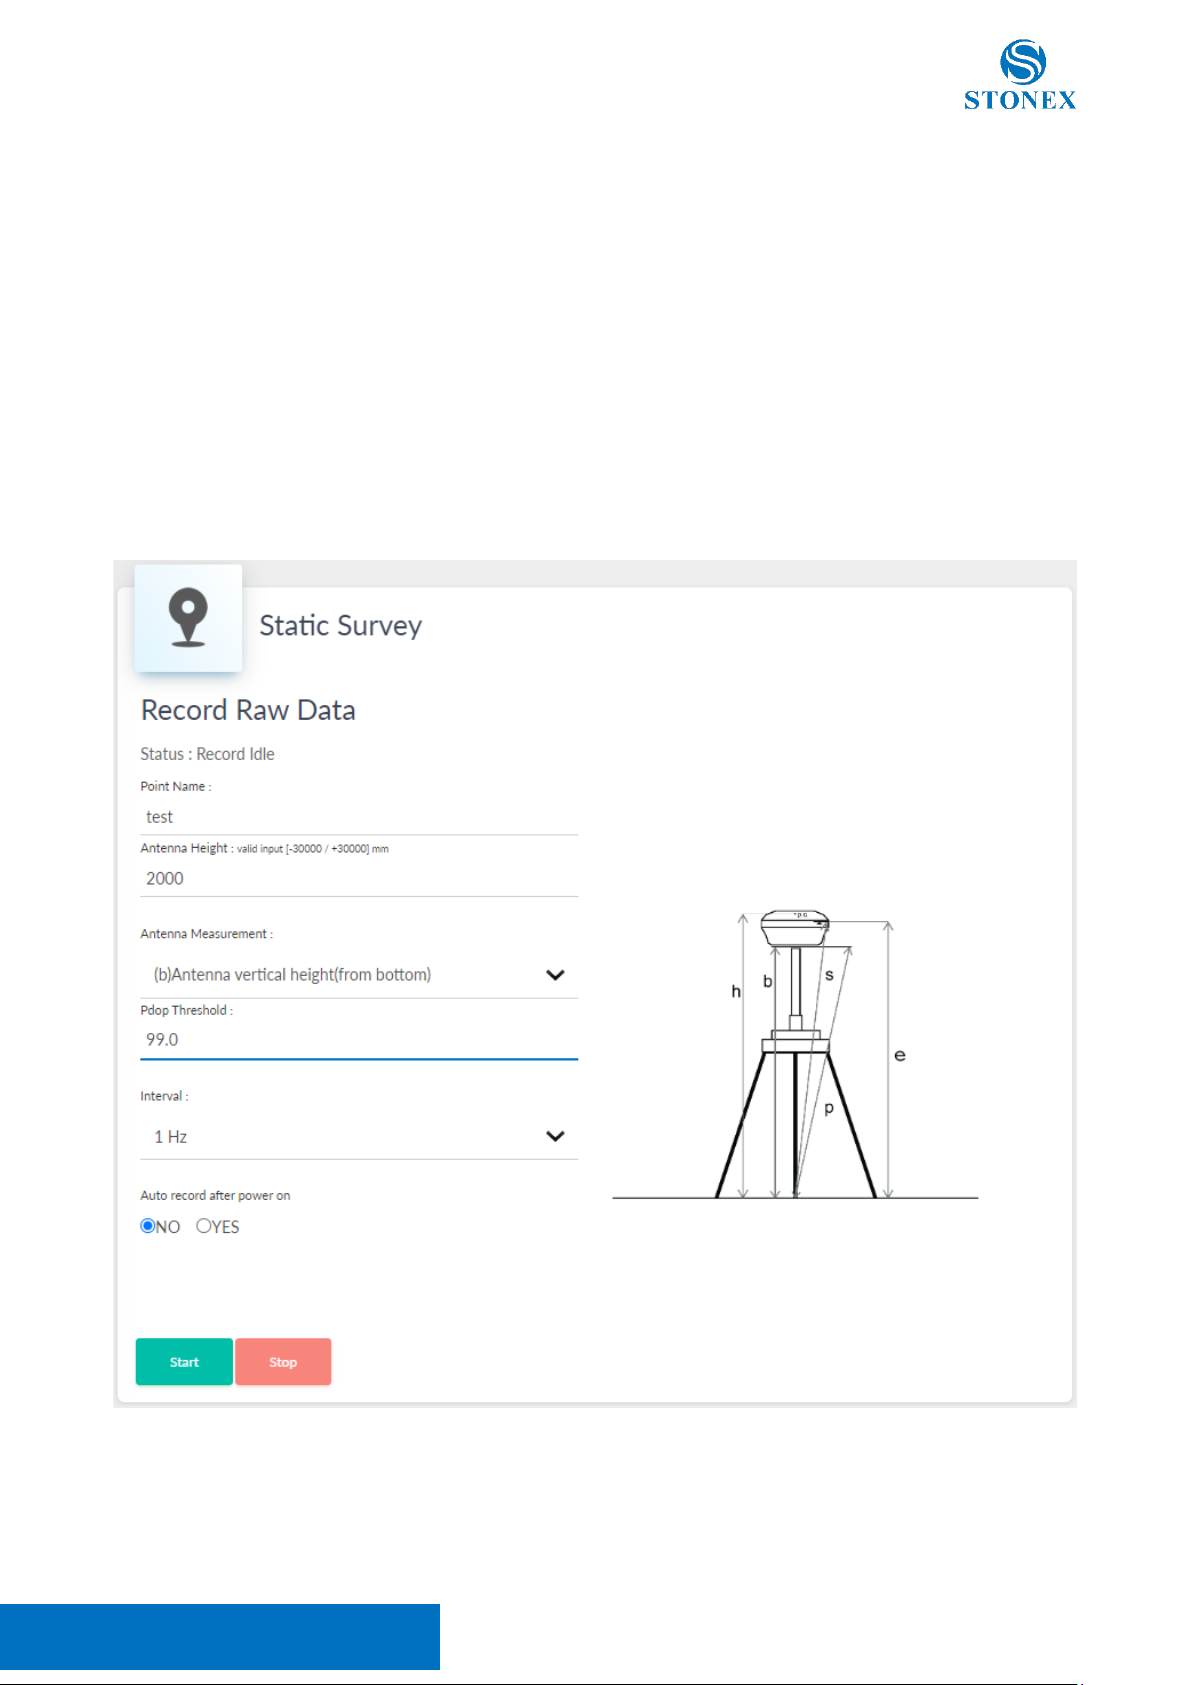
3.3 Static Survey
S900+it’s able to record raw data even while working as a rover or base, in this page is possible to set the option
for raw data recording. Before changing any setting be sure that the device is not recording.
The name can contain at maximum 4 characters, the antenna height can be measured with five different
methods explained by the picture. Select the correct method so that the phase center offset is applied correctly.
Enabling “auto record after power on” will cause the receiver to start to record as soon as the PDOP value is
lower than the threshold.
To save the settings press Start.
Stonex S900+GNSS Receiver –User Manual 10
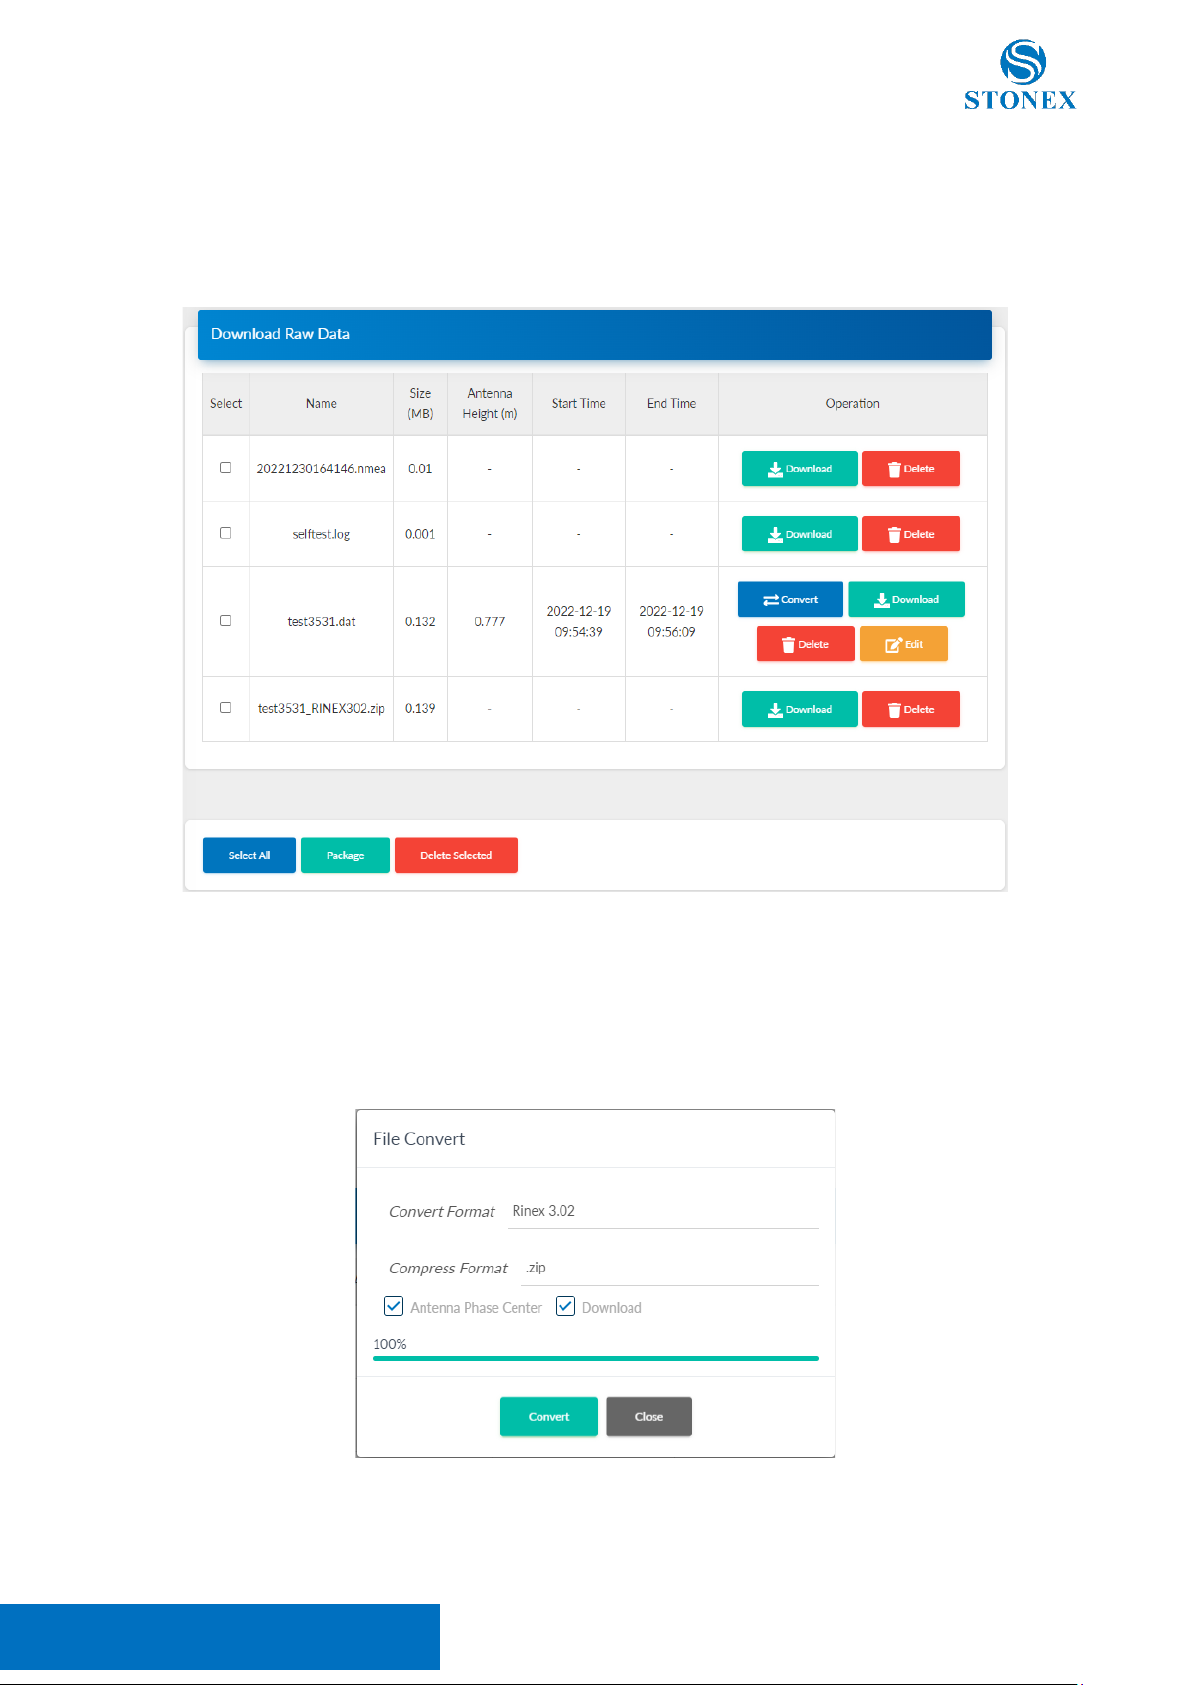
3.4 Download Raw Data
From this page, it’s possible to download and delete the log files (Raw data, Rinex, NMEA, selftest), singularly
on in batch.
Is possible to convert the raw data files (*.dat) in Rinex format by pressing Convert. The Rinex format can be
changed as well as the compression format. If Antenna Phase Center is selected, the height in the Rinex will be
the one of the Antenna Phase Center. If Download is selected the Rinex files will be downloaded automatically
at the end of the conversion.
Stonex S900+GNSS Receiver –User Manual 11
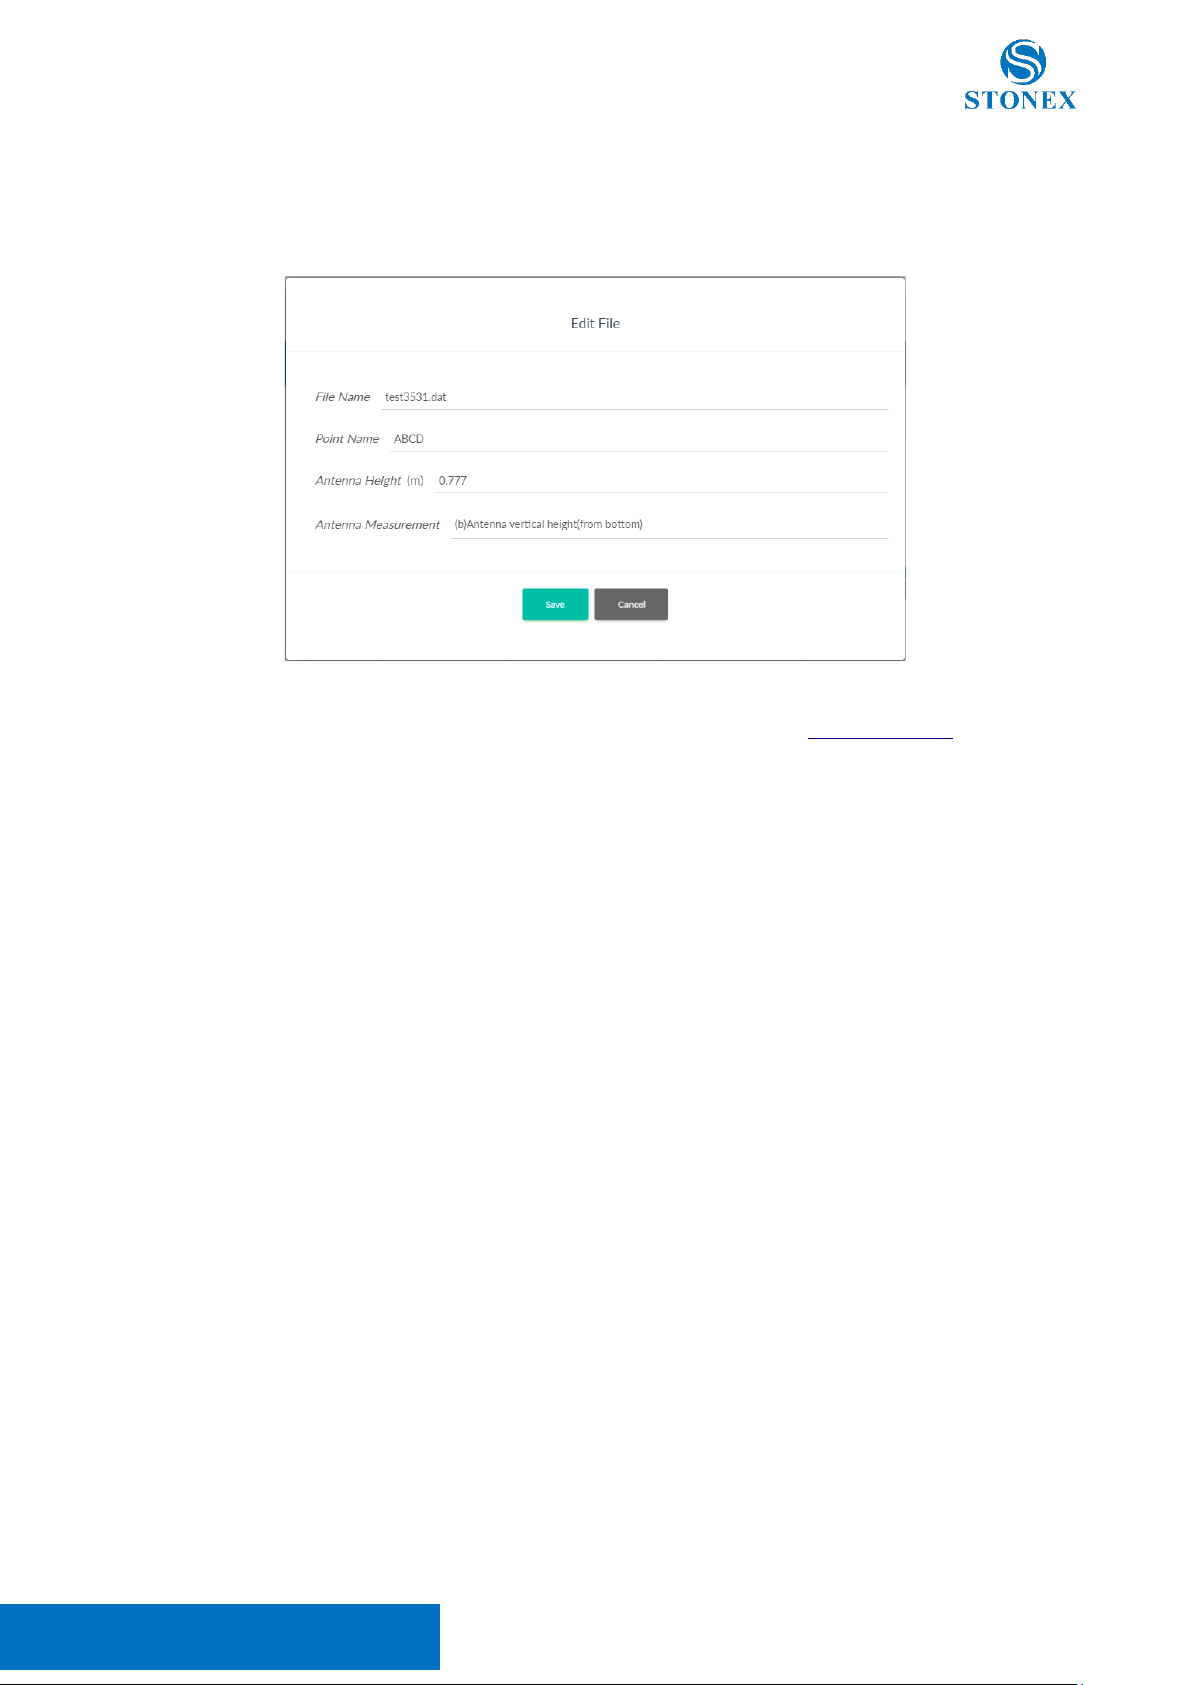
For every raw data file is showed the start time and the end time, the name, the size of the file, and its set
antenna height. By pressing Edit, is possible to change the file name, point name, antenna height, and
measurement type.
It’s possible to manage the log files also by accessing the record folder in the internal memory of the device
from a PC.

Stonex S900+GNSS Receiver –User Manual 12
3.5 Working Mode
This page contains all the settings to set up RTK datalink
3.5.1 Rover
In Rover mode, S900+automatically recognizes the RTK corrections format between:
•RTCM 3.2
•RTCM 3.0
•RTCM 2.3
•CMR+
•CMR
•DGPS
It’s necessary to correctly set the datalink between:
•UHF
•Network (SIM, Wi-Fi)
•External (Serial)
•Bluetooth

Stonex S900+GNSS Receiver –User Manual 13
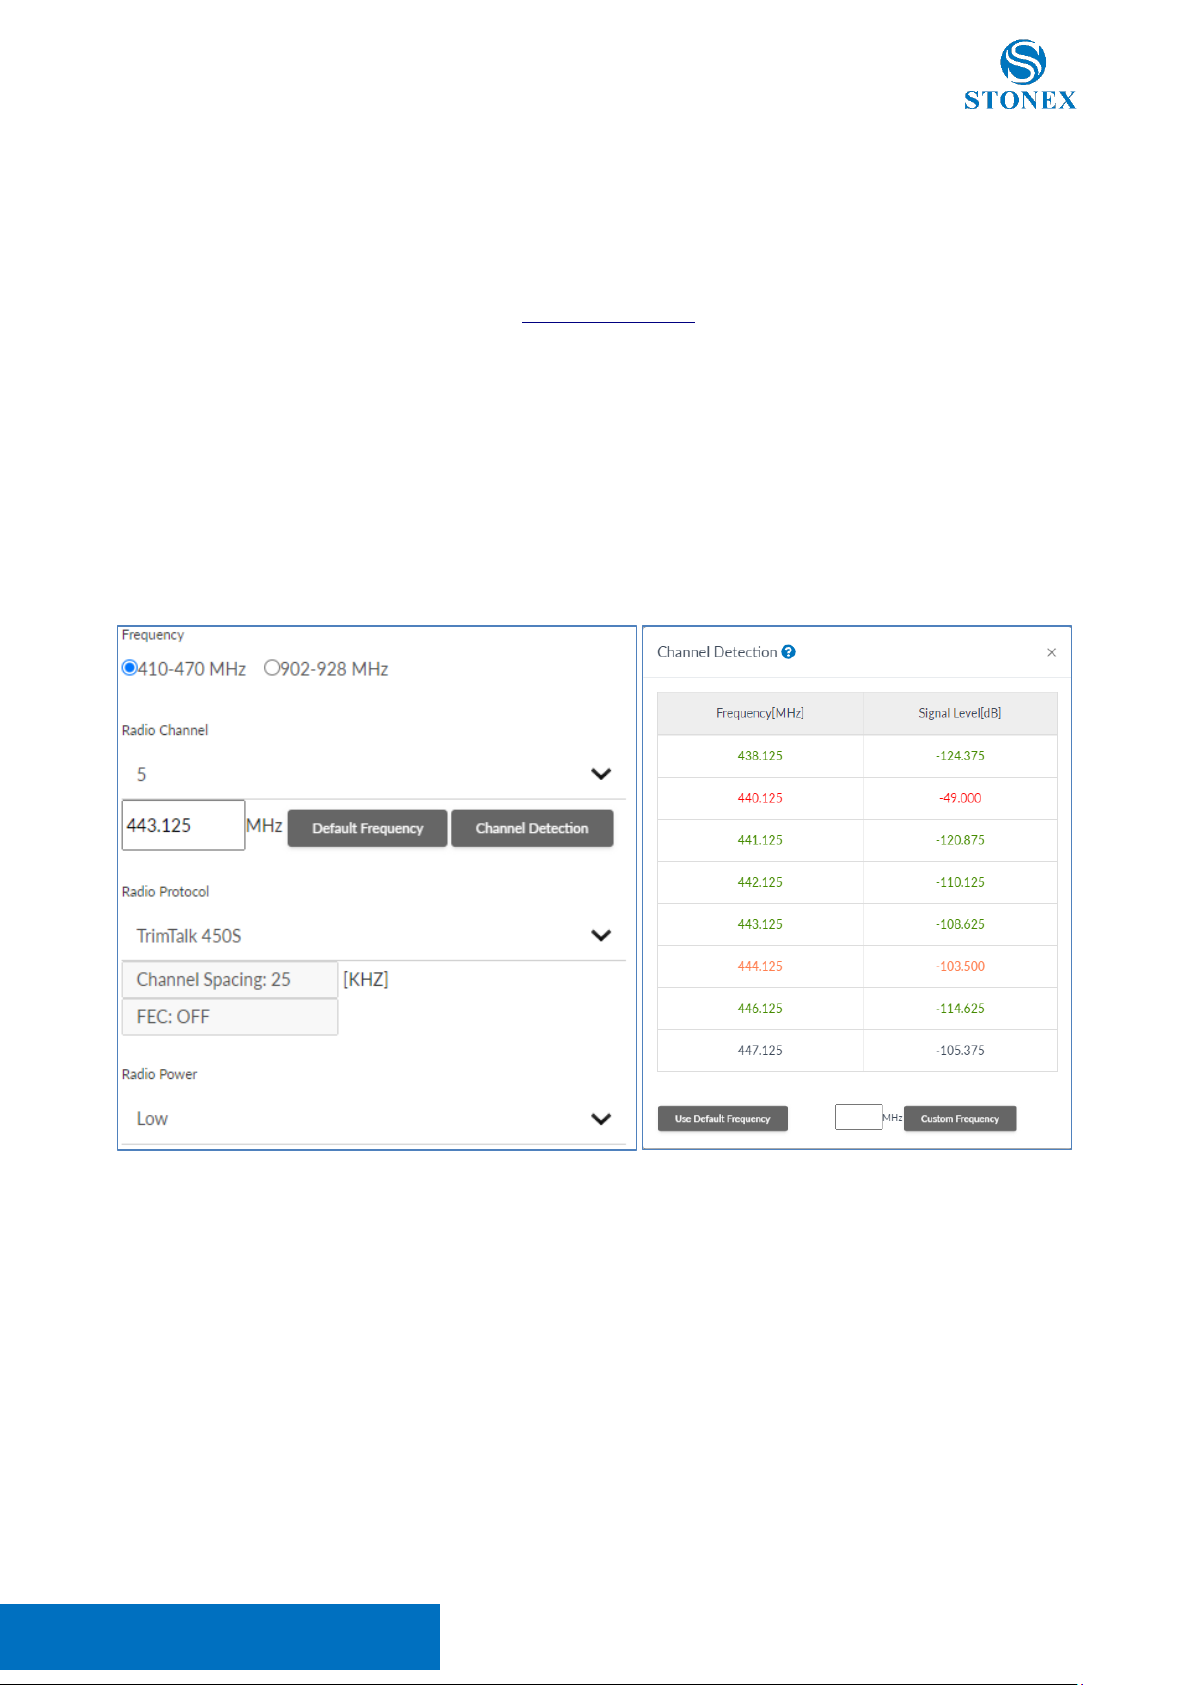
3.5.1.1 UHF Radio
S900+can have two different radio modules:
•TRM101 as default, with a working frequency between 410MHz and 470MHz
•TRM121 as optional, with two frequency bands: standard 410-470MHz and hopping 902.4-928MHz
For the 410-470MHz band, 8 channels with pre-set frequencies are available for quick configurations, the
frequency values can be edited and saved.
The channel detection function allows one to check if the channel frequencies in the area are already used for
transmission. In the example below it’s possible to see a transmission on frequency 440.125 MHz, while the
other frequencies are unused.
To receive the RTK corrections from the base, select the same frequency, radio protocol, spacing, and FEC. Be
sure to connect a UHF antenna to adapt to the frequency of the transmission. For hopping frequencies is
necessary to match the channel instead of the frequency.

Stonex S900+GNSS Receiver –User Manual 14
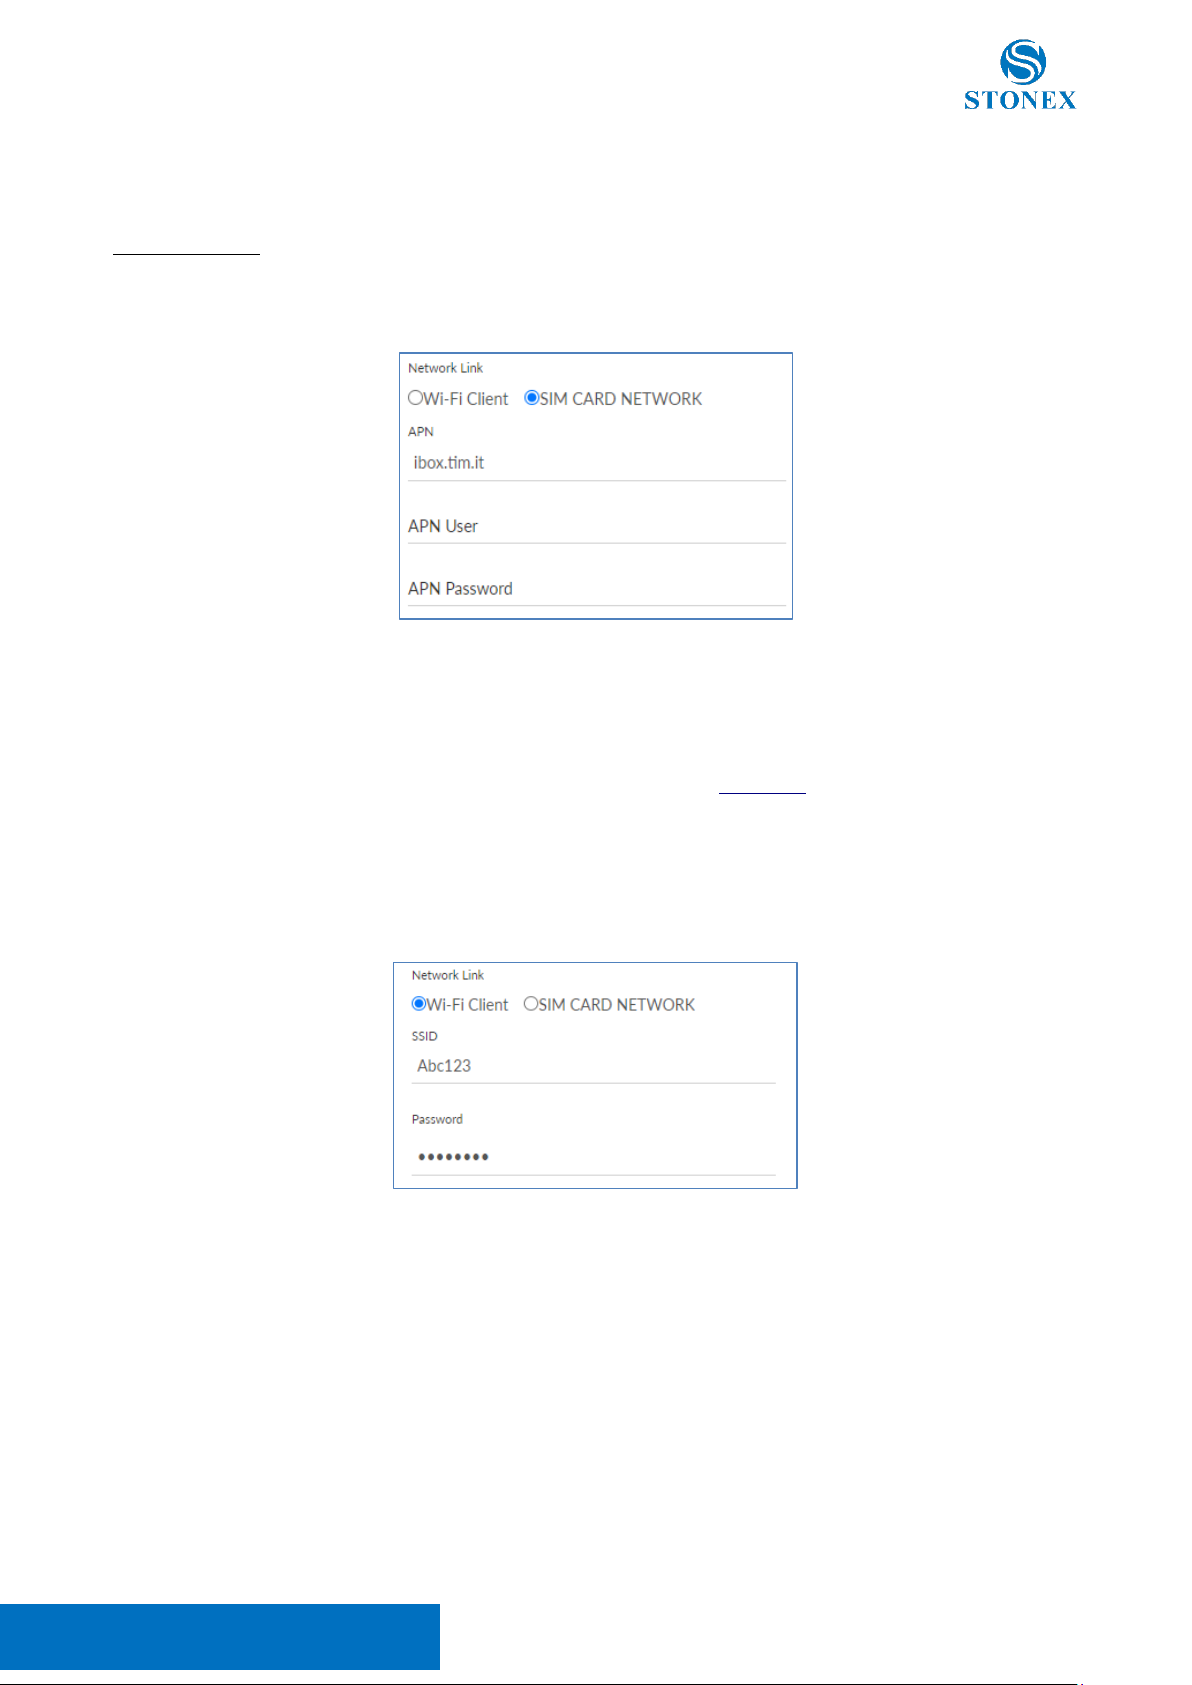
3.5.1.2 Network
S900+can connect to the Internet using a SIM card or a Wi-Fi connection.
Internet Settings
To use a SIM card, it must not have a PIN code, then set the SIM provider’s Access Point Name (APN).
To use a Wi-Fi connection, the SSID and the password must be set manually. SSID and password must
contain only alphanumeric characters.
Attention! Using this functionality will disable the S900+Wi-Fi hotspot and the IP address of the WebUI will
change. To access the WebUI the procedure is the same as shown in Chapter 3, but it’s necessary to connect
to the same Wi-Fi network set in the WebUI and use the IP address associated with the S900+by the
network instead of 192.168.10.1.
It’s possible to reactivate the S900+Wi-Fi hotspot, using Stonex Cube-a by setting Wi-Fi connect mode:
Master in Device > Wi-Fi Mode Settings.

Stonex S900+GNSS Receiver –User Manual 15
Connection Settings
S900+uses the NTRIP protocol to receive corrections from the network.
To connect to an NTRIP caster it’s necessary to set its IP address and port. The mount point can be written
manually or selected from the list obtained by pressing Get Mountpoint, internet connection and caster IP
address and port must be already set.
NTRIP Network often needs to know the position of the rover to provide the corrections, in these cases the
GGA upload must be set at 1 second at least.
The user and Password are the ones necessary to access the Caster if needed.
If the “Auto connect” option is enabled, at start-up the S900+will use the last settings to connect automatically
to the NTRIP caster.
CSD connect mode, allow receiving RTK corrections using a phone call, so it’s necessary to have a SIM card
enabled to perform phone call (voice and data).

Stonex S900+GNSS Receiver –User Manual 16
3.5.1.3 External (Serial)
By selecting External, the only setting necessary is the external port baud rate, it must match the baud rate of
the source of the transmission. The serial port used for this datalink is the 5-pin port.
The baud rate available are:
•9600
•19200
•38400
•57600
•115200
3.5.1.4 Bluetooth
Bluetooth has no settings. The datalink’s fully managed by the source of the transmission, for example, a
controller with Stonex Cube-a will set the datalink to Bluetooth if the “Phone network” communication mode
is selected.
Stonex S900+GNSS Receiver –User Manual 17
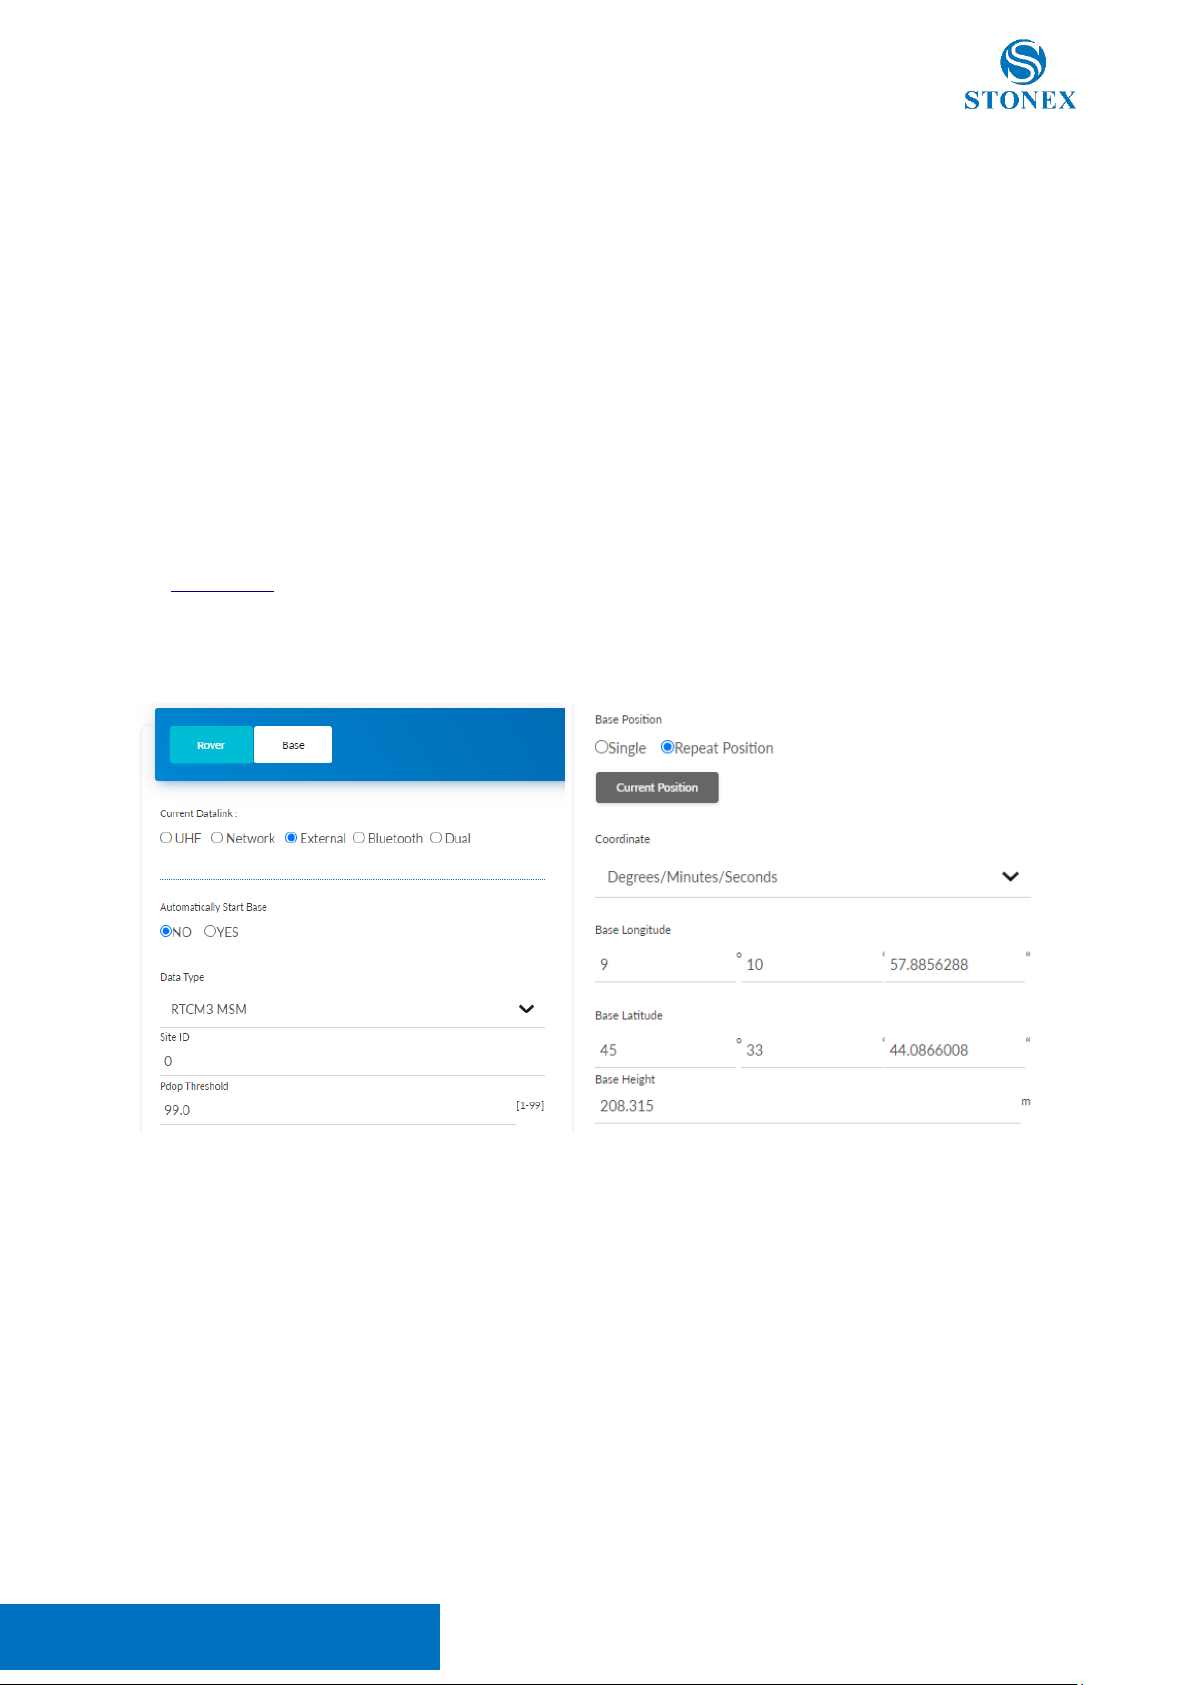
3.5.2 Base
As Base S900+can provide RTK corrections in the following formats:
•RTCM 3.2
•RTCM 3.0
•RTCM 2.3
•CMR+
•CMR
•DGPS
The PDOP threshold limits the use of the base if the PDOP value is higher.
To set the base position select Repeat Position, the coordinates requested are Longitude/Latitude/Height of
the S900+phase center. The phase center offset can be found on the label of one of the two battery covers,
or the Information page.
By selecting the “Single” option for the base coordinates, the S900+will set the phase center coordinates
calculated at the start of the base transmission.
Stonex S900+GNSS Receiver –User Manual 18
3.5.2.1 UHF Radio
S900+can have two different radio modules:
•TRM101 as default, with a working frequency between 410MHz and 470MHz
•TRM121 as optional, with two frequency bands: standard 410-470MHz and hopping 902.4-928MHz
For the 410-470MHz band, 8 channels with pre-set frequencies are available for quick configurations, the
frequency values can be edited and saved.
The channel detection function allows one to check if the channel frequencies in the area, are already used for
transmission. In the example below it’s possible to see a transmission on frequency 440.125 MHz, while the
other frequencies are unused. To avoid interference, use another frequency for the transmission. Be sure to
connect the correct UHF antenna for the frequency of the transmission.
The maximum power output for the S900+UHF module is 1W, when radio power is set to Low the output is
0.5W.
The radio power affects the transmission range and the battery duration.
Attention! Local regulations can limit the use of UHF radio. Check before starting the transmission.
Stonex S900+GNSS Receiver –User Manual 19
3.5.2.2 Network
S900+can connect to the Internet using a SIM card or a Wi-Fi connection.
Internet Settings
To use a SIM card, it must not have a PIN code, then set the SIM provider’s Access Point Name (APN).
To use a Wi-Fi connection, the SSID and the password must be set manually. SSID and password must
contain only alphanumeric characters.
Attention! Using this functionality will disable the S900+Wi-Fi hotspot and the IP address of the WebUI will
change. To access the WebUI the procedure is the same as shown in Chapter 3, but it’s necessary to connect
to the same Wi-Fi network set in the WebUI and use the IP address associated with the S900+by the
network instead of 192.168.10.1.
It’s possible to reactivate the S900+Wi-Fi hotspot, using Stonex Cube-a by setting Wi-Fi connect mode:
Master in Device > Wi-Fi Mode Settings.
Table of contents
Other STONEX Receiver manuals

STONEX
STONEX S800A User manual

STONEX
STONEX SC2200 User manual

STONEX
STONEX SC600 User manual

STONEX
STONEX SC2000 User manual

STONEX
STONEX S900 User manual

STONEX
STONEX S9III Plus User manual

STONEX
STONEX S900A User manual

STONEX
STONEX S900T User manual

STONEX
STONEX S10 User manual

STONEX
STONEX S9i User manual


