Stylies HERA User manual

www.stylies.ch
Messstreifen zur Ermittlung der Wasserhärte
Measuring strip for identifying water hardness
Bandelette de mesure de la dureté de l'eau
Cartine per determinare la durezza dell‘acqua
Pasek pomiarowy do określania twardości wody
Meetstrook voor bepaling van de waterhardheid
Mätsticka för att fastställa vattnets hårdhetsgrad
Tiras de medición para calcular la dureza del agua
Coplax AG
Chamerstrasse 174, 6300 Zug–Switzerland
Phone no: +41 41 766 8330
HERA - HUMIDIFIER
Gebrauchsanweisung Deutsch 2
Instruction Manual English 8
Mode d’emploi Français 14
Manuale di istruzioni Italiano 20
Instrukcja obsługi Polski 27
Gebruiksaanwijzing Dutch 33
Använderhandbok Svenska 39
Instrucciones de uso Español 45

HERA - ULTRASCHALL - ULTRASONIC

LEVEL 1 2 3
% AIR HUMIDITY
NO WATER

Herzlichen Glückwunsch! Sie sind soeben Besitzer des aussergewöhnlichen und technisch hoch-
modernen Stylies Hera Ultraschall-Luftbefeuchters geworden. Dieser Ultraschall-Luftbefeuchter
wird Ihnen bei Gebrauch viel Freude machen und die Luftqualität in Ihren Räumen verbessern.
Wie bei allen elektrischen Haushaltgeräten sind bei der Bedienung des Luftbefeuchters beson-
dere Vorsichtsmassnahmen zur Vermeidung von Verletzungen sowie Brand oder Schäden am
Gerät erforderlich. Vor dem ersten Gebrauch lesen Sie bitte diese Betriebsanleitung sorgfältig
durch und beachten Sie die Sicherheitsrichtlinien sowie die Sicherheitshinweise am Gerät.
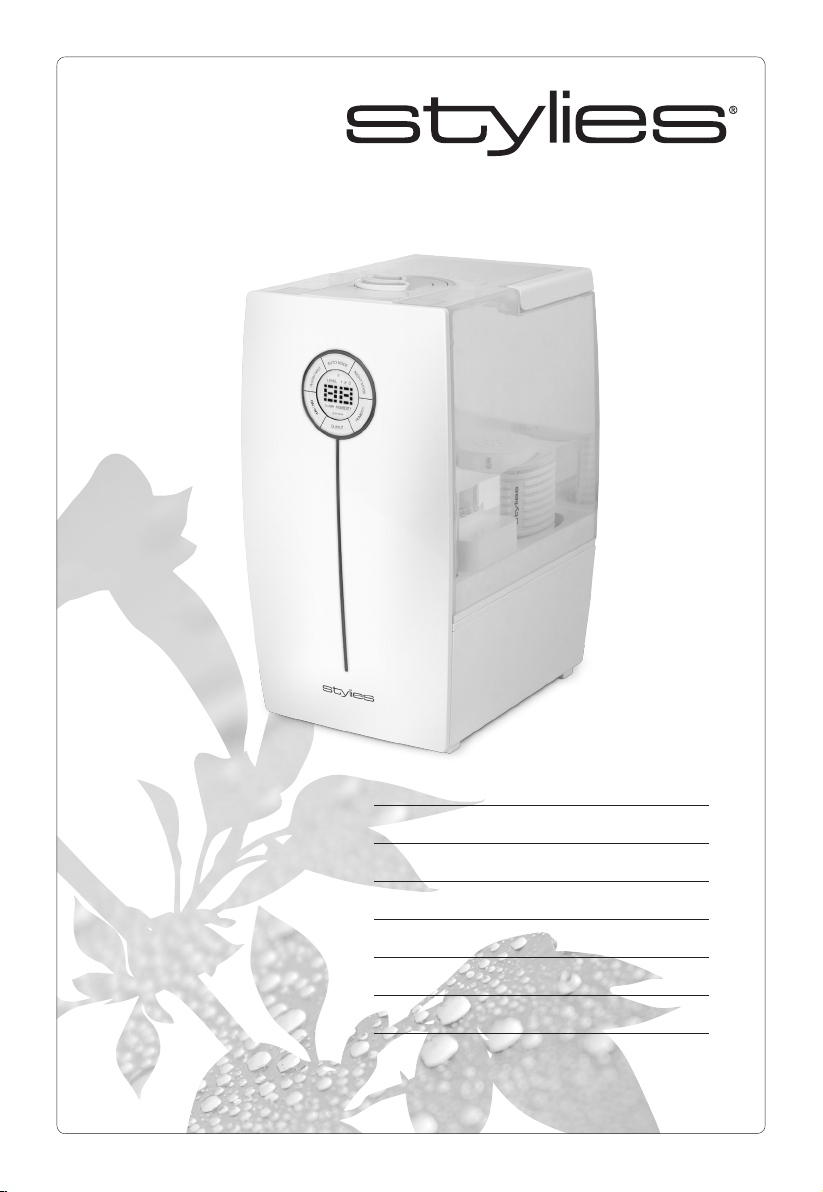
GERÄTEBESCHREIBUNG
Das Gerät besteht aus den folgenden Hauptkomponenten:
1. Stromkabel
2. Nebelauslass
3. Transparenter Wassertank
4. Kalkfilterkartusche
5. Tankdeckel
6. Geräteunterteil
7. Bedienteil und Anzeige
8. Silver Cube
9. Führung für Nebelaustrittskappe
10. Tragegriff
11. „ON/OFF“ (EIN/AUS)-Taste
12. „HUMIDITY“ (Feuchtigkeits)-Taste
13. „OUTPUT“ Nebelauslass-Taste
14. „WARM MIST“ (Warmer Nebel)-Taste
15. „NIGHT MODE“ (Nachtbetrieb)-Taste
16. „AUTO MODE“ (Automatikbetrieb)-Taste
WICHTIGE SICHERHEITSHINWEISE
• Bitte lesen Sie die Gebrauchsanleitung genau durch, bevor Sie den Luftbefeuchter Stylies Hera
das erste Mal in Betrieb nehmen und bewahren Sie sie zum späteren Nachschlagen gut auf,
geben Sie sie ggf. an den Nachbesitzer weiter.
• Für Schäden, die durch Nichtbeachten dieser Gebrauchsanleitung entstehen, lehnt die Coplax
AG jegliche Haftung ab.
• Das Gerät ist nur im Haushalt für die in dieser Gebrauchsanweisung beschriebenen Zwecke zu
benutzen. Ein nicht bestimmungsgemässer Gebrauch sowie technische Veränderungen am Gerät
können zu Gefahren für Gesundheit und Leben führen.
• Dieses Gerät kann von Kindern ab 8 Jahren und Personen mit eingeschränkten körperlichen,
sensorischen oder geistigen Fähigkeiten, aber auch von unerfahrenen und unwissenden Personen
verwendet werden, sofern diese das Gerät unter Aufsicht verwenden oder von einer anderen
Person über die sichere Verwendung des Gerätes unterwiesen wurden und sich der damit ver-
bundenen Gefahren bewusst sind. Kinder sollten nicht mit dem Gerät spielen. Kinder sollten
dasGerät nur unter Aufsicht reinigen und pflegen.
Deutsch
2

• Schliessen Sie das Kabel nur an Wechselstrom an. Achten Sie auf die Spannungsangaben auf dem Gerät.
• Den Netzstecker unbedingt ziehen:
- Vor jeder Umplatzierung des Gerätes
- Vor jedem Öffnen des Gerätes oder beim Wassereinfüllen
- Bei Störungen des Betriebs
- vor jeder Reinigung
- nach jedem Gebrauch.
• Keine beschädigten Verlängerungskabel verwenden.
• Gerät niemals am Netzkabel tragen oder ziehen
• Das Eindringen in das Gehäuse mit irgendwelchen Gegenständen ist strengsten verboten.
• Wenn das Netzkabel beschädigt ist, muss es durch eine qualifizierte Person ersetzt werden.
• Das Netzkabel nicht über scharfe Kanten ziehen oder einklemmen.
• Den Stecker nie am Netzkabel oder mit nassen Händen aus der Steckdose ziehen.
• Diesen Luftbefeuchter nicht in unmittelbarer Nähe einer Badewanne, einer Dusche oder eines
Schwimmbeckens benutzen (Mindestabstand von 3 m einhalten). Gerät so aufstellen, dass Per-
sonen das Gerät von der Badewanne aus nicht berühren können.
• Gerät nicht in der Nähe einer Wärmequelle aufstellen. Das Netzkabel keiner direkten Hitzeeinwir-
kung (wie z.B. heisse Herdplatte, offene Flammen, heisse Bügelsohle oder Heizöfen) aussetzen.
Netzkabel vor Öl schützen.
• Gerät nicht direkt neben Wände, Vorhänge oder Möbel stellen.
• Darauf achten, dass das Gerät beim Betrieb eine gute Standfestigkeit besitzt und nicht über das
Netzkabel gestolpert werden kann.
• Das Gerät ist nicht spritzwassergeschützt.
• Das Gerät nicht im Freien aufbewahren oder in Betrieb nehmen.
• Das Gerät an einem trockenen und für Kinder unzugänglichen Ort aufbewahren (einpacken).
• Gerät immer ausstecken beim Auffüllen von Wasser und bei der Reinigung.
• Berühren Sie nie die Ultraschallmembrane (im Geräteinnern) wenn das Gerät im Betrieb ist. Die
Schwingungen der Membrane verursachen Verletzungen ähnlich wie Verbrennungen.
• Keine Zusätze dem Wasser beigeben (Duftmittel, ätherische Öle oder Wasserfrischhaltemittel).
Gerät nicht direkt auf den Boden stellen. Verwenden Sie eine wasserfeste Unterlage!!
INBETRIEBNAHME / BEDIENUNG
Bitte beachten Sie, dass das Gerät nie mit vollem Tank transportiert werden darf.
Mögliche Gefahren:
- Aus dem Wassertank gelangt zu viel Wasser in das Geräteunterteil (6). Dadurch gibt das Gerät
wesentlich weniger Nebel ab.
- Aus dem Geräteunterteil (6) kann leicht Wasser auslaufen.
- Der Wassertank kann aus dem Geräteunterteil (6) herausfallen und durch das hohe Gewicht des
Wasser beschädigt werden. Darüber hinaus kann Wasser auf den Boden tropfen.
1. Das Geräteunterteil (6) des Hera-Luftbefeuchters sollte daher zuerst mit leerem Wasser-
tank (3) an einem geeigneten Ort aufgestellt werden.
2. Befindet sich das Gerät am gewünschten Standort: Füllen Sie den Wassertank (3) mit
Frischwasser, schrauben Sie den Tankdeckel (5) wieder fest ein und überprüfen Sie, dass
alles komplett dicht ist. Setzen Sie den Wassertank auf das Geräteunterteil und stecken
Sie das Stromkabel (1) in die Steckdose.
Modell mit Kalkfilterkartusche (4): Kalkfilterkartusche beim Öffnen und Wasser auffüllen
nicht von der Tankabdeckung entfernen.
3

Wichtig: Legen Sie die Kalkfilterkartusche vor der ersten Verwendung 24 Stunden in
Wasser ein (nicht im Wassertank!). Das Granulat muss zuerst Wasser aufnehmen, um
die volle Leistungsfähigkeit zu erreichen.
3. Schalten Sie das Gerät mithilfe des Ein-/Ausschalters (11) am Bedienfeld (7) ein. Die
Anzeige leuchtet blau. Der Nebelauslass (2) kann für Rundumbetrieb (360°) oder bidirek-
tional eingestellt werden.
4. Der gewünschte Luftfeuchtigkeitsgrad kann durch Drücken der „HUMIDITY“ (Feuchtigkeits)-
Taste (12) am Bedienfeld eingestellt werden. Das Gerät schaltet sich automatisch ab, wenn
der vorgegebene Feuchtigkeitsgrad erreicht ist. Auf der Anzeige (7) wird der aktuelle Feuch-
tigkeitsgrad im Raum angezeigt. Durch Drücken der „HUMIDITY“ (Feuchtigkeits)-Taste (12)
können Sie den gewünschten Feuchtigkeitsgrad auf 40 %, 45 %, 50 %, 60 %, 70 % oder
Dauerbetrieb einstellen. Lassen Sie die Taste los, wenn der gewünschte Feuchtigkeitsgrad
bzw. die Dauerbetriebeinstellung erreicht ist. Damit ist das Gerät eingestellt, die Anzeige
wechselt erneut und gibt den aktuellen Feuchtigkeitsgrad im Raum an. Hinweis: Ist „conti-
nuous“ (Dauerbetrieb) eingestellt, schaltet sich das Gerät NICHT automatisch ab.
Achtung: Das Gerät schaltet sich nicht ein, wenn der Feuchtigkeitsgrad zu niedrig einge-
stellt ist.
5. Die Nebelmenge kann mit der „OUTPUT“ (Abgabe)-Taste am Bedienfeld von Stufe 1 bis
Stufe 3 (siehe Anzeigetafel) geändert werden.
6. „WARM MIST“ (Warmer Nebel)-Taste (14): Mit dieser Taste kann ein Heizelement ein-
geschaltet werden. Das Heizelement erwärmt das Wasser auf 80 C°, bevor es in die
Kammer gelangt, in der der Nebel erzeugt wird. Durch diese Vorwärmfunktion erreicht
der abgegebene Nebel eine Temperatur von 40 C°, so dass die Raumtemperatur nicht
absinkt, wenn der Nebel verdampft. Eine LED oben an der Anzeige leuchtet auf, wenn die
Vorwärmfunktion eingeschaltet ist. Drücken Sie diese Taste erneut, um die Funktion abzu-
schalten. Daraufhin erlischt die LED-Anzeige
7. „NIGHT MODE“ (Nachtbetrieb)-Taste (15): Wenn diese Taste gedrückt wird, wechselt das
Gerät in den Nachtbetrieb mit gedimmtem LED-Licht. Erneutes Drücken stellt den norma-
len Lichtmodus wieder her, bei dem die relative Luftfeuchtigkeit im Komfort-Bereich von
45 % gehalten wird.
8. „AUTO MODE“ (Automatikbetrieb)-Taste (16): Diese Taste stellt den Feuchtigkeitsgrad
auf 45% ein und der Ventilator arbeitet im optimalen Bereich. Wird diese Taste gedrückt,
wird der vorher durch die „HUMIDITY“ (Feuchtigkeits)-Taste eingestellte Wert gelöscht.
9. „No water“ (Kein Wasser)-Warnleuchte: Auf dem unteren Teil der Anzeige erscheint ein
rotes LED-Warnlicht, das aufleuchtet, wenn kein oder nicht genügend Wasser in der Kam-
mer ist, in der der Nebel erzeugt wird. Leuchtet diese LED, sollten Sie das Gerät mit der
„ON/OFF“ (Ein-/Aus)-Taste abschalten und den Tank mit Frischwasser auffüllen. Anschlie-
ssend den Tank wieder auf das Geräteunterteil setzen und das Gerät einschalten.
Hinweis: Gerät vor dem Nachfüllen abschalten. Befindet sich der Tank wieder auf dem
Geräteunterteil, muss das Gerät wieder eingeschaltet werden.
Obwohl das Gerät, sobald Wasser ausläuft, seinen Motor und seinen Energieumwandler
automatisch abschaltet und die „No water“ (Kein Wasser)-LED aufleuchtet, empfehlen wir
zur Vermeidung unerwarteter Schäden, das Gerät bei Aufleuchten der „No water“ (Kein
Wasser)-Warnleuchte sofort mit dem Ein-/Ausschalter abzuschalten.
REINIGUNG
• Vor jeder Wartung und nach jedem Gebrauch das Gerät ausschalten und das Netzkabel aus
der Dose ziehen.
• Gerät nie ins Wasser tauchen (Kurzschlussgefahr). Zur Reinigung nur mit einem feuchten Lap-
pen abreiben und danach gut trocknen. Zuvor unbedingt Netzstecker ziehen.
• Luftbefeuchter je nach Kalkgehalt, aber mindestens wöchentlich entkalken: Zuerst Wassertank
4

(Oberteil) entfernen und mit einer Bürste reinigen. Gerät mit einem handelsüblichen Entkalker
entkalken und danach gut ausspülen. Vor dem Gebrauch wieder vollständig zusammenbauen.
• Wassertank regelmässig gut ausspülen.
• Kalkfilterkartusche (4) alle 1-2 Monate je nach Kalkgehalt des Wassers ersetzen.
KALKFILTERKARTUSCHE UND WASSERHÄRTE
• Die Wirkungsdauer der Kartusche hängt von der Wasserhärte ab. Mit dem mitgelieferten
Teststreifen kann diese getestet werden (Teststreifen klebt auf der Rückseite dieser Bedie-
nungsanleitung).
• Teststreifen eine Sekunde lang in das Wasser tauchen.
• Nach ca. einer Minute ist das Ergebnis auf dem Messstreifen sichtbar. Einige der grünlichen
Felder wechseln ihre Farbe zu rosa. Die Wasserhärte wird durch die Anzahl rosafarbener Fel-
der angegeben.
Beispiel: Bei drei rosafarbigen Feldern hat das Wasser den Härtegrad „3“.
Anzahl
rosafarbiger
Felder
Wasser-
härte
Deutsche
Härte
(°dH)
Kartusche ist verbraucht
nach Tagen/Liter
(bei 3Liter pro-Tag)
0/1 weich ab 4°dH ca. 120 Tage
ca. 360 Liter
2 mittelhart ab 7°dH ca. 60 Tage
ca. 180 Liter
3 ziemlich hart ab 14°dH ca. 40 Tage
ca. 120 Liter
4 sehr hart ab 21°dH ca. 20 Tage
ca. 60 Liter
Die Funktion der Kartusche kann mit einem einfachen Test überprüft werden: Halten Sie einen klei-
nen Spiegel für ein paar Sekunden in den Dampf. Falls sich auf dem Spiegel nachher weisser (Kalk-)
Niederschlag befindet, muss die Kartusche ersetzt werden.
Silver Cube
Bevor der Wassertank aufgesetzt wird, den „Silver Cube“ in die gekennzeichnete Position im Un-
terteil einsetzen. Der Silver Cube mit seiner patentierten Technologie verhindert Bakterien- und
Keimwachstum. Er kann für maximal eine Saison benutzt und muss dann zu Beginn der nächsten
Heizsaison ersetzt werden.
Trotz Einsatz des Silver Cube sollte das Wasser täglich gewechselt werden.
GUT ZU WISSEN:
Hinweise zur Funktionsweise eines Ultraschallverneblers:
Wie funktioniert der Ultraschallvernebler? Eine Ultraschallmembrane im Geräteinnern versetzt das
Wasser in Schwingung, sodass feinste Wassertröpfchen von der Wasseroberfläche „wegkatapul-
tiert“ werden. Diese Tröpfchen vermischen sich in der Nebelkammer mit der Luft und werden dann
durch einen Ventilator als sichtbarer Nebel in den Raum geblasen. In der warmen Raumluft verduns-
tet der feine Nebel und befeuchtet dadurch die Atemluft.
Weisser Staub:
Beim Ultraschallvernebler-Prinzip werden sämtliche Inhaltsstoffe des Wassers vernebelt, also auch
Kalk und Mineralien. Um dies so weit als möglich zu verhindern, wird das Wasser vor dem Vernebeln
zuerst durch die Kalkfilterkartusche geleitet. Diese hält einen grossen Teil der Inhaltsstoffe zurück.
Das Leitungswasser hat, je nach Region, sehr unterschiedliche Kalk- und Mineralien- Anteile. Es gibt
5

Mineralien, die vom verwendeten Entkalkungsharz ungenügend ausgefiltert werden. In diesem Fall
entsteht ein weisser, staubähnlicher Niederschlag im Raum, den man zuerst auf elektrostatisch
geladenen Flächen sieht (z. B. auf TV-Gerät). Dieser Niederschlag entsteht auch, wenn die Filterkar-
tusche aufgebraucht ist (siehe Kapitel Kalkfilterkartusche und Wasserhärte).
Tipps bezüglich Wasser:
Damit die Atemluft hygienisch bleibt, muss immer sauberes Wasser verwendet werden. Das Gerät
und vor allem der Wassertank müssen immer hygienisch sauber sein.
Empfehlung: Verwenden Sie immer den Silver Cube, denn dieser reduziert die Keimbildung im Wasser.
Hygrostat:
Die Standardtoleranz eines integrierten Hygrostat liegt bei +/- 10%. Das bedeutet, dass die effekti-
ve relative Luftfeuchtigkeit dementsprechend abweichen kann.
STÖRUNGEN
Rote Kontrollanzeige löscht nicht nach dem Wasser nachfüllen:
Das Gerät schaltet bei Wassermangel automatisch ab. Dabei wechselt die Farbe der Leuchtdiode
(an der Vorderseite) von blau auf rot. Um die Nebelerzeugung wieder zu starten, muss das Gerät
zuerst ausgeschaltet und dann wieder eingeschaltet werden (=Reset). Dies ist eine Schutzfunktion
für den Ultraschallvernebler.
Gerät schaltet nicht ein, nachdem Wassertank aufgesetzt und Ein-Schalter betätigt wurde:
Keine Störung, es kann bis zu einigen Minuten dauern bis genügend Wasser für den Betrieb vom Was-
sertank durch die Kartusche in den Unterteil geflossen ist. Warten und Ein-Schalter erneut betätigen.
Wassertank rinnt:
Deckel aufschrauben, Kartusche fest zuschrauben, Deckel wieder auf Tank schrauben.
Niedrige Leistung, kein Dampfausstoss, keine Funktion:
Wartung gemäss Kapitel „Reinigung“
REPARATUREN/ENTSORGUNG
• Reparaturen an Elektrogeräten (Wechseln des Netzkabels) dürfen nur von instruierten Fach-
kräften durchgeführt werden. Bei unsachgemässen Reparaturen erlischt die Garantie und jeg-
liche Haftung wird abgelehnt.
• Wenn das Netzkabel beschädigt wird, muss es vom Hersteller, seinem offiziellen Service-Part-
ner oder einer qualifizierten Person ersetzt werden, um Schäden zu vermeiden.
• Nehmen Sie das Gerät nie in Betrieb, wenn ein Kabel oder Stecker beschädigt ist, nach Fehl-
funktionen des Gerätes, wenn dieses heruntergefallen ist oder auf eine andere Art beschädigt
wurde (Risse/Brüche am Gehäuse).
• Keine scharfen, kratzenden Gegenstände oder ätzende Chemikalien verwenden
• Ausgedientes Gerät sofort unbrauchbar machen (Netzkabel durchtrennen) und bei der dafür
vorgesehenen Sammelstelle abgeben.
• Entsorgen Sie elektrische Geräte nicht im Hausmüll, nutzen Sie die offiziellen Recycling-Sam-
melstellen, falls vorhanden.
• Wenn elektrische Geräte unkontrolliert entsorgt werden, können während der Verwitterung
gefährliche Stoffe ins Grundwasser und damit in die Nahrungskette gelangen, oder die Flora
und Fauna auf Jahre belastet werden.
Dieses Gerät darf nicht mit dem Hausmüll entsorgt werden! Bitte geben sie dieses Gerät
an den dafür vorgesehenen Sammelstellen ab! Das Sammeln und Recyceln elektrischen
und elektronischen Abfalls schont wertvolle Ressourcen!
Das Verpackungsmaterial ist wiederverwertbar. Entsorgen Sie die Verpackung umweltge-
recht und führen Sie sie der Wertstoffsammlung zu.
6

TECHNISCHE DATEN
Dimensionen 198 x 262 x 369 mm (Länge x Breite x Höhe)
Nettogewicht ca. 4.75 kg
Leistungsaufnahme 110 W (Vorwärmen), 30 W (ohne Erwärmen)
Befeuchtungsleistung 400 ml/h
Automatische Abschaltung ja
Wassertankkapazität 7.5 l
Geräuschpegel 32 dBA
Entspricht den EU-Richtlinien CE/WEEE/RoHS
Technische Änderungen vorbehalten
2 JAHRE GEWÄHRLEISTUNG
Während der Gewährleistungsfrist von zwei Jahren ab dem Kauf des Geräts übernehmen wir die
Reparatur eines Geräts oder Teils, bei welchem ein Material- oder Verarbeitungsfehler festgestellt
wurde, oder (nach unserem Ermessen) dessen Ersatz durch ein in Stand gesetztes Produkt, ohne
dass Ihnen Kosten für die Teile oder den Arbeitsaufwand entstehen.
ABGESEHEN VON DER OBEN STEHENDEN GEWÄHRLEISTUNG ÜBERNIMMT Coplax FÜR DIE
ZEIT NACH ABLAUF DER GEWÄHRLEISTUNGSFRIST KEINERLEI ANDERE STILLSCHWEIGENDE
GARANTIE ODER ZUSAGE DER MARKTGÄNGIGKEIT ODER EIGNUNG FÜR EINEN BESTIMMTEN
ZWECK IM HINBLICK AUF DAS PRODUKT. Coplax repariert oder ersetzt ein Produkt im Rahmen
der Gewährleistung nach eigenem Ermessen. Es erfolgt KEINE Gutschrift. Die vorgenannten Rechts-
mittel stellen Ihre einzigen Rechtsmittel bei Verletzung der oben genannten Gewährleistung dar.
WER HAT ANSPRUCH AUF GEWÄHRLEISTUNG?
Anspruch auf Gewährleistung hat der Ersteigentümer eines Coplax-Geräts im Privateigentum, der
einen datierten Kaufbeleg in Form einer Rechnung oder Quittung vorlegen kann. Die Gewährleistung
ist nicht übertragbar. Vor der Rückgabe der Einheit ist eine Kopie des datierten Original-Kaufbelegs
per Fax, E-Mail oder Post zu übersenden. Bitte fügen Sie dem Artikel die Modellnummer Ihres Ge-
räts und eine detaillierte Beschreibung des Problems (vorzugsweise in Maschinenschrift) bei. Legen
Sie die Beschreibung in einen Umschlag, den Sie vor Versiegelung des Kartons mit Klebeband direkt
am Gerät befestigen. Bitte beschreiben oder modifizieren Sie den Original-Karton in keiner Weise.
NICHT IM GEWÄHRLEISTUNGSUMFANG ENTHALTEN:
• Teile, die üblicherweise ausgetauscht werden müssen, etwa Entkalkungspatronen, Silver Cube,
Aktivkohlefilter, Dochtfilter und sonstige regelmässig auszutauschende Verbrauchsteile, es sei
denn, es liegt ein Material- oder Verarbeitungsfehler vor.
• Schäden, Ausfälle, Verluste oder Verschlechterungen aufgrund von gewöhnlicher Abnutzung,
unsachgemässem Gebrauch, nicht bestimmungsgemässer Nutzung, Fahrlässigkeit, Unfall,
Mängeln bei Installation, Aufstellung und Betrieb, unsachgemässer Wartung, unbefugter Re-
paratur, Belastung durch unangemessene Temperaturen oder Bedingungen. Dies umfasst un-
ter anderem Schäden aufgrund der unsachgemässen Verwendung von ätherischen Ölen oder
Wasseraufbereitungs- und Reinigungsmitteln.
• Schäden aufgrund von unzureichender Verpackung oder falscher Handhabung durch Spediteu-
re bei Produktretouren.
• Falscher Einbau oder Verlust von Zubehör, etwa Düse, Duftstoffwanne, Wassertankdeckel usw.
• Kosten für Versand und Transport zum Reparaturort und zurück.
• Direkte, indirekte, besondere oder Folgeschäden jeder Art, unter anderem entgangene Gewin-
ne oder andere wirtschaftliche Verluste.
• Transportschäden an einer Einheit, die von einem unserer Einzelhändler ausgeliefert wurde.
Bitte wenden Sie sich direkt an den Einzelhändler.
Diese Gewährleistung erstreckt sich nicht auf Schäden oder Mängel, die darauf zurückzuführen
sind, dass die Spezifikationen von Coplax in Bezug auf Installation, Betrieb, Nutzung, Wartung,
oder Reparatur des Coplax-Geräts nicht strikt befolgt wurden.
7

Congratulations! You have just become the owner of the extraordinary Stylies Ultrasonic hu-
midifier Hera with State-of-the-Art technology. It will bring you a lot of pleasure when using it
and it will improve the air quality of your rooms.
As for all electrical household devices, special caution is required when using this humidifier in
order to avoid injuries, fire and damages to the device itself. Before you use it for the first time,
please read through this instruction manual carefully and pay attention to the safety guidelines
and indications printed on the device.
DESCRIPTION OF THE DEVICE
The device consists of the following main components:
1. Power cable for power supply
2. Mist cap
3. Transparent water tank
4. Filter cartridge
5. Water tank cover
6. Main base
7. Control panel and Display
8. Silver Cube
9. Mist Cap guide
10. Handel
11. “On/Off” Switch button
12. “Humidity” button
13. “Output” button
14. “Warm Mist” button
15. “Night Mode” button
16. “Auto Mode” button
IMPORTANT SAFETY GUIDELINES
• Do not place the device directly on the floor. Moisture might not evaporate and harm wodden
floors or carpet.
• Please read through the instruction manual carefully before using the Stylies Hera humidifier for
the first time, and store it in a safe place for future reference. If you ever give the humidifier to
a new owner, ensure that you also pass on this instruction manual.
• Coplax AG accepts no liability for any damage that is caused by non-compliance with this instruc-
tion manual.
• The device is only to be used in the household for the intended purpose described in this in-
struction manual. Using the device for purposes other than the intended purpose or performing
alterations to the device can be hazardous to health or fatal.
• This appliance can be used by children aged from 8 years and above and persons with reduced
physical, sensory or mental capabilities or lack of experience and knowledge if they have been
given supervision or instruction concerning use of the appliance in a safe way and understandthe
hazards involved. Children shall not play with the appliance. Cleaning and user maintenanceshall
8
English

not be made by children without supervision.
• Only connect the cable to alternating current. Pay attention to the voltage information on the device.
• If the supply cord is damaged, it must be replaced by the manufacturer, its service agent or
similarly qualified persons in order to avoid a hazard.
• The device must always be unplugged:
- before the device is moved to another place
- before the device is opened or when it is refilled with water
- in the case of malfunction
- before any cleaning
- after each use.
• Never use an extension cable that has been damaged.
• Never carry or pull the device by the power cable.
• Penetrating the housing with any kind of object is strictly prohibited.
• If the power cable becomes damaged, it must be replaced by a qualified person.
• Do not pull the power cable over sharp edges or allow it to become jammed.
• Never remove the plug from the socket by pulling at the power cable and never remove it with
wet hands.
• Do not use this humidifier in close proximity to a bath tub, shower or swimming pool (always
ensure a minimum distance of 3m). Always place the device in a position where it cannot be
reached by anyone in the bath tub.
• Do not set up the device near a source of heat. Do not subject the power cable to direct heat
(such as heat from hot oven hobs, naked flames, hot irons or heating furnaces). Keep the power
cable away from oil.
• Do not position the device directly next to walls, curtains or furniture.
• Ensure that the device is stable during operation and that no-one can trip over the power cable.
• The device is not splash-proof.
• Do not store or use the device outdoors.
• Store the device in a dry place, out of the reach of children (in its box).
• Never touch the ultrasonic membrane (inside the device) when the device is in operation. The
membrane’s oscillations can cause injuries similar to burns.
• Do not add anything to the water (fragrances, essential oils or water fresheners).
FIRST USE / OPERATION
Please note: never transport the device with a full water tank.
Possible hazards:
- too much water from water tank comes into the Main Base (6), this over loaded water level will
cause dramatic reduction of mist output of the device.
- water can easily come out from the Main Base (6).
- the water tank can fall off from the Main Base (6) and get damaged due to the heavy weight from
the water (and water can leak on to the floor).
1. For this reason, Main Base (6) of the Stylies Hera humidifier should be placed first with empty
Water Tank (3) in a suitable location.
2. When the device is in the desired location: Fill Water Tank (3) with fresh water and screw the
Tank Cover (5) back on firmly and check that it is sealed properly. Place Water Tank on base.
Plug Power Cable (1) into the power socket.
In the model with Filter Cartridge (4): do not take off the Filter Cartridge from the Tank Cover
when opening and filling water for the tank.
9

Important: Soak the filter cartridge in a water bath for 24 hours before the first use (not in the
water tank!). The resin has to absorb water to reach high performance.
3. Switch on the device by pressing the On/Off switch (11) on the Control Panel (7), the control
display appears blue. The Mist Cap (2) can be turned 360° or used bi-directional to have an
even distribution of moisture..
4. The desired air humidity level can be selected by pressing the Humidifity button (12) on the
Control Panal. The device will be shut off automatically when the room humidity reaches the
given level. On the Display panel (7), it shows the current humidity level in the room. By press-
ing the Humidifity button (12), you will be able to set the desired humidifity from 40%, 45%,
50%, 60% ,70% and “continous” model. Release the button at your desired humidifity level or
at continous model, the unit is set and the display will switch to show the actual room humidity
level again. Note: on “continous” the unit will NOT turn off automatically.
5. Caution: the device will not be switched on if the humidity level is set too low.
6. Pressing the Output button (13) on the control panel, you can change the volume of output
mist from Level 1 to Level 3 (shown on the display panel).
7. “Warm Mist” button (14): a heater can be switched on by pressing this button. This heater
will heat up the water to 80 C° before it enters into the mist generation chamber. By this pre-
heating function, the temperature of the output mist will reach 40 C°, which will not cause the
room temperature to drop when mist evaporates. A LED light on top the display panel will be
switched on when this pre-heating function is turned on. Press this button again to switch off is
function, and the LED light will be switched off.
8. “Night Mode“ button (15): Pressing this button, the device is switched to “night mode” with dim
LED light. Press again, the device is back to normal light mode. During this mode, the relative
humidity will be kept at a comfort level of 45%.
9. “Auto Mode” button (16): This button can set the humidifity level at 45% and the ventilator
works at the optimal level 1. By pressing this button, the previous humidity level set by “Humid-
ity” button will be canceled.
10. “No water” alarm light: At the lower part of the display panel, there is red LED alarm light. This
light will on when there is no water or not enough water in the mist generating chamber. When
this light is on, you should switch off the unit buy press the “ On/Off Switch” and refill the Water
Tank with fresh water, put it back onto the unit and switch on the unit again.
11. Note: turn off the unit before taking off the tank. You need to turn on the unit again when placing
the tank back to the unit.
12. Althrough the unit shuts off its motor and its transdusor automatically when water runs off
and the “No water” LED light turns on, in order to avoid unexpected damages, we recommend
you to switch off the unit by pressing the On/Off Button as soon as the “No water“ Light is on.
CLEANING PROCEDURE
• Switch off the device and unplug the power cable from the socket before all maintenance work
and after each use.
• Never submerge the device in water (this can result in short-circuiting). To clean the device,
simply wipe it with a damp cloth and then dry it thoroughly. Always ensure the power cable has
been unplugged beforehand.
• Descale the humidifier as appropriate for the hardness of the water, but at least once a week:
First remove the water tank (the upper section) and clean it with a brush. Descale the device
with a standard descaler and then rinse it thoroughly. Reassemble the device completely be-
fore use.
• Thoroughly rinse out the water tank on a regular basis.
• Replace Filter Cartridge (4) every 1-2 months as appropriate for the hardness of the water.
10

FILTER CARTRIDGE AND WATER HARDNESS
• The life-span of the cartridge is dependent on the hardness of the water. This can be tested
using the test strip supplied (The test strip is adhered to the reverse side of this instruction
manual).
• Dip the test strip into the water for one second.
• After approx. one minute, the result can be seen on the measuring strip. Some of the green
areas will change their colour to pink. The number of pink areas corresponds to the hardness
of the water.
• Example: If there are three pink areas, the water has a hardness of “3”.
Number of
pink areas
Water hard-
ness
Hardness
(°dH)
Cartridge needs replacing
after days/litres
(for 3 litres per day)
0/1 soft ab 4°dH approx. 120 days
approx. 360 litres
2 medium ab 7°dH approx. 60 days
approx. 180 litres
3 Slightly hard ab 14°dH approx. 40 days
approx .120 litres
4 Very hard ab 21°dH approx. 20 days
approx. 60 litres
A simple test can be carried out to determine whether the cartridge is functioning correctly: hold a
small mirror in the mist coming out from the unit for a few seconds. If a white deposit has been left
on the mirror (a sign of lime scale), the cartridge needs to be replaced.
Silver Cube
Before attaching the water tank, insert the “Silver Cube” in the base in the position indicated.
The Silver Cube with its patented technology prevents the growth of bacteria and germs. It can be
used for a maximum of one season, and must be replaced at the start of the next heating season
(i.e. when the weather becomes cold).
Despite using the Silver Cube, you should replace the water on a daily basis.
USEFUL INFORMATION:
Information on how an ultrasonic humidifier works:
How does the ultrasonic humidifier work? An ultrasonic membrane in the interior of the device
causes the water to oscillate, causing very fine droplets of water to be “catapulted off” from the
water surface. These droplets mix with the air in the spray chamber and are then blown into the
room through a ventilator as a visible spray. This fine spray evaporates in the warm air in the room,
moistening the air that people breathe.
White dust:
The ultrasonic humidifier method of action causes all substances contained in the water to be
sprayed, including calcium carbonate (a cause of limescale) and minerals. In order to prevent this as
far possible, the water is fed through the filter cartridge before being sprayed. The cartridge retains
a large percentage of the substances contained in the water. Tap water varies greatly from region
to region in terms of its calcium and mineral content. Some minerals cannot be sufficiently filtered
by the descaling resin used. In this case, a white, dust-like deposit is left in the room, which is first
visible on electro-statically charged surfaces (such as TV sets). This deposit also occurs when the
filter cartridge needs replacing (see the chapter on “Filter Cartridge and Water Hardness”).
Tips for water:
11

Clean water must always be used to ensure that the air remains hygienic to breathe. The device, and
the water tank in particular, must always be hygienically clean.
Recommendation: always use the Silver Cube, as this reduces the formation of germs in the water.
Hygrostat:
The standard-tolerance of an integrated hygrostat is +/- 10%. That means the effective relative
humidity level can deviate accordingly.
TROUBLE-SHOOTING
“No Water” alarm light does not switch off after tank has been filled with water:
The device switches off automatically if there is not enough water. The “No Water” Light switches
on (in red color) to warn you for the refill. To restart the generation of mist, the device must first be
switched off and then switched back on again (this resets the device). This is a protective function
for the ultrasonic vaporiser.
Device does not switch on although the water tank has been attached and the on-button has been
pressed:
This is not a malfunction. It takes few minutes till enough water runs from the water tank through the
cartridge and into the mist generation chamber. Wait for a while and then press the on-button again.
The water tank is leaking:
Turn the Tank Cover anti-clockwise to take it off from the Water Tank, check if the Cartridge if fixed
firmly and put the Cover tank back on to the tank.
Low performance, no steam output, device not functional:
Perform maintenance as described in the chapter on “Cleaning Procedure”.
REPAIRS / DISPOSAL
• Repairs to all electric devices (including replacement of the power cable) may only be per-
formed by instructed experts. Carrying out inappropriate repairs voids the warranty and no
liability shall be accepted.
• If the power cable has become damaged, it must be replaced by the manufacturer, his official
service partner or a qualified person, in order for further damage to be avoided.
• Never operate the device if the cable or the plug is damaged, after the device has malfunc-
tioned, if it has been dropped or if it has been damaged in any other way (i.e. with cracks or
breakages to the housing).
• Do not use any sharp, abrasive objects or corrosive chemicals.
• Disable devices that are to be discarded immediately (by cutting off the power cable) and dis-
pose of them at an appropriate waste collection centre.
• Do not dispose of electrical devices in the household refuse. Use the official recycling collection
centres, where available.
• If electrical devices are disposed off in an unregulated way, the effects of weathering can cause
hazardous substances to contaminate the groundwater and the food-chain or this can result in
a burden on flora and fauna for years to come.
This device must not be disposed of with household refuse. Please dispose of this device
at the appropriate waste collection centre. Collecting and recycling electrical and elec-
tronic waste saves valuable resources.
The packaging material is recyclable. Dispose of the packaging in an environmentally
friendly way and ensure that it reaches the recyclable material collection centre.
12

TECHNICAL DATA
Dimensions 198 x 262 x 369 (length x width x height)
Net weight approx. 4.75 kg
Power consumption 110 W (Pre-heating), 30 W (w/o heating)
Humidifiying capacity 400 ml/hour
Automatic shutoff yes
Water tank capacity 7.5 litre
Noise level 32 dBA
Fulfils EU regulations CE/WEEE/RoHS
Subject to technical changes without notice.
TWO-YEAR WARRANTY
For the warranty period of 2 years after the purchase of the appliance, we will repair or replace
with a refurbished product (at our option), without any cost to you for either the parts or labor, any
machine or part that proves to be defective in materials or workmanship.
EXCEPT FOR THE WARRANTY PROVIDED ABOVE, Coplax DISCLAIMS ANY AND ALL OTHER IM-
PLIED WARRANTIES AND ANY WARRANTY OF MERCHANTABILITY OR FITNESS FOR A PARTICU-
LAR PURPOSE WITH RESPECT TO THE PRODUCT FOR ANY PERIOD AFTER THE EXPIRATION.
Coplax will, at its sole discretion, repair or exchange a product under warranty. NO credit will be
issued. The remedies described above are your sole remedies in the event of any breach of the war-
ranty provided above
WHO IS COVERED:
The original owner of a privately-owned Coplax appliance who can provide a dated proof of purchase
in the form of an invoice or receipt is covered. The warranty is not transferable. The original dated
proof of purchase (a copy needs to be faxed, e-mailed, mailed) prior to returning the unit. Provide the
model number of your appliance and a detailed description (preferably typed) of the problem with the
item. Enclose your description in an envelope and tape it directly to the appliance before the box is
sealed. Do not write anything on or alter in any way the original box.
WHAT THIS WARRANTY DOES NOT COVER:
• Parts that normally require replacement, such as demineralization cartridges, Silver Cube, ac-
tive carbon filters, water wick filters and any other consumable item that needs regular replace-
ment except for material or workmanship defects.
• Damage, failure, loss or deterioration due to ordinary wear and tear from abuse, misuse, neg-
ligence, accident, faulty installation, placement and operation, improper maintenance, unau-
thorized repair, exposure to unreasonable temperatures or conditions. This includes damages
caused by misusing essential oils or water treatment and cleaning solutions.
• Damage resulting from inadequate packaging or carrier mishandling of returned products.
• Misplacement or loss of accessories such as nozzle, fragrance capsule, water tank cap etc.
• Shipping and transportation costs to and from any place of repair.
• Direct, indirect special or consequential damages of any type, including loss of profits or other
economic loss.
• Transportation damage of a unit shipped from one of our retailers. Please contact them di-
rectly.
This Warranty does not cover damages or defects caused by or resulting from failure to con-
form strictly to Coplax’s specifications in connection with the installation, operation, use, main-
tenance, or repair of the Coplax appliance.
13

Félicitations ! Vous venez d'acquérir l'humidificateur d'air à ultrasons Stylies Hera, un modèle
exceptionnel doté des toutes dernières innovations technologiques. Il vous offrira un confort
d'utilisation incomparable et améliorera la qualité de l'air chez vous.
Comme tous les appareils électroménagers, vous devez prendre des précautions particulières
en utilisant cet humidificateur, afin d'éviter tout risque de blessure, d'incendie et de dommages
à l'appareil lui-même. Avant d'utiliser l'humidificateur d'air pour la première fois, lisez attenti-
vement ce mode d'emploi et tenez compte des consignes de sécurité et des instructions pré-
sentes sur l'appareil.
DESCRIPTION DE L'APPAREIL
Principaux composants de l'appareil :
1. Câble d'alimentation électrique
2. Sortie de vapeur
3. Réservoir d'eau transparent
4. Cartouche filtrante
5. Couvercle du réservoir d'eau
6. Base
7. Panneau de commande et d'affichage
8. Silver Cube
9. Guide de la sortie de vapeur
10. Poignée
11. Interrupteur „ On/Off „ (marche/arrêt)
12. Bouton „ Humidity „ (humidité)
13. Bouton „ Output „ (débit de vapeur)
14. Bouton „ Warm Mist „ (vapeur chaude)
15. Bouton „ Night Mode „ (mode nuit)
16. Bouton „ Auto Mode „ (mode automatique)
CONSIGNES DE SÉCURITÉ IMPORTANTES
• Merci de lire attentivement l'intégralité du mode d'emploi avant de mettre en service l'humidi-
ficateur d'air Stylies Hera pour la première fois et de le conserver en bon état pour référence
ultérieure. Le transmettre au propriétaire suivant, le cas échéant.
• La société Coplax AG décline toute responsabilité pour les dommages causés par le non-respect
de ce mode d'emploi.
• L'appareil doit être utilisé uniquement dans le cadre domestique aux fins décrites dans le pré-
sent mode d'emploi. Une utilisation non conforme, ainsi que des modifications techniques de
l'appareil peuvent entraîner des risques pour la santé et la vie.
• Cet appareil peut etre utilise par les enfants ages de 8 ans et plus et lespersonnes aux capacites phy-
siques, sensorielles ou mentales reduitesou ne disposant pas de l’experience ou de la connaissance
necessaire,sous surveillance ou s’ils ont recu les instructions concernant l’utilisationde l’appareil et
s’ils comprennent les dangers impliques. Les enfants nedoivent pas jouer avec l’appareil. Les opera-
tions de nettoyage et d’entretienne doivent pas etre effectuees par des enfants sans surveillance.
14
Français

• Raccorder uniquement le câble à une source de courant alternatif. Respecter les données de
tension de l'appareil.
• Retirer impérativement la fiche secteur :
- avant tout déplacement de l'appareil ;
- avant toute ouverture de l'appareil ou en cas de remplissage d'eau ;
- en cas de dysfonctionnements ;
- avant tout nettoyage ;
- après chaque utilisation.
• N'utiliser aucun câble de rallonge endommagé.
• Ne jamais porter ou tirer l'appareil par le câble d'alimentation.
• Il est strictement interdit d'introduire un quelconque objet dans le boîtier.
• Si le câble d'alimentation est endommagé, il doit être remplacé par une personne qualifiée.
• Ne pas tirer ou coincer le câble d'alimentation sur des arêtes vives.
• Ne jamais retirer le câble d'alimentation de la prise avec les mains mouillées.
• Ne jamais utiliser cet humidificateur d'air à proximité directe d'une baignoire, d'une douche ou
d'une piscine (maintenir une distance minimale de 3 m). Installer l'appareil hors de portée des
personnes se trouvant dans la baignoire.
• Ne pas installer l'appareil à proximité d'une source de chaleur. Ne pas exposer le câble d'alimen-
tation à aucune source de chaleur directe (comme par ex. table de cuisson, flammes nues, se-
melle de fer à repasser chaud ou fours de chauffage). Protéger le câble d'alimentation de l'huile.
• Ne pas poser l'appareil directement à côté des murs, des rideaux ou des meubles.
• Veiller à ce que l'appareil soit bien stable pendant le fonctionnement et qu'il ne soit pas possible
de trébucher sur le câble d'alimentation.
• L'appareil n'est pas protégé contre les projections d'eau.
• Ne pas conserver ou mettre en service l'appareil en plein air.
• Conserver l'appareil emballé dans un endroit sec et hors de portée des enfants.
• Ne jamais toucher la membrane à ultrasons (à l‘intérieur de l‘appareil) lorsque l‘appareil est en
service. Les vibrations de la membrane entraînent des blessures similaires à des brûlures.
• N'ajouter aucun additif à l'eau (parfum, huiles essentielles ou préservateurs d'eau).
Ne pas poser l'appareil directement sur le sol. Utiliser un support résistant à l'eau.
MISE EN SERVICE/UTILISATION
Remarque : ne transportez jamais l'appareil lorsque le réservoir d'eau est plein.
Risques possibles :
- L'eau en excès dans le réservoir atteint la base (6), ce trop-plein d'eau provoque une réduction
significative du débit de vapeur de l'appareil.
- L'eau peut facilement s'écouler de la base (6).
- Le poids de l'eau peut provoquer la chute du réservoir d'eau de la base (6) et son endommagement
(de l'eau peut aussi se déverser sur le sol).
1. Pour cette raison, la base (6) de l'humidificateur d'air Stylies Hera doit être d'abord placée avec
le réservoir d'eau (3) vide dans un endroit approprié.
2. Lorsque l'appareil a été installé à l'endroit souhaité : remplissez le réservoir d'eau (3) avec de
l'eau douce, revissez solidement le couvercle du réservoir (5), puis vérifiez qu'il est fermé her-
métiquement. Placez le réservoir d'eau sur la base. Branchez le câble d'alimentation (1) dans
la prise électrique.
Sur le modèle avec cartouche filtrante (4) : ne retirez pas la cartouche filtrante du couvercle
du réservoir lorsque vous ouvrez et remplissez le réservoir d'eau.
15

Important: Veuillez svp mettre la cartouche filtrante dans un bain d’eau pour 24 heures avant
la première utilisation (ne pas dans le réservoir d'eau!). Ceci permet les granulés d’absorber de
l’eau pour atteindre la capacité maximale.
3. Mettez l'appareil en marche en appuyant sur l'interrupteur „ On/Off „ (marche/arrêt) (11) du
panneau de commande (7). L'affichage s'allume en bleu. La sortie de vapeur (2) peut être tournée
sur 360° ou utilisée dans deux sens différents pour une répartition homogène de l'humidité.
4. Le taux d'humidité de l'air souhaité peut être sélectionné en appuyant sur le bouton „ Humidity „
(humidité) (12) du panneau de commande. L'appareil s'arrête automatiquement lorsque l'humi-
dité de la pièce atteint le taux défini. Le panneau d'affichage (7) indique le taux d'humidité actuel
dans la pièce. Appuyez sur le bouton „ Humidity „ (humidité) (12) pour régler le taux d'humidité
souhaité à 40%, 45 %, 50 %, 60 %, 70 % ou en mode „ continuous „ (continu). Relâchez le
bouton une fois le taux d'humidité souhaité atteint ou le mode continu sélectionné, l'appareil est
alors réglé et l'affichage passe à nouveau sur le taux d'humidité actuel de la pièce. Remarque :
en mode „ continuous „ (continu), l'appareil NE s'éteint PAS automatiquement.
5. Attention : l'appareil ne se met pas en marche si le taux d'humidité réglé est trop bas.
6. Appuyez sur le bouton „ Output „ (débit de vapeur) (13) du panneau de commande pour mo-
difier le volume de vapeur sortant de l'appareil, du Level 1 (Niveau 1) au Level 3 (Niveau 3)
(indiqué sur le panneau d'affichage).
7. Bouton „ Warm Mist „ (vapeur chaude) (14) : ce bouton permet d'actionner un dispositif de
chauffage. Celui-ci réchauffe l'eau jusqu'à 80 C° avant qu'elle n'entre dans le compartiment de
production de vapeur. Grâce à cette fonction de préchauffage, la vapeur sortant de l'humidifica-
teur atteint une température de 40 C°, de sorte que la température de la pièce ne diminue pas
lorsqu'elle s'évapore. Un voyant à DEL situé dans la partie supérieure du panneau d'affichage
s'allume lorsque cette fonction de préchauffage est activée. Appuyez à nouveau sur ce bouton
pour désactiver la fonction, le voyant s'éteint alors.
8. Bouton „ Night Mode „ (mode nuit) (15) : appuyez sur ce bouton pour faire passer l'appareil en
„ mode nuit „ et adapter la luminosité des DEL. Appuyez à nouveau sur le bouton pour ramener
l'appareil en mode normal. Dans le mode nuit, le taux d'humidité relative est maintenu à un
niveau de confort de 45 % .
9. Bouton „ Auto Mode „ (mode automatique) (16) : ce bouton permet de régler le taux d'humidité
entre 45 % et de faire fonctionner le ventilateur à une vitesse optimale. Une pression sur ce
bouton annule le taux d'humidité précédemment réglé à l'aide du bouton „ Humidity „ (humidité).
10. Voyant d'alarme „ No water „ (manque d'eau) : un voyant d'alarme à DEL rouge se trouve dans la
partie inférieure du panneau d'affichage. Il s'allume en l'absence d'eau ou lorsque le niveau d'eau est
insuffisant dans le compartiment de production de vapeur. Lorsque ce voyant est allumé, vous de-
vez arrêter l'appareil en appuyant sur l'interrupteur „ On/Off „ (marche/arrêt), remplir le réservoir
d'eau avec de l'eau douce, puis le replacer sur l'appareil et remettre ce dernier en marche.
11. Remarque : arrêtez l'appareil avant de retirer le réservoir. Vous devez remettre l'appareil en
marche lorsque vous replacez le réservoir dessus.
12. Bien que le moteur et le capteur de l'appareil s'arrêtent automatiquement lorsqu'il n'y a plus
d'eau et que le voyant à DEL „ No water „ (manque d'eau) s'allume, nous vous recommandons
d'arrêter l'appareil en appuyant sur l'interrupteur „ On/Off „ (marche/arrêt) dès que le voyant
„ No water „ (manque d'eau) s'allume, afin d'éviter tout endommagement imprévu.
NETTOYAGE
• Avant toute maintenance et après chaque utilisation, arrêter l'appareil et retirer le câble d'ali-
mentation de la prise.
• Ne jamais plonger l'appareil dans l'eau (risque de court-circuit). Utiliser uniquement un chiffon
humide pour le nettoyage, puis sécher minutieusement. Retirer impérativement la fiche sec-
teur au préalable.
• Détartrer l'humidificateur d'eau en fonction de la quantité de tartre, mais au moins une fois par
16

semaine : Retirer tout d'abord le réservoir d'eau (partie supérieure) et nettoyer à l'aide d'une
brosse. Détartrer l'appareil avec un détartrant usuel, puis rincer correctement. Remonter en-
tièrement avant utilisation.
• Bien rincer le réservoir d'eau de manière régulière.
•
Remplacer la cartouche de filtre (4) tous les 1 à 2 mois en fonction de la quantité de calcaire dans l'eau.
CARTOUCHE DE FILTRE ET DURETÉ DE L'EAU
• La durée d'action de la cartouche dépend de la dureté de l'eau. Celle-ci peut être testée à l'aide
de la bandelette de test fournie (la bandelette de test est collée au dos de ce mode d'emploi).
• Plonger la bandelette de test dans l'eau pendant une seconde.
• Le résultat apparaît sur la bandelette de mesure au bout d'une minute environ. Certains
champs verdâtres prennent une couleur rose. La dureté de l'eau est indiquée par le nombre
de champs de couleur rose.
• Exemple : S'il y a trois champs roses, l'eau a un degré de dureté de „ 3 „.
Nombre
de champs
roses
Dureté
de l‘eau
Dureté en
degrés alle-
mands (°dH)
La cartouche est usée
après x jours/litres
(pour 3 litres par jour)
0/1 douce à partir de
4°dH
env. 120 jours
env. 360 litres
2 moyenne-
ment dure
à partir de
7°dH
env. 60 jours
env. 180 litres
3 plutôt dure à partir de
14°dH
env. 40 jours
env. 120 litres
4 très dure à partir de
21°dH
env. 20 jours
env. 60 litres
Le fonctionnement de la cartouche peut être vérifié à l'aide d'un test simple : maintenir un petit mi-
roir dans la vapeur pendant quelques secondes. Si un dépôt blanc (de tartre) est ensuite constaté
sur le miroir, la cartouche doit être remplacée.
Silver Cube
Avant d'installer le réservoir d'eau, introduire le „ Silver Cube „ sur la position marquée dans la partie
inférieure. Grâce à sa technologie brevetée, le Silver Cube empêche le développement de bactéries
et de germes. Il peut être utilisé pendant une saison au maximum et doit ensuite être remplacé au
début de la saison de chauffage suivante.
Malgré l'utilisation de le Silver Cube, l'eau doit être changée quotidiennement.
BON À SAVOIR :
Remarques relatives au fonctionnement d’un nébuliseur à ultrasons :
Comment fonctionne le nébuliseur à ultrasons ? Une membrane à ultrasons située à l'intérieur de
l'appareil fait vibrer l'eau, de telle sorte que les gouttes d'eau les plus fines sont „ catapultées „ de
la surface de l'eau. Ces gouttes d'eau se mélangent avec l'air dans la chambre à brouillard et sont
ensuite soufflées dans la pièce par un ventilateur sous la forme d'un brouillard visible. Le brouillard
fin s'évapore dans l'air ambiant chaud et humidifie ainsi l'air inhalé.
Poussière blanche :
Avec le principe du nébuliseur à ultrasons, toutes les substances contenues dans l'eau sont nébuli-
sées, ce qui inclut également le tartre et les minéraux. Pour empêcher cela autant que possible, l'eau
commence par traverser la cartouche de filtre avant la nébulisation. Celle-ci retient une grande partie
des substances contenues dans l'eau. L'eau du robinet présente des teneurs en tartre et en minéraux
17
Table of contents
Languages:
Other Stylies Humidifier manuals

Stylies
Stylies ORION User manual

Stylies
Stylies Ultra 240 User manual

Stylies
Stylies TITAN User manual

Stylies
Stylies ATLAS User manual

Stylies
Stylies MIRA User manual

Stylies
Stylies AQUILA User manual

Stylies
Stylies ORION COP000759 User manual

Stylies
Stylies ANTARES User manual

Stylies
Stylies CARINA User manual

Stylies
Stylies Libra Series User manual


