2
Swegon reserves the right to alter specifications. 20100816 www.swegon.com
WISE
Figure 3. Connection of slave air diffusers and accessories. For
the ADAPT Ea, one slave air diffuser is normally connected to the
Junction box of the Master air diffuser.
1. ADAPT Master air diffuser (not shown in picture)
2. ADAPT Ea
3. CONNECT Adapt, wiring terminal for the Master air diffuser
4. 230-24 V AC Transformer
5. 5 m long LINK Adapt (RJ45 cable)
10. Connection to main control system (Modbus RTU)
11. SPLIT Link
24 V
Modbus
Figure 5. Commissioning.
Maintenance
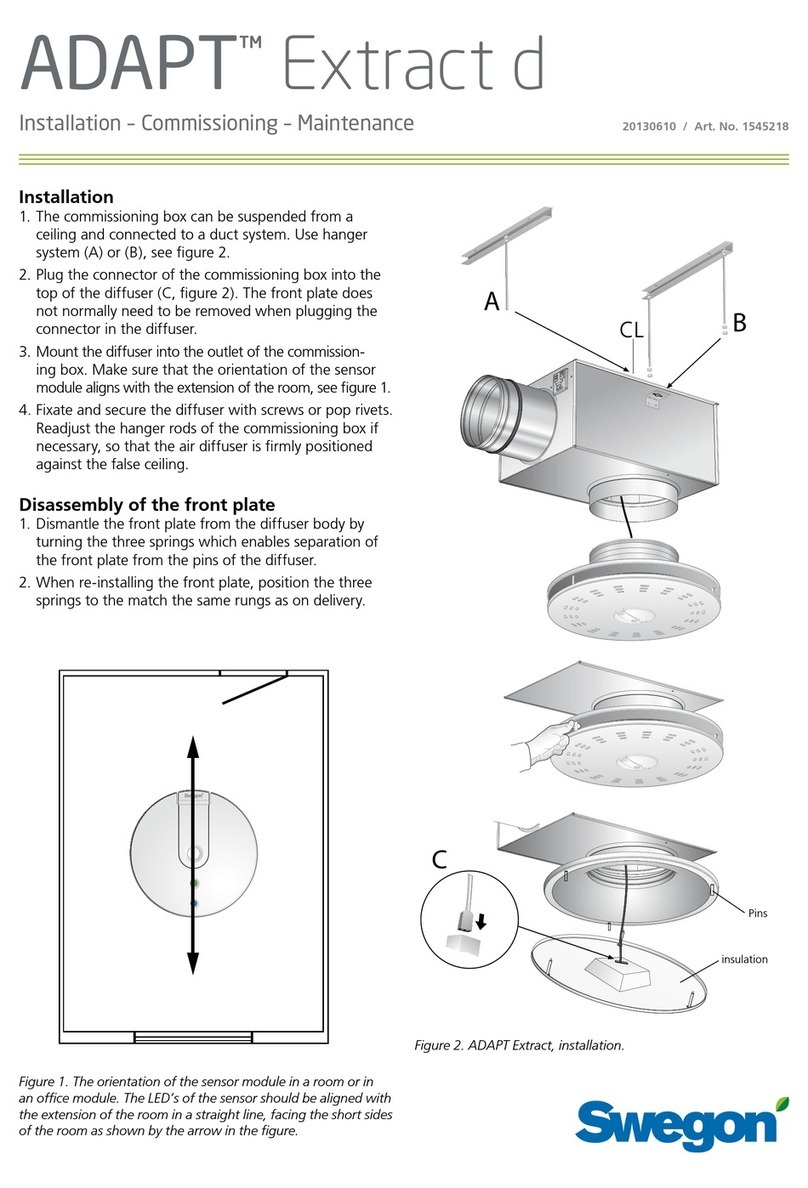
The exterior surface of the ADAPT air diffusers can be
cleaned whenever necessary using lukewarm water with
dishwashing detergent added. Normally the best method
of cleaning is vacuuming with a brush nozzle.
The duct system is accessible through the air diffuser and
the commissioning box.
Electrical connections
All the electrical connections are wired to the CONNECT
Adapt junction box, which belongs to the Master air dif-
fuser. The slave air diffuser is connected by means of the
LINK Adapt (RJ45) cable (included in the supply) to its
respective slave contacts. If more than 2 slave air diffusers
are installed, a SPLIT Link should be used to further con-
nect to the last slave air diffuser. See Figure 4. The maximal
permissible length of the LINK Adapt from the connection
box to the last air diffuser is 15 m if the SPLIT Link is used.
If ADAPT is to be connected up to Modbus communica-
tion, this should be done by means of the LINK Modbus
(RJ12) cable. All cables and contacts are different so that
they will not be confused or incorrectly connected.
Electrical data
ADAPT is supplied with power via the junction box. See the
wiring diagram. It is important that cables with appropri-
ate cross-sectional area, transformers of correct size and
power supply cables of correct length are selected accord-
ing to the specifications in the sizing documents available
at www.swegon.com.
Supply voltage 24 V AC ±10 %
Max. power consumption 3 VA
Cable rating 0,6 A
Ambient temperature: 0 °C - +50 °C
Commissioning
All the ADAPT Air terminals are supplied preset to the so-
called commissioning mode, which means that the air diffuser
is controlled by force to the max. airflow setting. More infor-
mation about the commissioning process itself can be read in
the Project Manual for the Wise system and in the instructions
for TUNE Adapt. When the ADAPT air diffuser is in com-
missioning mode, the light-emitting diode shines orange.
• Steady green LED: Normal operation, the air diffuser is
operating normally.
• Flashing green LED: The air diffuser has just been energi-
sed and calibration is in progress.
• Steady red LED: The voltage (24V AC) is too low
• Flashing red LED: Internal sensor error
• Steady orange LED: The commissioning mode, max.
airflow
• Flashing orange LED: Other commissioning modes and
all the forced control situations of the feed-back control
system.
2
3
1
Figure 4. Air diffuser connections
1. Connection for LINK Adapt cable (RJ45)
2. Connection for the LINK Modbus cable (RJ12). Only the master
air diffuser should be connected.
3. Direct 24 V connection if a junction box is not used and the air
diffuser will be completely “stand alone”.
20
Master
21
Slave
22
Slave
23
Modbus
1 2 3 4 5 6 7 8 9 10 11 12 13 14 15 16
2
4
3
55
22
10
11
5
- + C
