SWIT S-1092H User manual

Model:S-1092H
9” Full HD Broadcast LCD Monitor
User Manual
Ver: V1.0.0V00
Please read this ser Manual
throughout before using.

Preface
Congratulations on your purchase of this product. Please read this user manual carefully.
1
.
All internal technologies of this product are protected, including device, software and trademark.
Reproduction in whole or in part without written permission is prohibited.
2
.
All brands and trademarks of SWIT Electronics Co., Ltd. are protected and other relative trademarks
in this user manual are the property of their respective owners.
3
.
Due to constant effort of product development, SWIT reserves the right to make changes and
improvements to the product described in this manual without prior notice.
4
.
The warranty period of this product is 2 years, and does not cover the following:
(1) Physical damage to the surface of the products, including scratches, cracks or other damage to
the LCD screen or other externally exposed parts;
(2) The LCD dot defects are not over three;
(3) Any damage caused by using third-party power adaptors;
(4) Any damage or breakdown caused by use, maintenance or storage not according to the user
manual.
(5) The product is disassembled by anyone other than an authorized service center.
(6) Any damage or breakdown not caused by the product design, workmanship, or manufacturing
quality, etc.
5
.
For any suggestions and requirements on this product, please contact us through phone, fax, Email,
etc.
SWIT Electronics Co., Ltd.
Address: 10 Hengtong Road, Nanjing Economic and Technological Development Zone,
Nanjing 210038, P.R.China
Phone: +86-25-85805753
Fax: +86-25-85805296
Email: contact@swit.cc
Website: http://www.swit.cc

Maintenance
The Monitor
1. Please keep the signal terminals and the cooling vent away from knife-edge, metal or liquid in
order to avoid short-circuit and damage.
2. Please don't try to disassemble any parts of the monitor by yourself, which would probably
damage the monitor and do harm to human body, and it will cause the invalidation of product
warranty.
3. Please don't touch the screen with your fingers, which would probably deface the screen.
4. Please don't press the screen; the LCD is extremely exquisite and flimsy.
The power
Please use the power adapter provided or recommended by the manufacturer in order to avoid
damage. For a third party power adapter, please make sure the voltage range, supplied power, and
polarity of power lead are fit.
Please disconnect the power cable under the following situations:
1. If you do not operate this monitor for a period of time;
2. If the power cable or power adaptor is damaged;
3. If the monitor housing is broken.
Working En ironment
1. Please don't lay this product on the unstable place.
2. Please don't lay this product in hot, cold or wet location.
Cleaning
1. Please clean the screen with dry and downy cloth or special LCD cleanser.
2. Please do not press hard when cleaning the screen.
3. Please do not use water or other chemical cleanser to clean the screen. The chemical may
damage the LCD.
4. For first time use, please tear off the factory LCD film. To protect the LCD screen, please post the
LCD protection film offered in the package.

1. Features
Full-HD 9” LCD Panel
IPS LCD panel, 1920×1200 resolution, H
170°/V 170° viewing angle, 800:1 contrast,
LCD protecti e glass
Applied LCD protective glass to effectively
protect the LCD panel from external
shocks.
Multiple inputs
3G/HD/SD-SDI, HDMI and Composite input
Loop through outputs
3G/HD/SD-SDI, HDMI has loop through
output
PIP Display
nder SDI/HDMI, switch on a sub-window
to PIP display another CVBS
nder CVBS, switch on a sub-window to
PIP display another SDI/HDMI
SDI audio de-embed
De-embed SDI audio and output via 3.5mm
headphone socket or speaker
2-ch audio meter display
nder SDI and HDMI, it displays channel1
and channel 2 embedded audio meters
with mark. The audio meter is green, and
will turn yellow when audio exceeds -20dB,
and turn red when exceeds -9dB.
SDI Timecode
nder SDI input, it can display the SMPTE
timecode, which is used extensively for
synchronization, and for logging and
identifying material in recorded media.
Peaking focus assist (red/blue switch)
The Peaking focus assist function is to
mark the sharpest edges of the image with
red or blue color, for users to check if the
subjects are focused.
Zebra stripes
Zebra Stripes are used to check if the
image is over exposed or not by showing
black and white lines on the monitor. It is
considered over exposed when luminance
value exceeds 90%.
Freeze frame
To capture and display the on-play current
frame.
Blue/Red/Green only
nder the Blue/Red/Green Only Mode, only
the blue/red/green pixels are used to
generate the image, to assist image noise
monitoring and adjustment.
Safe Area Adjustable
You can select the scale of safe area frame
from 80%, 85%, 88%, 90% ,93% and 95%
in the menu system.
Scale Marker
The monitor has 16:9 native LCD panel,
and supports 4:3, 13:9, 14:9, 15:9, 1.85:1
and 2.35:1 scales marker for different video
producing.
User definable function keys
There are 4 function keys on the monitor
front panel, which permit users to define
shortcuts for the various functions.
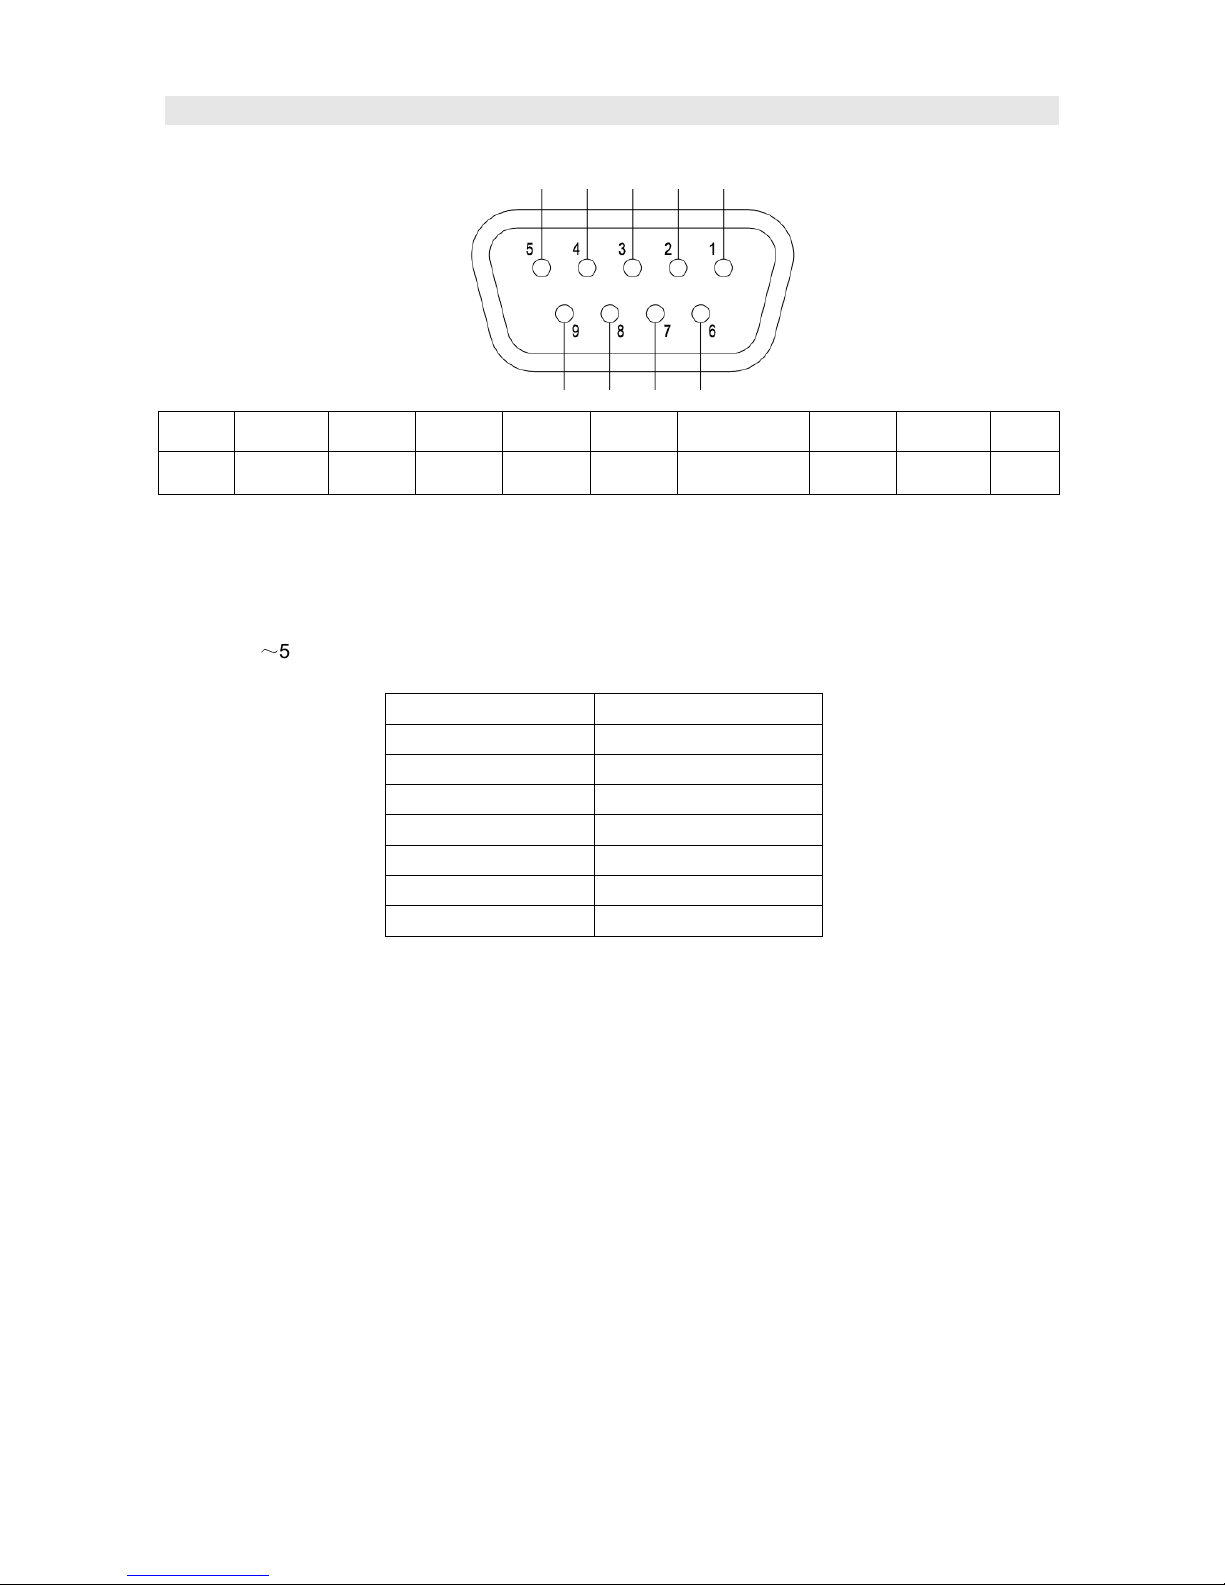
User definable GPI control
Offer DB9 interface to define functions for
users to remote operate the monitor.
User editable ideo title
ser can edit a video title for the current
camera, and the title will display on the top
of screen.
Front and Rear 3-color TALLY light
2 TALLY lights design, to give “live” signals
to people in front of the camera, as well as
the camera operator behind.
Quick interchangeable battery mount
The monitor supports snap-on DV battery
plates of various types, which can be easily
taken of and changed to another type.

2. Panel Instruction
Front iew
⑴
MEN
:
Press to enter Menu
⑵
DISPLAY
:
Display current settings
Press “Display” to display or shut off relevant status information
⑶
ZOOM: Press “ ZOOM” to switch on/off the zoom function.
⑷
SO RCE
:
Press
“
SO RCE
”
to select SDI1
、
SDI2
、
HDMI
、
CVBS signal input
⑸~⑻
ser definable function keys
Press and hold F1/F2/F3/F4, it will display the current definitions of the 4 function keys.
⑼
ENTER/VOL
:
Select and Apply
nder menu system, revolve “ENTER/VOL” to adjust settings and press to apply;
Out of menu system, revolve “ENTER/VOL” to adjust volume, and press “ENTER/VOL” to mute.
⑽
BRIGHT: Revolve “BRIGHT” to adjust brightness value from 0
~
100. Default: 50.
⑾
CONTRAST
:
Revolve “CONTRAST” to adjust contrast value from 0
~
100. Default: 50.
⑿
SAT RATION
:
Revolve “SAT RATION” to adjust saturation value from 0
~
100. Default: 50.
⒀
POWER
:
Power on/off
Connect with power cable, press the “POWER” to switch on the monitor. Press again to switch off.
Disconnect with power cable or battery if the monitor will not be used for a period of time.
⒁
TALLY Light: Red, Green and Yellow 3-color TALLY indicator
⒂
PHONE
:
3.5mm earphone socket, for SDI/HDMI embedded audio and analog audio monitoring.

Rear iew
⑴
DC 12V IN: Connect with DC12V 4-pin XLR power adapter, support 6.5V-24V voltage input (Pin 1:
Negative, Pin 4: Positive)
⑵
Heat sinks: under normal temperature, when the monitor is working, the temperature of the heat
sinks may reach 55
℃
which is a normal phenomenon. Please do not touch the heat sinks.
⑶、⑷
Battery mount connector:
Connect with SWIT S-7004 series quick release battery plate, and then mount corresponding
V-mount or DV batteries. See details in “5.Optional Battery Plate”.
⑸
SDI-O T: SDI loop through output (BNC connector)
When SDI2 is displayed, the SDI-LOOP outputs the SDI-IN2 signal, and when SDI-IN1 or other
input sources are displayed, the SDI-LOOP outputs the SDI-IN1 signal.
⑹
SDI-IN1
:
SDI input (BNC connector)
⑺
HDMI-O T: HDMI loop through output (HDMI
-A
connector)
⑻
PHONE: 3.5mm headphone socket, for SDI/HDMI embedded audio and analog audio monitoring.
⑼
AD IO-IN: 3.5mm analog audio input
⑽
HDMI-IN: HDMI input (HDMI
-A
connector)
⑾
SDI-IN2: SDI input (BNC connector)
⑿
CVBS-IN: CVBS input (BNC connector)
⒀
TALLY/GPI:TALLY and GPI control input. See details in “4.TALLY/GPI TALLY Operation”.
⒁
TALLY Light: Red, Green and Yellow 3-color TALLY indicator
·
··
·
Input formats
Input
Supported formats
CVBS
PAL
/
NTSC
HDMI
480
i
/
576
i
/
480
p
/
576
p
1080i
(
60
/
59.94
/
50
)
720p
(
60
/
59.94
/
50
)
1080p
(
60
/
59.94
/
50
/
30
/
29.97
/
25
/
24
/
23.98
)
SDI
SMPTE
-
425
M
1080p
(
60
/
59.94
/
50
)
SMPTE
-
274M
1080i
(
60
/
59.94
/
50
)
,
1080p
(
30
/
29.97
/
25
/
24
/
23.98
)
SMPTE
-
RP211
1080
p
sf
(
30
/
29.97
/
25
/
24
/
23.98
)
SMPTE
-
296M
720p
(
60
/
59.94
/
50
)
SMPTE
-
125M
480i
(
59.94
)
IT
-
R
BT.656
576i
(
50
)

3. Menu Operation
⑴
Press “MEN ” and it will display menu system
⑵
Revolve “ENTER” to select an item. The selected item will be highlighted display.
⑶
Press “ENTER” to enter the selected item.
⑷
nder menu system, press “MEN ” to back to previous menu.
*The menu will automatically save and quit if it remains idle.
3.1 VIDEO submenu
The PICT RE submenu includes:
⑴
CONTRAST: 0-100 value adjustment
⑵
BRIGHTNESS: 0-100 value adjustment
⑶
HUE: 0-100 value adjustment
⑷
SATURATION: 0-100 value adjustment
⑸
SHARPNESS: 0-100 value adjustment
⑹
SD Aspect Ratio: under SD-SDI input, the aspect
radio can be set to 4:3 or 16:9; under HD-SDI, it is not
available to adjust.
⑺
SCAN: “ NDERSCAN” / “OVERSCAN” / “Full Screen” / “Pixel-to-pixel” / ”SD 2X Display” selection.
⑻
ZOOM: Turn on the zoom function to enlarge the video by 150% from the center in real time.
3.2 Color temp submenu
The Color temp submenu includes:
⑴
Color temp
:
5600K, 6500K, 9300K, SER1, SER2,
SER3
⑵
Red GAIN
:
0
~
255 value adjustment
⑶
Green GAIN
:
0
~
255 value adjustment
⑷
Blue GAIN
:
0
~
255 value adjustment
⑸
Red Offset
:
0
~
255 value adjustment
⑹
Green Offset
:
0
~
255 value adjustment
⑺
Blue Offset
:
0
~
255 value adjustment
* Remark: RGB GAIN and RGB Offset settings are only available when “Color temp” is set as
SER1/2/3
3.3 Marker submenu
The Marker submenu includes:
⑴
Marker Select: Select the scale marker from 4:3, 13:9,
14:9, 15:9, 1.85:1, 2.35:1 and 16:9
⑵
Safe Area: Select the safe area scale from 80%, 85%,
90%, 93% and 95%.
⑶
Center Marker: ON/OFF
Turn on/off the center cross marker on the screen.
⑷
Marker Color: Select the color of markers from
WHITE, RED, GREEN, BL E, BLACK and GRAY.
⑸
Fit Marker: On/Off
When switched off, the size of the safe area is 80%~95% of the actual screen display area; and
when switched on, the size of the safe area is 80%~95% of the inside scale marker area.

⑹
Marker Back: Normal, Semitransparent, Black
Normal: Normally display the outer area of scale marker
Semitransparent: half-tone display the outer area of scale marker
Black: Black display the outer area of scale marker
3.4 OSD submenu
The OSD submenu includes:
⑴
Menu Position: Center, right top, right bottom, left
top, left bottom
⑵
Menu timeout: 0
~
60s
Set a time (in seconds) in which the menu will
automatically quit if remains idle. Default: 30.
⑶
Language: Menu language selection
⑷
Source ID Display
:
On/Off
⑸
Source ID Character
:
CAM 1
。
Revolve "ENTER" button to select the letters, and press "ENTER" to input. Max 10 letters are
supported, the default is CAM1. There are 76 letters available, details are as below:
A
~
Z
a
~
z
0
~
9
!
& ‘
(
)
* +
,
- . / : ?
⑹
Input info Display
:
On/Off
On
:
turn on the OSD info display
Off
:
turn off the OSD info display
3.5 System submenu
The system submenu includes:
⑴
Backlight: 0
~
100 value adjustment
⑵~⑸
F1
~
F4 Button: define Function Key F1, F2, F3
and F4, function includes:
⑹
Input Source Scan: On/Off
Switch on: when turn on the monitor, it will scan the signal input with the sequence: SDI1
→
SDI2
→
HDMI
→
CVBS until the first recognized input and automatically display.
⑺
Tally R Brightness: Low, Medium, High
⑻
Tally G Brightness: Low, Medium, High
⑼
Reset: Yes/No
Select “YES” to recover all to factory settings expect Language setting.
SD Aspect Ratio Zebra
Scan B/R/G Only
Zoom Time Code
Mono CVBS
Freeze Frame HDMI
Button Lock SDI1
PIP SDI2
Focus Assist ndefined
Audio Bar

3.6 GPI submenu
The “GPI” submenu includes:
⑴
GPI control: on/off
On: ser can control the monitor through GPI control
unit
Off: ser cannot control the monitor through GPI
control unit
⑵
Terminal1~5: define each GPI terminal function, see
details in “4.TALLY/GPI Operation”
3.7 PIP submenu
The “PIP” submenu includes:
⑴
Sub window size:
Off, Large, Small
⑵
Sub window position:
Right-Bottom, Right-Top, Left-Bottom, Left-Top
⑶
Sub window source
When the input signal is SDI1/SDI2/HDMI,
the PIP window signal can only be CVBS;
When the input signal is CVBS,
the PIP window signal can be selected from SDI1/SDI2/HDMI.

4.TALLY/GPI Operation
The GPI interface is the DB9 port, the DB9 terminals definition are as below:
ser can define each GPI terminal function in the “menu”. It will be on when GPI terminal connected to
GND, and off when disconnected.
Terminal 1
~
5: the functions can be set as below:
ndefined Freeze Frame
Tally R Button lock
Tally G PIP
Tally Y Focus assist
SD Aspect Ratio Audio bar
Scan Zebra
Zoom B/R/G Only
Mono Timecode
DB9 1 2 3 4 5 6 7 8 9
GPI GPI_1 GPI_2
GPI_3
GPI_4
GPI_5
VCC_OUT GND

5. Optional Battery Plate
5.1 Battery Mount choice
S-1092H monitor can use V-mount, Gold mount and various DV batteries by connecting with SWIT
S-7004 series battery plates. There’re following types of S-7004 for choice:
Model Compatible battery type Recommended SWIT battery
S-7004F SONY L series NP-F770/970 S-8972, S-8970, S-8770
S-7004P Panasonic CGA series D54S/D28S S-8D62
S-7004J JVC BN-V428 S-8428
S-7004C Canon BP series BP-930/945 S-8945, S-8845
S-7004 SONY BP- series 60/30 S-8 63
S-7004E Canon DSLR, LP-E6 S-8PE6
S-7004B Panasonic VW-VBG6 S-8BG6
S-7004V JVC BN-VF823 S-8823
S-7004I JVC SSL-JVC50 S-8I50
S-7004S SONY V-mount batteries S-8080S, S-8110S, S-8160S.etc
S-7004A Anton Bauer Gold mount batteries S-8080A, S-8110A, S-8160A.etc
5.2
Installation of S-7004F/P/J/C/U/E/B/V/I snap-on type DV battery plate
S-7004F/P/J/C/ /E/B/V/I DV plate is snap-on type, quick release and interchangeable. Please
follow the instructions to install:
(1) Please make sure the power terminals are clean and in well condition before use.
(2) Align the S-7004 DV plates slots to the bolts of the monitor rear panel, and press tightly in.
(4) Fix the S-7004 DV plates by provided screws on the top side.
(5) Mount the corresponding battery to S-7004 DV plate to power the monitor.
(6) To release the battery, press the battery release button to take out the battery

5.3
Installation of S-7004A/S Gold mount / V-mount battery plate
To use Gold mount or V-mount battery, please install the S-7004A/S plate as following
instructions:
(1) Please make sure the power terminals are clean and in well condition before use.
(2) Connect the wire of S-7004A/S to the 2-pin DC socket.
(3) Align the S-7004A/S screw holes to the bolts of the monitor rear panel.
(S-7004A Gold mount plate need a spare bedding between the monitor and plate)
(4) Fix the S-7004A/S mount by provided screws.
(5) Mount Gold mount / V-mount battery to S-7004A/S to power the monitor.
(6) Press the battery release to take down the battery

6.Specification
LCD Performance
Size 9 inches
Display area 192 mm
×
120 mm
Resolution 1920
×
1200
Aspect ratio 16:9 / 4:3
Brightness 450cd
/
m
2
Contrast 800:1
Viewing angle Horizontal: 170
Vertical: 170
Input and Output
Input
BNC ×2 3G/HD/SD-SDI input ×2
BNC ×1 CVBS input
HDMI ×1 HDMI input
3.5mm ×1 Analog audio input
Output
BNC ×1 3G/HD/SD-SDI loop through output
HDMI ×1 HDMI loop through output
3.5mm ×1 SDI/HDMI/analog audio output
Video Format
CVBS NTSC /
PAL
HDMI
480i / 576i / 480p / 576p
1080i (60 / 59.94 / 50)
720p (60 / 59.94 / 50)
1080p (60 / 59.94 / 50 / 30 / 29.97 / 25 / 24 / 23.98)
SDI
SMPTE-425M 1080p (60 / 59.94 / 50)
SMPTE-274M 1080i (60 / 59.94 / 50)
1080p (30 / 29.97 / 25 / 24 / 23.98)
SMPTE-RP211 1080psf (30 / 29.97 / 25 / 24 / 23.98)
SMPTE-296M 720p (60 / 59.94 / 50)
SMPTE-125M 480i (59.94)
IT -R BT.656 576i (50)
General
Input voltage DC 6.5V-24V
Power consumption ≤18W
Working temperature 0
℃~
+40
℃
Working humidity 10%
~
90%
Storage temperature -15
℃~
+60
℃
Storage humidity 10%
~
90%
Dimensions 241
×
178
×
52mm
Net weight (main body) 1.1kg

7.
Packing List
Simple Package Luxury Package
1. Monitor 1. Monitor
2. ser Manual 2. ser Manual
3. Warranty card 3. Warranty card
4. Sun hood 4. Sun hood
5. Cold shoe / Screw arm trestle 5. Cold shoe / Screw arm trestle
6. Power adaptor + Power cable 6. Power adaptor + Power cable
7. shape desktop stand
8. D-tap to 4-pin XLR cable
9. Carrying case


Table of contents
Other SWIT Monitor manuals