Drucklegung: CHF 2.60/min) wenden. Bei Garantieansprüchen wenden Sie sich an Ihren Fachhändler. Die Garantie-
zeit beträgt 2 Jahre.
Fragen und Antworten
Fragen Antworten
Keine Funktion − Die Batterien sind nicht korrekt eingelegt
− Die Batterien sind leer
Senden nicht
möglich − Drücken Sie die P−Taste vollständig, um zu senden
− Ihr Kanal wird von anderen Teilnehmern benutzt
Kein Empfang − Lassen Sie die P−Taste los, um zu empfangen
− Die Lautstärke ist zu gering eingestellt
− Sie befinden sich außerhalb des Empfangsbereichs, ändern Sie Ihre Position
− Hindernisse wie Bäume und Gebäude haben einen negativen Einfluss auf die Reichweite
− Nutzen Sie die Funktion Monitor", um nach schwachen Signalen zu suchen
6 Technische Eigenschaften
Technische Daten
Merkmal Wert
Ausgangsleistung 0.5 W
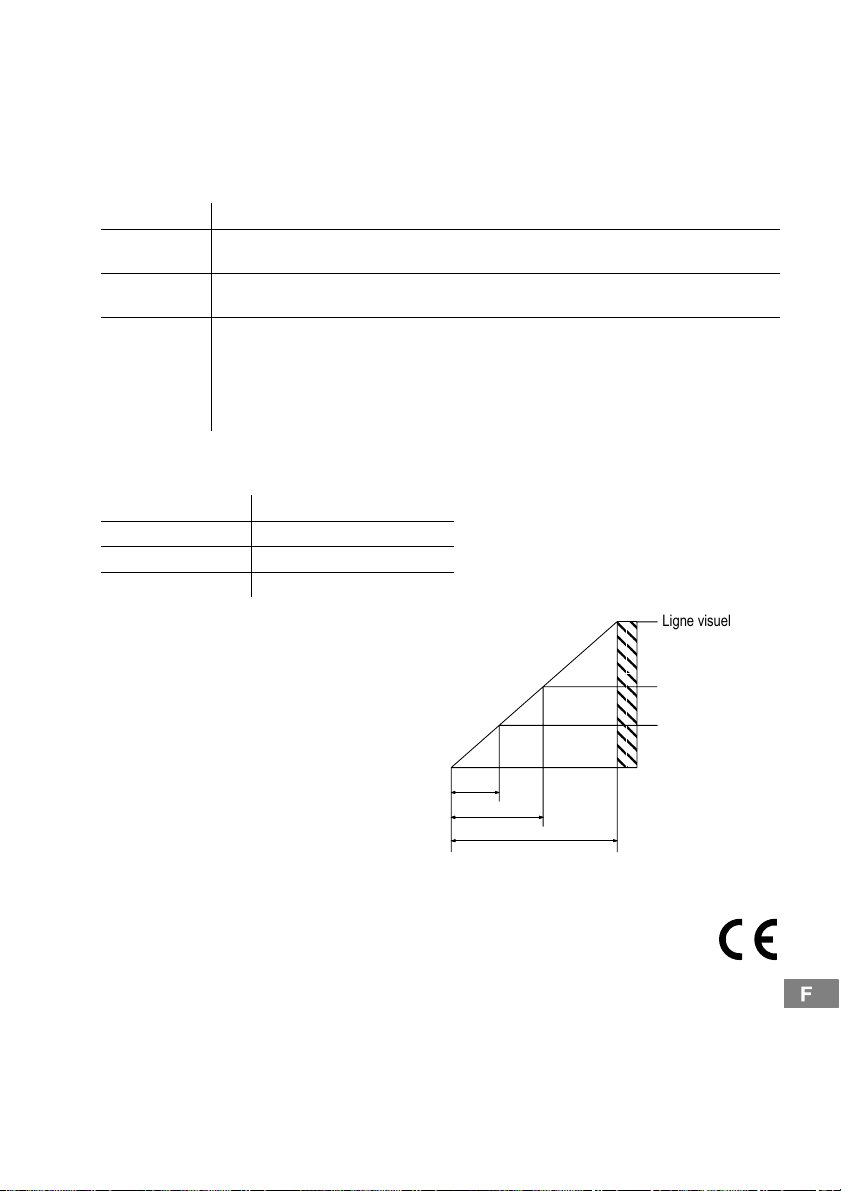
Reichweite ca. 5 km − bei freier Sichtlinie
Batterien Alkaline AAA 1.5V
Reichweite
Hindernisse wie Bäume und Gebäude haben einen
negativen Einfluss auf die Reichweite. Die folgende
Skizze zeigt die zu erwartende Reichweite bei
unterschiedlichen Bedingungen.
Konformitätserklärung
Dieses Gerät erfüllt die Anforderungen der EU−Richtlinie:
1999/5/EG Richtlinie über Funkanlagen und Telekommunikationsendeinrichtungen und die gegenseitige An-
erkennung ihrer Konformität. Die Konformität mit der o. a. Richtlinie wird durch das CE−Zeichen auf dem Ge-
rät bestätigt.
Die Konformitätserklärung finden Sie auf der Rückseite dieser Bedienungsanleitung.
7 Pflegehinweise / Garantie
Pflegehinweise
SReinigen Sie die Gehäuseoberflächen mit einem weichen und fusselfreien Tuch.
SVerwenden Sie keine Reinigungsmittel oder Lösungsmittel.
Garantie
SWITEL − Geräte werden nach den modernsten Produktionsverfahren hergestellt und geprüft. Ausgesuchte Materialien
und hoch entwickelte Technologien sorgen für einwandfreie Funktion und lange Lebensdauer. Die Garantie gilt nicht
für die in den Produkten verwendeten Batterien, Akkus oder Akkupacks. Die Garantiezeit beträgt 24 Monate, gerechnet
vom Tage des Kaufs.
Innerhalb der Garantiezeit werden alle Mängel, die auf Material− oder Herstellungsfehler zurückzuführen sind, kosten-
los beseitigt. Der Garantieanspruch erlischt bei Eingriffen durch den Käufer oder durch Dritte. Schäden, die durch un-
sachgemäße Behandlung oder Bedienung, natürliche Abnutzung, durch falsches Aufstellen oder Aufbewahren, durch
unsachgemäßen Anschluss oder Installation sowie durch höhere Gewalt oder sonstige äußere Einflüsse entstehen,
fallen nicht unter die Garantieleistung. Wir behalten uns vor, bei Reklamationen die defekten Teile auszubessern, zu
ersetzen oder das Gerät auszutauschen. Ausgetauschte Teile oder ausgetauschte Geräte gehen in unser Eigentum
über. Schadenersatzansprüche sind ausgeschlossen, soweit sie nicht auf Vorsatz oder grober Fahrlässigkeit des Her-
stellers beruhen.
Sollte Ihr Gerät dennoch einen Defekt innerhalb der Garantiezeit aufweisen, wenden Sie sich bitte unter Vorlage Ihrer
Kaufquittung ausschließlich an das Geschäft, in dem Sie Ihr SWITEL − Gerät gekauft haben. Alle Gewährleistungsan-
sprüche nach diesen Bestimmungen sind ausschließlich gegenüber Ihrem Fachhändler geltend zu machen. Nach Ab-
lauf von zwei Jahren nach Kauf und Übergabe unserer Produkte können Gewährleistungsrechte nicht mehr geltend
gemacht werden.
Freie Sichtlinie
Mittlere Bebauung
Starke Bebauung
ca. 5 km
750 m
1,5 km
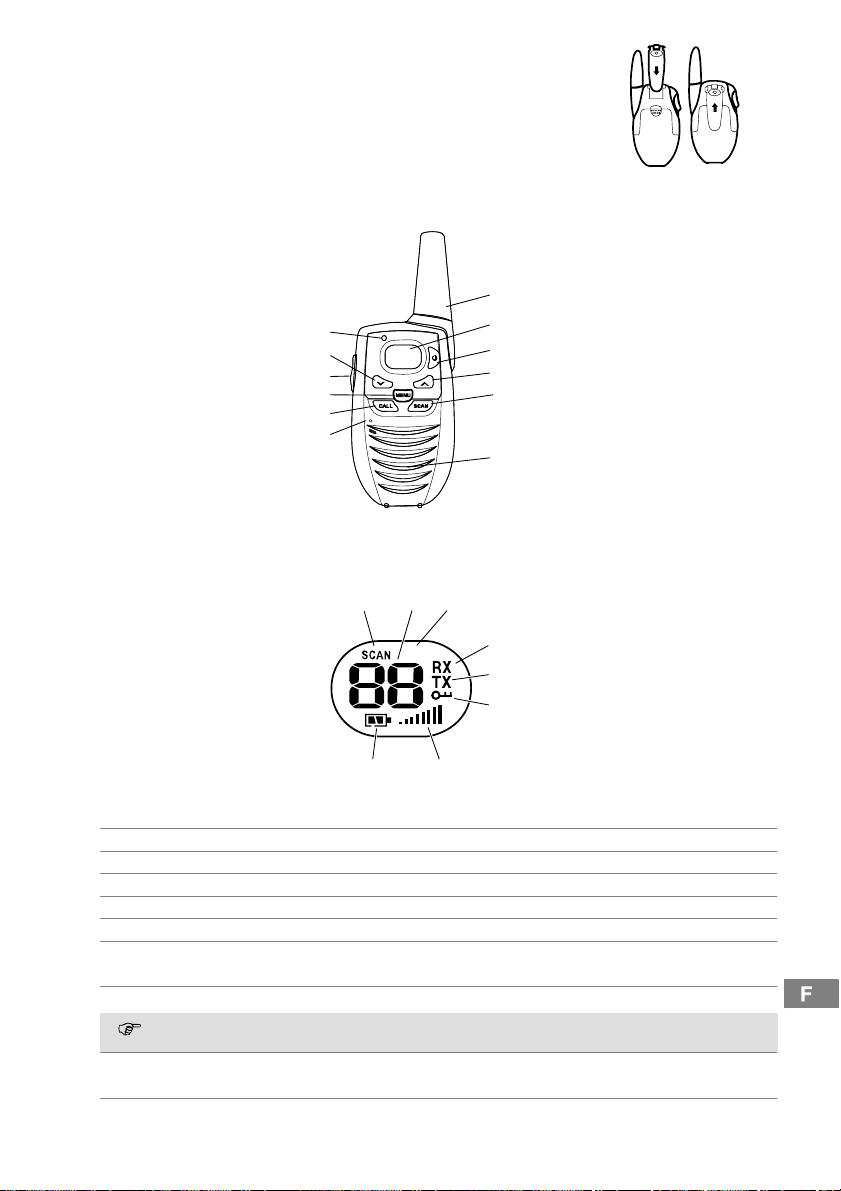
Signalstärke