Takara Belmont AY-YHBYM Series User manual

1
Operating Instructions
Takara Belmont Shampoo Accessory
AY-YHBYM*/AY-YHBSS*
Model number:
2022.06 (version 2)
1A0WPCA0 (inquiry number)
Thank you for purchasing this Takara Belmont product.
Please read the Operating Instructions carefully before use and use the product correctly.
Failing to read the Operating Instructions before use may lead to accidents.
●Keep this booklet safe near the product so that it can be referred to promptly, and be sure to read this
booklet again when necessary.
●This product is an industrial appliance designed for use by hair and beauty salons. Only use this
product for its intended purpose.
●The product must only be used by professionals such as hair stylists and aestheticians.
If the Operating Instructions become illegible due to stains and tears, or if this booklet is misplaced,
please request a copy from Takara Belmont using the inquiry number shown in the box below.
YUMEHEADBATH
(AY-YHBYM* shown in the figure)
Instruction manual
Video (about 4 minutes)
https://beauty.takarabelmont.co.jp/
yume-headbath-videos/

2
Table of Contents
Introduction
Preparation
How to Use
Maintenance
Description of Warning Symbols .................................................................................. 3
Safety Precautions ...................................................................................................... 4
Precautions for Use .................................................................................................. 6
Accessories ............................................................................................................... 7
Names of Parts ......................................................................................................... 8
Device Setup ............................................................................................................. 9
Customer Setup ...................................................................................................... 10
Nozzle Arch Setup .................................................................................................. 11
Inner Bowl Setup .................................................................................................... 12
Performing Treatment ........................................................................................... 12
After Treatment ...................................................................................................... 15
Maintenance Method ............................................................................................. 17
Daily Inspection ...................................................................................................... 19
Standard Period of Use .......................................................................................... 19
Consumable Goods ................................................................................................ 20
Disposal of the product ......................................................................................... 21
Specifications ......................................................................................................... 21
Product Dimension Diagram ................................................................................. 22
Information for Use when Needed

3
Description of Warning Symbols
These are intended for the safe use of the product and to prevent harm and damage to users and other
people.
All of the precautions shown are important details related to safety. Please be sure to follow these
precautions.
If an accident occurs due to a failure to follow the Safety Precautions and Precautions for Use, Takara
Belmont is not responsible for any damage or risk to the person using this product or those around
them due to accidents. In this case, the person failing to adhere to the Safety Precautions and Precau-
tions for Use will be responsible for any damage or risk incurred.
Detailed descriptions of symbols are provided below. Read and understand these symbols thoroughly
before reading this manual.
Please be sure to read the Safety Precautions and Precautions for Use carefully and use the product
correctly.
■Before using the product ...
■Precautions shown on this page
The items explained under this symbol are precautions that may
result in deaths or serious injury from the incorrect handling of the
product if the warning is not followed.
The items explained under this symbol are precautions that may
result in mild or moderate injury or property damage from the
incorrect handling of the product if the caution is not followed.
Symbols Magnitude of harm/damage and urgency
Individual items that must be complied with are explained under the following symbols:
WARNING
CAUTION
Symbols for prohibited items Symbols for mandatory items
Display for general prohibitions
Display for prohibition of disassembly,
repair, and modification
Display for general mandatory action
by the user

4
Safety Precautions (items that must be followed)
WARNING
When using or handling the product ...
●Be sure to perform daily inspection
The use of the product without performing daily inspections may lead to injury and product
damage.
Please refer to [page 19] for the daily inspection.
●Avoid disassembling, repairing, and modifying the product
・The device must not be disassembled or repaired by people other than qualified repair
technicians under any circumstances because this may result in accidents and failures.
・Modification of the product is dangerous and must be avoided under any circumstances.
●Avoid using hot water above 41°C in temperature
・This may cause burns.
・Check that the thermostatic control knob of the wash unit stops at the lock position.
・Check that the set temperature for the thermostatic control knob of the wash unit is 40°C
or below.
●Keep the user’s and customer’s hands, fingers, bodies and pieces of clothing away from
the moving parts of the product or the area around the moving parts
This may cause injury from jamming.
●Do not operate the chair or the wash unit during treatment
This may lead to injury.
●Adjust the temperature of the hot water by checking the temperature with hands
When adjusting the temperature of the hot water, tilt the nozzle arch towards you and adjust
the temperature while checking the temperature with hands so that the hot water does not
come into contact with the customer. Care must be provided because the simultaneous use
of other devices that share the same source of cold or hot water may cause changes in water
pressure and lead to boiling water being output.
●Do not use the device with products that are not listed as compatible
Use of the device with non- compatible products may result in injury or device damage.
Please refer to [page 9] for the list of compatible products.

5
Safety Precautions (items that must be followed)
CAUTION
When using or handling the product ...
●Precautions before installation
If the customer has long hair, the hair should be held together using hair clips, etc. to avoid
the hair becoming caught during product installation.
●Precautions for product installation/removal
・Avoid contact of the product with customers because this may result in injury.
・The product should be handled carefully with both hands near the customer. Accidental
slipping and dropping of the product may cause injury to the customer or product/device
breakage.
●Precautions during removal
Flush the water from the nozzle arch then store this in the dedicated storage bag. Failure to
flush the water before storage may cause water to leak and cause the device and floor to
become wet.
Please refer to [page 15] for instructions on how to flush the water out.
●Precautions during treatment
Be sure to use a face towel because water may splash onto the customer’s face, or simulta-
neous use of other devices that share the same source of cold or hot water may cause chang-
es in water pressure and lead to unstable water output, which may also cause the water to
come into contact with the customer’s face.
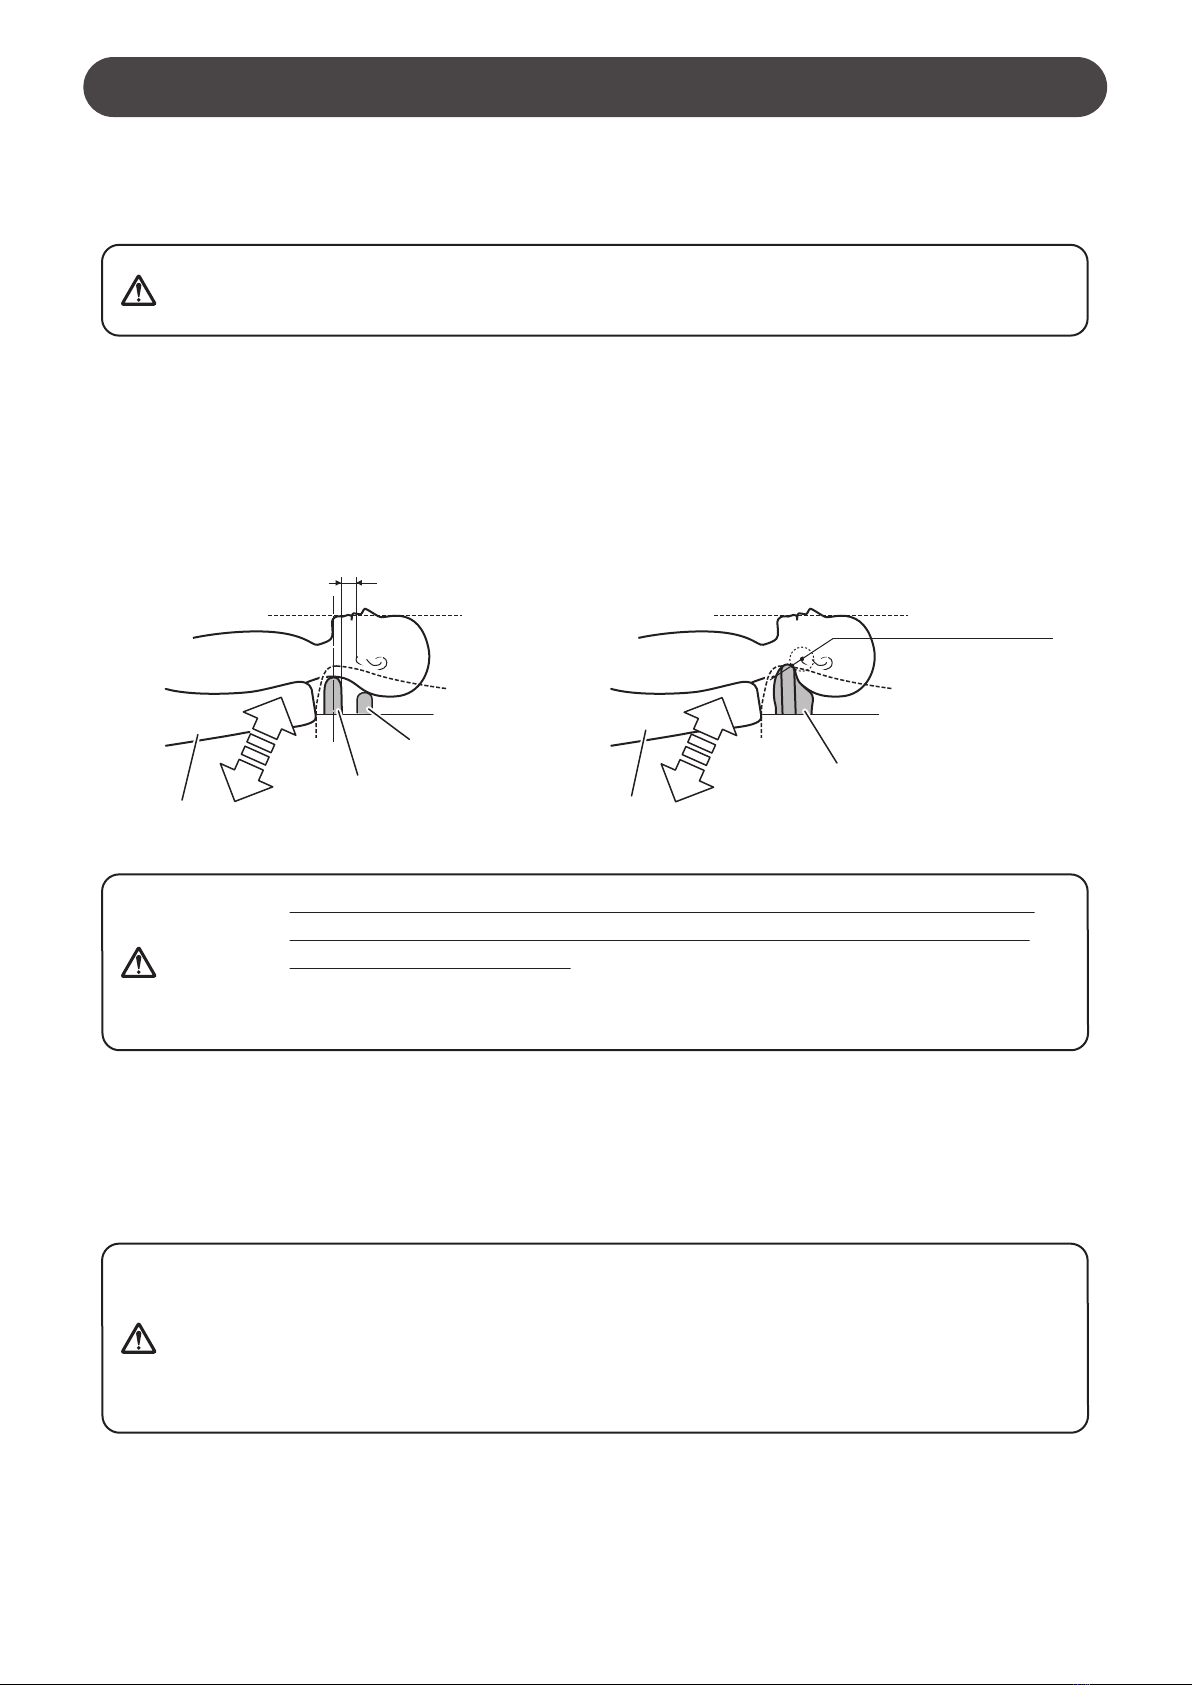
●Support the head of the customer when lowering or raising the backrest of the chair
When lowering or raising the backrest of the chair, be sure to support the head of the
customer with your hand and call out to the customer.
●Consideration for the physical condition of customers
The customer’s head becomes warm during treatment. If the customer becomes or feels
unwell, treatment should be discontinued. Care must be taken, particularly for customers
who are susceptible to dizziness from heat, who have high blood pressure, or have concerns
in physical conditions.
●Be sure to wipe the floor if it is wet
If the floor is wet after treatment, immediately wipe the floor clean because this may lead to
deterioration of the floor surface or injury from accidental slipping.
●Do not lean on the nozzle arch.
Damage to the product, a malfunction, or breakage may lead to injury.
●Be careful of customers and children
・Care must be taken during use of this product to monitor the customer at all times. Sudden
movement of the customer may lead to malfunctions and accidents.
・Keep children away from the product during treatment.
●Do not apply shock to the product
Damage to the cover, a malfunction, or breakage may lead to injury.
●Avoid drinking the hot or cold water
This product is designed for use for head bath. Do not drink the water.
Diarrhea, abdominal pain, etc. may occur depending on the water quality.
●Avoid using the product with a damaged nozzle cover and base.
In case of damage to the nozzle cover and base, contact your local Takara Belmont dealer
immediately and have these replaced. Continued use without replacing these parts may
result in failure or an accident.

6
Precautions for Use
●Do not use for any purpose other than hair and beauty salon treatment
This product is an industrial appliance for use in hair and beauty salons. Please avoid the use of the
product outside these purposes.
The product must only be used by those who have undergone appropriate training, such as hair
stylists and aestheticians.
●Be sure to secure sufficient supply of hot water
Stable output of hot water in cascade form requires hot water supply of at least 8.6 L/min.
Special caution will be required because the use of a dual function shower head with hot/cold water
supplied at a pressure of 0.1 MPa will result in a shower output rate of about 10 L/min for the YUME,
YUME DX, YUME ESPOIR, YUME SWING, YUME SUITE, and YUME NOBLE, about 8.0 L/min for
W SWING YUME, and about 8.5 L/min for the YUME OASIS backwash basin, and about 9.5 L/ min for
the YUME OASIS sidewash basin.
●Remove the product when not in use
Coming into contact with the product when washing the hair may result in injury.
●Avoid holding the nozzle cover
This may cause nozzle cover breakage.
●Wipe off any chemicals that adhere to the product
If chemicals adhere to the product, immediately wipe these off with a dry cloth because such contact
may result in degeneration and discolouration.
●Avoid applying heat of 60°C or higher
This may result in degeneration and discolouration.
●Avoid the use of mint oil and aroma oils
This may result in degeneration and damage.
●Avoid the use of polishing agents
Do not use polishing agents when cleaning the product.
The use of polishing agents, sponges containing polishing agents, or hard cleaning equipment, such
as wire wool and nylon scrub sponges, may cause scarring.
●Shower head of the wash unit must be returned to the shower head holder so that the shower head
plate is facing towards the basin
When water is released, the hot water may spill outside the basin or come into contact with the
customer.
●Do not use the dedicated storage bag for purposes other than product storage
Use for purposes other than product storage may damage the bag.
●After treatment, store the product in the dedicated storage bag and place on a flat surface
Storage of the product in an unstable location may cause the product to fall and become damaged.
●Avoid moving the basin while the product is set to the basin
This may cause the product to fall and break.
●Insert the shower head of the wash unit securely to the shower head holder
If the shower head is not inserted sufficiently, it will not be held securely by the shower head holder.
This may cause the direction of the shower head to change when water is released, resulting in the
water coming into contact with the customer.

7
Precautions for Use
●Clean the hair catcher of the wash unit frequently
The hair catchers should be cleaned as frequently as possible. Cleaning should be performed after
each customer’s treatment where possible because use of the device without cleaning may cause the
drain to become clogged with accumulated hair and result in water overflow and unhygienic condi-
tions.
Accessories
□Dedicated storage bag (with liner) □Operating Instructions: One copy
(this document)
●Be sure to use the neck cushion of the wash unit
Neck cushion must be used as performing treatment without using the neck cushion may cause a
burden on the neck and lead to injury.
●Wipe off the water accumulated in the dedicated storage bag
Water left in the bag may lead to spillage and cause the floor to become wet.
Names of Parts
Inner bowl
Bowl cushion
Neck seal
Urea screw
Drainage
outlet
Neck seal holder
Bowl cushion
Neck seal
Neck seal holder
AY-YHBYMS2
AY-YHBYMS/AY-YHBYMO/
AY-YHBSS*/AY-YHBSSS2

8
Neck seal
Names of Parts
Nozzle arch
Base rubber
Base rubber
Nozzle cover
Water drainage button
Rubber leg
Rubber cover
Urea screw
Rubber holder
Rubber band
Filter
Nozzle
Backwash (YUME) basin specificationBackwash (YUME) basin specification
Sidewash basin/side neck specificationSidewash basin/side neck specification
AY-YHBYMS/AY-YHBYMO AY-YHBSSS/AY-YHBSSO
AY-YHBYMS/AY-YHBSSS/
AY-YHBYMS2
AY-YHBYMO/AY-YHBSSOAY-YHBSSS2
OASIS basin/backwash specificationOASIS basin/backwash specification
OASIS basin/sidewash specificationOASIS basin/sidewash specification
AY-YHBYMS2 AY-YHBSSS2
Base

9
Device Setup
Inner bowl
Nozzle arch
Customer side
The product is used by attaching the nozzle arch and the inner bowl to the backwash (YUME) basin and
sidewash basin and OASIS basin as shown in the figure below.
・This product is an accessory of wash unit for use for head bath.
・AY-YHBYMS/YMO are dedicated for use with the YUME series backwash (YUME) basin specification.
・AY-YHBSSS/SSO are dedicated for use with the YUME series sidewash basin specification.
・AY-YMS2/SSS2 are dedicated for use with the YUME series OASIS basin specification.
Do not use the product with other products that are not listed as compatible. Use of
the device with non-compatible products may result in injury or device damage.
・YUME ・YUME DX
・YUME SWING ・YUME ESPOIR
・YUME SUITE ・YUME NOBLE
・YUME OASIS (full lie-flat posture only)
・W SWING YUME (full lie-flat posture only)
* Follow the setting procedure in the following sections to install the nozzle arch and inner bowl.
* The product can only be used with the dual function shower head of compatible products.
* YUME OASIS and W SWING YUME are available for use in the full lie-flat posture only.
* It is not available for use with the YUME NAGOMI (IXI).
Avoid contact of the product with the customer when installing the product.
CAUTION
Compatible products
WARNING
*Note
Please be advised that the illustrations used in this Operating Instructions are those of the
AY-YHBYM*.

10
Customer Setup
CAUTION Be sure to support the head of the customer with operator’s hand when lowering the
backrest of the chair to avoid injury caused by contact of the head with the basin.
CAUTION
Deterioration in the neck cushion of the wash unit cause the cushion to lower, and
this may result in the water held in the inner bowl to overflow from the side of the
neck beyond the neck cushion. The neck cushion should be replaced if the level of
the water in the inner bowl is reaching overflow level. Neck cushions should be
considered consumable goods.
1Allow the customer to lie down
3Wetting the customer’s hair
The product must be used while the hair is wet, for example, after shampooing and rinsing the hair
or after the spa cleansing process. If the hair is not wet, the hot water may splash and come into
contact with the face and ears.
Support the head of the customer and gently lower the head onto the neck cushion.
CAUTION
・Do not use this product to rinse off hair colour because this may lead to discoloura-
tion of the inner bowl.
・If the customer has long hair (shoulder length or longer), the hair should be held
together using hair clips, etc. to avoid the hair becoming caught during product
installation.
2Check that the face angle is horizontal
If the face angle is not horizontal, make fine adjustments by asking the customer to move upward
or downward.
Face angle: Horizontal
[Guideline] 1 to 2 cm
from the earlobes
Head pillow
Neck cushion
Backrest of the chair
<Backwash basin> <Sidewash basin>
Face angle: Horizontal
[Guideline] 1 to 2 cm
radius from the earlobes
Neck cushion
Backrest of the chair

11
Nozzle Arch Setup
1Remove the drain cap from the drainage
outlet in the basin
The drain cap should be placed outside the
basin.
2Attach the nozzle arch
Insert the base rubber of the nozzle arch to
the drainage outlet in the basin.
CAUTION
・Be sure to keep the customer’s
hair from being caught.
・Avoid contact of the nozzle
arch with the customer.
・Do not hold the nozzle cover
because this may lead to
damage.
Drain cap
Drainage
outlet
Nozzle arch
Base rubber
Check that the
nozzle arch is tilted
towards the front.
3Hold the shower head with a rubber band
(i) Switch the shower head to shower mode.
The amount of hot water output in
low-splash foaming mode is not sufficient
for cascades of water, and the head bath
sensation may not be obtained.
(ii) Insert the shower head into the rubber
holder while holding the rubber band
towards the customer side.
(iii) Return the rubber band to hold the
shower head.
Press the convex side of
the switch to change to
shower mode.
CAUTION
If the shower head is not secured
properly with the rubber band,
the shower head may become
displaced and cause hot water to
splash into the surrounding
area.
CAUTION
When inserting the shower head
into the holder, pull the shower
head straight out before insert-
ing it into the holder. The shower
hose may break if it is bent
forcibly.
Nozzle cover
Rubber holder
Shower head
Rubber band
Rubber band
Front side
OASIS basinOASIS basinBackwash (YUME) basin /
Sidewash basin
Backwash (YUME) basin /
Sidewash basin

12
Inner Bowl Setup
Attach the inner bowl
Lift the customer’s head and place the convex part
of the inner bowl on top of the concave part of the
rubber cover on both the right and left sides to
attach the inner bowl.
CAUTION
・Be careful not to get the
customer’s hair caught during
setup.
・Avoid the inner bowl coming
into contact with the customer
1Check that the nozzle arch is tilted
towards the front
Performing Treatment
CAUTION
Be sure to use a face towel because hot water may splash the customer’s face, or
simultaneous use of other devices that share the same source of cold or hot water
may cause changes in water pressure and lead to unstable water output, which
may also cause the hot water to come into contact with the customer’s face.
Inner bowl
Convex part of the inner bowl
Concave part of the rubber cover
* Check that neck seal is not folded, as this may
prevent the water from being held in the basin.
Nozzle arch
Neck seal
Front side

13
Performing Treatment
(i) Check that the set temperature for the thermostatic control
knob of the wash unit is 40°C or below.
(ii) Fully open the tap on the wash unit.
(iii) Check the hot water temperature with hands.
(iv) To make the water output stable, wipe the nozzle with a
finger while taking care to avoid wetting the customer’s face.
2Pour hot water in the inner bowl
CAUTION
Hot water with a temperature different from the temperature setting may spout due
to residual water in the piping. Hot water at an inappropriate temperature should be
discharged through the drain outlet in the inner bowl.
Please refer to [page 15] for how to drain the water.
WARNING
When adjusting the temperature of the hot water, tilt the nozzle arch towards you
and adjust the temperature while checking the temperature with hands so that the
hot water does not come into contact with the customer. Care must be provided as
the simultaneous use of other devices that share the same source of cold or hot
water may cause changes in water pressure and lead to hot water being output.
3Once a certain amount of hot water is
contained in the inner bowl, lift the
nozzle arch towards the customer and
adjust the water outlet to the side of the
face line.
CAUTION
・Do not make adjustments by
holding the nozzle cover
because this may cause damage.
・If the nozzle arch is moved too
close to the customer, this may
result in hot water entering the
ears. Be sure to check the
position while adjusting.
Nozzle cover
Nozzle
Nozzle arch
Inner bowl

14
Performing Treatment
4Perform head bath
Adjust the angle of the nozzle arch while checking the state of water output.
Head massage may be performed during treatment.
CAUTION
・Care must be taken during use of this product to monitor the customer at all times.
Sudden movement of the customer may lead to malfunctions and accidents.
・The customer’s head becomes warm during treatment. If the customer becomes
or feels unwell, treatment should be discontinued. Care must be taken,
particularly for customers who are susceptible to dizziness from heat, who have
high blood pressure, or have concerns about their physical condition.
・Do not use the device after hair colouring as the fading of hair colour may be
accelerated.
CAUTION
・Do not lift the neck of the customer off the neck cushion because this may cause
wetting around the customer’s neck.
・Avoid accidental contact of the hand with the nozzle arch because this may cause
the customer’s face or ears to become wet with hot water.
・Do not wet the shower head holder with hot water because the floor surface may
become wet.

15
1Hold the nozzle arch and tilt to the
front, then stop the water.
2Drain the hot water held in the inner
bowl
Lift the neck seal and drain the water through
the drainage outlet in the inner bowl.
After the Treatment
CAUTION
If the customer has long hair
(shoulder length or longer),
the hair should be bundled
together before draining the
water because the hair may
become tangled during
drainage.
CAUTION
・Do not tilt the nozzle arch by
holding the nozzle cover
because this may cause
damage.
・Stopping the water before
tilting the nozzle arch to the
front may cause residual hot
water to come into contact
with the face.
3Remove the inner bowl after water is
drained
The inner bowl should be stored in the
pocket section of the dedicated storage bag.
[See page 16]
4Remove the shower head and return
to the shower head holder
Pull the rubber band holding the shower
head towards the customer side and remove
the shower head.
Lift the neck seal and drain the water
through the drainage outlet in the
inner bowl.
Draining methodDraining method
Nozzle cover
Rubber holder
Shower head
Rubber band
Base rubber Drainage button
5Drain the hot water accumulated in the
nozzle arch
Press and hold the drainage button for about
10 seconds and allow the water to drain.
Shower head stand
Nozzle arch
Neck seal
Drainage
outlet
Inner bowl
* Hot water accumulated in the nozzle arch
must be drained after every use. Otherwise,
the hot water accumulated inside the nozzle
arch may spill into the bag.

16
CAUTION Do not hold the nozzle cover as this
may cause damage.
6Remove the nozzle arch
Remove the nozzle arch while avoiding contact
with the customer, then store this in the dedicated
storage bag. [See figure below]
The dedicated storage bag, nozzle arch, and inner bowl should be dried separately after operation
completion.
After the Treatment
Nozzle arch
Nozzle cover
Inner bowl storage
Nozzle arch storage Inner bowl
Nozzle arch
Storage Method
Dedicated storage bag
* The bag is made of waterproof material;
however, it is not designed to hold water.
Wipe the inside of the bag to prevent an
accumulation of water during use. An
excessive accumulation of water may cause
leakage through the stitches that may spill
onto the floor.
* Remove the liner in the dedicated storage bag and allow to dry.
Accumulation of water between the bag and the liner may cause the water to spill onto the floor
through the stitches.
*The dedicated storage bag must be used with the liner inside.
Liner

17
Maintenance Method
Maintenance should be performed after using the product to keep it clean at all times.
Stains left uncleaned may lead to the growth of mold.
Wipe gently with a dry, soft cloth.
Resin parts/
bag:
For severe staining
Wipe with a soft cloth wet with neutral detergent diluted about tenfold with water,
followed by wiping with a cloth wet with water, then carefully wipe with a dry cloth.
Metal parts:
Some of the product’s metal parts and mechanical sections may be sharp. Care must
be taken when handling to avoid injury to the hands and fingers.
Wipe with a dry, soft cloth.
Residual moisture may cause rust and malfunction.
Cleaning must be performed if the product is being reused after a period of non-use.
Also, be sure to check that the product operates correctly after cleaning.
Maintenance of Individual Parts
CAUTION
・The following materials must not be used:
Volatile chemicals, such as thinner, alcohol, remover, gasoline, and kerosene, acid, alkaline or
chlorine-based detergents, antiseptic solution strongly corrosive to metals (Povidone Iodine,
sodium hypochlorite, etc.), waxes containing abrading agent, sponges containing abrading agent
and scrubbing brushes, or other cleaning tools.
・Do not use brushes and scrubbing brushes for maintenance of the product because this may cause
scarring and make the stains more difficult to remove.
If the rubber cover becomes displaced, re-attach at the sections shown with the shaded circles .
Rubber Cover
Rubber cover

18
Filter
Rubber holder
Urea screw
Filter
Rubber band
Filter
1Remove the urea screw, rubber band, rubber
holder, and the filter and clean the filter
Remove the filter by lifting the edge of the filter with
the fingers.
2Attach the filter to the rubber holder
3Attach the rubber holder, rubber band, and
urea screw
Attach the filter to the rubber holder with the front side
facing the rubber holder.
FrontFront BackBack
Be sure to install the filter to prevent
contamination of the pipes with foreign
matter.
CAUTION
(i)
(ii)
(ii)
Filter
Rubber holder
[Key point]
Attach the filter by holding the filter with the edge of
the rubber holder. Placing the rubber holder as shown
below will allow the filter to be held securely.
(i)Secure the filter into the rubber holder and press
(ii)Push the edge of the rubber holder from both sides.
Edge of the rubber holder
Maintenance Method

19
Standard Period of Use
●The standard period of use for this product is three years.
●Standard period of use is defined as “a guideline for the standard period of using the product without
any problems in safety under standard conditions of product use with appropriate maintenance and
inspection (including replacement of parts) performed.” Please be advised that this is not an
indication of the guarantee period, and the standard period will differ depending on the environment
(including water quality) and method in which you use the product. Please contact your local Takara
Belmont dealer for maintenance after completion of the standard period of use.
Daily Inspection
Check that the shower head switch is on shower
mode. If the water stream continues to divide after
wiping the nozzle with a finger and after cleaning the
shower head or the filter, discontinue use and
contact your local Takara Belmont dealer.
Discontinue use and contact your local Takara
Belmont dealer.
The rubber band and/or the rubber holder may be
worn out. Discontinue use and contact your local
Takara Belmont dealer. Rubber bands and rubber
holders are considered consumable goods.
The neck seal should be replaced. Neck seals are
considered consumable goods.
State of water
output
Angle of nozzle arch
Fixation of the
shower head
State of the neck
seal
Fully open the tap on the wash unit
and check for division of the water
stream.
Check that the nozzle arch stops at
the desired position
Hold the shower head with the
rubber band and check that the
shower head is held securely.
Check for any tears or deformations
Inspection item Inspection method Inspection result, action to take in case of failure
Daily inspection items
The following inspection should be performed for safe use of the product.
Daily inspections must be performed according to the details shown below.
Use without performing daily inspections may lead to injury and damage to the
product, accessories, and facilities.
WARNING

20
Consumable Goods
“Consumable goods” refer to parts that are expected to undergo wear, deterioration, and
changes/damage in appearance with use. Please be advised that the repair and replacement of
consumable goods are not covered under the guarantee and will incur a charge.
(*Degree and timing of wear, deterioration, and damage varies depending on the environment (water
quality, etc.) and conditions the product is used.)
In the case of significant wear and deterioration or damage, inspection or replacement of the parts will
be necessary. Please contact your local Takara Belmont dealer immediately.
Also, scars, stains, deterioration, and discolouration on the outer surface of the exterior parts (metal
parts, resin parts, etc.) are not covered under the guarantee.
Consumable goods (the following items are not covered under the guarantee and incur a charge)
□Rubber band □Rubber holder □Inner bowl □Neck seal
□Dedicated storage bag
Replacement of Consumable Goods
Rubber bandRubber band
Inner bowl/neck sealInner bowl/neck seal
Rubber band
Urea screw
Rubber holder
Inner bowl
Remove the urea screw and replace the rubber
band or the rubber holder.
Rubber holderRubber holder
Remove the urea screw and replace the rubber
holder.
*Be sure to install the filter. [See page 18]
(i) Remove the urea screw and replace the
neck seal or the inner bowl.
*The neck seal holder should be attached
with the smooth side on top.
(ii) Bring the notch section (round section) of
the bowl cushion to the outside of the inner
bowl.
Bowl cushion
Inner bowl
Bowl cushion
Neck seal
Neck seal holder
Urea screw
This manual suits for next models
1
Table of contents
Other Takara Belmont Spa Accessories manuals

Takara Belmont
Takara Belmont YUME SWING User manual

Takara Belmont
Takara Belmont YUME ESPOIR User manual

Takara Belmont
Takara Belmont YUME SWING User manual

Takara Belmont
Takara Belmont Yume DX User manual

Takara Belmont
Takara Belmont YUME ESPOIR User manual

Takara Belmont
Takara Belmont YUME ESPOIR User manual

Takara Belmont
Takara Belmont YUME User manual

Takara Belmont
Takara Belmont ESTHE PLACE User manual

Takara Belmont
Takara Belmont SPA MIST II AK-160 User manual

Takara Belmont
Takara Belmont YUME ESPOIR User manual