Takara Belmont YUME User manual

YUME
Operating Instructions
Translation of the original instructions
2022.9
1A0FTWA0
Version 9
Thank you for purchasing this Takara Belmont product.
The instructions contained in this booklet should be thoroughly read and
understood before use.
Using this product before reading this operating instructions may result in an
accident.
This product is an industrial shampoo unit designed for barbers and hair salons.
Only use this product for its intended purpose and do not use it for
non-hairdressing work.
Keep this instruction and refer back to them when required.
For installation and assembly of this product, contact your local Takara Belmont
dealer.

1. Locations of Warning Labels................................................... 1
2. Dimension and Specifications................................................ 2
3. Overall View and Major Components ................................3
4. Accessories .......................................................................................4
5. Preparation .......................................................................................4
6. Operating Instruction ..................................................................6
7. Maintenance.....................................................................................9
8. Troubleshooting.......................................................................... 12
9. Parts Replaced on a Regular Basis .................................. 13
10. Consumable Supplies ........................................................... 13
TABLE OF CONTENTS

1.Locations of Warning Labels
-1-

Type ----------------------- EX-YM*L, EX-YM*R, SU-YM
Drive System ---------------- Motorized Hydraulic System
Measurement --------------- 760 x 1985 x 975 mm (W x L x H)
Angle of Bracket ------------- 59°(6°〜65°)
Type of Mixing -------------- Thermo Mixing
Stop Valve ------------------ Water x 1 (Handle Type) / Hot Water x 1 (Handle Type)
Electrical Requirements ------ AC 110・120V 50/60 Hz 5.8/4.4A
Electrical Requirements ------ AC 220V 50/60 Hz 2.1/2.5A
Electrical Requirements ------ AC 230V 50/60 Hz 2.1/2.4A
Electrical Requirements ------ AC 240V 50/60 Hz 2.3/2.3A
Electrical Requirements ------ AC 230V 50/60 Hz 2.1/2.4A (CE Spec)
Usage Environment ---------- Operational Temperature (10〜40℃)
Water and Hot Water --------- 0.1〜0.4Mpa (1〜4kgf/cm2)
Supply Pressure ------------- Water Supply Pressure ≧Hot Water Supply Pressure
Pressure dif ference between water supply and hot water supply within 0.2Mpa (2kgf.cm2)
Water Volume
(Shower Head)
--- 10L/min (water and hot water pressure are 0.1 Mpa)
Weight --------------------- 156 kg
2. Dimension and Specifications
65°
760
595
650
520
950 ( Neckrest height )
600 ( Neckrest height )
975
450 170
465170
1965
880
830 ( Seat height )
480 ( Seat height )
520
6°
-2-

■Main Body
Backrest
Seat
Main switch
Shampoo basin
Maintenance cover Foot control
Neck cushion
(Consumable)
Head pillow
(Consumable)
Shower head
Tap
Shower hose
Preset
Seat Lowering
Seat LiftingAuto Return
Backrest Raising Backrest Reclining
Seat Lowering
Seat LiftingAuto Return
Backrest Reclining Backrest Raising
Thermostatic control knob
Body cover
EX-YM*L : left side foot control EX-YM*R : right side foot control
Preset
Mohair tape
(inside cover)
Safety lock cover
3. Overall View and Major Components
-3-
A sticker of drain hose replacement
■Foot Control
Drain cap
Shower head holder

-4-
4. Accessories
Operation Manual ...1
Installation instructions ...1
YUME SPA Technical Manual ...1
Neck Cushion ....1 Head Pillow ...1set
Drain Cap ...1 Hair Catcher ...1
Mohair Tape ...1
5. Preparation
Head Pillow
5-1. Attach the Neck Cushion
1. Attach the neck cushion on metal fittings
as shown in figure.
2. Both side snap button of the neck cushion is fixed on a fixed pin.
5-2. Attach the Head Pillow
1. Attach the head pillow as shown in figure.
Snap Button
Snap Button
Snap Button
Neck Cushion
Fixed Pin
Metal Fitting
Sponge ...1

-5-
5. Preparation
1Turn the cover anticlockwise.
Turn the cover around 5 degrees.
【Image】
2Pinch the front and back of the cover
to deform and remove the catch.
Catch
Cover
Attach the sponge to the shower hose.
Attach the sponge and sponge holder to the shower
hose, between the shower head holder and the
cover.
Align groove in the cover and protrusion of the holder until they snap into place.
Protrusion
Sponge
Cover
Sponge holder
Shower head
holder
Do not remove the cover of holder forcibly.
Failure to follow the instruction may cause damage the product.
Caution
Ensure that the harder side of
sponge is facing upwards.
Caution
Note: Harder side of sponge to be
facing upwards.
■Removing the cover
■Sponge installation
■Installation of the cover

-6-
6-1. Main Switch
Turn on the main switch of EX-YM*L located on the left side of the pump cover and
that of EX-YM*R located on the right side of the pump cover.
OFF
Turn off the main switch after daily operation.
Operate the main switch by hand only.
6-2. Controls
Before operating the chair, confirm that it is safe for the patient
and the operator.
(1) Manual Mode Control
A. Seat Lifting
Keep depressing Seat lifting switch until the seat is lifted
up to the desired position.
B. Seat Lowering
Keep depressing Seat lowering switch until the seat is
lowered to the desired position.
C. Backrest Reclining
Keep depressing Backrest reclining switch until the backrest is
reclined to the desired position.
D. Backrest Raising
Keep depressing Backrest raising switch until the backrest is
raised to the desired position.
Seat Lowering
Seat Lifting
Backrest
Raising
Backrest
Reclining
6. Operating Instruction
ON
・
・
OFF
( Mark) ON
( Mark)
< Main switch >
Caution

Preset
Auto Return
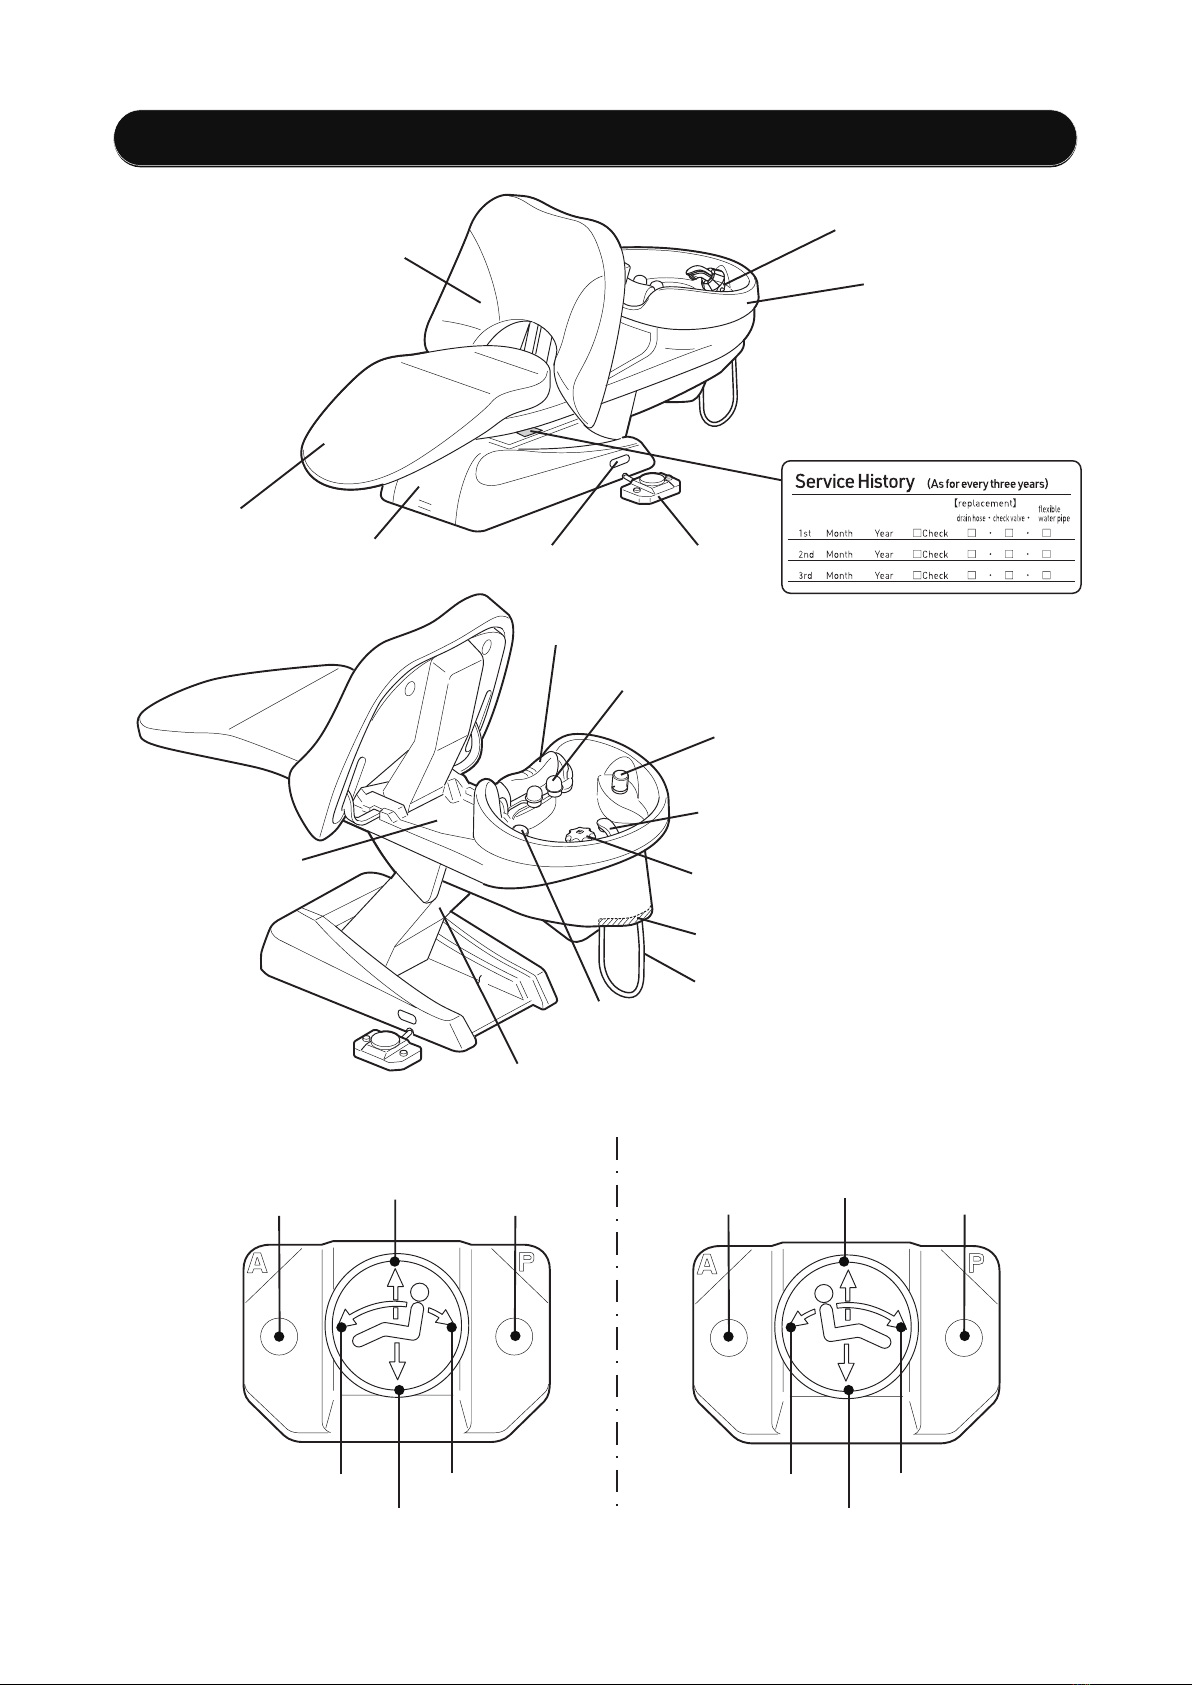
(2) Auto Mode Control
E. Preset Control
Momentarily depress Preset switch on the foot control,
the chair will move to the preset position automatically.
(Preset position is set best position of seating shampoo.
If adjustment is needed, please refer AUTO MODE
POSITION ADJUSTMENT.
F. Auto Return
Momentarily depress Auto return switch on the foot control,
the chair will return to the initial position. (The seat is fully
lowered and the backrest is in the upright position.)
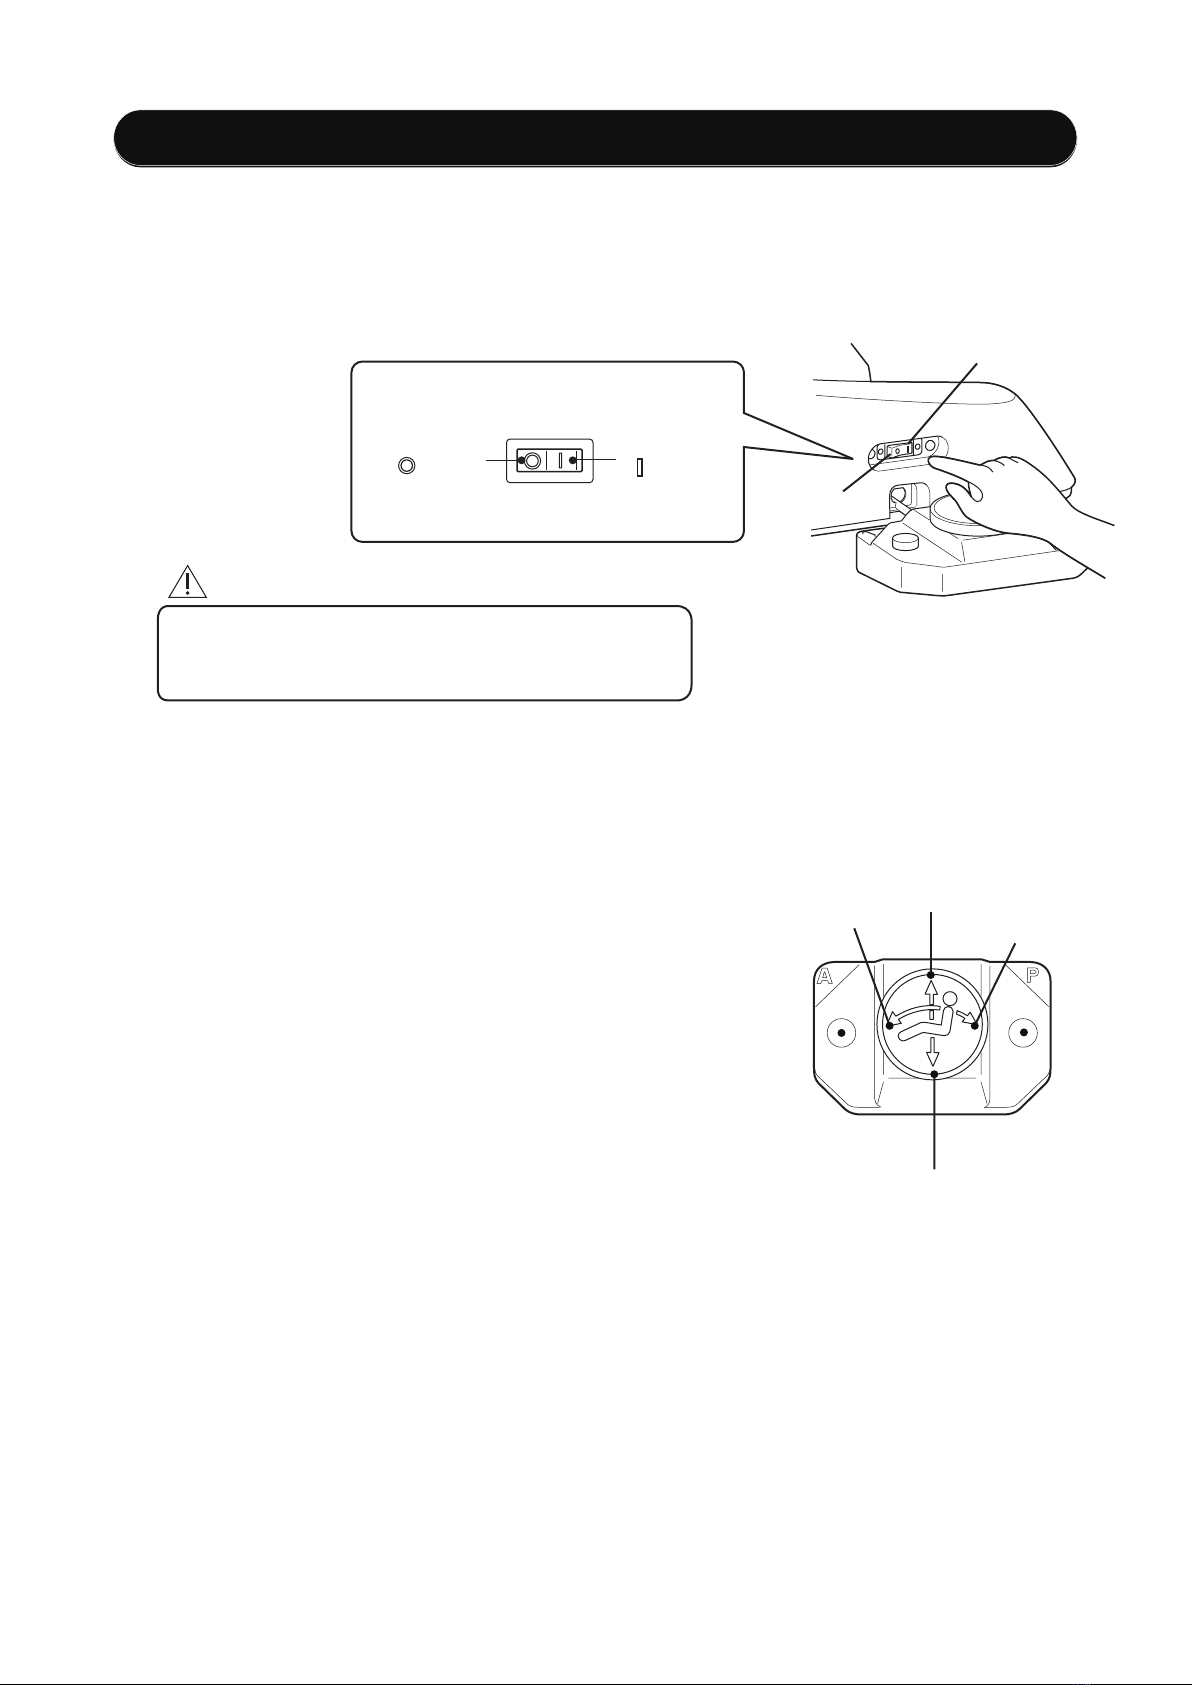
G. Emergency Stop
During automatic procedure (Preset and Auto return), depress of any
side of the switches on the foot control will cancel the automatic
movement immediately.
6-3. Auto Mode Position Adjustment
Preset position adjustment
A. Set the seat and the backrest to the desired preset position by manual control.
B. Turn off main switch.
C. While depressing Preset switch, turn on main switch.
D. Keep depressing Preset switch until buzzer sounds, then release it.
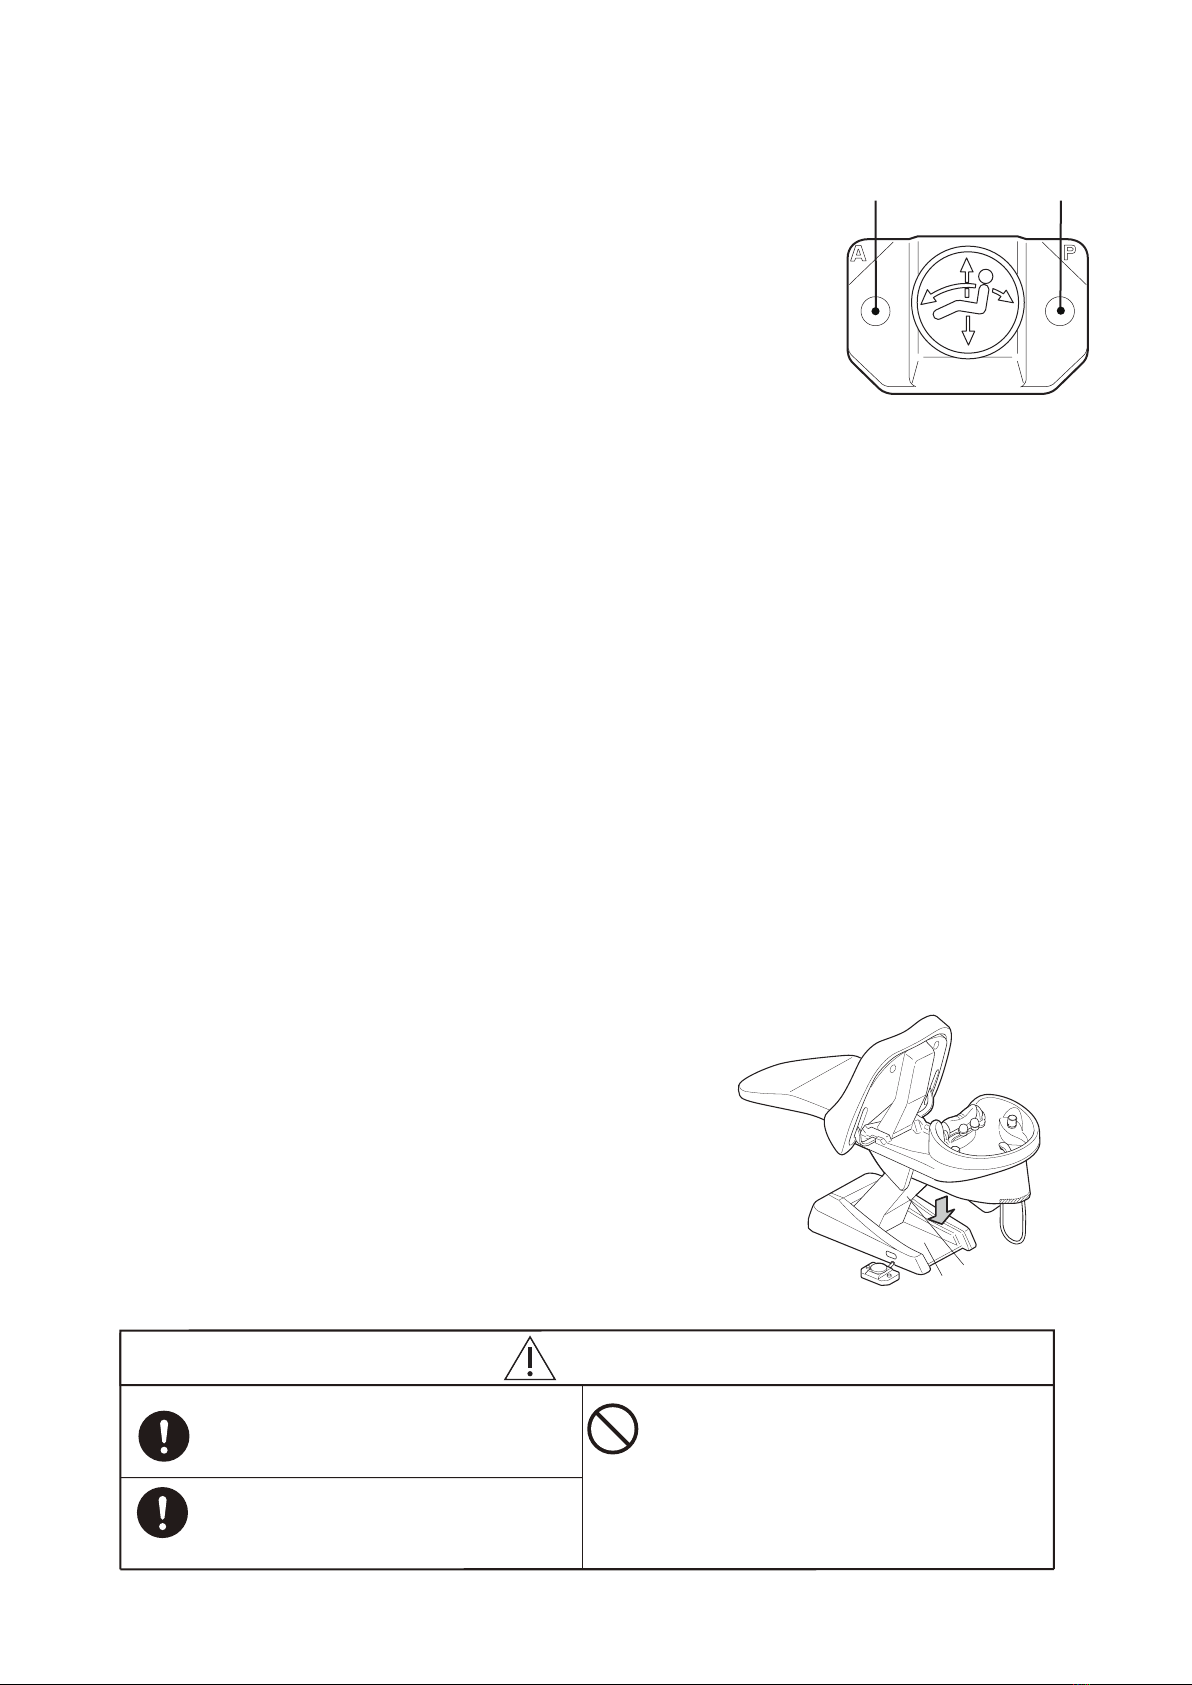
6-4. Safety Lock Device
Chair down movements can be stopped automatically
by the safety lock device when pressure is detected
between the base and the safety lock cover.
If the safety device has been activated, simply operate
the Seat lifting switch and remove the object causing the
safety device to activate from this area.
Safety lock cover
Base
-7-
Be careful of use.
The appliance is not to be used by children or persons
with reduced physical, sensory or mental capabilities,
or lack of experience and knowledge, unless they have
been given supervision or instruction.
Be careful of use.
Children shall not play with the appliance.
Be careful of use.
Cleaning and user maintenance shall not be made by
children without supervision.
Caution

Rotate the drain cap in the clockwise
direction to close the drain outlet.
To drain the water, rotate the
drain cap in the anticlockwise
direction to open the drain outlet.
The drain is closed. The drain is open.
Clockwise Direction
Anticlockwise Direction
<Filling the Basin> <Discharging the Water>
6-6. To Fill the Basin With Water
Drain Cap
A. Turn the tap to anticlockwise.
B. Adjust the water temperature with
thermostatic control knob.
C. Press stop button on the thermostatic
control knob to release lock for hot water,
then turn clockwise.
Stop
Stop
Button
(H) Hot
(C) Cold
Tap
Thermostatic
Control Knob
Shower Head
Open
Hot
Cold
Drain Cap
-8-
The drain cap must be detached from the drain outlet
when the product is not in use. If the drain cap is not
detached, the drain may accidentally close, and the water
may overflow from the failure to notice water dripping,
thus resulting in water leaks.
Caution

Wash around the drain cap, and remove any hair
or dirt from solvents.
The drain cap is a consumable supply.
If it is extremely dirty, remove the gasket from
the drain cap, wash with detergent solution diluted
using water, and rinse carefully with water. Drain cap gasket
Drain cap
7-2. Neck cushion and head pillow(consumable parts)
Use dry cloth to wipe off water and dry in shade.
Dump cloth with neutral detergent and wipe to remove colouring or perm solution.
7-1. Hair Catcher
Take out the hair catcher under the drain cap and remove hairs
from the hair catcher.
Drain Cap
Hair Catcher
Alcohol
Notice
Do not use the following substances.
Thinner, alcohol, gasoline, kerosene or other volatile chemicals; waxes containing
abrasives; sponges containing abrasives, etc.
Thinner
Gasoline
Waxes
Containing
abrasives
Chemicals
7-3. Use dry and soft cloth to clean upholstery, plastics, plated and painted surface.
Dump cloth with neutral detergent and wipe to remove stubborn stains and dirt. Use only mild
neutral detergent. Use cotton buds etc. to clean around the neck cushion and head pillow
mounting parts.
7-4. Drain cap
Clean the hair catcher as often as possible. If using the hair catcher not
cleaned, it may cause clogging of the port, overflow or poor sanitary.
Cleaning the hair catcher every after each shampooing is recommended.
Rinse the cushion immediately after chemical is splashed on the neck cushion.
Splashed chemical may cause deterioration or discolouration
.
Wipe the basin with diluted neutral detergent.
Do NOT use metal scrub brushes, paper files. Using them may be a cause of scratches.
7-5. Cleaning of basin
7. Maintenance
-9-
Caution
Caution
Caution

-10-
<Remove>
<Attachment>
Push the socket to remove the cover.
Sponge is consumable supply.
Replace the sponge if degradation causes rubbing sound
when the hose is moving. (Available at additional cost)
Remove the coverfrom the holder. [Page 5]
Replace the cover if it easily comes off repeatedly when the hose is moving. (Available at additional
cost)
- Remove the sponge from the hose and wash with water.
- After washing the sponge with water, squeeze it like press-
ing with both hands.
- Clean the sponge every day.
- After cleaning the sponge, put it in the hose and put it back
on the cover.
Remove the shower head.
(The figure on the right)
Remove the cover from the shower
hose.
1
2
Install a new cover.
3
Shower head
Cover
Tips for installation.
Put the socket into a plastic bag and push the
cover to make it easier to enter.
Socket
- Please keep the sponge in the net.
If the sponge protrudes from the end of the net, return it to the net.
- Do not twist the sponge as it may damage the parts.
- Be careful not to mistake the direction of the sponge.
The harder side is above.
Cover
Sponge
Sponge holder
Shower head
holder
[Replacement method]
7-6. Sponge
7-7. Shower head holder cover
*Anticlockwise:
Removed
Caution

7-8. Strainer for check valve
Clean strainer (built-in check valve) at regular intervals.
Remove the water in strainer if freezing is expected in the cold district.
A. Raise the chair and turn off the main switch.
B. Remove two screws and open the maintenance cover
C. Place cloths near the water / hot water supplies.
D. Turn off the water & hot water stop valves and
remove strainer by flat head screw driver and
wipe off the water by cloth.
E. After cleaning the strainer, put it back and tighten up.
F. Wipe water off and remove cloth.
G. Turn on the water & hot water stop valves.
H. Close the maintenance cover and install two screws.
Maintenance
Cover
Screw
Water
Hot Water
Water & Hot Water Stop Valve
Check Valve
(Close)
Flat Head
Screw Driver
Strainer
Cloth
(Open)
Water & Hot Water Stop Valve
Open the maintenance cover and check water
leakage once a week.
Water leak check
-11-

Symptom Check
Seat and backrest
Check the fuses in your fuse box to make sure they haven’t
burned out.
After the long time operation, Over temperature protection
system works. Please leave the chair for 10 minutes and start
operation.
Unplug the machine and then plug it in again and see if it will
operate.
In case other than those listed above, contact your local Takara Belmont dealer.
doesn't move Make sure that the main switch has been turned on.
Make sure that the power plug is properly plugged into the outlet.
If you have a breaker box, check for tripped breakers.
Main Switch
ON?
Fuse Box or Breaker
No Water / Hot Water Make sure that the water & hot water stop valve has been
turned on.
The temperature of
hot water is too low
Check to make sure that the temperature setting of water
supply tank is properly.
Make sure that the temperature setting of the chair is properly.
Slow drainage Check to make sure that the hair removed from the hair catcher
completely.
If the supply cord is damaged, it must be replaced by
the manufacturer or its service agent or similarly
qualified person in order to avoid hazard.
8. Troubleshooting
-12-
Caution

-13-
9. Parts Replaced on a Regular Basis
The following are parts that must be replaced on a regular basis as designated by our company:
The above-listed parts must be replaced on a regular basis to ensure and maintain safety and
performance.
Any part that is outside the designated replacement period must be replaced even if there is no
problem during use. (The parts are available at additional cost.) Our company will not assume
responsibility for any harm, damage, or defects attributed to any part that was not replaced within the
designated period.
For ordering replacement work, contact your localTakara Belmont dealer.
□Drain hose: Replace every three years
・For the drain hose, there is a possibility that water leaks will occur because cracks are caused due to
deterioration and hardening of the hose from chemical agents in the drain water.
・Damage to the hose may result in water flooding on or beneath the floor.
□Check valve: Replace every three years
・When the check valve is used continuously for long periods of time, there is a possibility that the
parts in the valve will deteriorate resulting in no water discharging, or sometimes, the sewage water
once discharged from the water faucet will flow back, thus causing contamination of city water or
public health problems.
□Water/hot-water supply hose: Replace every three years
・For the water/hot-water supply hose, there is a possibility that cracks due to deterioration caused by
equipment operation or residual chlorine or copper ions in the city water will cause water leaks.
・Damage to the hose may result in water flooding on or beneath the floor.
10. Consumable Supplies
The following parts are "consumable supplies" and wear, degradation, changes in external
appearance and damage are expected.
Please note that repair or replacement of these parts is not covered by warranty, and a fee will be
required.
(* The level and period of wear, degradation or damage may differ depending on the environment
and conditions that the customer uses this product in.)
Inspections or replacement of parts will be required if there is extensive wear, degradation or
damage.
External scratches or dirt, degradation or fading of the following external parts are not covered by
warranty.
Consumable supplies (the following parts are not covered by warranty, and a fee will be required.)
- Neck cushion - Head pillow - Drain cap - Hair catcher
- Sponge - Shower head holder cover - Mohair tape
- Shower hose - Rubber gaskets - Lubricant (oil, grease, etc)
* External parts
- Covers, frames, basin - Floor sheet
- Leathered surfaces (backrest, seat, legrest)
- Taps (such as water tap, thermostatic control knob)
- Other (such as shower head, shower head holder etc.)

COUNTRY REGISTERED PLACE OF BUSINESS & ADDRESS
TAKARA BELMONT(U.K.)LTD.
BELMONT HOUSE, ONE ST.ANDREWS WAY, BOW
LONDON E3 3PA, ENGLAND
TAKARA COMPANY EUROPE GmbH
BERNER STRASSE 18, 60437
FRANKFURT/M,GERMANY
TAKARA COMPAGNIE PARIS S.A.R.L.
56 rue des Hautes Pâtures
92009 NANTERRE Cedex France
GBR Importer in UK
Importeur in Deutschland
DEU
FRA Importateur en France
IMPORTER INFORMATION
TAKARA BELMONT ITALY S.R.L.
Via Marino Mazzacurati No.4/1, 42019 Scandiano RE, Italy
Importatore in Italia
ITA
TAKARA COMPANY EUROPE GmbH
Berner Strasse 18, 60437
Frankfurt am Main, Germany
TAKARA BELMONT CORPORATION
2-1-1, Higashishinsaibashi,Chuo-ku,Osaka, 542-0083, Japan
TAKARA BELMONT(U.K.)LTD.
BELMONT HOUSE, ONE ST.ANDREWS WAY, BOW
LONDON E3 3PA, ENGLAND
EU Authorised representative
UK Authorised representative
EU Declaration of Conformity
We hereby declare that the product listed below complies with the essential requirements of the
EMC (electromagnetic compatibility) Directive : 2014/30/EU,Low Voltage Directive : 2014/35/EU,
Machinery Directive : 2006/42/EC and RoHS Directive : 2011/65/EU based on category 11 of Annex I.
Product : BEAUTY SHAMPOO UNIT
Model : YUME(YUME, K-YUME)
The product has been designed and manufactured in accordance with the European standards as the
listed in the Declaration of Conformity.
UK DECLARATION OF CONFORMITY
We declare under sole responsibility that the device that is covered by the present declaration is in
conformity with the following regulations and, if applicable, with any other relevant UK legislation
that provides for the issuing of an UK declaration of conformity.
Product : BEAUTY SHAMPOO UNIT
Model : YUME(YUME, K-YUME)
Regulations this product conforms to:
The Electrical Equipment (Safety) Regulations 2016, S.I. 2016/110
The Electromagnetic Compatibility Regulations 2016, S.I. 2016/1091
The Supply of Machinery (Safety) Regulations 2008, S.I. 2008/1597
The Restriction of the Use of Certain Hazardous Substances in Electrical and Electronic Equipment
Regulations 2012, S.I. 2012/3032 based on category 11 of PART 1, SCHEDULE I
Other manuals for YUME
3
Table of contents
Other Takara Belmont Spa Accessories manuals

Takara Belmont
Takara Belmont YUME SWING User manual

Takara Belmont
Takara Belmont YUME-iXi User manual

Takara Belmont
Takara Belmont YUME ESPOIR User manual

Takara Belmont
Takara Belmont YUME NAGOMI User manual

Takara Belmont
Takara Belmont YUME NAGOMI User manual

Takara Belmont
Takara Belmont ESTHE PLACE User manual

Takara Belmont
Takara Belmont YUME ESPOIR User manual

Takara Belmont
Takara Belmont SPA MIST II AK-160 User manual

Takara Belmont
Takara Belmont YUME ESPOIR User manual

Takara Belmont
Takara Belmont Yume DX User manual