Telstra T48G Operating and maintenance instructions

Quick Start Guide
for your Telstra T48G
DOT(Digital Ofce Technology)™

Let’s get this show on the road
Handset legend
Your Telstra T48G
Getting connected
Bluetooth connectivity
Wi-Fi connectivity
Your contacts
MessageBank
Basic call features
Troubleshooting
Let’s get this show
on the road
This guide will help you get connected as quickly and as easily as possible.
It’ll guide you through the set up and run through the features that are included.
Mentoring
Your rst hour over the phone is on us.
After installation, we can schedule a one hour over the
phone mentoring session at your convenience, and at no
additional cost. We’ll show you how to make the most of
your service including:
• IP Phone Features
• Smart Call Management Tools and Applications, such as
Call Conductor
• Virtual Receptionist
• Voice2Email
Extra over the phone sessions are available. Additional
charges apply. For customers in Sydney metro/within
50kms of Sydney GPO, you can upgrade your rst bonus
hour into an onsite session, or add extra onsite sessions.
Additional charges apply.
Book your Mentoring session:
Visit https://bookmentoring.telstra.com/book/index.php
Email dotmentor@team.telstra.com
(Include your rst and last name, email address, mobile
number, company name and phone number, DOT order
number, State,and preferred appointment date and time.)
Call 1300 723 572 9am-5pm, Mon-Fri (AEST)
To nd out more,contact our support team
at telstra.com/dot/support
or call 1300 723 572 9am-5pm, Mon-Fri (AEST)
Let’s get started
Your package contains the following:
• Telstra T48G IP Phone
• Telstra T48G Phone Stand
• Power Adapter
• Ethernet Cable
• This Quick Start Guide

Let’s get this show on the road
Handset legend
Your Telstra T48G
Getting connected
Bluetooth connectivity
Wi-Fi connectivity
Your contacts
MessageBank
Basic call features
Troubleshooting
Handset legend
Icon Description
Network is unavailable
Registered successfully
Register failed
(Flashing)
Registering
Hands-free speakerphone mode
Handset mode
Headset mode
Multi-lingual lowercase letters input mode
Multi-lingual uppercase letters input mode
Alphanumeric input mode
Numeric input mode
Multi-lingual uppercase and lowercase letters input mode
Voice Mail
Auto Answer
Icon Description
Do Not Disturb
Call Forward
Call Hold
Call Mute
Ringer volume is 0
Received Calls
Placed Calls
Missed Calls
Forwarded Calls
Bluetooth mode is on
Bluetooth headset is both paired and connected
The default caller photo and contact icon
Wi-Fi connection is successful
No Wi-Fi connection

Let’s get this show on the road
Handset legend
Your Telstra T48G
Getting connected
Bluetooth connectivity
Wi-Fi connectivity
Your contacts
MessageBank
Basic call features
Troubleshooting
Message Light Indicates phone power and some feature status.
Headset Key Presses to activate the headset mode.
Mute Key Presses to activate the mute mode.
Hold Key Places a call on hold or resumes a held call.
MessageBank Key Presses to access MessageBank.
Transfer Key Transfers a call to another party.
Redial Key Presses twice to dial out a last dialled number.
Speakerphone Key Presses to activate the Speakerphone.
Volume Key Presses +/- to adjust volume.
Scrolls through the displayed information.
OK Conrms actions or answers incoming calls.
X
Cancels actions or rejects incoming calls.
Your Telstra T48G
Mute Key
Hold Key
Message Light
Navigation Keys
Headset Key
Message Key
Redial Key
Transfer Key
Speakerphone Key
Volume Key Cancel Key
Wall Mount
Bracket Slots
Stand Slots
EXT Port
Connect EHS36
or EXP40
Wall Mount
Bracket Slots
PC Port
Internet Port
Power Plug
Handset Port
Headset Port
USB Port
Connect WiFi dongle
or Bluetooth dongle

Let’s get this show on the road
Handset legend
Your Telstra T48G
Getting connected
Bluetooth connectivity
Wi-Fi connectivity
Your contacts
MessageBank
Basic call features
Troubleshooting
1. Set up your Telstra
T48G IP Phone
Fig 1
• Turn your phone over to expose the ports on the back
of the unit.
• Attach the stand (Fig 1) to the phone.
Fig 2
Fig 3
• Connect the handset cable to the handset port on the
phone (Fig 2).
• Optional – Wired Headset: Connect the wired headset to
the headset port on the phone (Fig 2). Connect the EHS36
(Fig 2) or EXP40 (Fig 3) to the EHS port on the phone.
2. Set up your power and
the network connection
Connect via AC power
Fig 4
Connect via AC power
• Ensure the power source is turned OFF.
• Plug the Power Adapter (DC5V) into the power source.
• Connect the Power Adapter (DC5V) to the DC5V port on
the back of the phone (Fig 4).
• Turn the power source ON.
• Connect the Ethernet cable to the Internet port on the
back of the phone and an available Ethernet port on a
compatible DOT router/switch* (Fig 4).
• Optional – PC Connection: Connect one end of the second
Ethernet cable to the LAN port on the user’s PC and the
other end to the PC port on the phone (Fig 4).
* DOT-powered switches are available for purchase, if there are insufcient
Ethernet ports on your DOT router to connect all your devices.
Getting connected

Let’s get this show on the road
Handset legend
Your Telstra T48G
Getting connected
Bluetooth connectivity
Wi-Fi connectivity
Your contacts
MessageBank
Basic call features
Troubleshooting
Fig 5
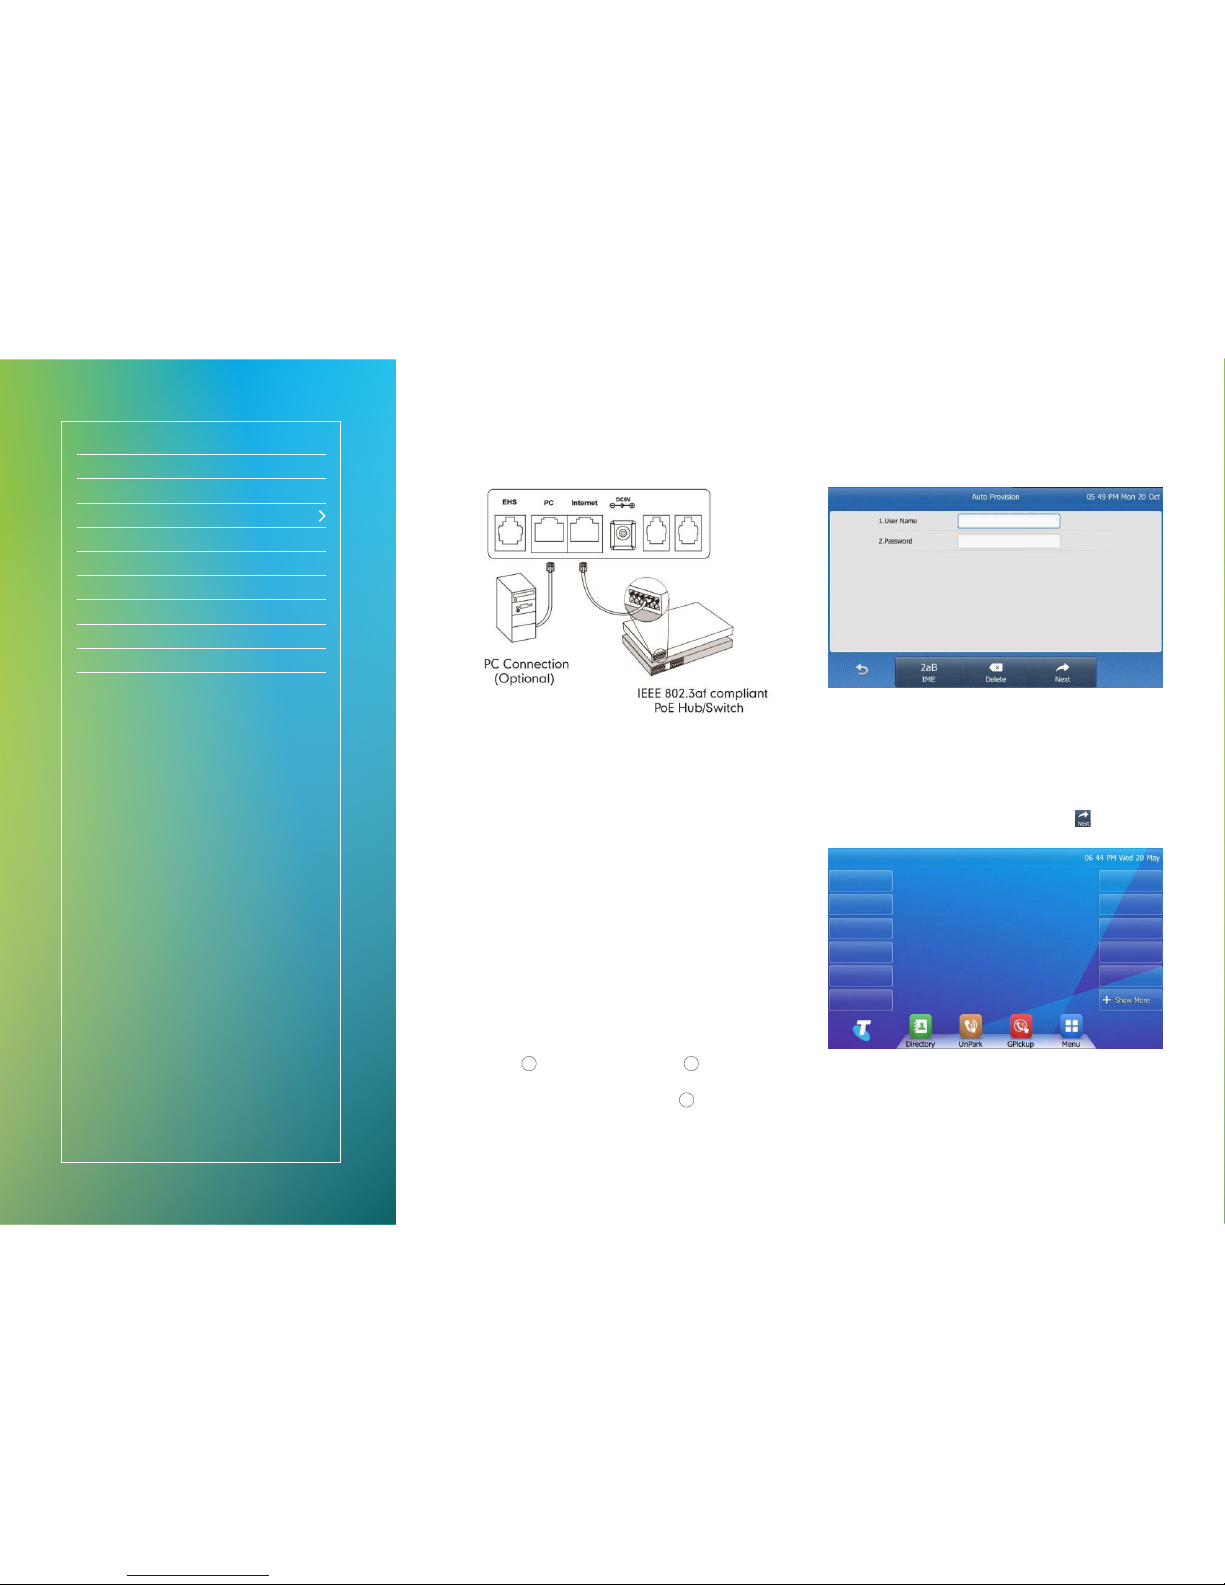
Connect via Power Over Ethernet (PoE)
• Connect the Ethernet cable to the Internet port on the
back of the phone and an available Ethernet port on a
compatible DOT router/switch* (Fig 5).
• Optional – PC Connection: Connect one end of the second
Ethernet cable to the LAN port on the user’s PC and the
other end to the PC port on the phone (Fig 5).
* DOT-powered switches are available for purchase, if there are insufcient
Ethernet ports on your DOT router to connect all your devices.
3. Set up your User Prole
The user prole must be set-up before you can use the phone.
• During startup, the “Zero Touch” screen will display Update,
OK or Cancel?
If your phone is attempting to connect to a wireless
network, you will need to manually reboot the phone to
access the startup/“Zero Touch” screen.
• Press OK to update conguration or
X
to cancel startup.
Your phone will update conguration setting automatically
after 10 seconds, unless you press
X
.
• The LCD screen will cycle display:“Network checking” for
~30 seconds;“Conguration updating” for ~1 minute;
“Welcome... Initialising... Please wait” for ~1 minute;
“Network checking...” for ~5 seconds.
Fig 6
• You will be prompted for your admin details (Fig 6) –
please ensure you follow the next steps correctly.
− Refer to the Conguration Summary that was sent to
your DOT registration email.
− Refer to section “Device type: T48G” for your User ID
and Password.
• Enter your User Name and Password select to complete
the set up.
Fig 7
• The LCD screen will revert to the home display screen
(Fig 7) – your phone is ready for use.
Getting connected

Let’s get this show on the road
Handset legend
Your Telstra T48G
Getting connected
Bluetooth connectivity
Wi-Fi connectivity
Your contacts
MessageBank
Basic call features
Troubleshooting
A Bluetooth-enabled mobile phone or wireless headset can be paired to the Telstra T48G
IP phone – this allows you answer calls on your headset and mobile around the ofce.
1. Pair and Connect a
Bluetooth Device
Fig 8
• When phone is in idle state, connect the Bluetooth dongle
into the USB port on the back of the phone (Fig 8).
Fig 9
• You will be prompted (Fig 9):“Adapter has been added,
scan bluetooth devices right now?”
• Select “OK”.
The IP phone will automatically scan for available Bluetooth
devices; these will be displayed on the touch screen.
• Tap the desired Bluetooth device.
• Enter the PIN in the Password eld.
• Tap the OK soft key to connect your phone and
Bluetooth headset.
Bluetooth connectivity

Let’s get this show on the road
Handset legend
Your Telstra T48G
Getting connected
Bluetooth connectivity
Wi-Fi connectivity
Your contacts
MessageBank
Basic call features
Troubleshooting
1. Connecting to a Wireless
Network (Wi-Fi)
There are three ways to connect your phone to Wi-Fi:
• A: Manually connect to an available wireless network
• B: Wi-Fi Protected Setup (WPS)
• C: Manually add and connect to a new wireless network
Before attempting to congure and connect to a wireless
network / Wi-Fi, you must ensure your Telstra T48G IP
Phone is:
1) Connected to a mains power supply; and
2) NO Ethernet cable should be connected (either for wired
Ethernet or Power over Ethernet).
The PC Port does not support wireless operations;it is only
supported in a wired operation (i.e. when the phone is
connected to the network via an Ethernet cable).
A:To manually connect to an available
wireless network
Fig 10
• When phone is in idle state, connect the Wi-Fi dongle into
the USB port on the back of the phone (Fig 10).
• You will be prompted:“Wi-Fi adapter connected. Scan for
available Wi-Fi networks?”
• Select “OK”.
Fig 11
• The IP phone will toggle the Wi-Fi on and search for
available wireless networks in your area (Fig 11).
• Optional – Refresh search:To search again for available
networks, tap .
• To connect to the desired wireless network (SSID): Select
the wireless network (SSID);or Tap at the end of the
desired SSID, and then tap .
• For secure networks, please enter the password in the
Wi-Fi Password eld.
• Select “OK”.
Wi-Fi connectivity

Let’s get this show on the road
Handset legend
Your Telstra T48G
Getting connected
Bluetooth connectivity
Wi-Fi connectivity
Your contacts
MessageBank
Basic call features
Troubleshooting
Fig 12
• Once the connection has completed successfully, The SSID
will now display the status”“Connected” (Fig 12).
You will need to contact your network administrator for your
Wi-Fi password.
B: Wi-Fi Protected Set up (WPS)
There are 2 options for connecting your Telstra IP Phone via
the Wi-Fi Protected Set up (WPS):
• Push Button Conguration (PBC):The user has to push the
WPS button on both the IP phone and gateway/router to
connect.
• Personal Identication Number (PIN):The user has to enter
a PIN generated randomly by the IP phone on the gateway/
router to connect.
Push Button Conguration (PBC)
To connect to the wireless network using PBC method:
Fig 13
• When phone is in idle state, connect the Wi-Fi dongle
into the USB port on the back of the phone (Fig 13).
• You will be prompted:“Wi-Fi adapter connected.
Scan for available Wi-Fi networks?”
• Select “OK”.
Fig 14
Fig 15
• The IP phone will toggle the Wi-Fi on and search for
available wireless networks in your area (Fig 14).
• Optional – Refresh search:To search again for available
networks, tap .
• Whilst the phone is scanning for available networks, long
press the WPS button on the Wi-Fi USB dongle.(Fig 15)
• You will be prompted:“WPS activated. Connecting…120s”.
• Long press the WPS button on your gateway/router.
• Once WPS setup has completed successfully,
the SSID will now display the status:“Connected”.
Wi-Fi connectivity

Let’s get this show on the road
Handset legend
Your Telstra T48G
Getting connected
Bluetooth connectivity
Wi-Fi connectivity
Your contacts
MessageBank
Basic call features
Troubleshooting
Personal Identication Number (PIN)
To connect to the wireless network using PIN method:
Fig 16
• When phone is in idle state, connect the Wi-Fi dongle
into the USB port on the back of the phone (Fig 16).
• You will be prompted:“Wi-Fi adapter connected.
Scan for available Wi-Fi networks?”
• Select “OK”.
Fig 17
• The IP phone will toggle the Wi-Fi on and search for
available wireless networks in your area (Fig 17).
• Optional – Refresh search:To search again for available
networks, tap .
• Tap and select PIN.
• You will be presented with a randomly-generated PIN.
Fig 18
• Tap OK (Fig 18).
• You will be prompted:“WPS activated. Connecting…120s”.
• From a PC or laptop connected to the DOT router / switch,
open up a web browser and enter in the DOT router address.
• Locate the Wireless Protected Setup conguration menu.
• Enter the PIN in the corresponding eld to enable the setup
of wireless devices via PIN.
• Click the corresponding button in the router’s web interface
to search clients.
• Once WPS setup has completed successfully, the gateway/
router’s web interface will prompt success.
Wi-Fi connectivity

Let’s get this show on the road
Handset legend
Your Telstra T48G
Getting connected
Bluetooth connectivity
Wi-Fi connectivity
Your contacts
MessageBank
Basic call features
Troubleshooting
C: Manually add and connect to
a new wireless network
To manually add and connect to a new wireless network:
Fig 19
• Tap in the Wi-Fi conguration screen (Fig 19).
• Using WLAN settings obtained from your DOT router,
congure the following WLAN Prole on your DOT IP phone:
− If you select WEP from the pull-down list
“Security Mode”:
Edit the prole name, SSID, WPA shared key in the
corresponding elds.
− If you select WPA PSK or WPA2 PSK from the pull-down
list “Security Mode”:
Select the desired Cipher type (TKIP, AES or TKIP+ AES)
from the pull-down list of Encryption Type.
Edit the prole name, SSID, WPA shared key in the
corresponding elds.
• Tap .
2. Disconnecting from a
Wireless Network (Wi-Fi)
To disconnect the wireless network connection:
• Tap > Basic > Wi-Fi.
• Do one of the following:
Fig 20
• In the Available Networks list – Tap the connected SSID or
at the end of the connected SSID (Fig 20).
Fig 21
• Tap (Fig 21).
• Tap Saved Networks.
• Tap the connected SSID.
• The SSID will now display the status:“Disconnected”.
Wi-Fi connectivity

Let’s get this show on the road
Handset legend
Your Telstra T48G
Getting connected
Bluetooth connectivity
Wi-Fi connectivity
Your contacts
MessageBank
Basic call features
Troubleshooting
3. Viewing the Wireless Network
(Wi-Fi) information
To view the WLAN information:
• Tap > Basic > Wi-Fi.
Fig 22
• Tap at the end of the desired SSID to view the detailed
WLAN information.
• If the IP phone has been connected to a wireless network
successfully, you can also tap Network Status to view the
connected WLAN information.
4. Disabling Wi-Fi
To disable Wi-Fi feature, do one of the following:
• Tap > Basic > Wi-Fi.
• In the Wi-Fi eld, select “Off”.
• Connect an Ethernet cable to the IP phone.
The wireless network is changed to the wired network, and
the IP phone will switch the Wi-Fi off.
• Unplug the Wi-Fi USB dongle from the IP phone.
The IP phone will switch the Wi-Fi off.
Wi-Fi connectivity

Let’s get this show on the road
Handset legend
Your Telstra T48G
Getting connected
Bluetooth connectivity
Wi-Fi connectivity
Your contacts
MessageBank
Basic call features
Troubleshooting
Search and call a saved contact
• Select to access your Phone Directory.
• In left column, select the address book you would like
to search.
• Select and type the complete or partial name of the
contact you wish to call.
• Using the navigation keys, scroll up or down to desired
contact.
• Select the desired contact/number to initiate call.
Search a contact/place a call from Call History
• From the home screen, use navigation keys to scroll down.
• Select “History”.
• Select applicable Call History type: Missed, Placed,
Received, Forwarded
• Optional – search by name: Select and type the complete
or partial name of the contact you wish to call.
• Using the navigation keys, scroll up or down to desired
contact.
• Select the desired contact/number to initiate call.
Save a number/edit a contact from Call History
• From the home screen, use navigation keys to scroll down.
• Select “History”.
• Select applicable Call History type: Missed, Placed,
Received, Forwarded
• Optional – search by name:
Select and type the complete or partial name of the
contact you wish to call.
• Using the navigation keys, scroll up or down to desired
contact.
• Select “i” at the end of the desired contact/number to open
contact details.
You can choose to call (“Send”); delete (“Delete”) contact
or edit details directly in corresponding elds.
Your contacts

Let’s get this show on the road
Handset legend
Your Telstra T48G
Getting connected
Bluetooth connectivity
Wi-Fi connectivity
Your contacts
MessageBank
Basic call features
Troubleshooting
Set up your MessageBank
• Using the keypad, key in “101” and select or press
on your phone to connect straight to MessageBank.
• Follow the prompts to set up your MessageBank
greeting, etc.
Access your MessageBank
The message light on your phone will ash to indicate
new messages.
• Using the keypad, key in “101” and select or press
on your phone to connect straight to MessageBank.
• Follow the prompts to listen to your voicemail messages.
MessageBank

Let’s get this show on the road
Handset legend
Your Telstra T48G
Getting connected
Bluetooth connectivity
Wi-Fi connectivity
Your contacts
MessageBank
Basic call features
Troubleshooting
Call Transfer
These are 2 ways to transfer calls: Blind or Supervised.
Blind Transfer – Transfer the call to another handset without
announcing the call the other party.
• Whilst on an active call, press .
• Dial the number you are transferring to.
• Hang up to complete the transfer.
Supervised Transfer – Transfer the call to another handset
after announcing the call to the other party.
• Whilst on an active call, press .
• Dial the number you are transferring to.
• Wait for the party to answer, and announce the call.
• Press after the call is answered to complete
the transfer.
Call Park
Call Park allows you to park a line by placing a call on hold
and pick-up the call from any other phones in the ofce.
• To place an active call on hold, press or press 68 using
the keypad.
• Dial the number or extension of the location you would like
to resume the call on, followed by #.
• To resume the call, go to the location and press or press
88 using the keypad.
Note: Call park code ( 68) and Call park retrieve code ( 88) should already be
pre-congured on the phone. The call on hold will remain ‘parked’ if you dial the
incorrect phone or extension number, and the parked call will ring at the
originating location after ~45 seconds.
Group Call Pickup
Group Call Pickup enables calls that are ringing on another
phone to be answered from any other phone in the ofce.
• When another phone within the ofce is ringing, press .
Note: Group call pickup code (*98) should already be pre-congured on
the phone.
Conference Calls
Local Conference Call – a maximum of three parties
(including the caller) can be on a conference call at any
one time.
To initiate a conference, add a third party to a call
• Whilst on an active call, press .
• Enter the other party’s number, wait for the party to answer
the phone.
• Press to connect all parties into the conference.
To manage callers in a conference
• During the conference call, press to mute the selected
party. The muted party can hear everyone, but no one can
hear the muted party.
• Press to remove the selected party from the
conference call.
Network Conference Call – more than three parties
(including the caller) can be on a conference call at any
one time.
• Whilst on a 3-way conference call, press .
• Enter the other party’s number, wait for the party to answer
the phone.
• Press to connect all parties into the conference.
• Repeat the above steps to invite more parties.
Note: Network conference features should already be pre-congured on the phone.
Basic call features

Let’s get this show on the road
Handset legend
Your Telstra T48G
Getting connected
Bluetooth connectivity
Wi-Fi connectivity
Your contacts
MessageBank
Basic call features
Troubleshooting
Why can’t the IP phone enable the Wi-Fi feature?
• Ensure the Ethernet cable is removed.
• Ensure the Wi-Fi USB dongle is working correctly.
Why can’t the IP phone connect to Wi-Fi?
• Ensure the entered password is correct.
• Ensure your gateway/router has Wi-Fi enabled.
• Reboot your gateway/router.
• Turn off the Wi-Fi feature on the IP phone and then turn it
on again.
Why is the wireless signal strength low?
• Ensure the IP phone and your gateway/router are within
working range and there is no obvious interference (walls,
doors, etc) between them.
™ and ® are trade marks and registered trade marks of Telstra Corporation Limited, ABN 33 051 775 556. C061 JUL17
Troubleshooting

Thank you
Other manuals for T48G
1
Table of contents
Other Telstra IP Phone manuals