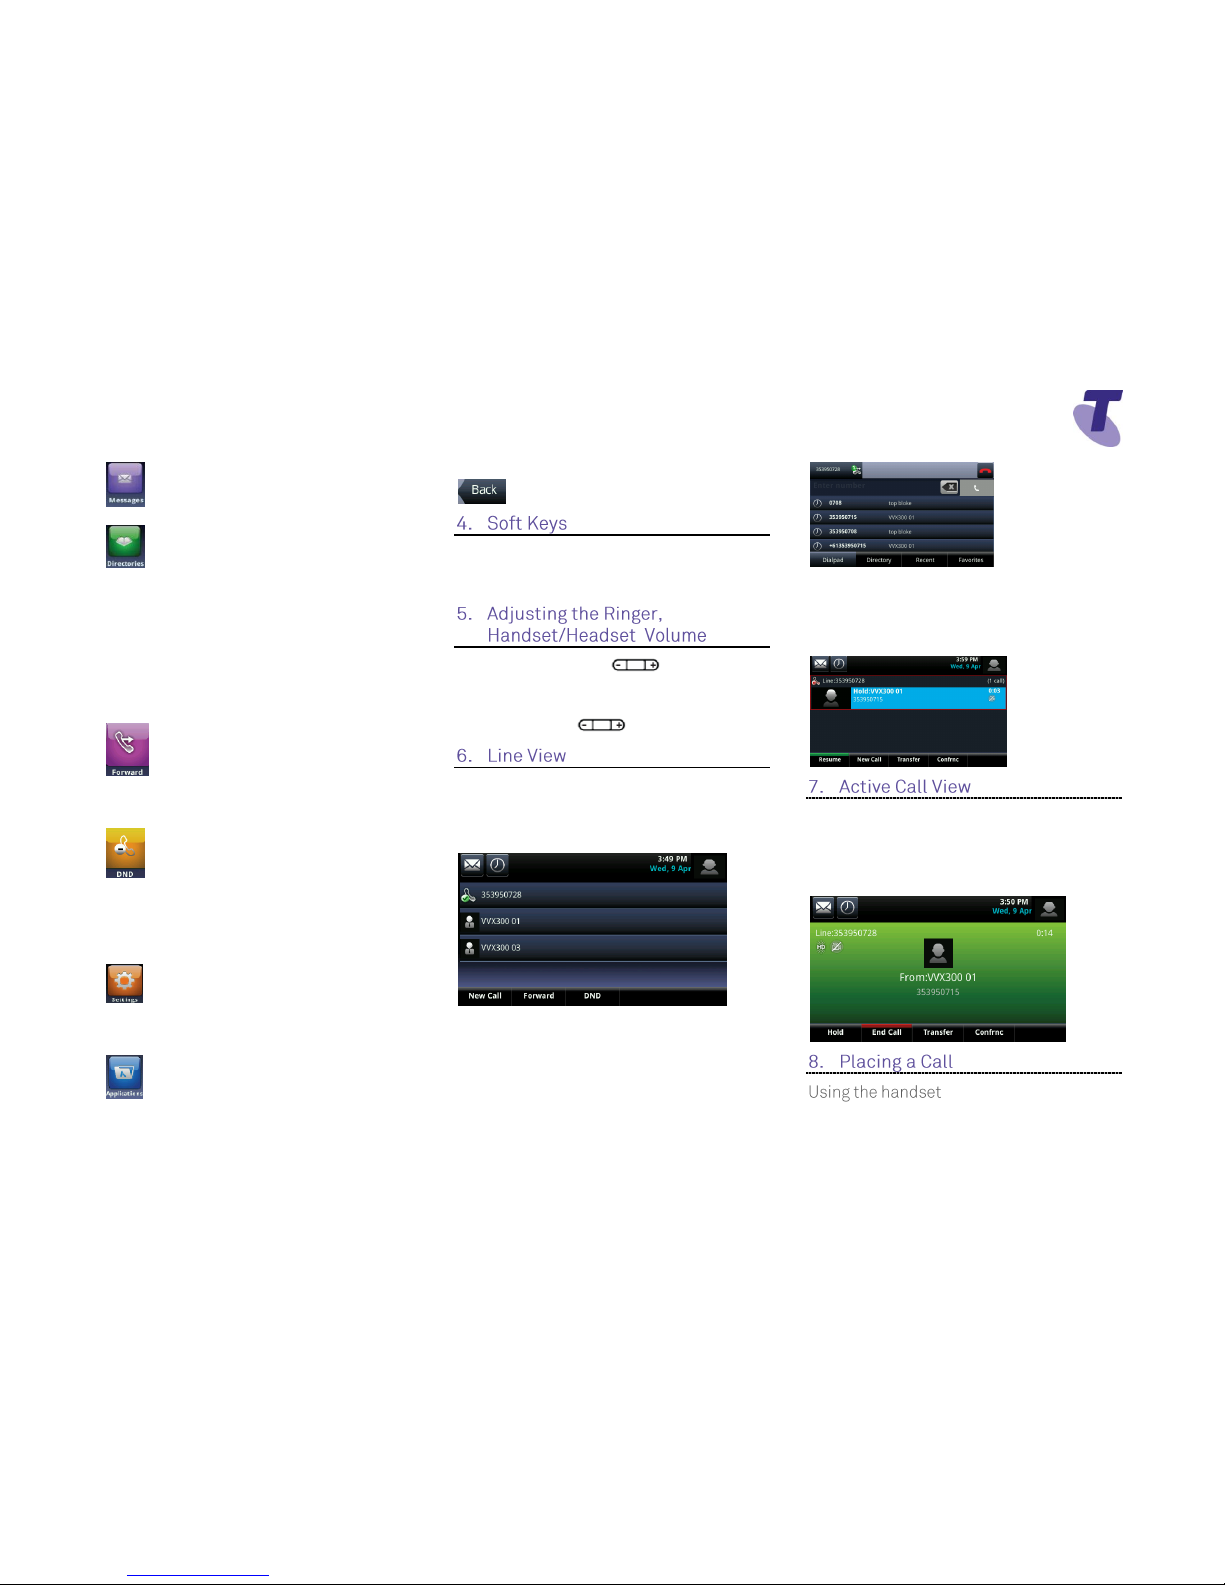
manuals.online logo
Brands
  1. Home
  2. •
  3. Brands
  4. •
  5. Telstra
  6. •
  7. IP Phone
  8. •
  9. Telstra VVX600 User manual

Telstra VVX600 User manual

Telstra 600 Phone Guide | July 2014 Page 1
Telstra VVX600 Phone Guide
If you are required to initially configure your IP
phone you will be advised of the Username and
Password. This information only needs to be
entered once via the QSetup soft key.
Tap the QSetup soft key
Tap the Server User field
Enter the Server User credentials (obtain this
information from Telstra.
This number will be your phone number)
Tap the Server Password field
Tap the Mode soft key and tap 123 (to select
numbers)
Enter the Server password (obtain this
information from Telstra)
Tap Save Config to Save the Config
You will now need to manually reboot the phone
Press the Home button
Tap Settings
Tap Basic , swipe your finger up the screen and
Tap Restart Phone
Tap the Yes soft key (to confirm)
Note 1: Restarting the phone may take a few
minutes
Note 2: If your phone has been preconfigured
the QSetup soft key will not be visible
Note 3: This is only required for phones that are
on DMS (Device Management System)
platform.
Your VVX 600 Media phone supports a
Polycom USB camera with a Shutter to Open
and Close
To enter the Home View main menu, press
To return to the Line View, press
Tap an icon on the screen to select a menu item
–New Call, Messages. Directories, Forward,
DND, Settings or Applications.
Use the Page Indicator icon if there are
multiple pages to move through the pages
Alternatively, you can Swipe the screen to
display additional icons
New Call –Tap New Call to display
Dialler
Using the Dialler, you can enter a number or
URL via the screen of the phone.
Tap the Call soft key to make the call
From the DialPad, you can access the
Directory, Recent and Favorites via the soft key
tabs on the screen
Slot on the back of your
phone for Polycom USB
camera
Telstra 600 Phone Guide | July 2014 Page 2
Telstra VVX600 Phone Guide
Messages –Tap Messages to access
your Voicemail Messages
Directories –Tapping the Directories
icon allows you to view all the contacts in your
Contact Directory, Recent Calls, BroadSoft
Directory and UC-One Contacts.
From your Directory, you can add and search
for contacts, as well as quickly accessing the
DialPad, Recent and Favorites
Forward - Tap the Forward icon to
enable/disable your call forward always, no
answer or busy settings.
DND - Tap the DND icon to
enable/disable Do Not Disturb. Calls cannot
be received when enabled. You can also tap
the DND soft key tab on the screen to
enable/disable DND.
Settings –Tap the Settings icon to
access features and settings to customise your
phone
Applications –Tap Applications to view
custom applications configured by your CGA
To return to previous screen, Press Back
The VVX600 has four soft key tabs at the
bottom of the phone screen. Tapping the
relevant soft key will access that feature.
During a call, press the to adjust the
call volume
While the phone is idle, to adjust the Ringer
volume, press the volume buttons.
Line View is the default display.
Line View displays all your phone lines, your
favorites and other soft key tab options.
If your phone is idle you can;
Tap the New Call soft key to access the dialpad
If your phone has calls, the phone line indicates
the number of calls you have, and if they are
active or held
An active call displays with a green bar (right of
the call)
A held call displays as seen below
This view displays the name and number of the
person you are talking with and the duration of
the call
From Active view you can Hold, End Call,
Transfer or Confrnc (Conference)
Lift the handset and enter the required number
by using the phone keypad.
Telstra 600 Phone Guide | July 2014 Page 3
Telstra VVX600 Phone Guide
Enter a number
Press the Dial soft key
Or
With the handset on-hook, press the New Call
soft key, enter the phone number by using the
phone keypad
Lift the handset Or
Press the Answer soft key
Answering on a Shared Line
If you share a line with another phone, you can
answer calls as described above, or you can
wait for someone else to answer the call. If you
answer the call and place it on hold, anyone
who shares your line can resume the held call.
Hang up the handset OR
Press the End Call soft key
If the Call Waiting feature has been turned on,
while engaged in a call:
Call Waiting tone indicates another call to your
line.
Press the Answer soft key to switch to and
answer the incoming call.
The initial call is automatically placed on hold.
By tapping on the required call you can toggle
between the active and held calls.
On the held call tap the Resume soft key to
resume your conversation.
You cannot receive additional calls while both
lines are engaged.
Tap the Hold soft key
To return to the call
Tap the Resume soft key
To make another call while the original
caller is on hold
Tap the New Call soft key, enter the required
number
If multiple calls are on hold
Tap the call on hold and select it and tap the
Resume soft key
To join all three parties onto an impromptu
conference call
With 2 calls in progress (1 call on hold and 1
call active)
Tap the Join soft key
While Mute is activated, you can hear all other
parties, however they cannot hear you.
During a call press the mute button
(The mute button is illuminated in red)
To turn off mute, press the mute button
again
Blind Transfer enables you to transfer a call to
another party without announcing the call prior
to transfer.
During a Call tap the Transfer soft key
Tap the Blind soft key
Enter the transfer destination number
Your call will be transferred automatically.
Consult Transfer enables you to transfer a call
to another party with consultation.
During a Call press the Transfer soft key
Enter the transfer destination number
When the party answers, announce the call
Press the Transfer soft key again to complete
the transfer.
If the party refuses the call (prior to completing
the transfer)
Press the Cancel soft key to be returned to the
original caller.
There are 3 Call forward options which can be
set from your handset using either soft keys or
Feature Access Codes; Call Forward Always,
Call Forward No Answer, Call Forward Busy.
To forward all your calls to another number
Press the Forward soft key
Select Always
Enter the required number to forward your calls
Tap the Enable soft key
An arrow is displayed on the phone
screen next to your phone number.
Telstra 600 Phone Guide | July 2014 Page 4
Telstra VVX600 Phone Guide
Tap the Forward soft key
Tap Always
Tap Disable
To forward your calls to another number if not
answered after a specified number of rings
Press the Forward soft key
Tap No Answer and select
Enter the required number to which to forward
your calls
Tap Forward After Rings field and enter the
required number of rings (20 rings is the
maximum)
Tap the Enable soft key
Tap the Forward soft key
Tap No Answer.
Tap the Disable soft key
To forward your calls to another number if
you are engaged on a call
Tap the Forward soft key
Tap Busy
Enter the required number to which to forward
your calls
Tap the Enable soft key
Tap the Forward soft key
Tap Busy
Press Disable soft key
Call Forwarding is not available on Shared
Lines
When you enable Do Not Disturb (DND), you
prevent your phone from ringing. All incoming
calls are sent directly to voicemail. All calls
received while DND is enabled, will be
displayed in your Recent Calls list
From Home View
Tap DND icon
Or
From Line View
Tap the DND soft key tab
The Do Not Disturb icon displays on screen
when enabled
From Line View
Tap DND soft key, the icon changes on the
screen to display Do Not Disturb is disabled
Or
From Home View
Tap DND
The Do Not Disturb Service has been turned
off.
While engaged in one call:
Tap the Confrnc soft key
Enter the required number or extension of the
second party
When the call connects:
Tap the Confrnc soft key
All parties are connected in a three-way call.
To end the conference:
Press the End Call soft key
Telstra 600 Phone Guide | July 2014 Page 5
Telstra VVX600 Phone Guide
Note: If either of the other two parties hang up,
your call with the remaining party stays intact. If
you hang up, the other two parties will be
disconnected
Note: There can be a maximum of 3 parties on
a conference call, unless you have the
Executive service pack which has the N-Way
feature which enables a total of 8 parties on a
Conference call.
To organise a multipoint video conference,
include your Virtual Meeting Room (VMR)
phone number in your meeting invite.
To start the Video conference, as a Host
(organiser)
Dial your VMR phone number
To start the conference, press #, then enter
your Meeting Room PIN, followed by #
As a Guest (invitee) dial the VMR phone
number at the time of the meeting
The conference will commence for all
participants.
If the Host has not initiated the meeting the
guest/s will be placed in a virtual waiting room
until the Host joins.
To add a contact:
Press Home and tap the Directories icon
Tap Contact Directory
Press the Plus icon (at top right of screen)
Enter first name, tap on last name and enter
the detail tap on contact and enter the numbers
Tap Save
From Home View
Tap Directories
Tap Contact Directory
Tap the required contact
Tap the Pencil icon (edit) and make the
required changes.
Tap the Save Soft Key
From Home view
Tap Directories
Tap Contact Directory
Tap the Contact
Tap the Delete soft key
The screen will display the message “Are you
sure you want to delete this contact?” Press
Yes.
Your phone maintains lists of Missed, Received
and Placed calls. Each list can hold up to 100
entries
Missed Calls
Received Calls
Placed Calls
Tap the Call History icon to access the Call
List.
Tap the Call History icon .
Tap the delete icon .
Select the list you want to delete –All calls,
missed calls, received calls, placed calls. The
selected list will be deleted
Tap the Call History Icon
Tap the icon of contact you want as
favourite
Tap Add to Favorites icon. A message will
appear “Add to Favorites with an index of XX”
Tap Yes
Tap at the top of screen to close.
To change your ring type:
From Home View
Tap Settings icon
Tap Basic
Tap a Ring type option
Tap the Play soft key to listen to the tune
Tap the Back soft key three times to return to
the Home view screen
Telstra 600 Phone Guide | July 2014 Page 6
Telstra VVX600 Phone Guide
From the Home View screen select the
Settings icon
Tap Basic
Tap Backlight Intensity
Tap Backlight On Intensity and choose either
High, Medium or Low.
Tap Back icon
Tap Backlight Idle Intensity and choose either
High, Medium or Low
Tap Back icon
Or
Tap Maximum Intensity
Tap the Up or Down soft key to adjust the
intensity
Tap the Back icon to return to the previous
screen
You can connect an Analogue headset to your
phone. When the headset button is pressed it
illuminates green. All calls received will be
answered through the headset. When the
headset is activated, Mute and Volume will take
effect on the headset device.
Tap the headset button again to deactivate the
headset
You set up your phone so that all incoming and
outgoing calls use your headset. At any time
you can switch to handset or speaker mode
From the Home Screen
Tap Settings icon
Tap Basic
Tap Preferences
Tap Headset...
Tap Headset memory...
Tap Enabled
Press the Home button to return to the home
screen
To access Headset memory mode, press the
headset key twice.
The headset button will flash when enabled
If your phone is unable to perform certain tasks,
a warning icon will display in the status
bar. The warning icon lets you know that your
phone has one or more issues that you should
know about. Contact your Customer Group
Administrator to advise them of this issue.
From Line view
Tap the voicemail icon to access
voicemail
OR
From the Home view
Tap the Messages icon
Tap Message Centre
Enter a passcode, when prompted; after your
initial login you will need to change your
passcode.
Note: It is essential your passcode is changed
for security reasons. It is important to keep your
new passcode private.
Record your name when prompted
Press the hash key (#)
Follow the prompts to save the recording, or re-
record your name
Tap the Messages button,or dial the
Voice Portal extension.
Enter your passcode followed by the hash key
(#).
Tap the Messages button or dial the
Voice Portal extension.
Press the star key (*) during the greeting.
Enter your mailbox ID (your extension).
Enter your passcode followed by the hash key
(#).
Press 1
Press 1again
Dial the Voice Portal phone number.
Enter your mailbox ID (your extension) followed
by the hash key (#).
Telstra 600 Phone Guide | July 2014 Page 7
Telstra VVX600 Phone Guide
Enter your passcode followed by the hash key
(#).
1... Access your Voice Mailbox
2... Change your CommPilot Express profile†
3... Go to the Greetings Menu
4... Change your Call Forwarding options
6... Make a Call
8... Change your passcode
9... Exit the Voice Portal
#... Repeat this menu
†... Only available if assigned.
Press the Messages button
Enter your passcode and press #
Press 3to access your Greetings menu
Press 2to change your Mailbox Busy greeting
1... Record your Name
2... Change your conference Greeting
*... Go back to previous menu
#... Repeat menu
Tap the Messages icon
Enter your passcode and press #
Press 1 to access your voice mailbox
Press 3to change your Mailbox No Answer
greeting
1... Record new No Answer Greeting
2... Play current Greeting
3... Revert to system default Greeting
*... Return to Voice Messaging main menu
#... Repeat menu
Your phone may indicate you have Voicemail
messages by the following by displaying
A message counter in the Home View ,
and
A message icon in the status bar
If you have more than one message, the icon
will display a counter indicating the number of
messages
A message icon also scrolls under the Date and
Time display
Press the Message Button (this will direct
you to your voicemail, where you will follow the
prompts to retrieve your messages
OR
From Home View tap the Message icon
Tap Message Centre (this will direct you to
your voicemail, where you will follow the
prompts to retrieve your messages
1... Listen to your messages
2... Change your mailbox Busy greeting
3... Change your mailbox No Answer greeting
5... Compose and send a new message
7... Delete all messages
8... Modify the message deposit settings for
your mailbox
*... Go to the CommPilot Voice Portal
#... Repeat this menu
New messages flagged as urgent are played
first.
The message envelope for each message is
played first (time and date, sender if known),
followed by the message itself.
Use your keypad as follows to browse your
messages (you can interrupt the message or
envelope to perform any function):
1
2

3
4

5

6

7
ERASE
8
CALL
BACK
9
MORE
OPTIONS
*
BACK TO
MAILBOX
0
#
Telstra 600 Phone Guide | July 2014 Page 8
Telstra VVX600 Phone Guide
#... Save this message
7... Erase this message
2... Repeat this message
4... Return to previous message
5... Play the message envelope
6... Go to the next message
8... Call back the caller
9... Hear additional options
*... Go back to the previous menu

Other Telstra IP Phone manuals

Telstra T42G User manual

Telstra

Telstra T42G User manual

Telstra T42G Operating and maintenance instructions

Telstra

Telstra T42G Operating and maintenance instructions

Telstra VVX500 User manual

Telstra

Telstra VVX500 User manual

Telstra VVX 1500 User manual

Telstra

Telstra VVX 1500 User manual

Telstra 450 Specification sheet

Telstra

Telstra 450 Specification sheet

Telstra T48G Operating and maintenance instructions

Telstra

Telstra T48G Operating and maintenance instructions

Popular IP Phone manuals by other brands

Cisco CP-7962G datasheet

Cisco

Cisco CP-7962G datasheet

Grandstream Networks GXP1450 user manual

Grandstream Networks

Grandstream Networks GXP1450 user manual

Avaya E129 using manual

Avaya

Avaya E129 using manual

Snom D717 user manual

Snom

Snom D717 user manual

Denwa Communications DW-610G user manual

Denwa Communications

Denwa Communications DW-610G user manual

Nortel Nortel IP Phone 1120E user guide

Nortel

Nortel Nortel IP Phone 1120E user guide

Avaya one-X 9640 quick reference

Avaya

Avaya one-X 9640 quick reference

Philips ID965 user manual

Philips

Philips ID965 user manual

Mitel OfficeConnect 5340 Quick reference guide

Mitel

Mitel OfficeConnect 5340 Quick reference guide

Teo 9102 quick reference

Teo

Teo 9102 quick reference

Cisco IP Conference Station 7935 System guide

Cisco

Cisco IP Conference Station 7935 System guide

Cisco 8831 user guide

Cisco

Cisco 8831 user guide

Polycom SoundPoint IP 321 user guide

Polycom

Polycom SoundPoint IP 321 user guide

Aastra 5370 Quick user guide

Aastra

Aastra 5370 Quick user guide

Alcatel-Lucent OmniTouch 8 Series Phone guide

Alcatel-Lucent

Alcatel-Lucent OmniTouch 8 Series Phone guide

cetis ND2100IP user manual

cetis

cetis ND2100IP user manual

Avaya IP Office 9620 quick guide

Avaya

Avaya IP Office 9620 quick guide

Siemens Gigaset 3000 Classic Administration manual

Siemens

Siemens Gigaset 3000 Classic Administration manual

manuals.online logo
manuals.online logoBrands
  • About & Mission
  • Contact us
  • Privacy Policy
  • Terms and Conditions

Copyright 2025 Manuals.Online. All Rights Reserved.