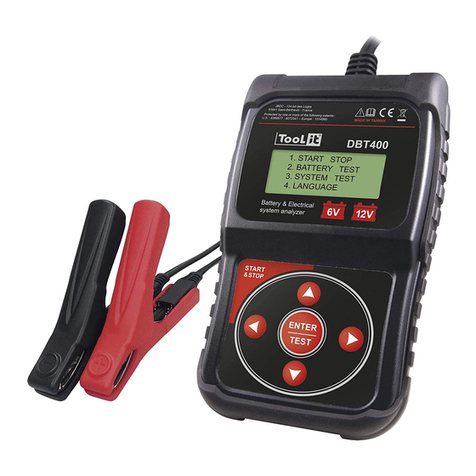
Tool it DBT400 User manual

V2_22/04/2021
FR 2-5
EN 6-9
DE 10-13
ES 14-17
RU 18-21
NL 22-25
IT 26-29
Find more languages of user manuals on our website
TESTEUR DE BATTERIE DBT 400
BATTERY TESTER DBT 400
BATTERIETESTER DBT 400
PROBADOR DE BATERÍA DBT 400
ТЕСТЕР БАТАРЕЙ DBT 400
ACCU-TESTER DBT 400
TESTER DI BATTERIA DBT 400
www.gys.fr

INSTRUCTIONS DE SÉCURITÉ
Ce manuel d’utilisation comprend des indications sur le
fonctionnement de l’appareil et les précautions à suivre pour la
sécurité de l’utilisateur. Merci de le lire attentivement avant la
première utilisation et de le conserver soigneusement pour toute
relecture future.
Risque d’explosion et d’incendie!
Une batterie en charge peut émettre des gaz explosifs.
Le testeur de batterie doit être connecté uniquement aux batteries
ayant une tension nominale de sortie de 6 V,12 V et 24 V .
ATTENTION : Une inversion de polarité entraînera la fusion
du fusible et pourrait causer des dommages permanents. Les
dommages dus à l’inversion de polarité ne sont pas couverts par
notre garantie.
ATTENTION : si la batterie de la voiture est déconnectée, il est
possible que certains systèmes de gestion soient désactivés.
Consultez le manuel de votre véhicule pour plus d’informations
sur l’installation.
N’utilisez pas le testeur de batterie si le cordon ou les cosses
sont endommagés.
N’utilisez pas le testeur de batterie s’il a reçu un choc violent ou
a été endommagé de quelque manière que ce soit.
Ne pas démonter l’appareil. Un réassemblage incorrect peut
entraîner un risque de choc électrique ou d’incendie.
Risque de projection d’acide !
• Porter des verres de sécurité et des vêtements appropriés.
• En casdecontactaveclesyeuxoulapeau,rincerimmédiatement
à l’eau et consulter un médecin sans tarder.
• Éviter les ammes et les étincelles. Ne pas fumer.
• Protéger les surfaces de contacts électriques de la batterie à
l’encontre des courts-circuits.
• Matériel conforme aux directives européennes. La déclaration
UE de conformité est disponible sur notre site.
• Marque de conformité EAC (Communauté économique
Eurasienne)
• Matériel conforme aux exigences britanniques. La
déclaration de conformité britannique est disponible sur
notre site (voir à la page de couverture).
• Appareil conforme aux normes Marocaines.
• La déclaration Cم(CMIM) de conformité est disponible sur
notre site internet.
2
DBT 400 FR
Notice originale

• Ce matériel fait l’objet d’une collecte sélective selon la direc-
tive européenne 2012/19/UE. Ne pas jeter dans une pou-
belle domestique !
• Produit recyclable qui relève d’une consigne de tri.
BRANCHEMENT DU TESTEUR DE CHARGE
1- S’assurer que l’endroit est bien ventilé avant d’eectuer un test.
2- Testeur pour batteries 6 et 12 V et test du système de charge sur batteries 12 et 24 V (seulement 12 V sur les
batteries START & STOP).
3- Avant d’eectuer un test sur la batterie, s’assurer que le contact est coupé, que les accessoires ne fonctionnent pas.
Fermer toutes les portes et le core.
4- S’assurer que les bornes de la batterie soient propres. Si nécessaire, les nettoyer à l’aide d’une brosse métallique.
Toute présence d’oxydation entre les cosses du testeur et les connecteurs de la batterie ou entre les connecteurs de
la batterie et les bornes de cette dernière diminue l’ecacité du testeur.
5- Vérier que le testeur dispose de 6 piles de 1.5 V dans le compartiment.
6- Brancher la pince négative (noire) à la borne négative de la batterie. Brancher la pince positive (rouge) sur la borne
positive de la batterie.
REGLAGE DE L’APPAREIL
Dénir la langue :
1. Appuyer sur pour sélectionner «langage » puis appuyer sur «ENTER» pour valider la sélection
2. Sélectionner la langue à l’aide des èches puis valider le choix en cliquant sur «ENTER».
TESTER LA BATTERIE
1. Appuyer sur pour choisir le test «1. START-STOP» s’il s’agit d’une batterie START & STOP ou «2. TEST BATTERIE»
s’il s’agit d’une batterie classique. Valider en appuyant sur «ENTRÉE».
2. Sélectionner le type de batterie à l’aide des èches puis cliquer sur la èche du bas pour accèder aux autres
critères.
3. Choisir la norme inscrite sur la batterie puis valider (normes possibles : CCA, BCI, CA, MCA, DIN, IEC, EN, SAE, GB)
4. Entrer le courant de démarrage indiqué sur la batterie (ex : 830SAE) puis valider en appuyant sur «ENTER».
Le test se lance.
• Résultat du test de la batterie
Résultat Achage écran Analyse
BATTERIE OK
BATTERIE OK
××.××V ×××× SAE
SOH: ×××× SAE
XX%
La batterie est opérationnelle.
OK A RECHARGER
OK A RECHARGE
××.××V ×××× SAE SOH:
×××× SAE
XX%
Batterie en bon état mais état de charge faible.
CHARGER & TESTER
CHARGER & TESTER
××.××V ×××× SAE
SOH: ×××× SAE
XX%
Recharger la batterie et eectuer le test à
nouveau.
A REMPLACER
A REMPLACER
××.××V ×××× SAE
SOH: ×××× SAE
XX%
La batterie est proche de sa n de vie.
Son remplacement est à prévoir.
BATTERIE ENDOMMAGÉE, REMPLACER
BAD CELL & REPLACE
××.××V ×××× SAE
SOH: ×××× SAE
XX%
Un problème au niveau des cellules est constaté
(court-circuit...). Remplacer la batterie.
Pour tester une batterie 24V, diviser les batteries en deux et tester une batterie
après l’autre. La procédure du test est identique à une batterie 12V.
3
DBT 400 FR
Notice originale

ERREUR CHARGE ERREUR CHARGE
La batterie dépasse 2000 CCA ou 200 AH, ou les
pinces ne sont pas bien connectés.
S’il ne s’agit d’aucune des deux causes citées
ci-dessus, recharger complètement la batterie et
tester à nouveau. Si l’achage reste le même,
remplacer la batterie.
5. Dans chaque cas, pour acher l’état de santé de la batterie (SOH) et l’état de charge (SOC), appuyer sur pour
faire déler les résultats.
6. Appuyer sur «ENTER» pour revenir à l’écran d’accueil. Appuyer une nouvelle fois sur «ENTER» pour accèder au
menu principal.
TEST DU SYSTÈME DE CHARGE DE L’ALTERNATEUR
1. Appuyer sur «TEST DU SYST» l’écran suivant apparaît :
COUPEZ CONSOMM.
DEMARREZ MOTEUR
2. S’assurer que tous les accessoires du véhicule soient éteints (lumières, clim, radio etc.).
3. Démarrer le moteur. L’un de ces trois résultats apparaît :
Cas Achage écran Analyse
Tension inférieure à 9,6 V
VOLTS DEMARRAGE
x.xx V BAS
La tension de démarrage est anormale. La batterie doit
être remplacée.
Tension supérieure à 9,6 V
VOLTS DEMARRAGE
x.xx V NORMAL La tension de démarrage est normale.
Pas d’ondulation
VOLTS DEMARRAGE
NO D’ONDULATION
La tension de démarrage n’est pas détectée.
Recommencer le test.
1. Si la tension de démarrage est normale, appuyer sur «ENTER» pour poursuivre le test.
2. Garder le moteur allumé. Verier que tous les accessoires du vehicule soient éteints puis valider.
3. L’un des 3 résultats s’ache :
• Résultat du test de la tension de démarrage
Cas Résultats achés Analyse
Haute tension de démarrage lorsque
le test est eectué avec le moteur au
ralenti
ALT. VOLTS REDRES
xx.xx V HAUT Vérier que les connexions sont bonnes. Si tout
est bien connecté, remplacer le régulateur.
Tension de démarrage normale lorsque
le test est eectué avec le moteur au
ralenti
ALT. VOLTS REDRES
xx.xx V NORMAL Aucun problème détecté. Fonctionnement normal
de l’alternateur.
Tension basse de démarrage lorsque
le test est eectué avec le moteur au
ralenti
ALT. VOLTS REDRES
xx.xx V BAS
L’alternateur ne procure pas susamment de
courant à la batterie. Vérier les courroies, et
s’assurer que l’alternateur tourne lorsque le
moteur est en marche. Si les courroies glissent ou
sont brisées, les remplacer et faire le test à nou-
veau. Vérier la connexion entre l’alternateur et
la batterie. Si la connexion est mauvaise, nettoyer
ou remplacer le câble et faire le test à nouveau.
Si les courroies et la connexion sont en bonne
condition, remplacer l’alternateur.
4. Appuyer sur «ENTER» pour continuer le test de circuit de charge avec accessoires.
5. Le testeur demande «ALLUMEZ CONSOM ET PRESSEZ ENTER». Allumer le chauage au maximum (chaleur),
les phares de route et les feux arrières. Ne pas allumer de charges cycliques telles que la climatisation ou les
essuie-glaces.
4
DBT 400 FR
Notice originale

6. Faire tourner le moteur à 2500 tr/min pendant 15 secondes.
7. Appuyer sur «ENTRÉE» , l’intensité d’ondulation du cicrcuit de charge apparait. L’un des deux résultats s’ache :
Résultats trouvés Achage écran Analyse
Intensité d’ondulation normale TENSION REDR OK
xx.xx V NORMAL
Les diodes fonctionnent bien dans l’al-
ternateur/démarreur
Intensité d’ondulation haute
TENSION REDR OK
xx.xx V HAUT
OU
TENSION REDR DEF
Une ou plusieurs diodes ne
fonctionnent pas ou sont
endommagées. S’assurer que le
support de l’alternateur est bien placé
et que les courroies fonctionnent
correctement. Si c’est le cas, remplacer
l’alternateur.
8. Continuer le test en appuyant sur «ENTER». Le testeur analyse maintenant la tension de démarrage avec les
accessoires du véhicule en marche.
• Résultat du test de système de charge avec accessoires en marche
Cas Résultats achés Analyse
Haute tension de démarrage lorsque
le test est eectué avec les
accessoires en marche
TENSION ALTERNA
xx.xx V HAUT
La tension de sortie de l’alternateur est anormale-
ment élevée. Vérier qu’il n’y a pas de problèmes de
connexions. Si non, remplacer l’alternateur.
Tension de démarrage normale
lorsque le test est eectué avec les
accessoires en marche
TENSION ALTERNA
xx.xx V NORMAL La sortie de tension de l’alternateur est
normale. Aucun problème n’est détecté.
Tension basse de démarrage lorsque
le test est eectué avec les
accessoires en marche
TENSION ALTERNA
xx.xx V BAS
L’alternateur ne procure pas susamment de
courant pour la charge du système électrique et
la batterie. Vérier les courroies, et s’assurer que
l’alternateur tourne lorsque le moteur est en marche.
Si les courroies glissent ou sont brisées, remplacer
les courroies et faire le test à nouveau. Vérier la
connexion entre l’alternateur et la batterie. Si la
connexion est mauvaise, nettoyer ou remplacer le
câble et faire le test à nouveau. Si les courroies et la
connexion sont en bon état, remplacer l’alternateur.
MAINTENANCE
Cas Analyse
Ecran non allumé Vérier que l’appareil est bien connecté à la batterie
La tension de la batterie n’est pas assez importante pour réaliser le test.
Charger complètement la batterie et réessayer.
Batterie interne insusante Remplacer la pile du testeur.
CONDITION DE GARANTIE
La garantie couvre tous défauts ou vices de fabrication pendant 2 ans, à compter de la date d’achat (pièces et main
d’oeuvre).
La garantie ne couvre pas :
• Toutes autres avaries dues au transport.
• L’usure normale des pièces (Ex. : câbles, pinces, etc.).
• Les incidents dus à un mauvais usage (erreur d’alimentation, chute, démontage).
• Les pannes liées à l’environnement (pollution, rouille, poussière).
En cas de panne, retourner l’appareil à votre distributeur, en y joignant :
- un justicatif d’achat daté (ticket de sortie de caisse, facture…)
- une note explicative de la panne.
5
DBT 400 FR
Notice originale
SAFETY INSTRUCTIONS
This manual includes guidelines on the operation of your device
and the precautions to follow for your own safety. Ensure it
is read carefully before rst use and keep it handy for future
reference.
Risk of explosion and re!
A battery being charged can emit explosive gas.
The battery tester should only be connected to batteries with a
rated output voltage of 6 V, 12 V and 24 V .
CAUTION: Reverse polarity will cause the fuse to blow and
could cause permanent damage. Damage due to reverse
polarity is not covered by our warranty.
CAUTION: If the car’s battery is disconnected, some
management systems may be disabled.
Consult your vehicle manual for more information on installation.
Do not use the battery tester if the cord or terminals are damaged.
Do not use the battery tester if it has received a severe shock or
has been damaged in any way.
Do not disassemble the device. Incorrect reassembly may result
in a risk of electric shock or re.
Acid projection hazard!
• Wear appropriate safety glasses and clothing.
• If your eyes or skin come into contact with battery acid, rinse
the affected part of the body with plenty of water and seek
immediate medical assistance.
• Avoid ames and sparks. Do not smoke.
• Protect the electrical contacts of the battery against short-
circuiting.
• The device complies with European Directive.
• The certicate of compliance is available on our website.
• EAC conformity mark (Eurasian Economic Commission)
• Material conforms to UK requirements. The UK Declaration of
Conformity is available on our website (see cover page).
• Device compliant with Moroccan standards.
• The Cم (CMIM) declaration of conformity is available on our
website.
• This product should be disposed of at an appropriate recycling
facility. Do not dispose of in domestic waste.
• Recyclable product that falls within waste sorting recommen-
dations
6
DBT 400 EN
Translation of the original instructions

CONNECTING THE BATTERY TESTER
1- Ensure that the area is well ventilated before performing a test.
2- Tester for 6 and 12 V batteries and test of the 12/24 V battery charging system (only 12 V on the START & STOP
batteries).
3- Before performing a test on the battery, make sure that the ignition and the consumers are switched o. Close all the
doors and the boot.
4- Make sure that the battery connections are clean. If necessary, clean them using a wire brush.
Any presence of oxidation between the tester terminals and the battery connectors or between the battery connec-
tors and the battery terminals reduces the eectiveness of the tester.
5- Check that the tester has 6 x 1.5V batteries in the compartment.
6- Connect the negative plug (black) to the negative terminal of the battery. Connect the positive plug (red) to the po-
sitive terminal of the battery.
DEVICE SETTINGS
Set the language:
1. Press to select «language» then press «ENTER» to conrm selection
2. Select the language using the arrow then conrm the choice by clicking on «ENTER».
BATTERY TEST
1. Press to select the test «1. START-STOP «if it is a START & STOP battery or» 2. BATTERY TEST «if it is a stan-
dard battery. Conrm by pressing «ENTER».
2. Select the type of battery using the arrows then click on the down arrow to access the other criteria.
3. Choose the standard written on the battery and validate (possible standards: CCA, BCI, CA, MCA, DIN, IEC, EN,
SAE, GB)
4. Enter the start current indicated on the battery (eg 830SAE) and conrm by pressing «ENTER».
The test starts.
• Battery test result
Result Screen display Analysis
BATTERY OK
BATTERY OK
××.××V ×××× SAE
SOH: ×××× SAE
XX%
The battery is in working order.
OK FOR RECHARGE
OK TO RECHARGE
××.××V ×××× SAE SOH:
×××× SAE
XX%
Battery in good condition but low state of charge.
CHARGE & TEST
CHARGING & TESTING
××.××V ×××× SAE
SOH: ×××× SAE
XX%
Charge the battery and perform the test again.
TO BE REPLACED
TO REMPLACE
××.××V ×××× SAE
SOH: ×××× SAE
XX%
The battery is nearing the end of its life. A repla-
cement should be organised.
BATTERY DAMAGED, REPLACE
BAD CELL & REPLACE
××.××V ×××× SAE
SOH: ×××× SAE
XX%
A problem at the cell level is observed (short cir-
cuit.....). Replace the battery.
ERROR CHARGE ERROR CHARGE
The battery exceeds 2000 CCA or 200 AH, or the
clamps are not properly connected.
If neither of these two elements listed above are
the cause, fully recharge the battery and test
again. If the display remains the same, replace the
battery.
7
DBT 400 EN
Translation of the original instructions

5. In each case, to display the battery health status (SOH) and charge status (SOC), press to scroll through the
results.
6. Press «ENTER» to return to the home screen. Press «ENTER» again to access the main menu.
TEST OF THE ALTERNATOR CHARGING SYSTEM
1. Press «SYSTEM TEST» the following screen appears :
CUT CONS.
START ENGINE
2. Make sure all vehicle consumers are switched o (lights, air conditioning, radio etc.).
3. Start the engine. One of these three results appears :
Examples Screen display Analysis
Voltage below 9.6 V START VOLTS
x.xxx V LOW The starting voltage is not correct. The battery must
be replaced.
Voltage above 9.6 V START VOLTS
x.xxx V NORMAL The starting voltage is normal.
No undulation START VOLTS
NO UNDULATION The starting voltage is not detected.
Repeat the test.
1. If the start voltage is normal, press «ENTER» to continue the test.
2. Keep the engine running Check that all the accessories of the vehicle are o then validate.
3. One of the 3 results is displayed :
• Result of the start voltage test
Examples Results displayed Analysis
High starting voltage when the test is
performed with the engine at idle
ALT. VOLTS ADJUST
xx.xx V UP Check that the connections are good. If every-
thing is properly connected, replace the regulator.
Normal starting voltage when the test
is performed with the engine at idle
ALT. VOLTS ADJUST
xx.xx V NORMAL No problem detected. Normal operation of the
alternator.
Low starting voltage when the test is
performed with the engine at idle
ALT. VOLTS ADJUST
xx.xx V LOW
The alternator does not provide enough power
to the battery. Check the belts, and ensure that
the alternator is running when the engine is
on. If the belts slip or are broken, replace them
and re-test. Check the connection between the
alternator and the battery. If the connection is
bad, clean or replace the cable and re-test. If
the alternator belts and connection are in good
condition, replace the alternator.
4. Press «ENTER» to continue charging circuit test with accessories.
5. The tester asks «SWITCH CONSUMERS ON AND PRESS ENTER». Turn on the heater to maximum (heat), high and
rear headlights. Do not switch on cyclic loads such as air conditioning or windshield wipers.
6. Run the engine at 2500 rpm for 15 seconds.
7. Press «ENTER», the ripple intensity of the load cell appears. One of the two results is displayed :
8
DBT 400 EN
Translation of the original instructions

Results found Screen display Analysis
Normal undulation intensity
VOLTAGE REDR OK
xx.xx V NORMAL
OR
VOLTAGE REDR DEF
The diodes are working in the alterna-
tor/starter
High undulation intensity TENSION REDR OK
xx.xx V HIGH
One or more diodes do not
do not work or are damaged. Make
sure that the alternator support is
properly positioned and that the timing
belts are working properly. If so, re-
place the alternator.
8. Continue the test by pressing «ENTER». The tester now analyses the starting voltage with the accessories
of the vehicle running.
• Result of the load system test with consumables running
Examples Results displayed Analysis
High starting voltage when the test is
performed with the accessories running
VOLTAGE ALTERNA
xx.xx V HIGH
The alternator output voltage is abnormally high.
Check that there are no connection problems. If
not, replace the alternator.
Normal starting voltage when the
test is performed with the accessories
running
VOLTAGE ALTERNA
xx.xx V NORMAL The alternator output voltage is
normal. No problem detected.
Low starting voltage when
the test is performed with the accesso-
ries running
VOLTAGE ALTERNA
xx.xx V LOW
The alternator does not provide enough current
for charging the electrical system and the battery.
Check the belts, and ensure that the alternator is
running when the engine is on. If the belts slip or
are broken, replace them and re-test. Check the
connection between the alternator and the battery.
If the connection is bad, clean or replace the cable
and re-test. If the belts and connection are in good
condition, replace the alternator.
MAINTENANCE
Examples Analysis
Display switched o Check that the device is connected to the battery. The battery voltage is not high
enough to perform the test (<1.0 V). Fully recharge the battery and try again.
Insucient internal battery Replace the batteries in the tester.
WARRANTY
The warranty covers faulty workmanship for 2 years from the date of purchase (parts and labour).
The warranty does not cover:
• Transit damage.
• Normal wear of parts (eg. : cables, clamps, etc..).
• Damages due to misuse (power supply error, dropping of equipment, disassembling).
• Environment related failures (pollution, rust, dust).
In case of failure, return the unit to your distributor together with:
- The proof of purchase (receipt etc ...)
- A description of the fault reported
9
DBT 400 EN
Translation of the original instructions

SICHERHEITSANWEISUNGEN
Diese Betriebsanleitung enthält Sicherheits- und Betriebshinweise.
Bitte lesen Sie diese Anleitung aufmerksam durch, bevor Sie das
Gerät zum ersten Mal benutzen und bewahren Sie diese sorgfältig
auf.
Explosions- und Brandgefahr!
Beim Auaden einer Batterie können explosive Gase freigesetzt
werden.
Der Batterietester sollte nur an Batterien mit einer Ausgangs-
nennspannung von 6 V, 12 V und 24 V angeschlossen werden.
ACHTUNG: eine Verpolung führt zum Schmelzen der Sicherung
und kann dauerhafte Beschädigungen verursachen. Die von einer
Verpolung verursachten Schäden werden nicht durch die Garantie
abgedeckt.
ACHTUNG: Wenn die Batterie nicht angeschlossen ist, sind
möglicherweise einige Steuerungssysteme inaktiv.
Für weitere Information zur Einrichtung lesen Sie bitte die
Bedienungsanleitung Ihres Fahrzeugs.
Benutzen Sie das Gerät nicht, wenn die Kabel oder Anschlüsse
beschädigt sind.
Benutzen Sie das Gerät nicht, wenn es einen heftigen Stoß
erlitten hat oder auf andere Art beschädigt wurde.
NehmenSiedasGerätnichtauseinander.EinefalscherZusammenbau
kann zu einem elektrischen Schlag oder Brand führen.
Gefahr von Säurespritzern !
• Tragen Sie Schutzbrille und geeignete Kleidungen.
• Bei Kontakt der Batteriesäure mit den Augen oder der Haut
sofort gründlich mit Wasser nachspülen und Arzt konsultieren.
• Vermeiden Sie Funken und Flammen. Rauchen Sie nicht!
• Schützen Sie die elektrischen Kontaktächen der Batterie
gegen Kurzschlüsse.
• Das Gerät entspricht den europäischen Richtlinien und Normen.
Die Konformitätserklärung ist auf unserer Internetseite verfügbar.
• EAC-Konformitätszeichen (Eurasische Wirtschaftsgemeinschaft)
• Das Material entspricht den britischen Anforderungen.
• Die UK-Konformitätserklärung ist auf unserer Website verfügbar
(siehe Titelseite).
• Das Gerät entspricht den marokkanischen Normen.
• Die Cم (CMIM)-Konformitätserklärung ist auf unserer Website
verfügbar.
• Dieses Gerät entspricht der 2012/19/EU-Richtlinie über Elektronik-
und Elektro-Altgeräte (Altgeräteverordnung) und darf daher nicht
im Hausmüll entsorgt werden. Entsorgen Sie das Gerät über Ihre
kommunale Sammelstelle für Elektro-Altgeräte!
10
DBT 400 DE
Übersetzung der Originalbetriebsanleitung

• Recyclingprodukt, das nicht über den Hausmüll entsorgt werden
darf.
ANSCHLUSS DES BATTERIETESTERS
1- Führen Sie den Test nur in gut gelüfteten Räumen durch.
2- Batterietester für 6 &12V Batterien und Ladesysteme 12 & 24V (Nur 12V bei Start-Stop-Batterien)
3- Vor dem Test sicherstellen, dass die Zündung aus und keine Verbraucher im Fahrzeug eingeschaltet sind. Alle Türen
und den Koerraumdeckel schließen.
4- Stellen Sie sicher, dass alle Batterieanschlüsse sauber sind. Wenn erforderlich, mit einer Metallbürste reinigen.
Rost oder Schmutz zwischen den Klemmen des Testers und den Batterieanschlüssen oder zwischen den Batte-
rieanschlüssen und deren Polen beeinussen das Testergebnis.
5- Sechs 1,5V Batterien in das Batteriefach einlegen.
6- Die Minuspolklemme (schwarz) am Minuspol der Batterie anschließen. Die Pluspolklemme am Pluspol der Batterie
anschließen.
EINSTELLEN DES GERÄTS
Sprache festlegen :
1. Drücken Sie um «Sprache» auszuwählen, und drücken Sie dann «ENTER», um die Auswahl zu bestätigen.
2. Wählen Sie die Sprache mit den Pfeilen und bestätigen Sie die Auswahl mit «ENTER».
BATTERIE TESTEN
1. Drücken Sie um den Test «1 START-STOP» auszuwählen, wenn es sich um eine START & STOP-Batterie handelt,
oder «2. TEST BATTERIE» wenn es sich um eine traditionelle Batterie handelt. Mit ENTER bestätigen.
2. Wählen Sie den Batterietyp mit den Pfeiltasten aus und klicken Sie dann auf den Pfeil nach unten, um auf die
anderen Kriterien zuzugreifen.
3. Wählen Sie die Norm anhand der auf der Batterie aufgeführten Angaben aus (zB: CCA, BCI, CA, MCA, DIN, IEC,
EN, SAE, GB).
4. Geben Sie den Startstrom auf der Batterie im Ampere (A) angegeben (z.B. 830SAE) und bestätigen beim Drücken
«ENTER».Der Test beginnt.
• Ergebnis des Batterietests
Ergebnis Anzeige Analyse
BATTERIE OK
BATTERIE OK
××.××V ×××× SAE
SOH: ×××× SAE
XX%
Die Batterie ist betriebsbereit.
OK WIEDERAUFLADEN
OK AUFLADEN
××.××V ×××× SAE SOH:
×××× SAE
XX%
Batterie in gutem Zustand aber geringer Ladezus-
tand
AUFLADEN & TESTEN
AUFLADEN & TESTEN
××.××V ×××× SAE
SOH: ×××× SAE
XX%
Die Batterie auaden und das Test erneut
durchführen.
BATTERIE ERSETZEN
ZU ERSETZEN
××.××V ×××× SAE
SOH: ×××× SAE
XX%
Die Batterie ist nah am Lebensende. Der Aus-
tausch steht bevor.
BESCHÄDIGTE BATTERIE, ERSETZEN
BAD CELL & REPLACE
××.××V ×××× SAE
SOH: ×××× SAE
XX%
Ein Problem wurde in den Zellen gefunden (z.B.
Kurzschluss...). Batterie ersetzen
FEHLER AUFLADUNG FEHLER AUFLADUNG
Die Batterie hat über 2000CCA/200AH oder die
Messklemmen sind nicht richtig angeschlossen.
Wenn eine der beiden oben genannten Ursachen
vorliegt, laden Sie die Batterie vollständig auf und
testen Sie sie erneut. Bleibt die Anzeige gleich,
muss die Batterie ersetzt werden. 11
DBT 400 DE
Übersetzung der Originalbetriebsanleitung

5. Um den Batteriezustand (SOH) und den Ladezustand (SOC) anzuzeigen, drücken Sie jeweils um durch die
Ergebnisse zu blättern.
6. «ENTER» drücken, um zurück ins Hauptmenü zu gelangen. «ENTER» drücken, um zurück ins Hauptmenü zu gelangen.
TEST DER LICHTMASCHINE
1. Drücken Sie «SYSTEM-TEST», das folgende auf dem Display erscheint :
DEN VERBRAUCH
AUSSCHALTEN. MOTOR
STARTEN
2. Sicherstellen, dass alle Verbraucher im Fahrzeug ausgeschaltet sind (Beleuchtung, Klimaanlage, Radio usw.)
3. Motor starten. Ein der drei folgenden Ergebnisse erscheint :
Fall Anzeige Analyse
Spannung kleiner als 9,6V VOLT STARTEN
x.xx V NIEDRIG Die Startspannung ist nicht normal. Die Batterie muss
ersetzt werden.
Spannung höher als 9,6V VOLT STARTEN
x.xx V NORMAL Die Startspannung ist normal.
Keine Welligkeit. VOLT STARTEN
KEINE WELLIGKEIT Es wird keine Startspannung gemessen.
Test erneut durchführen.
1. Die Startspannung ist normal, drücken Sie «ENTER», um den Test fortzusetzen.
2. Lassen Sie den Motor laufen. Sicherstellen, dass alle Verbraucher im Fahrzeug ausgeschaltet sind (Beleuchtung,
Klimaanlage, Radio)
3. Eines der folgenden Ergebnisse wird angezeigt:
• Ergebnis des Startspannungstests
Fall Angezeigte Ergebnisse: Analyse
Hohe Startspannung, wenn der Test
mit leerlaufendem Motor durchgeführt
wird.
ALT. VOLTS REDRES
xx.xx V HOCH"
Prüfen, ob die Verbindungen korrekt sind. Wenn
alles richtig angeschlossen ist, den Regler er-
setzen.
Normale Startspannung wenn der Test
mit leerlaufendem Motor durchgeführt
wird.
ALT. VOLTS REDRES
xx.xx V NORMAL Kein Problem festgestellt. Normalbetrieb der
Lichtmaschine.
Niedrige Startspannung wenn der Test
mit leerlaufendem Motor durchgeführt
wird.
ALT. VOLTS REDRES
xx.xx V NIEDRIG
Die Lichtmaschine liefert nicht genug Strom an
die Batterie. Keilriemen prüfen und sicherstellen,
dass die Lichtmaschine funktioniert, wenn der
Motor in Betrieb ist. Rutschen die Keilriemen oder
sind sie beschädigt, dann diese ersetzen und den
Test erneut durchführen. Verbindung zwischen
Lichtmaschine und Batterie prüfen. Bei schlechter
Verbindung das Kabel reinigen oder ersetzen und
den Test erneut durchführen. Sind die Keilrie-
men in gutem Zustand, dann die Lichtmaschine
ersetzen.
4. «ENTER» drücken, um den Test mit in Betrieb stehendem Zubehör durchzuführen.
5. Der Tester zeigt «VERBRAUCH STARTEN UND ENTER DRÜCKEN». Die Heizung auf maximale Leistung stellen und
die Beleuchtung einschalten. Keine zyklischen Verbraucher wie Klimaanlage oder Scheibenwischer einschalten.
6. Starten Sie das Fahrzeug und steigern Sie die Drehzahlen des Motors auf 2500 U/min für 15 Sekunden.
7. Drücken Sie ENTER. Die Welligkeit des Ladestromkreises erscheint. Ein der folgenden Ergebnisse wird angezeigt.
12
DBT 400 DE
Übersetzung der Originalbetriebsanleitung

Ergebnis Anzeige Analyse
Normale Welligkeitsleistung.
SPANNUNG REDR OK
xx.xx V NORMAL
ODER
SPANNUNG REDR DEF
Die Dioden in der Lichtmaschine/im
Anlasser arbeiten korrekt.
Hohe Welligkeit. SPANNUNG REDR OK
xx.xx V HOCH
Eine oder mehrere Dioden funktio-
nieren nicht oder sind beschädigt.
Überprüfen Sie den Anschluss und
Funktion der Lichtmaschine. Ist der
Anschluss wie vorgegeben , muss die
Lichtmaschine ersetzt werden.
8. Drücken Sie ENTER, um mit dem Test fortzufahren. Der Tester wird nun die Startspannung mit eingeschalteten Ver-
brauchern im Fahrzeug überprüfen.
• Ergebnis des Ladestromkreistests mit eingeschalteten Verbrauchern.
Fall Angezeigte Ergebnisse: Analyse
Hohe Startspannung beim Test mit
eingeschalteten Verbrauchern.
SPANNUNG LICHTM
xx.xx V HOCH
Die Ausgangsspannung der Lichtmaschine ist zu
hoch. Prüfen, ob es einen Verbindungsfehler gibt.
Sonst die Lichtmaschine ersetzen.
Normale Startspannung beim Test mit
eingeschalteten Verbrauchern.
SPANNUNG LICHTM
xx.xx V NORMAL Die Ausgangsspannung der Lichtmaschine ist
normal. Es wurde kein Problem erkannt.
Niedrige Startspannung beim Test mit
eingeschalteten Verbrauchern.
SPANNUNG LICHTM
xx.xx V NIEDRIG
Die Lichtmaschine liefert nicht genug Energie zur
Auadung der Batterie und zum Betrieb der elek-
trische Anlage. Keilriemen prüfen und sicherstellen,
dass die Lichtmaschine funktioniert, wenn der
Motor in Betrieb ist. Rutschen die Riemen, oder sind
sie beschädigt, dann diese ersetzen und den Test
erneut durchführen. Verbindung zwischen Licht-
maschine und Batterie prüfen. Bei schlechter Verbin-
dung das Kabel reinigen oder ersetzen und den Test
erneut durchführen. Sind die Keilriemen in gutem
Zustand, dann die Lichtmaschine ersetzen.
WARTUNG
Fall Analyse
Bildschirm aus Prüfen, dass das Gerät an der Batterie richtig angeschlossen ist. Die Batteriespan-
nung ist zu niedrig, um einen Test durchzuführen (<1,0V). Die Batterie auaden und
erneut versuchen.
Interne Batterie ersetzen Batterie des Testers ersetzen.
HERSTELLERGARANTIE
Die Garantieleistung des Herstellers erfolgt ausschließlich bei Fabrikations- oder Materialfehlern, die binnen 24 Monate
nach Kauf angezeigt werden (Nachweis Kaufbeleg).
Die Garantieleistung erfolgt nicht bei:
• Durch Transport verursachten Beschädigungen.
• Normalem Verschleiß der Teile (z.B. : Kabel, Klemmen, usw.) sowie Gebrauchsspuren.
• Von unsachgemäßem Gebrauch verursachten Defekten (Sturz, harte Stöße, Demontage).
• Durch Umwelteinüsse entstandene Defekte (Verschmutzung, Rost, Staub).
Die Reparatur erfolgt erst nach Erhalt einer schriftlichen Akzeptanz (Unterschrift) des zuvor vorgelegten Kostenvo-
ranschlages durch den Besteller. Im Fall einer Garantieleistung trägt GYS ausschließlich die Kosten für den Rückver-
sand an den Fachhändler.
13
DBT 400 DE
Übersetzung der Originalbetriebsanleitung

INSTRUCCIONES DE SEGURIDAD
Estemanualdeusoincluyeindicacionessobreelfuncionamiento
de su aparato y las precauciones a seguir para su seguridad.
Léalo atentamente antes del primer uso y consérvelo con
cuidado para cualquier relectura en el futuro.
Riesgo de explosión y de incendio !
Una batería en carga puede emitir gases explosivos.
El probador de batería debe conectarse únicamente a as
baterías con una tensión nominal de salida de 6V, 12V y 24V.
CUIDADO : una inversión de polaridad puede conllevar
la fusión del fusible y podría causar daños permanentes.
Los daños debidos a la inversión de polaridad no están
cubiertos por la garantía.
ATENCIÓN: si la batería del vehículo está desconectada,
es posible que algunos sistemas de gestión estén
desactivados.
Consulte el manual de su vehículo para más información
sobre la instalación.
No utilice el probador de batería si el cordón o los terminales
están dañados.
No utilice el probador de batería si el producto a recibido un
golpe brusco o ha sido dañado de cualquier manera.
No desmonte el aparato. Un re-ensamblado incorrecto puede
conllevar un riesgo de descarga eléctrico o de incendio.
Riesgo de proyección de ácido !
• Lleve gafas de seguridad y prendas apropiadas.
• En caso de contacto con los ojos o la piel, aclare
inmediatamente con agua abundantemente y consulte con
un médico sin demora.
• Evite las llamas y las chispas. No fume.
• Proteja las supercies de contactos eléctricos de la batería
contra cortocircuitos.
• Material conforme a las Directivas europeas. La declaración
de conformidad UE está disponible en nuestra página web.
• Marca de conformidad EAC (Comunidad económica
euroasiática).
• Material conforme a las exigencias británicas.
• La declaración de conformidad británica esta disponible
en nuestra web (dirección en la portada).
• El dispositivo se ajusta a las normas marroquíes.
• La declaración de conformidad Cم(CMIM) está
disponible en nuestro sitio web.
14
DBT 400 ES
Traducción de las instrucciones originales

• Este material requiere una recogida de basuras selectiva
según la directiva europea 2012/19/UE. ¡No tirar este pro-
ducto a la basura doméstica!
• Producto reciclable que requiere una separación determi-
nada.
CONEXIÓN DEL PROBADOR DE CARGA
1- Asegúrese de que el lugar está bien ventilado antes de efectuar una comprobación.
2- Probador para baterías 6 y 12 V y prueba del sistema de carga de baterias12 y 24 V (únicamente 12 V en baterías
START & STOP).
3- Antes de efectuar una comprobación sobre la batería, asegúrese de que el contacto esté cortado y que los accesorios
no funcionan. Cierre todas las puerta y el maletero.
4- Asegúrese de que los bornes de la batería estén limpios. Si fuese necesario, límpielos con un cepillo metálico.
Toda presencia de óxido entre los terminales del comprobador y los conectores de la batería o entre los conectores
de la batería y los bornes de este último disminuye la ecacia del indicador de carga.
5- Comprobar que el probador dispone de una pila1,5 V*4 en el compartimiento.
6- Conecte el terminal negativo (negro) al borne negativo de la batería. Conecte el terminal positivo (rojo) sobre el
borne positivo de la batería.
AJUSTE DEL APARATO
Dena el idioma :
1. Presionar en para seleccionar «lenguaje » y presionar «ENTAR» para validar la selección.
2. Seleccionar el idioma con las echas y validar la selección presionando «ENTRAR».
COMPROBAR LA BATERÍA
1. Presionar en para seleccionar la prueba «1. START-STOP» si se trata de una batería START & STOP».
2. PRUEBA BATERÍA » si trata de una batería clásica Validar presionando «ENTRAR».
2. Seleccione el tipo de batería con las echas y presione la echa de abajo para acceder a los otros criterios.
3. Seleccione la norma inscrita sobre la bateria y validar (normas posibles : CCA, BCI, CA, MCA, DIN, IEC, EN, SAE, GB)
4. Entrar la corriente de arranque indicada en la batería (ex : 830SAE) y validar presionando «ENTRAR».
La prueba se inicia.
• Resultado de la comprobación de la batería
Resultado Visualización pantalla Análisis
BATERÍA OK
BATTERIE OK
××.××V ×××× SAE
SOH: ×××× SAE
XX%
La batería esta operacional.
OK A RECARGAR
OK A RECARGAR
××.××V ×××× SAE SOH:
×××× SAE
XX%
Batería en buen estado pero carga débil.
CARGAR & PROBAR
CARGAR & PROBAR
××.××V ×××× SAE
SOH: ×××× SAE
XX%
Recargar la batería y efectuar la prueba de nuevo.
A REEMPLAZAR
A REEMPLAZAR
××.××V ×××× SAE
SOH: ×××× SAE
XX%
La batería se acerca a su n de vida Su cambio se
debe prever.
BATERÍA DAÑADA, REEMPLAZAR
BAD CELL & CAMBIAR
××.××V ×××× SAE
SOH: ×××× SAE
XX%
Un problema al nivel de las celdas se encuentra
(corto-circuito...). Reemplace la batería.
15
DBT 400 ES
Traducción de las instrucciones originales

ERROR CARGA ERROR CARGA
La batería supera 2 000 CCA o 200 Ah, o las
pinzas no están conectadas correctamente.
Si no se trata de una de las 2 causas mencionadas
encima, recargar completamente la batería y
probar de nuevo. Si la pantalla sigue igual,
cambiar la batería.
5. En cada caso, para indicar el estado de salud de la batería (SOH) y el estado de carga (SOC), presionar para hacer
deslar los resultados.
6. Presionar en «ENTRAR» para regresar a la pantalla inicial. Presionar de nuevo en «ENTRAR» para acceder al menú
principal.
PRUEBA DEL SISTEMA DE CARGA DEL ALTERNADOR
1. Presionar en «PRUEBA SIST» la pantalla siguiente aparece
CORTAR CONSUM.
ARRANCAR MOTOR
2. Asegúrese de que todos los accesorios del vehículo estén apagados (luces,aire acondicionado, radio, etc.)
3. Arrancar el motor. Uno de estos 3 resultados aparece :
Caso Visualización pantalla Análisis
Tensión inferior a 9,6 V VOLTIOS ARRANQUE
x.xx V DÉBIL La tensión de arranque esta anormal. La batería se
debe reemplazar.
Tensión superior a 9,6 V VOLTIOS ARRANQUE
x.xx V NORMAL La tensión de arranque esta normal
No ondulación VOLTIOS ARRANQUE
NO ONDULACIÓN La tensión de arranque no se ha detectado.
Renovar la prueba.
1. Si la tensión de arranque es normal, presione «ENTRAR» para seguir la prueba.
2. Conservar le motor en funcionamiento. Asegúrese de que todos los accesorios del vehículo estén apagados y validar
3. Uno de los 3 resultados se indica :
• Resultado de la prueba de tensión de arranque
Caso Resultados indicados Análisis
Alta tensión de arranque cuando se
efectúa la prueba con el motor al
ralenti
ALT. VOLTIOS REDRES
xx.xx V ALTA
Vericar que las conexiones estén buenas. Si
todo se conectó correctamente, cambiar el regu-
lador.
Tensión de arranque normal cuando
se efectúa la prueba con el motor al
ralenti
ALT. VOLTIOS REDRES
xx.xx V NORMAL No se ha detectado ningún problema. Funciona-
miento normal del alternador.
Baja tensión de arranque cuando se
efectúa la prueba con el motor al
ralenti
ALT. VOLTIOS REDRES
xx.xx V DÉBIL
El alternador no procura suciente corriente a la
batería. Compruebe las correas, y asegúrese de
que el alternador gire cuando el motor esté en-
cendido.. Si las correas se deslizan o están rotas,
reemplace las correas y haga la prueba de nue-
vo. Compruebe la conexión entre el alternador
y la batería. Si la conexión está mala, límpiela o
reemplace el cable y haga la prueba de nuevo. Si
las correas y la conexión están en buena condi-
ción, reemplace el alternador.
4. Presionar «ENTRAR» para continuar la prueba del circuito de carga con los accesorios.
5. El probador pedirá «ENCIENDE CONSUM Y PRESIONE ENTRAR». Encender la calefacción al máximo (caldo), los faros
altos y los faros traseros. No encienda las cargas cíclicas como la climatización y limpia parabrisas.
6. Haga girar el motor a 2500 tr/min durante 15 segundos.
16
DBT 400 ES
Traducción de las instrucciones originales

7. Presionar «ENTRAR» , la ondulación del sistema de carga aparece. Uno de los 2 resultados se aparece :
Resultados encontrados Visualización pantalla Análisis
Intensidad de ondulación normal TENSIÓN REDR OK
xx.xx V NORMAL
Los diodos funcionan correctamente en
el alternador/arrancador
Intensidad de ondulación alta TENSION REDR OK
xx.xx V ALTA
Uno o varios diodos no funcionan o
están dañados. Asegúrese de que el
soporte del alternador esté bien
anclado y que las correas estén en
buenas condiciones y funcionan de
forma adecuada.. Si es el caso, cambiar
el alternador.
8. Continuar la prueba presionando «ENTER». El probador analiza la tensión de arranque con los accesorios del vehículo
en funcionamiento.
• Resultado del sistema de carga con los consumidores en funcionamiento
Caso Resultados indicados Análisis
alta tensión de arranque cuando el
test se efectúa con los accesorios en
marcha
TENSIÓN ALTERNA
xx.xx V ALTA
La tensión de salida del alternador está anormal-
mente alta. Compruebe que no haya problemas de
conexiones. Si no, reemplazar el alternador>.
Tensión de arranque normal cuando la
prueba se realiza con los consumidores
en funcionamiento
TENSIÓN ALTERNA
xx.xx V NORMAL La salida de tensión del alternador está nor-
mal. No se ha detectado ningún problema.
Tensión de arranque débil cuando la
prueba se realiza con los consumidores
en funcionamiento
TENSIÓN ALTERNA
xx.xx V DÉBIL
El alternador no procura suciente corriente para la
carga del sistema eléctrico y de la batería. Com-
pruebe las correas, y asegúrese de que el alternador
gire cuando el motor esté encendido.. Si las correas
se deslizan o están rotas, reemplace las correas y
haga la prueba de nuevo. Compruebe la conexión
entre el alternador y la batería. Si la conexión está
mala, límpiela o reemplace el cable y haga la prueba
de nuevo. Si las correas y la conexión están en
buena condición, reemplace el alternador.
MANTENIMIENTO
Caso Análisis
Pantalla no encendida Compruebe que esté bien conectado a la batería La tensión de la batería no es lo
suciente alta como para iniciar una comprobación (< 1.0V). Cargar completamente
la batería y reintentar.
Batería interna insuciente Cambiar la pila del probador.
GARANTÍA
La garantía cubre todos los defectos o vicios de fabricación durante 2 años, a partir de la fecha de compra (piezas y
mano de obra). La garantía no cubre :
• Todas las otras averías resultando del transporte
• El desgaste normal de las piezas (cables, pinzas…)
• Los incidentes resultando de un mal uso (error de alimentación, caída, desmontaje)
• Los fallos relacionados con el entorno (polución, oxidación, polvo…)
En caso de fallo, regresen la maquina a su distribuidor, adjuntando:
• Un justicativo de compra con fecha (recibo, factura…)
• Una nota explicativa del fallo
17
DBT 400 ES
Traducción de las instrucciones originales

Перевод оригинальных инструкций
ТЕХНИКА БЕЗОПАСНОСТИ
Данное руководство содержит инструкции по работе
устройства и меры предосторожности для обеспечения
собственной безопасности. Перед первым использованием
внимательно прочитайте его.
Риск взрыва и пожара!
Заряжаемая батарея может выделять взрывоопасный газ.
Тестер батарей должен подключаться только к батареям с
номинальным выходом Напряжение 6 В, 12 В и 24 В.
ВНИМАНИЕ: Обратная полярность может привести к выходу
прибора из строя, а так же к поломке предохранителя. Не
является гарантийным случаем.
ВНИМАНИЕ: Если аккумулятор автомобиля отключен,
некоторые системы управления могут быть отключены.
Дополнительную информацию по установке см. в руководстве
по эксплуатации транспортного средства.
Не используйте тестер батареи, если шнур или клеммы
повреждены.
Не используйте тестер батареи, если он получил сильный
удар или был поврежден каким-либо образом.
Не разбирайте устройство. Неправильная сборка может
привести к риску поражения током или пожара.
Опастность поражения кислотой!
• Носите защитные очки и перчатки.
• В случае контакта с глазами или кожей, промойте обильно
водой и проконсультируйте врача без промедления.
• Избегайте открытого огня и искр. Не курите.
• Защитите электрические контакты батареи от короткого
замыкания.
• Устройство соответствует Европейским стандартам.
Сертификат соответствия доступен на нашем сайте.
• Знак соответствия EAC (Евразийская экономическая комиссия)
• Материал соответствует требованиям Великобритании.
Заявление о соответствии для Великобритании доступно на
нашем веб-сайте (см. главную страницу).
• Товар соответствует нормам Марокко. Декларация Cم
(CMIM) доступна для скачивания на нашем сайте
• Этот продукт следует утилизировать на соответствующем
объекте рециркуляции. Не утилизировать с бытовыми
отходами
• Рециркулируемый продукт, подпадающий под рекомендации
по сортировке отходов
DBT 400
18
RU

Перевод оригинальных инструкций
19
DBT 400 RU
ПОДКЛЮЧЕНИЕ ТЕСТЕРА
1- Убедитесь, что место хорошо проветривается перед выполнением теста.
2- Тестер для батарей 6 и 12 В и проверка системы зарядки от батарей 12 и 24 В (START & STOP АКБ
только 12 В).
3- Перед выполнением теста АКБ убедитесь, что зажигание выключено, что аксессуары не работают. Закройте
все двери и багажник.
4- Убедитесь, что клеммы аккумулятора чистые. При надобности почистите их металлической щеткой.
Присутствие ржавчины между наконечниками тестера и коннекторами аккумулятора или же между
коннекторами и клеммами аккумулятора снижает эффективность монитора зарядки.
5- Убедитесь, что в отсеке тестера 6 батарей по 1,5 В.
6- Подключите отрицательную (черную) клемму к отрицательной клемме АКБ. Подключите положительную
(красную) клемму к положительной клемме АКБ
НАСТРОЙКИ АППАРАТА
Выбор языка :
1. Нажмите чтобы выбрать «язык», затем нажмите «ENTER», чтобы подтвердить выбор.
2. Выберите язык с помощью стрелок затем подтвердите выбор, нажав «ENTER».
ТЕСТЕРЫ АККУМУЛЯТОРНЫХ БАТАРЕЙ АКБ
1. Нажмите чтобы выбрать тест «1. START-STOP «, если это батарея START & STOP или» 2. ТЕСТ
АККУМУЛЯТОРА », если это обычный аккумулятор. Подтвердите нажатием «ENTER».
2. Выберите тип АКБ, используя стрелки затем нажмите стрелку вниз, чтобы получить доступ к другим
критериям.
3. Выберите стандарт, написанный на батарее, затем подтвердите (возможные нормы: CCA, BCI, CA, MCA, DIN,
IEC, EN, SAE, GB)
4. Введите начальный ток, указанный на батарее (например, 830SAE), затем подтвердите нажатием «ENTER».
Тест начнется
• Результат теста аккумулятора
Результат Вывод информации н
экране Анализ
АКБ ОК
АККУМУЛЯТОР ОК
××.××V ×××× SAE
SOH: ×××× SAE
XX%
Аккумулятор работоспособный
ОК ДЛЯ ПЕРЕЗАРЯДКИ
ОК, ЧТОБЫ ПЕРЕЗАРЯДИТЬ
××.××V ×××× SAE SOH:
×××× SAE
XX%
Аккумулятор в хорошем состоянии, но низкий
уровень заряда
ЗАРЯДНОЕ УСТРОЙСТВО & ТЕСТЕР
ЗАРЯДКА И ТЕСТ
××.××V ×××× SAE
SOH: ×××× SAE
XX%
Зарядите аккумулятор и повторите проверку.
ТРЕБУЕТСЯ ЗАМЕНА
ЗАМЕНИТЬ
××.××V ×××× SAE
SOH: ×××× SAE
XX%
Аккумулятор не подлежит восстановлению.
Замена аккумулятора скоро
АККУМУЛЯТОР ПОВРЕЖДЕН, ТРЕБУЕТСЯ
ЗАМЕНА
ЯЧЕЙКА ПОДВ. И ЗАМЕНА
××.××V ×××× SAE
SOH: ×××× SAE
XX%
Отмечена проблема на уровне ячеек (короткое
замыкание ...). Замените аккумулятор.
ОШИБКА ЗАРЯДКИ ОШИБКА ЗАРЯДКИ
Аккумулятор превышает 2000 CCA или 200 AH,
или зажимы подключены неправильно.
Если это не одна из двух причин,
перечисленных выше, полностью зарядите
аккумулятор и повторите проверку. Если
дисплей остается прежним, замените
аккумулятор.

Перевод оригинальных инструкций
DBT 400
20
RU
5. В каждом случае, чтобы отобразить состояние работоспособности батареи (SOH) и состояние заряда (SOC),
нажмите, чтобы просмотреть результаты.
6. Нажмите «ENTER», чтобы вернуться на главный экран. Нажмите «ENTER» еще раз, чтобы получить доступ к
главному меню.
ТЕСТ АЛЬТЕРНАТОРНОЙ ЗАРЯДНОЙ СИСТЕМЫ
1. Нажмите на «ТЕСТ СИСТЕМЫ», появится следующий экран:
ОСТАВНОВИТЬ
ПОТРЕБЛЕНИЕ.
ЗАПУСТИТЬ ДВИГАТЕЛЬ
2. Убедитесь, что все аксессуары автомобиля выключены (свет, кондиционер, радио и т. д.).
3. Запустите двигатель. Появляется один из этих трех результатов:
В случае Вывод информации н
экране Анализ
Напряжение ниже 9,6 V
ВОЛЬТ ЗАПУСКА
x.xx B НИЗКИЙ
Пусковое напряжение аномальное Аккумулятор
необходимо заменить.
Напряжение выше 9,6 V
ВОЛЬТ ЗАПУСКА
x.xx B НОРМАЛЬНЫЙ Пусковове напряжение нормальное
Нет пульсации тока
ВОЛЬТ ЗАПУСКА
НЕТ ПУЛЬСАЦИИ ТОКА
Пусковое напряжение не найдено
Начать тестирование заново
1. Если начальное напряжение нормальное, нажмите «ENTER» для продолжения теста.
2. Держите двигатель включенным. Убедитесь, что все аксессуары автомобиля выключены, затем подтвердите.
3. Отображается один из 3 результатов
• Результат теста пускового напряжения
В случае Отображаемые результаты Анализ
Высокое пусковое напряжение при
проведении теста на холостом ходу
двигателя
АЛЬТ. ВЫПР. ВОЛЬТ
xx.xx В ВЫСОКО
Проверьте правильность соединений. Если все
правильно подключено, замените регулятор.
Нормальное пусковое напряжение,
когда тест проводится на холостом
ходу двигателя
АЛЬТ. ВЫПР. ВОЛЬТ
xx.xx В НОРМ
Проблем не обнаружено. Нормальная работа
генератора.
Низкое пусковое напряжение при
проведении теста на холостом ходу
двигателя
АЛЬТ. ВЫПР. ВОЛЬТ
xx.xx В НИЗК.
Генератор не подает достаточный ток на
аккумулятор. Проверьте ремни и убедитесь,
что генератор работает при работающем
двигателе. Если ремни проскальзывают или
оборваны, замените их и проверьте снова.
Проверьте соединение между генератором
и аккумулятором. Если соединение плохое,
почистите или замените кабель и повторите
проверку. Если ремни и соединения находятся
в хорошем состоянии, замените генератор.
4. Нажмите «ENTER», чтобы продолжить проверку цепи зарядки с аксессуарами.
5. Тестер спрашивает «ПИТАНИЕ ПОТРЕБЛЕНИЕ И НАЖМИТЕ ENTER». Как можно больше включите печьку
(обогрев), фары и задние фары. Не включайте циклические нагрузки, такие как кондиционер или
стеклоочистители
6. Двигатель должен работать на 2500 об/мин в течение 15 сек.
Other manuals for DBT400
1
Table of contents
Languages:
Other Tool it Test Equipment manuals

Tool it
Tool it PBT 550 User manual

Tool it
Tool it PBT 700 User manual

Tool it
Tool it PBT 812 User manual

Tool it
Tool it NBT100 Reference guide

Tool it
Tool it BTW 6 V User manual

Tool it
Tool it PBT 600 User manual

Tool it
Tool it PBT 550 User manual

Tool it
Tool it TBP 100 User manual

Tool it
Tool it PBT 600 User manual

Tool it
Tool it DBT 300 User manual