Topcom IP100 User manual

IP100
USER GUIDE
1.0

Important
To use ‘Caller ID’ (display caller), this service has to be activated on your phone line.
Normally you need a separate subscription from your telephone company to activate this
function. If you don’t have the Caller ID function on your phone line, the incoming telephone
numbers will NOT be shown on the display of your telephone.
UK The features described in this manual are published with reservation to
modifications.
This product is in compliance with the essential requirements and other relevant provisions of the R&TTE directive 1999/5/EC
.
The Declaration of conformity can be found on :
http://www.topcom.net/support/cedeclarations.php

1 Before Initial use ....................................................................................................3
1.1 Intended Purpose .............................................................................................................3
1.2 Caller ID .......................................................................................................................... 3
1.3 Connection .......................................................................................................................3
2 Cleaning ..................................................................................................................3
3 Disposal of the device (environment) ..................................................................3
4 Safety advice ..........................................................................................................4
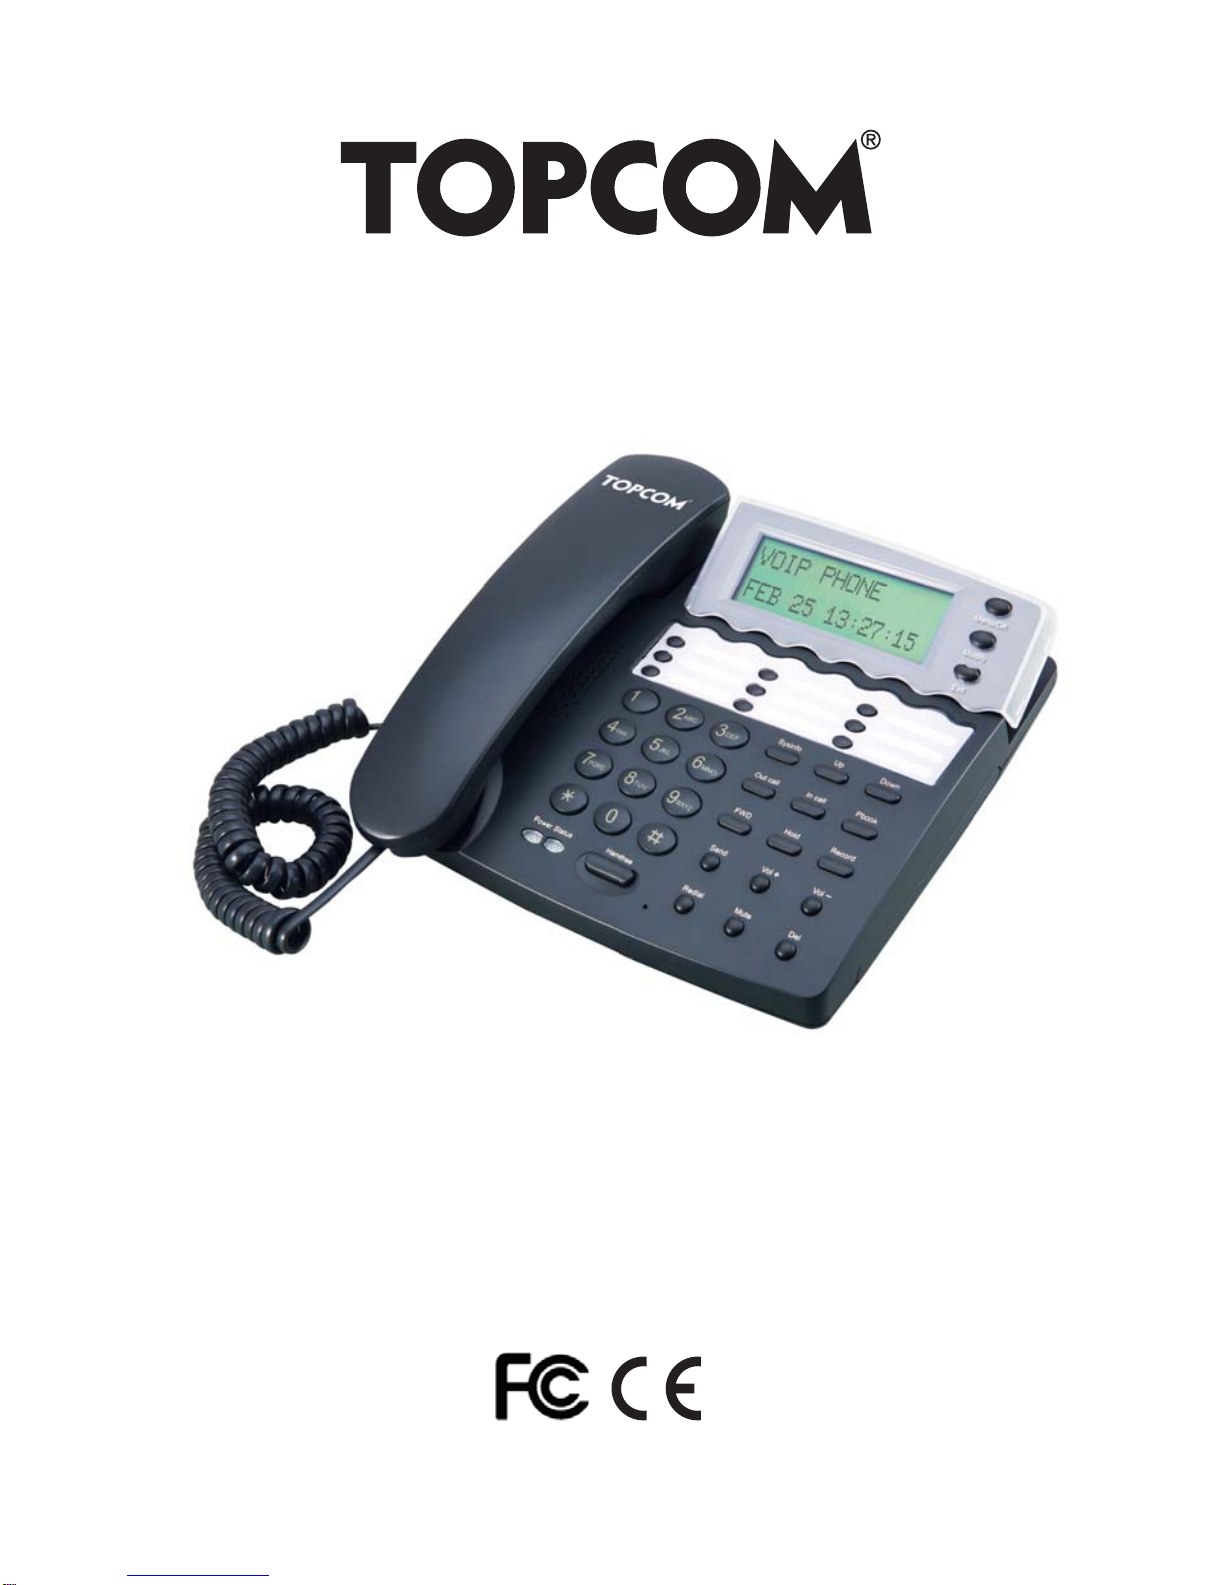
5 IP100 Features ........................................................................................................5
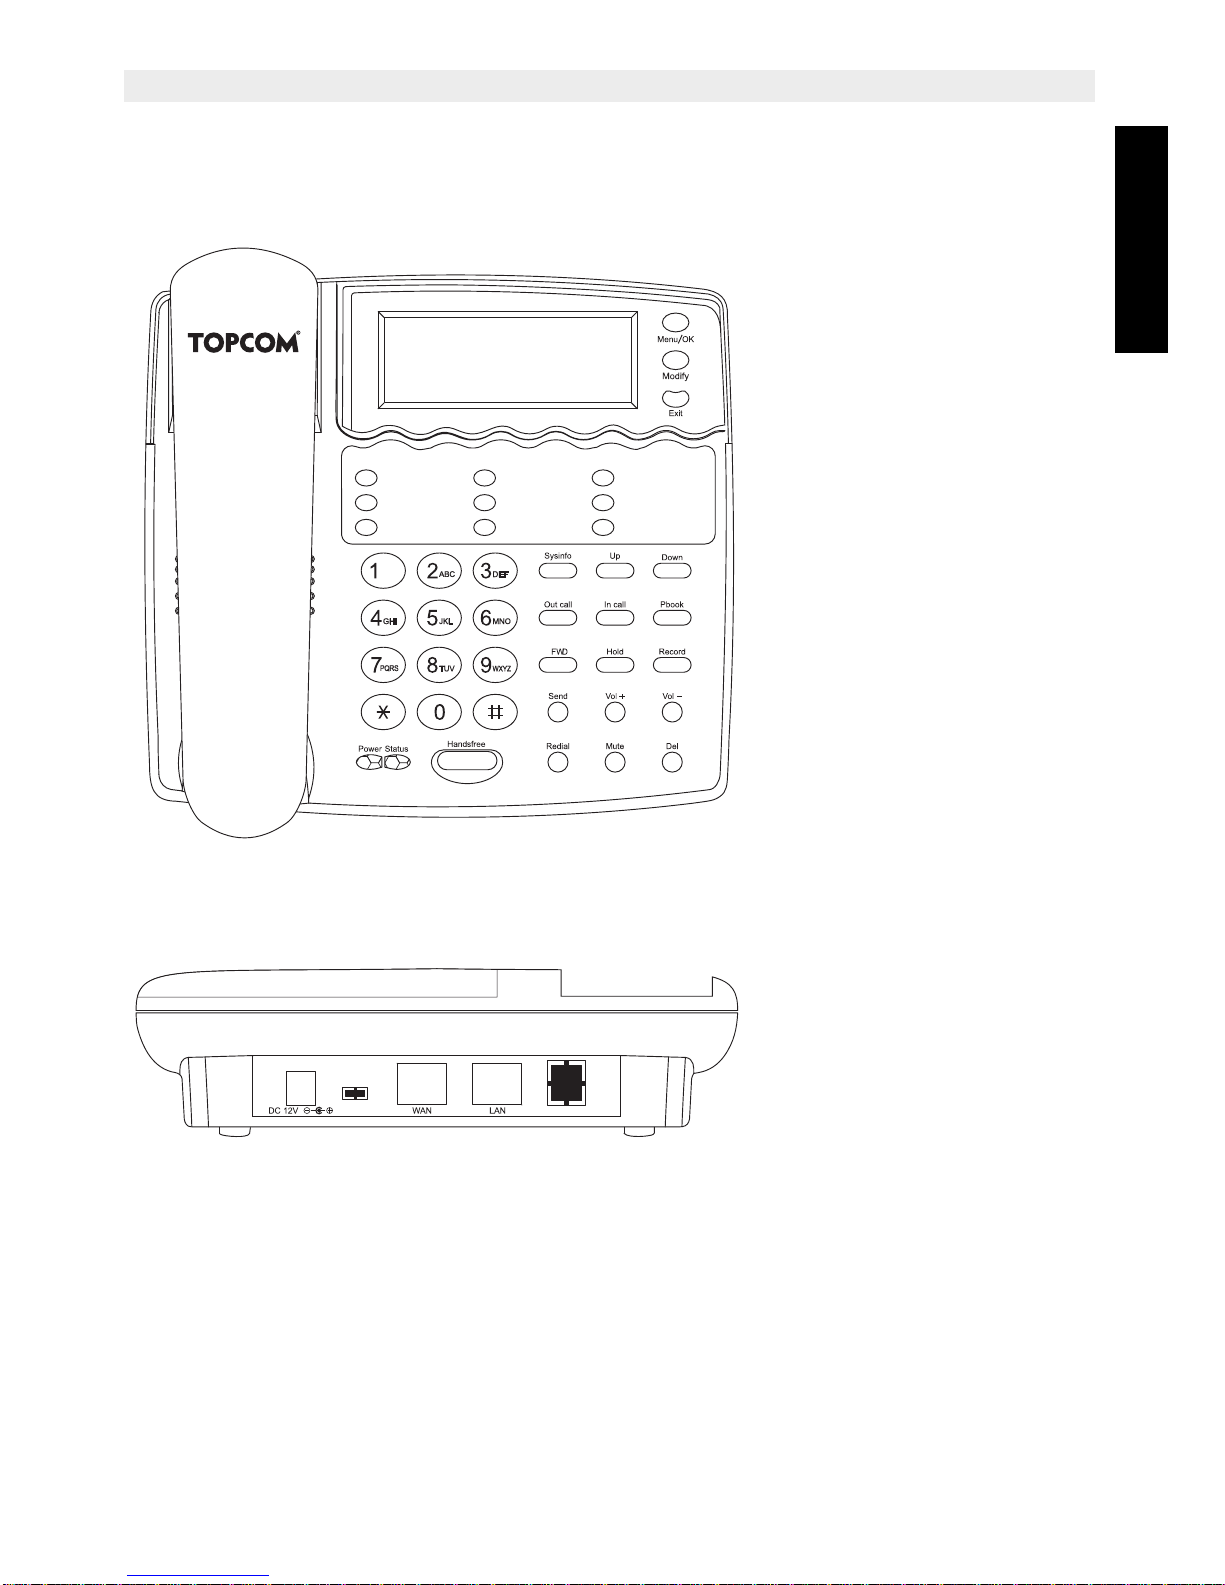
5.1 Appearance ......................................................................................................................5
5.2 Interface ..........................................................................................................................5
5.3 Electricity characteristic.................................................................................................... 5
5.4 Software........................................................................................................................... 6
5.5 Standard and Protocols ....................................................................................................6
5.6 Compliant Standard .........................................................................................................6
5.7 Operating requirement .....................................................................................................7
5.8 Package ...........................................................................................................................7
5.9 Installation ........................................................................................................................7
6 Web Configuration .................................................................................................8
6.1 Access Web setting page .................................................................................................8
6.2 Current state .................................................................................................................... 8
6.3 Network............................................................................................................................ 9
6.4 VoIP SIP Config .............................................................................................................11
6.5 Advance .........................................................................................................................13
6.6 Config Manage ...............................................................................................................23
6.7 Update............................................................................................................................ 23
6.8 System Manage..............................................................................................................25
7 Use keypad configure IP100 IP phone ...............................................................27
7.1 Keypad function .............................................................................................................27
7.2 Keypad Menu................................................................................................................. 28
8 Telnet Console .....................................................................................................29
8.1 Introduce ........................................................................................................................29
8.2 Global Command ...........................................................................................................30
9 Tree Structure .......................................................................................................30
9.1 Account ..........................................................................................................................30
9.2 Config .............................................................................................................................30
9.3 Debug (Level 0~7) ......................................................................................................... 35
9.4 download configure to flash ...........................................................................................35
9.5 password ........................................................................................................................35
9.6 reload .............................................................................................................................35
9.7 show system running info ...............................................................................................35
9.8 telnet and logout .............................................................................................................39
9.9 timesettings ....................................................................................................................39
9.10 tracert trace network path info ........................................................................................39
9.11 update IP phone .............................................................................................................39
9.12 upload configure file .......................................................................................................39

10 Network Diagnosis ...............................................................................................39
11 Restore to factory default ....................................................................................40
12 POST Mode(safe mode) .......................................................................................40
13 FAQ ........................................................................................................................40
13.1 How many servers may IP100 register simultaneously? ...............................................40
13.2 Why the settings vanish after reboot? ............................................................................40
13.3 How to use the dial rule? ................................................................................................40
13.4 How to use speed dial function? ....................................................................................41
13.5 How to configure digital map? ........................................................................................41
13.6 How to use Call Forward, Call Transfer and 3-way Conference calls?.......................... 42
13.7 How to use the record function? .................................................................................... 42
13.8 How to use set the IP type via keypad? .........................................................................43
13.9 VLAN implement ............................................................................................................43
14 Topcom warranty .................................................................................................45
14.1 Warranty period ..............................................................................................................45
14.2 Warranty handling.......................................................................................................... 45
14.3 Warranty exclusions....................................................................................................... 46

Topcom IP100 3
Topcom IP100
ENGLISH
1 Before Initial use
Thank you for purchasing this new desktop caller ID telephone.
1.1 Intended Purpose
This product is intend to be connected indoor to an analogue PSTN telephone line.
1.2 Caller ID
Caller ID is a network provider service. After subscribing to Caller ID, this phone will display
the caller’s phone number.
1.3 Connection
This device has been designed and manufactured to comply with the 98/482/EC rule,
referent to the Pan European connection of a terminal to the Public Switching Telephone
Network (PSTN) and following the established guidelines by the 1999/5/EC Directive about
radio electric equipments and the reciprocal acknowledge of their conformity. However, due
to the fact that there are some differences in the PSTNs from one country to another, the
verifying measurements by themselves do not set up an unconditional guarantee for an
optimal working in every connection point to the PSTN of any country .If any problem comes
up, get in touch firstly with the distributor.
In any case, use conditions for which the product has been created should be respected as
well asavoid itsuse inpublic orprivate networks with technical requirements clearlydifferent
to those established in the EU.
2 Cleaning
Clean the telephone with a slightly damp cloth or with an anti-static cloth. Never use cleaning
agents or abrasive solvents.
3 Disposal of the device (environment)
At the end of the product lifecycle, you should not throw this product into the nor-
mal household garbage but bring the product to a collection point for the recy-
cling of electrical and electronic equipments. The symbol on the product, user
guide and/or box indicate this.
To use ‘Caller ID’ (display caller), this service has to be activated on your
phone line. Normally you need a separate subscription from your
telephone company to activate this function. If you don’t have the Caller
ID function on your phone line, the incoming telephone numbers will NOT
be shown on the display of your telephone.

4Topcom IP100
Topcom IP100
Some of the product materials can be re-used if you bring them to a recycling point. By re-
using some parts or raw materials from used products you make an important contribution to
the protection of the environment.
Please contact your local authorities in case you need more information on the collection
points in your area.
4 Safety advice
• Do not operate the equipment if the telephone cable or the equipment itself is damaged.
• If the equipment is dropped, it must be checked by an electrician before further use.
• Dangerous voltages are present inside the equipment. Never open the housing or insert
objects through the ventilation holes.
• Do not allow liquids to get into the equipment. In case of emergency, pull out the plug
from the socket.
• Similarly, if a fault develops during use or before you start to clean the equipment, pull
the plug out of the socket.
• Do not touch plug contacts with sharp or metal objects.
• Do not carry out any modifications or repairs to the equipment yourself. Have repairs
done to the equipment or the mains cable only by a specialist service centre.
Unsatisfactory repairs can lead to considerable danger for the user.
• Children frequently underestimate the dangers associated with electrical equipment.
Therefore you must never leave children unsupervised in the vicinity of electrical
equipment.
• The equipment is not to be used in a damp room (e.g. bathrooms) or rooms where there
is a lot of dust.
• Equipment connected to the telephone line during a thunderstorm can be damaged by
lightning. Therefore you should pull the plug out of the main socket during a storm.
• To completely disconnect the equipment from the electricity supply, the plug must be
removed from the socket. When doing this, always pull on the plug itself and never on
the cable.
The CE symbol indicates that the unit complies with the essential
requirements of the R&TTE directive.
The following safety advice must always be followed before using
electrical equipment.
Please read carefully through the following information concerning
safety and proper use. Make yourself familiar with all the functions of the
equipment. Be careful to keep these advice notes and if necessary pass
them on to a third party.

Topcom IP100 5
Topcom IP100
ENGLISH
5 IP100 Features
5.1 Appearance
5.2 Interface
• Power:Output Power:12VDC,500mA.
• WAN:RJ45 port.
• LAN:RJ45 port.
5.3 Electricity characteristic
• Speciality of electric: output the 12V 500mA DC
• The network connects:2 RJ45 connect, a WAN, a LAN
• Support POE function
IP100

6Topcom IP100
Topcom IP100
5.4 Software
• Support two sip accounts at the same time.
• Redundancies server support.
• NAT, Firewall.
• DHCP client and server.
• Support PPPoE, (used for ADSL, cable modem connecting).
• Support major G7.xxx CODEC.
• VAD,CNG.
• G.168 compliant 32ms echo cancellation
• Tone generation and Local DTMF re-generation according with ITU-T
• E.164 dial plan and customized dial rules
• Hotline.
• Speed Dial
• Call Forward, Call Transfer, 3-way conference calls
• Record
• Caller ID display
• DND(Do Not Disturb),Black List,Limit List
• Upgrade firmware through FTP, TFTP or HTTP,.
• Web management.
• Telnet remote management.
• Adjustable user password and super password
5.5 Standard and Protocols
• IEEE 802.3 /802.3 u 10 Base T / 100Base TX
• PPPoE: PPP Protocol over Ethernet
• DHCP Client and Server: Dynamic Host Configuration Protocol
• G.711 u/a; G729, G7231 5.3/6.3 audio Codec
• SIP RFC3261, RFC 2543
• IAX2
• TCP/IP: Internet transfer and control protocol
• RTP: Real-time Transport Protocol
• RTCP: Real-time Control Protocol
• VAD/CNG save bandwidth
• Telnet: Internet's remote login protocol
• DNS: Domain Name Server
• TFTP: Trivial File Transfer Protocol
• HTTP: Hyper Text Transfer protocol
• FTP: File Transfer protocol
5.6 Compliant Standard
• CE:EN55024,EN55022
• FCC part15
• Comply with ROHS in EU
• Comply with ROHS in China

Topcom IP100 7
Topcom IP100
ENGLISH
Explanation:
The letter "e" is the first letter of "environment: and "electronic", The rim is a round with two
arrow , stands for recycle. The number 20 stands for the years of environment protection.
Please note the years of environment protection is not discarding year nor usage life
5.7 Operating requirement
• Operation temperature: 0 to 40°„ C (32°„ to 104°„ F)
• Storage temperature: -30°„ to 65°„ C (-22°„ to 149°„ F)
• Humidity: 10 to 90% no dew
5.8 Package
• Size:338 X 220 X 85mm
• Packing List
> IP100 IP phone
> Power adaptor (out put 12v ,500mA)
> Manual CD
5.9 Installation
Use ethernet cable to connect IP100's LAN port and your computer. Set your computer's ip
to the network 192.168.10.x or using dynamic obtain IP. Open your web browser and key in
192.168.10.1. Then you will see the logon page of IP100, the default username and
password is admin/admin for administrator and guest/guest for guest.
Set up page for VoIP use only:

8Topcom IP100
Topcom IP100
6 Web Configuration
6.1 Access Web setting page
Enter IP100 IP address in the web browser and press ENTER to go to the log on page, and
key in the username and password to access IP100 setting page.
Default username and password is:
Administrator: Username:admin password: admin
User: Username:guest Username:guest
6.2 Current state
This page shows IP100's running state.
Network shows the WAN and LAN port connecting state and current settings.
VoIP part show the working state of VoIP, you can see whether IP100 has registered the
public sip server
Phone Number public sip and private sip phone numbers.

Topcom IP100 9
Topcom IP100
ENGLISH
6.3 Network
6.3.1 Wan Config
WAN port network setting page.
Support static IP, dynamic obtain IP and PPPoE.
• Configure Static IP:
----Enable Static;
----Set IP100's IP address in the IP Address;
----Set netmask in the Netmask field;
----Set router IP address in the Gateway;
----DNS Domain:
----Set local DNS server in the Preferred DNS and the Alternate DNS
• Configure to dynamic obtain IP
----Enable DHCP;
If there is DHCP server in your local network, IP100 will automatically obtain WAN
port network information from your DHCP server.
• Configure PPPoE:
----Enable PPPoE
----PPPoE server: Enter "ANY" if no specified from your ITSP.
----Enter PPPoE username and pin in the username and password.
IP100 will automatically obtain WAN port network information from your ITSP if
PPPoE setting and the setup are correct.
Notice: If user accesses the IP phone through WAN port. He/She should use the new
IP address to access the IP phone when the WAN port address was changed.

10 Topcom IP100
Topcom IP100
6.3.2 LAN Config
Bridge Mode: Enable this option to switch to bridge mode. IP phone won't assign IP for its
LAN port in bridge mode and its LAN and WAN port will be in the same network. (This setting
won't take effect unless you save the config and reboot the device)
IP Netmask:Set the IP and Netmask for the LAN
DHCP Server:Enable DHCP service in LAN port
NAT: Enable NAT.

Topcom IP100 11
Topcom IP100
ENGLISH
6.4 VoIP SIP Config
6.4.1 SIP config
Setting page of public SIP server:
Register Server Addr:Register address of public SIP server
Register Server Port: Register port of public SIP server£¨default port is 5060
Register Username: Username of your SIP account (Always the same as the phone
number)
Register Password:Password of your SIP account.
Proxy Server Addr: IP address of proxy SIP server (SIP provider always use the same IP
for register server and proxy server, in this case you don't need to
configure the proxy server information. )
Proxy Server Port: Signal port of SIP proxy
Proxy Username: proxy server username
Proxy Password: proxy server password
Domain Realm: SIP domain, enter the sip domain if any, otherwise IP100 will use the
proxy server address as sip domain.
Local SIP port: Local SIP register port, default 5060
Phone Number: Phone number of your SIP account
Register Expire Time: register expire time, default is 600 seconds. IP100 will auto configure
this expire time to the server recommended setting if it is different
from the SIP server.
Detect Interval Time:Co-work with the Auto Detect Server, if Auto Detect Server is enable,
IP100 will periodically detect if the SIP server is available according
this setting.

12 Topcom IP100
Topcom IP100
User Agent:
Encrypt Key: The particular service system decrypts of the key , matching with the server
Type usage, the key provide by the particular service system supplier, default
is empty.
Server Type: The particular service system supplier carries out the sign and speeches to
encrypt, default is common
DTMF Mode: DTMF signal sending mode: support RFC2833, DTMF_RELAY (inband audio)
and SIP info
RFC Protocol Edition:Current IP100 SIP version. Set to RFC 2543 if the gate need to
communicate to devices (such as CISCO5300) using the SIP 1.0.
Default is RFC 3261.
Enable Register: Enable/Disable SIP register. IP100 won't sent register info to SIP server if
disable register.
6.4.2 Iax2 Config
Setting page of public IAX server:
IAX Server Addr:Register address of public IAX server
IAX Server Port: Register port of public IAX server£¨default port is 4569
Account Name: Username of your SIP account (Always the same as the phone number)
Account Password:Password of your IAX account.
Local port: Signal port of local, default port is 4569
Phone Number: Phone number of your IAX account
Voice mail number: If the IAX support voice mail, but your username of the voice mail is
letters which you can not input with the ATA , then you use the number
to stand for your username.
Voice mail text: if IAX support voice mail, config the domain name of your mail box here.
Echo test number: If the platform support echo test , and the number is test form , the config
the test number to replace the text format The echo test is to test the
woring status of terminals and platform.

Topcom IP100 13
Topcom IP100
ENGLISH
Echo test text: echo test number in text format
Refresh time: IAX refresh time
Enable Register: enable or disable register
IAX(Default Protocol): Set IAX 2 as the default protocol , if not the system will choose SIP
as default.
Enable G.729: Using G.729 speech coding mandatory consultations
6.5 Advance
6.5.1 DHCP Server
DHCP server manage page.
User may trace and modify DHCP server information in this page.
DNS Relay: enable DNS relay function.
User may use below setting to add a new lease table.
Lease Table Name: Lease table name.
Lease Time: DHCP server lease time.
Start IP: Start IP of lease table.
End IP: EndIP oflease table.Network deviceconnectingto theIP100 LANport candynamic
obtain the IP in the range between start IP and end IP.
Netmask: Netmask of lease table.
Gateway: Default gateway of lease table
DNS: default DNS server of lease table.
Notice: This setting won't take effect unless you save the config and reboot the device

14 Topcom IP100
Topcom IP100
6.5.2 NAT
Advance NAT setting. Maximum 10 items for TCP and UDP port mapping.
IPSec ALG: Enable/Disable IPSec ALG;
FTP ALG: Enable/Disable FTP ALG;
PPTP ALG:Enable/Disable PPTP ALG;
Transfer Type:Transfer type using port mapping.
Inside IP:LAN device IP for port mapping.
Inside Port:LAN device port for port mapping.
Outside Port:WAN port for port mapping.
Click Add to add new port mapping item and Delete to delete current port mapping item.

Topcom IP100 15
Topcom IP100
ENGLISH
6.5.3 Net Service
HTTP Port:configure HTTP transfer port, default is 80.User may change this port to enhance
system's security. When this port is changed, please use
http://xxx.xxx.xxx.xxx:xxxx/ to reconnect.
Telnet Port:configure telnet transfer port, default is 23.
RTP Initial Port: RTP initial port.
RTP Port Quantity:Maximum RTP port quantity, default is 200
Notice:
Settings in this page won't take effect unless save and reboot the device.
If you need to change telnet port or HTTP port, please use the port greater than 1024,
because ports under 1024 is system remain ports.
HTTP service if HTTP is set to 0.

16 Topcom IP100
Topcom IP100
6.5.4 Firewall settings
Firewall setting page. User may set up firewall to prevent unauthorized Internet users from
accessing private networks connected to the Internet (input rule), or prevent unauthorized
private network devices to access the internet.
Access list support two type limits: input_access limit or output_access limit. Each type
support 10 items maximum.
IP100 firewall filter is base WAN port. So the source address or input destination address
should be WAN port IP address.
Configuration:
in_access enable enable in_access rule
out_access enableenable out_access rule
Input/Output:specify current adding rule is input rule or output rule.
Deny/Permit:specify current adding rule is deny rule or permit rule.
Protocol Type:protocol using in this rule: TCP/IP/ICMP/UDP.
Port Range:port range if this rule
Src Addr: source address. Can be single IP address or network address.
Dest Addr: destination address. Can be IP address or network address.
Src Mask: source address mask. Indicate the source is dedicate IP if set to
255.255.255.255. Otherwise is network ID
Des Mask: Destination address mask. Indicate the source is dedicate IP if set to
255.255.255.255. Otherwise is network ID

Topcom IP100 17
Topcom IP100
ENGLISH
6.5.5 QoS settings
IP100 IP phone implement QoS based on 802.1p, The QoS is used to mark the network
communication priority in the data link/MAC sub-layer. IP100 will sorted the packets using
the QoS and sends it to the destination.
1. Voice 802.1p Priority --- Configure the priority of the voice packets in 802.1p protocol.
2. VLAN Enable --- Disable/Enable VLAN function
3. Voice VLAN ID --- configure the Voice/signaling VLAN ID
4. DiffServ Enable --- Disable/Enable Diffserv service
5. DiffServ Value --- Configure Diffserv parameter. The value range : value range£½
0x28,0x30,0x38,0x48,0x50,0x58,0x68,0x70,0x78,0x88,0x90,0x98,0xb8.default is 0xb8
,oxb8 stands for best fast transmission; 28-30 is guaThrantee for the transmission priority for
the 1st rank , 48-58 is guarantee for the transmission priority for the 2nd rank, 68-78 is
guarantee for the transmission priority for the 3rd rank, 88-98 is guarantee for the
transmission priority for the 4th rank.
6. Data VLAN ID--- Assign VLAN id for data stream.
7. Data 802.1P Priority --- Configure the priority of the data packets (non-voice/signaling
data) in 802.1p protocol.
8. Data/Voice DiffServ differentiated --- undifferentiated for Date and voice VLAN is not
distinction VLAN tag, Tag differentiated for Date and Voice VLAN is distinction VLAN tag,
Date untagged for Date VLAN is distinction VLAN tag
Please refer to VLAN implement for detail

18 Topcom IP100
Topcom IP100
6.5.6 Advance SIP settings
This page is used to set the private sip server, stun server, and back up sip server
information.
STUN Server setting:
STUN Server Addr: configure stun server address;
STUN Server Port: configure stun server port default 3478
STUN Effect Time: stun detect NAT type circle, unit: minute.
Enable SIP STUN: enable/disable stun.
Enable PRACK: Whether to make gateway or IP phone support Prack function in SIP , we
suggest you keeping default setting
Enable Keep Authentication: registering signal together with the authentication
information. If enable it, the server will confirm the registering and send back the confirmation
massage directly instead of requesting the terminals to send authentication information if
needed.
Auto Detect Server: Whether to enable the function of auto detecting the server. With this
functionyourATAandIPphonewillsendinformationtoautodetecttheserver ateveryperiod
of time. If find the server is not available it will try to register the server again.
Enable Session Timer:½Whether to enable te RFC4028
Signal Encode: Wherther to enable the signal encrypt
Rtp Encode: Whether to enable the voice encrypt
Enable Private Register: Whether to enable the second SIP Server to register
Please refer to SIP_Config for the setting for how to set the public alter server.
User can register two sip servers: public sip server and private sip server.these two sip
servers are independent from each other and running in the same time.
For how to configure private sip server. Please refer to SIP_Config
Table of contents
Other Topcom IP Phone manuals

Topcom
Topcom TE-5730 User manual

Topcom
Topcom SOLOGIC B921 Product information sheet

Topcom
Topcom SOLOGIC A811 User manual

Topcom
Topcom BUTLER E2100 User manual

Topcom
Topcom Butler E400 User manual

Topcom
Topcom ALLURE 150 User manual

Topcom
Topcom BUTLER 2900 Triple User manual

Topcom
Topcom DESKMASTER 142 User manual

Topcom
Topcom Fidelity 160 User manual

Topcom
Topcom Butler E751 TripleButler E751 Quattro User manual