Toro 07046 User manual

FormNo.3410-771RevB
CargoBedKit
Workman®GTXUtilityVehicle
ModelNo.07046
InstallationInstructions
WARNING
CALIFORNIA
Proposition65Warning
ThisproductcontainsachemicalorchemicalsknowntotheStateofCaliforniato
causecancer,birthdefects,orreproductiveharm.
Safety
SafetyandInstructionalDecals
Safetydecalsandinstructionsareeasilyvisibletotheoperatorandarelocatednearanyareaofpotential
damage.Replaceanydecalthatisdamagedormissing.
decal115-7739
115-7739
1.Falling,crushinghazard,bystanders—noridersonthemachine
Installation
LooseParts
Usethechartbelowtoverifythatallpartshavebeenshipped.
ProcedureDescriptionQty.Use
Rearcargo-box-accessorymount1
1Flange-headbolt(5/16x3/4inch)8
Installtherearcargo-box-accessory
mount.
Cargobedsupport(right)1
Cargobedsupport(left)1
2Flange-headbolt(5/16x3/4inch)8
Installthecargobedsupports.
Bolt(1/2x4-1/2inches)2
3Flangenut2Installthecargobox.
©2016—TheToro®Company
8111LyndaleAvenueSouth
Bloomington,MN55420
Registeratwww.T oro.com.OriginalInstructions(EN)
PrintedintheUSA
AllRightsReserved*3410-771*B

1
InstallingtheRear
Cargo-Box-AccessoryMount
Partsneededforthisprocedure:
1Rearcargo-box-accessorymount
8Flange-headbolt(5/16x3/4inch)
Procedure
1.Aligntheholesintherearcargo-box-accessorymount
tothethreadedinsertsonthebottomofthecargo
bed(Figure1).
g191316
Figure1
1.Flange-headbolt(5/16x3/4inch)
2.Use8ange-headbolts(5/16x3/4inch)tosecure
therearcargo-box-accessorymounttothecargobox
(Figure1).
2
InstallingtheCargoBed
Supports
Partsneededforthisprocedure:
1Cargobedsupport(right)
1Cargobedsupport(left)
8Flange-headbolt(5/16x3/4inch)
Procedure
1.Aligntheholesineachofthecargobedsupportsto
thethreadedinsertsonthebottomofthecargobed
(Figure2).
g191317
Figure2
1.Flange-headbolt(5/16x3/4inch)
2.Securethecargobedsupportstothecargobedwith8
ange-headbolts(5/16x3/4inch)(Figure2).
3.Torquetheange-headboltsto15to17N∙m(133to
147in-lb).
2
3
InstallingtheCargoBox
Partsneededforthisprocedure:
2Bolt(1/2x4-1/2inches)
2Flangenut
Procedure
1.Parkthemachineonalevelsurface,engagetheparking
brake,shutofftheengine,andremovethekeyfrom
thekeyswitch.
2.Rotatethecargoboxsothatthepivot-bracketassembly
andproprodarefacingdownward.
3.Usingliftingequipmentatthefrontandbackofthe
cargobox,raisethecargoboxandalignitoverthe
frameofthemachinewiththepivot-bracketassembly
rearward(Figure3).
g191339
Figure3
4.Adjusttheheightandpositionoftheliftingequipment
sothattheshortlegoftheproprodisalignedwith
thekeyholeattheendoftheprop-rodslotinthe
left-framechannelorprop-rodbracket(Figure4).
Note:Youmustanglethecargoboxwiththelifting
equipmentinordertoaligntheproprodtothekey
hole.
5.Swingtheproprodforwardandinserttheshortlegof
therodthroughthekeyhole(Figure4).
g191980
Figure4
1.Proprod2.Keyhole(prop-rodslot)
6.Movethecargoboxandproprodrearwarduntilthe
pivot-bracketassemblyisalignedovertherear-frame
channel.
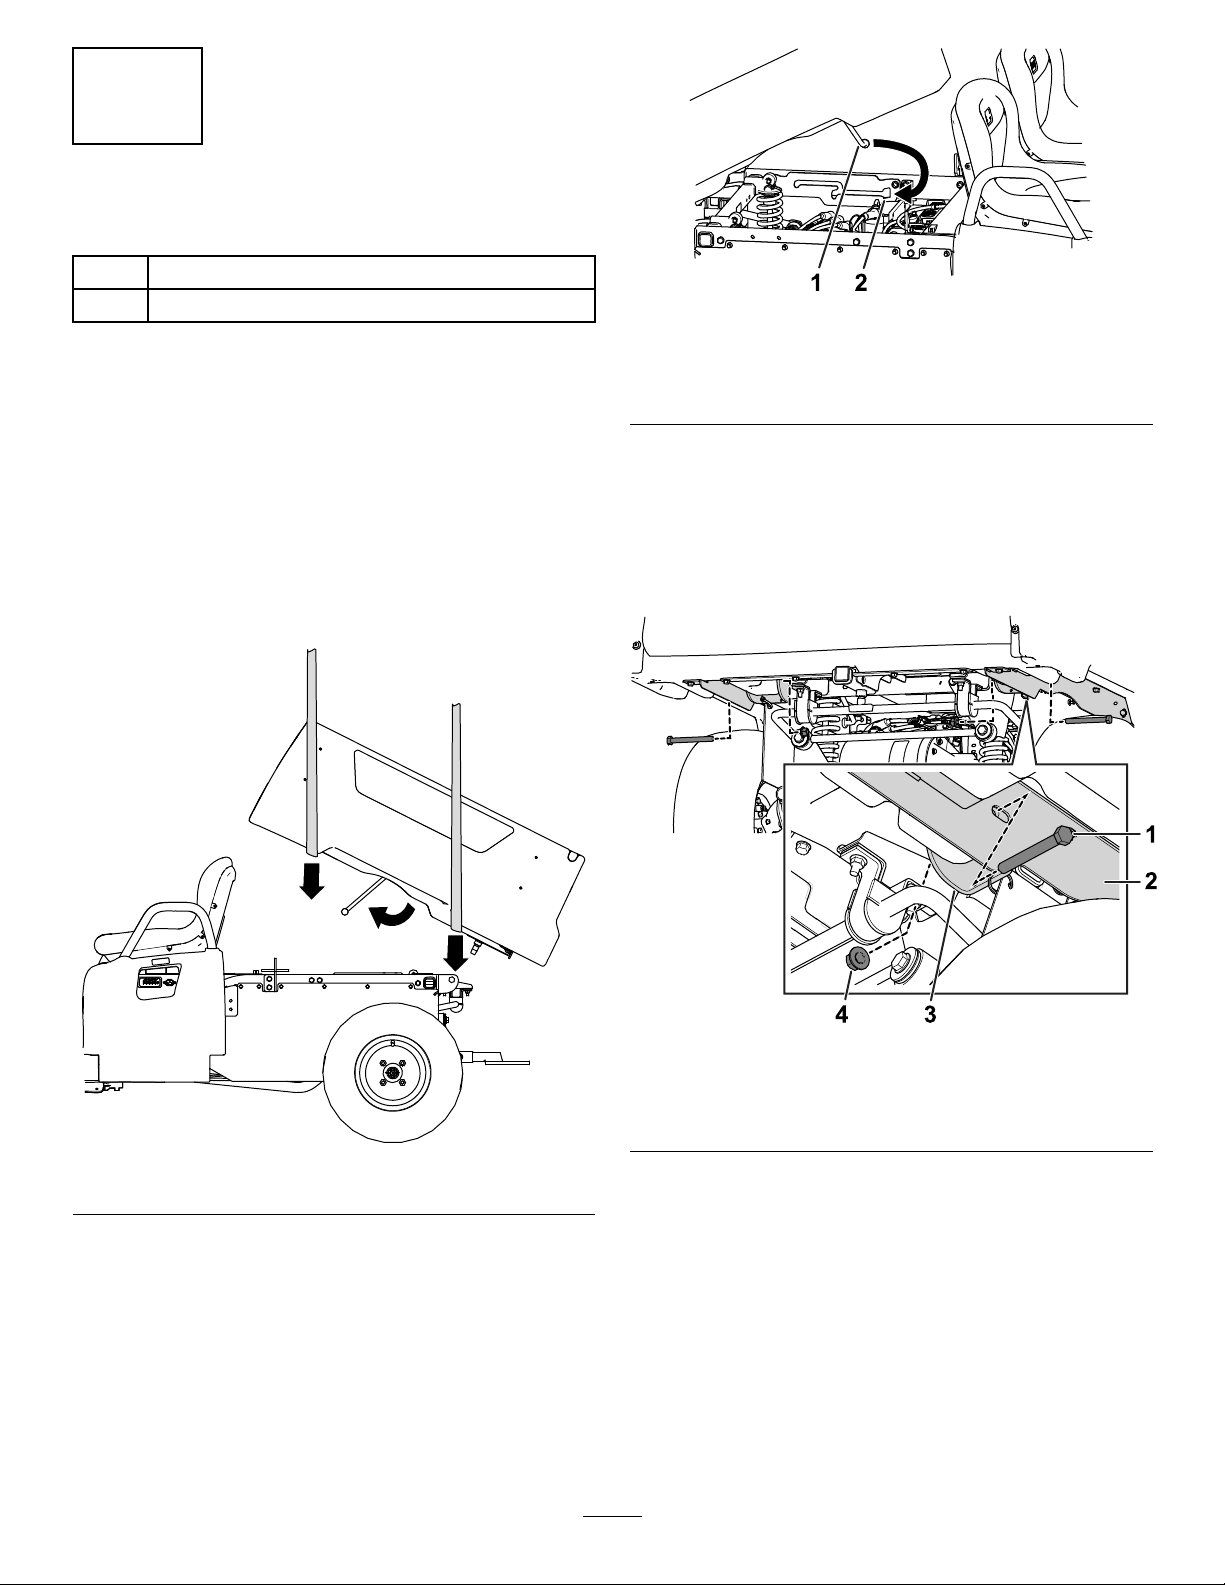
7.Carefullylowerthecargoboxuntiltheholesinthe
pivotbracketsalignwiththemountingholesinthe
cargobedsupports(Figure5).
g191148
Figure5
1.Bolt(1/2x4-1/2inches)3.Pivotbracket
2.Cargobedsupport4.Flangenut
8.Use2bolts(1/2x4-1/2inches)and2angenutsto
securetherightandleftcargobedsupportstothe
pivotbrackets(Figure5).
9.Torquethe2angenutsto16to19N∙m(140to170
in-lb).
3

4
AdjustingtheCargo-Box
Latches
NoPartsRequired
Procedure
Ifthecargo-boxlatchisoutofadjustment,thecargobox
vibratesupanddownasyoudrivethemachine.Youcan
adjustthelatchpoststomakethelatchesholdthecargobox
snuglytothechassis.
1.Verifythatthecargoboxislatching.
Note:Ifthecargoboxdoesnotlatch,thebox-latch
strikerislikelytoolow.Ifthecargoboxlatches,but
vibratesupanddownasyoudrive,thebox-latchstriker
islikelytoohigh.
2.Pullontheleverontheleft,insideofthecargobox
towardyouandliftthecargoboxup(Figure6).
g034019
Figure6
1.Cargo-boxlever
3.Pulltheproprodintothedumppositiondetentslot,
securingtheboxinadumpingposition(Figure7).
g034021
Figure7
1.Servicepositiondetent
slot
3.Dumppositiondetentslot
2.Proprod
4.Loosenthe2boltsonthebox-latchstrikerandmove
thestrikerupordown,dependingonifthestrikeris
toohighortoolow(Figure8).
g034451
Figure8
1.Bolt2.Box-latchstriker
5.Tightenthe2boltsonthebox-latchstriker(Figure8).
6.Verifythattheadjustmentiscorrectbylatchingthe
cargoboxseveraltimes.
4
Other Toro Automobile Accessories manuals


Popular Automobile Accessories manuals by other brands

Havis-Shields
Havis-Shields Vehicle Specific Console C-VS-1100-F150 Install instructions

ARB
ARB 1780500 manual

KW automotive
KW automotive Variant 3 Setup manual

Volvo
Volvo TRAVEL ACTIVE 500 user guide

Metra Electronics
Metra Electronics 95-3305 installation instructions

Discount Car Stereo
Discount Car Stereo A2D-VW02 installation guide


