Toro Workman 07369 User manual

FormNo.3450-692RevA
Workman®HDUtilityVehicle
ModelNo.07369—SerialNo.410300000andUp
Registeratwww.Toro.com.
OriginalInstructions(EN)*3450-692*

ItisaviolationofCaliforniaPublicResourceCode
Section4442or4443touseoroperatetheengineon
anyforest-covered,brush-covered,orgrass-covered
landunlesstheengineisequippedwithaspark
arrester,asdenedinSection4442,maintainedin
effectiveworkingorderortheengineisconstructed,
equipped,andmaintainedforthepreventionofre.
Theenclosedengineowner'smanualissupplied
forinformationregardingtheUSEnvironmental
ProtectionAgency(EPA)andtheCaliforniaEmission
ControlRegulationofemissionsystems,maintenance,
andwarranty.Replacementsmaybeorderedthrough
theenginemanufacturer.
WARNING
CALIFORNIA
Proposition65Warning
Theengineexhaustfromthisproduct
containschemicalsknowntotheStateof
Californiatocausecancer,birthdefects,
orotherreproductiveharm.
Batteryposts,terminals,andrelated
accessoriescontainleadandlead
compounds,chemicalsknownto
theStateofCaliforniatocause
cancerandreproductiveharm.Wash
handsafterhandling.
Introduction
Thisutilityvehicleisintendedtobeprimarilyused
off-highwaytotransportpeopleandmaterialloads.
Usingthisproductforpurposesotherthanitsintended
usecouldprovedangeroustoyouandbystanders.
Readthisinformationcarefullytolearnhowtooperate
andmaintainyourproductproperlyandtoavoid
injuryandproductdamage.Youareresponsiblefor
operatingtheproductproperlyandsafely.
Visitwww.Toro.comforproductsafetyandoperation
trainingmaterials,accessoryinformation,helpnding
adealer,ortoregisteryourproduct.
Wheneveryouneedservice,genuineToroparts,or
additionalinformation,contactanAuthorizedService
DistributororToroCustomerServiceandhavethe
modelandserialnumbersofyourproductready.
Figure1identiesthelocationofthemodelandserial
numbersontheproduct.Writethenumbersinthe
spaceprovided.
Important:Withyourmobiledevice,youcan
scantheQRcodeontheserialnumberdecal(if
equipped)toaccesswarranty,parts,andother
productinformation.
g239323
Figure1
1.Modelandserialnumberlocation
ModelNo.
SerialNo.
Thismanualuses2wordstohighlightinformation.
Importantcallsattentiontospecialmechanical
informationandNoteemphasizesgeneralinformation
worthyofspecialattention.
Thesafety-alertsymbol(Figure2)appearsbothin
thismanualandonthemachinetoidentifyimportant
safetymessagesthatyoumustfollowtoavoid
accidents.Thissymbolwillappearwiththeword
Danger,Warning,orCaution.
•Dangerindicatesanimminentlyhazardous
situationwhich,ifnotavoided,willresultindeath
orseriousinjury.
•Warningindicatesapotentiallyhazardous
situationwhich,ifnotavoided,couldresultin
deathorseriousinjury.
•Cautionindicatesapotentiallyhazardoussituation
which,ifnotavoided,mayresultinminoror
moderateinjury.
g000502
Figure2
Safety-alertsymbol
©2022—TheToro®Company
8111LyndaleAvenueSouth
Bloomington,MN554202
Contactusatwww.Toro.com.
PrintedintheUSA
AllRightsReserved

Contents
Safety.......................................................................4
GeneralSafety...................................................4
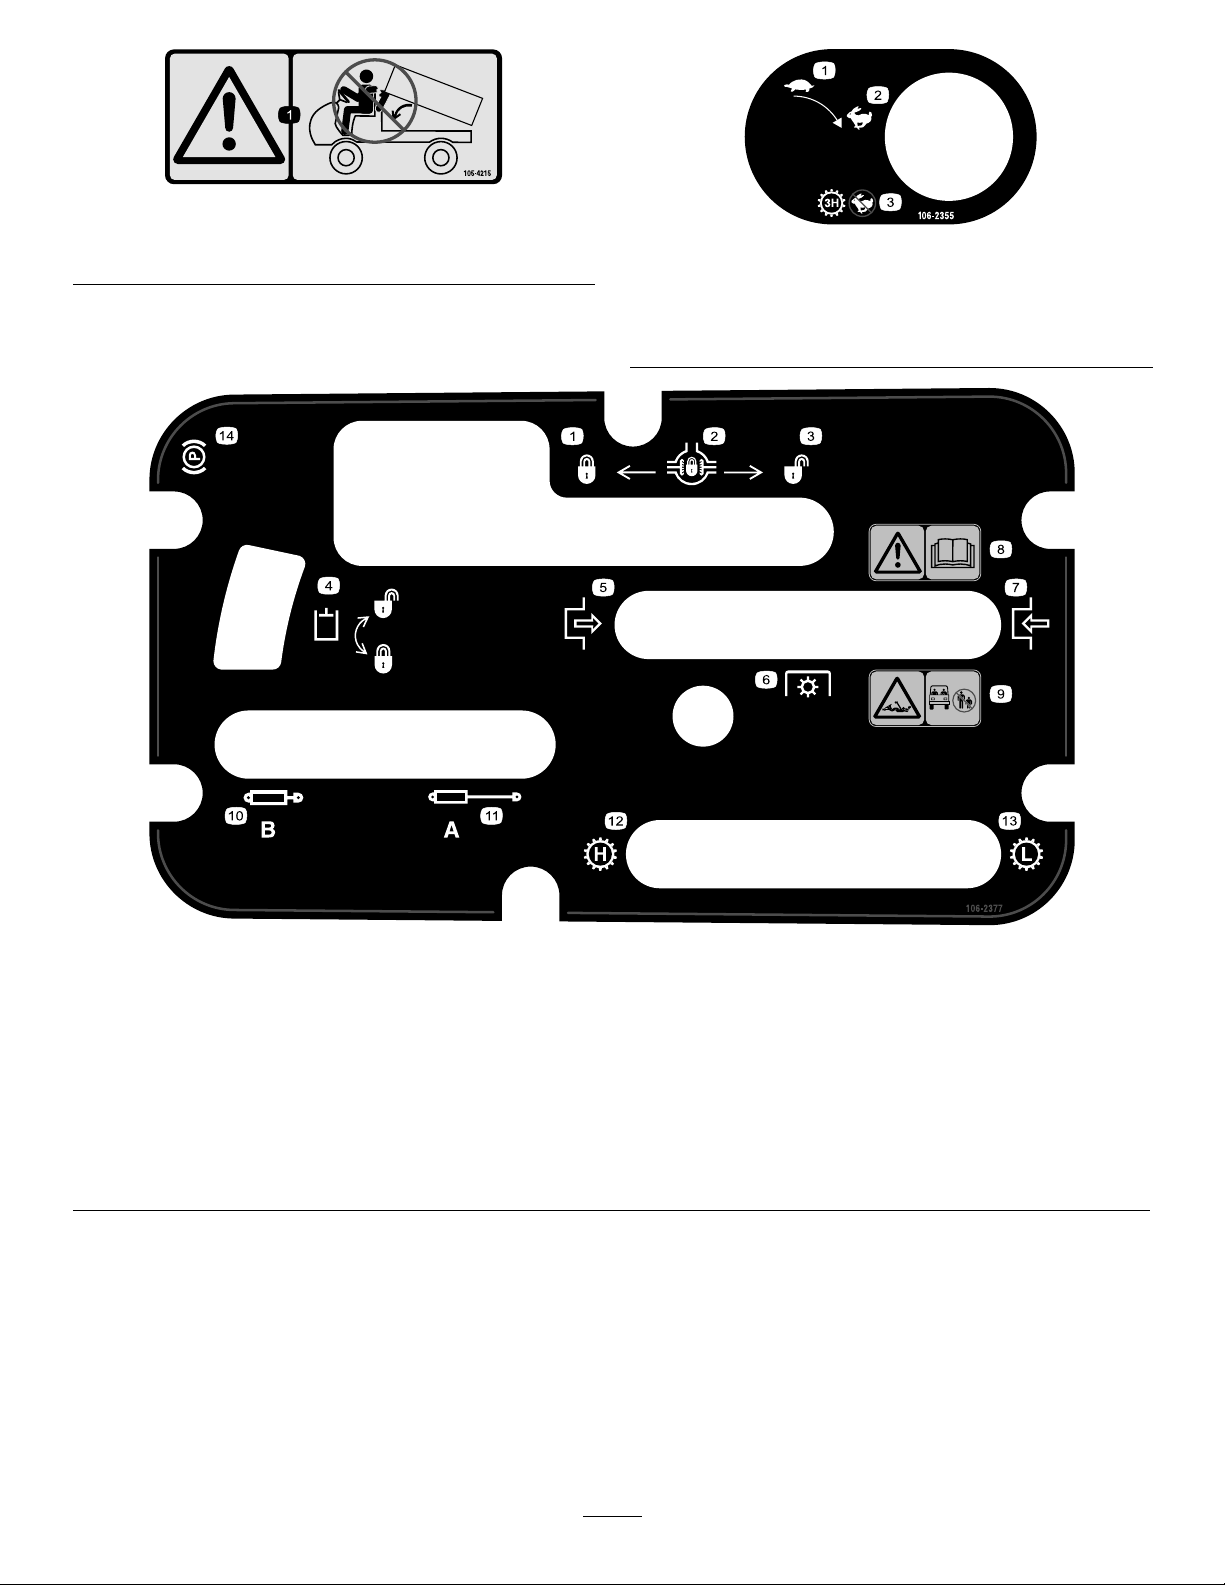
SafetyandInstructionalDecals..........................5
Setup.......................................................................11
1CheckingtheFluidLevelsandTire
Pressure........................................................11
2InstallingtheRollBar.....................................12
3BurnishingtheBrakes....................................12
ProductOverview...................................................13
Controls...........................................................13
Specications..................................................18
Attachments/Accessories.................................18
BeforeOperation.................................................19
BeforeOperationSafety...................................19
PerformingDailyMaintenance..........................19
CheckingtheTirePressure...............................19
AddingFuel......................................................20
BreakinginaNewMachine..............................20
CheckingtheSafety-InterlockSystem..............21
DuringOperation.................................................21
DuringOperationSafety...................................21
OperatingtheCargoBed..................................23
StartingtheEngine...........................................24
DrivingtheMachine..........................................24
StoppingtheMachine.......................................24
ShuttingOfftheEngine.....................................24
UsingtheDifferentialLock................................25
UsingtheHydraulicControl..............................25
AfterOperation....................................................27
AfterOperationSafety......................................27
HaulingtheMachine.........................................28
TowingtheMachine..........................................28
TowingaTrailer................................................28
Maintenance...........................................................29
MaintenanceSafety..........................................29
RecommendedMaintenanceSchedule(s)...........29
MaintainingtheMachineunderSpecial
OperatingConditions....................................31
Pre-MaintenanceProcedures..............................32
PreparingtheMachineforMaintenance............32
UsingtheBedSupport......................................32
RemovingtheFullBed......................................33
InstallingtheFullBed........................................33
RaisingtheMachine.........................................34
RemovingandInstallingtheHood....................35
Lubrication..........................................................36
GreasingtheBearingsandBushings................36
EngineMaintenance...........................................38
EngineSafety...................................................38
ServicingtheAirCleaner..................................38
ServicingtheEngineOil....................................39
ServicingtheSparkPlugs.................................41
FuelSystemMaintenance...................................41
InspectingFuelLinesandConnections.............41
InspectingtheCarbonCanisterAir
Filter..............................................................41
ReplacingtheFuelFilter...................................42
ElectricalSystemMaintenance...........................42
ElectricalSystemSafety...................................42
ServicingtheFuses..........................................42
Jump-StartingtheMachine...............................43
ServicingtheBattery.........................................44
DriveSystemMaintenance..................................44
AdjustingtheShiftCables.................................44
AdjustingtheHigh-LowCable...........................44
AdjustingDifferential-LockCable......................45
InspectingtheTires..........................................45
CheckingtheFrontWheelAlignment................46
TorquingtheWheelLugNuts............................47
CoolingSystemMaintenance..............................47
CoolingSystemSafety.....................................47
CleaningtheEngine-CoolingAreas..................47
BrakeMaintenance.............................................48
CheckingtheBrake-FluidLevel........................48
AdjustingtheParkingBrake..............................49
AdjustingtheBrakePedal.................................49
BeltMaintenance................................................50
CheckingthePump-BeltTension......................50
AdjustingthePump-DriveBelt..........................50
ControlsSystemMaintenance.............................51
AdjustingtheClutchPedal................................51
AdjustingtheAccelerator..................................52
AdjustingtheChoke..........................................52
HydraulicSystemMaintenance...........................53
HydraulicSystemSafety...................................53
ServicingtheTransaxle/Hydraulic
System..........................................................53
RaisingtheCargoBedinanEmergency...........55
Cleaning..............................................................56
WashingtheMachine.......................................56
Storage...................................................................57
StorageSafety..................................................57
StoringtheMachine..........................................57
Troubleshooting......................................................58
3

Safety
Thismachinehasbeendesignedinaccordancewith
therequirementsofSAEJ2258(Nov2016).
GeneralSafety
Thisproductiscapableofcausingpersonalinjury.
Alwaysfollowallsafetyinstructionstoavoidserious
personalinjury.
•Readandunderstandthecontentsofthis
Operator’sManualbeforeyoustartthemachine.
Ensurethateveryoneusingthisproductknows
howtouseitandunderstandsthewarnings.
•Useyourfullattentionwhileoperatingthe
machine.Donotengageinanyactivitythat
causesdistractions;otherwise,injuryorproperty
damagemayoccur.
•Donotputyourhandsorfeetnearmoving
componentsofthemachine.
•Donotoperatethemachinewithoutallguards
andothersafetyprotectivedevicesinplaceand
workingonthemachine.
•Keepbystandersandchildrenoutoftheoperating
area.Neverallowchildrentooperatethemachine.
•Stopandshutoffthemachineandremovethekey
beforeservicingorfueling.
Improperlyusingormaintainingthismachinecan
resultininjury.Toreducethepotentialforinjury,
complywiththesesafetyinstructionsandalways
payattentiontothesafety-alertsymbol,which
meansCaution,Warning,orDanger—personalsafety
instruction.Failuretocomplywiththeseinstructions
mayresultinpersonalinjuryordeath.
4

SafetyandInstructionalDecals
Safetydecalsandinstructionsareeasilyvisibletotheoperatorandarelocatednearanyarea
ofpotentialdanger.Replaceanydecalthatisdamagedormissing.
decalbatterysymbols
BatterySymbols
Someorallofthesesymbolsareonyourbattery.
1.Explosionhazard6.Keepbystandersaway
fromthebattery.
2.Nore,opename,or
smoking
7.Weareyeprotection;
explosivegasescan
causeblindnessandother
injuries.
3.Causticliquid/chemical
burnhazard
8.Batteryacidcancause
blindnessorsevereburns.
4.Weareyeprotection.9.Flusheyesimmediately
withwaterandgetmedical
helpfast.
5.ReadtheOperator's
Manual.
10.Containslead;donot
discard
decal93-9850
93-9850
1.Donotrepairorrevise—readtheOperator'sManual.
decal93-9852
93-9852
1.Warning—readtheOperator’sManual.2.Crushinghazard—installthecylinderlock.
decal93-9868
93–9868
1.Crushinghazardofhand—readtheOperator’sManual.
decal93-9879
93-9879
1.Storedenergyhazard—readtheOperator'sManual.
93-9899
decal93-9899
93-9899
1.Crushinghazard—installthecylinderlock.
5

decal105-4215
105-4215
1.Warning—avoidpinchpoints.
decal106-2355
106-2355
1.Slow3.Transmission—thirdhigh;
nofastspeed
2.Fast
decal106-2377
106-2377
1.Locked8.Warning—readtheOperator'sManual.
2.Differentiallock9.Entanglementhazard,shaft—keepbystandersoutofthe
operatingarea.
3.Unlocked10.Retracthydraulics
4.Hydrauliclock11.Extendhydraulics
5.Engage12.Transmission—highspeed
6.Powertakeoff(PTO)13.Transmission—lowspeed
7.Disengage14.Parkingbrake
6

decal106-7767
106-7767
1.Warning—readtheOperator'sManual;avoidtippingthe
machine;weartheseatbelt;leanawayfromthedirection
themachineistipping.
decal115-2047
115-2047
1.Warning—donottouchthehotsurface.
decal115-2282
115-2282
1.Warning—readtheOperator'sManual.
2.Warning—stayawayfrommovingparts;keepallguardsandshieldsinplace.
3.Crushinghazard—keepbystandersoutoftheoperatingarea;donotcarrypassengersinthecargobed;keeparmsandlegs
insideofthevehicleatalltimes;useseatbeltsandhandholds.
7

decal115-7723
115-7723
1.Warning—thehydraulic-uidpressureis124bar(1,800psi).
2.CouplerA
3.CouplerB
decal115-7739
115-7739
1.Falling,crushinghazard—donotcarrypassengers.
decal115-7741
115-7741
1.ReadtheOperator’sManualbeforeservicingtransmission
uid.
decal115-7814
115-7814
8

decal121-9776
121-9776
1.Warning—readtheOperator’sManualandreceiveproper
trainingbeforeoperatingthemachine.
4.Warning—engagetheparkingbrake,shutofftheengine,and
removethekeyfromthekeyswitchbeforewalkingawayfrom
themachine.
2.Warning—wearhearingprotection.5.Tippinghazard—taketurnsslowly;driveslowlyupandacross
cliffs;withnoload,donotexceed32kph(20mph);while
carryingaloadorwhendrivingonuneventerrain,driveslowly.
3.Firehazard—shutofftheenginebeforerefuelingthemachine.
decal136-1163
136-1163
1.Donotexceedatransport
loadof1591kg(3,500lb).
2.Donotexceedatongue
weightof273kg(600lb).
decal145-2286
145-2286
1.Poweroutlet(10A)5.Lights,brake(15A)
2.Switchedpower(10A)6.Hazard(10A)
3.Fuelpump,supervisor
switch(10A)
7.4WD,transmission(10A)
4.Horn,powerpoint(15A)
9

decal145-2282
145-2282
1.Powerpoint
decal145-2276
145-2276
1.Engine—stop3.Engine—start
2.Engine—run
10

Setup
LooseParts
Usethechartbelowtoverifythatallpartshavebeenshipped.
ProcedureDescriptionQty.Use
1Nopartsrequired–Checktheuidlevelsandtirepressure.
Rollbar1
2Flange-headbolt(1/2x1-1/4inches)6Installtherollbar.
3Nopartsrequired–Burnishthebrakes.
Note:Determinetheleftandrightsidesofthemachinefromthenormaloperatingposition.
1
CheckingtheFluidLevels
andTirePressure
NoPartsRequired
Procedure
1.Checktheengine-oillevelbeforeandafter
yourststarttheengine;refertoCheckingthe
Engine-OilLevel(page39).
2.Checkthetransaxle/hydraulic-uidlevelbefore
yourststarttheengine;refertoCheckingthe
Transaxle/Hydraulic-FluidLevel(page53).
3.Checkthebrake-uidlevelbeforeyourststart
theengine;refertoCheckingtheBrake-Fluid
Level(page48).
4.Checktheairpressureinthetires;referto
CheckingtheTirePressure(page19).
11

2
InstallingtheRollBar
Partsneededforthisprocedure:
1Rollbar
6Flange-headbolt(1/2x1-1/4inches)
Procedure
1.Applymedium-grade(service-removable)
thread-lockingcompoundtothethreadsofthe6
ange-headbolts(1/2x1-1/4inches).
2.Aligneachsideoftherollbarwiththemounting
holesoneachsideofthemachineframe(Figure
3).
g009812
Figure3
1.Rollbarmountingbracket2.Flange-headbolt(1/2x
1-1/4inches)
3.Securetherollbarmountingbrackettothe
machineframeusing3ange-headbolts(1/2x
1-1/4inches)oneachside(Figure3).
4.Torquetheange-headbolts(1/2x1-1/4inches)
to115N∙m(85ft-lb).
3
BurnishingtheBrakes
NoPartsRequired
Procedure
Toensureoptimumperformanceofthebrakesystem,
burnishthebrakesbeforeuse.
1.Bringthemachineuptofullspeed,applythe
brakestorapidlystopthemachinewithout
lockingupthetires.
2.Repeatthisprocedure10times,waiting1minute
betweenstops,toavoidoverheatingthebrakes.
Important:Thisprocedureismosteffective
ifthemachineisloadedwith454kg(1,000
lb).
12

ProductOverview
Controls
Becomefamiliarwithallthecontrolsbeforeyoustarttheengineandoperatethemachine.
ControlPanel
g390286
Figure4
1.Hornswitch5.Keyswitch
2.Lightswitch6.Supervisorswitch
3.Choke7.USBpowerpoint
4.Display
Display
g351788
Figure5
1.Chargeindicator3.Fuelgauge
2.Oil-pressure-warninglight4.Hourmeter
13

AcceleratorPedal
Usetheacceleratorpedal(Figure6)tovarytheground
speedofthemachinewhenthetransmissionisin
gear.Pressingdowntheacceleratorpedalincreases
theenginespeedandgroundspeed.Releasingthe
pedaldecreasestheenginespeedandgroundspeed.
g212798
Figure6
1.Clutchpedal3.Acceleratorpedal
2.Brakepedal
ClutchPedal
Youmustfullypresstheclutchpedal(Figure6)
todisengagetheclutchwhenstartingtheengine
orshiftingtransmissiongears.Releasethepedal
smoothlywhenthetransmissionisingeartoprevent
unnecessarywearonthetransmissionandother
relatedparts.
Important:Donotridetheclutchpedalduring
operation.Theclutchpedalmustbefullyoutor
theclutchslips,causingheatandwear.Never
holdthemachinestoppedonahillusingthe
clutchpedal.Damagetotheclutchmayoccur.
BrakePedal
Usethebrakepedaltostoporslowthemachine
(Figure6).
CAUTION
Operatingamachinewithwornorincorrectly
adjustedbrakescanmayresultinpersonal
injury.
Ifthebrakepedaltravelstowithin25mm(1
inch)ofthemachineoorboard,adjustor
repairthebrakes.
Gear-ShiftLever
Fullypresstheclutchpedalandmovetheshiftlever
(Figure7)intothedesiredgearselection.Adiagram
oftheshiftpatternisshownbelow.
g009160
Figure7
Important:Donotshiftthetransaxletothe
REVERSEorFORWARDgearunlessthemachineis
motionless;otherwise,youcoulddamagethe
transaxle.
CAUTION
Down-shiftingfromtoohighaspeedcan
causetherearwheelstoskid,resultinginloss
ofmachinecontrolaswellasclutchand/or
transmissiondamage.
Shiftsmoothlytoavoidgrindingthegears.
14

DifferentialLock
Thedifferentiallock(Figure8)allowstherearaxle
tolockforincreasedtraction.Youcanengagethe
differentiallockwhenthemachineisinmotion.
Movetheleverforwardandtotherighttoengage
thelock.
Note:Machinemotionplusaslightturnisrequiredto
engageordisengagethedifferentiallock.
CAUTION
Turningwiththedifferentiallockoncanresult
inthelossofmachinecontrol.
Donotoperatethemachinewiththe
differentiallockonwhenmakingsharp
turnsorathighspeeds;refertoAdjusting
Differential-LockCable(page45).
g002381
Figure8
1.Gear-shiftlever4.Hydraulic-liftlock
2.Parking-brakelever5.Differentiallock
3.Hydraulic-bedlift6.High-lowrangeshifter
Parking-BrakeLever
Wheneveryoushutofftheengine,engagethe
parkingbrake(Figure8)topreventthemachinefrom
accidentallymoving.
•Toengagetheparkingbrake,pullbackonthe
parking-brakelever.
•Todisengagetheparkingbrake,pushthe
parking-brakeleverforward.
Note:Disengagetheparkingbrakebefore
movingthemachine.
Ifyouparkthemachineonasteepgrade,engagethe
parkingbrake,shiftthetransmissionintoFIRSTgear
onauphillgradeorREVERSEgearonadownhillgrade,
andplacechocksatthedownhillsideofthewheels.
Hydraulic-LiftLever
Thehydraulicliftraisesandlowersthebed.Move
itrearwardtoraisethebed,andforwardtolowerit
(Figure8).
Important:Whenloweringthebed,holdthelever
intheforwardpositionfor1to2secondsafterthe
bedcontactstheframetosecureitinthelowered
position.Donotholdthehydraulicliftintheraise
orlowerpositionformorethan5seconds,once
thecylindersreachtheendoftheirtravel.
Hydraulic-LiftLock
Thehydraulic-liftlocksecurestheliftlever,sothatthe
hydrauliccylindersdonotoperatewhenthemachine
isnotequippedwithabed(Figure8).Italsolocksthe
liftleverintheONpositionwhenusingthehydraulics
forattachments.
High-LowRangeShifter
Thehigh-lowrangeshifteradds3additionalspeeds
forprecisespeedcontrol(Figure8):
•Youmuststopthemachinecompletelybefore
shiftingbetweentheHIGHandLOWrange.
•Shiftonlevelgroundonly.
•Presstheclutchpedalfully.
•MovetheleverfullyforwardforHIGHandfully
rearwardforLOW.
HIGHrange—Forhigherspeeddrivingonlevel,dry
surfaceswithlightloads.
LOWrange—Forlow-speeddriving.Usethis
rangewhengreaterthannormalpowerorcontrol
isnecessary.Forexample,steepgrades,difcult
terrain,heavyloads,slowspeedbuthigh-engine
speed(spraying).
Important:ThereisalocationbetweenHIGHand
LOWinwhichthetransaxleisinneitherrange.
DonotusethispositionasaNEUTRALposition,
becausethemachinecouldmoveunexpectedlyif
theHigh-Lowshifterisbumpedandthegear-shift
leverisingear.
15

KeySwitch
Usethekeyswitch(Figure4)tostartandshutoff
theengine.
Thekeyswitchhas3positions:OFF,ON,andSTART.
RotatethekeyswitchclockwisetotheSTARTposition
toengagethestartermotor.Releasethekeyswitch
whentheenginestarts.Thekeyswitchmoves
automaticallytotheONposition.
Toshuttheengineoff,rotatethekeyswitch
counterclockwisetotheOFFposition.
HourMeter
Thehourmeterindicatesthetotalhoursofmachine
operation.Thehourmeter(Figure5)startstofunction
wheneveryourotatethekeyswitchtotheONposition
oriftheengineisrunning.
HornSwitch
Thehornswitchislocatedonthecontrolpanel(Figure
4).Pressthehornswitchtosoundthehorn.
SupervisorSwitch
Movethesupervisorswitch(Figure4)totheSLOW
positionandremovethekeytopreventtheuseofthird
gearwhenintheHIGHrange.Theengineshutsoffif
theshiftlevermovestothirdgearwheninHIGHrange.
Note:Thekeyisremovableineitherposition.
LightSwitch
Pushthelightswitch(Figure4)totoggletheheadlights
onoroff.
Oil-Pressure-WarningLight
Theoil-pressure-warninglight(Figure5)illuminatesif
theengine-oilpressuredropsbelowasafelevelwhile
theengineisrunning.
Important:Ifthelightickersorremainson,
stopthemachine,shutofftheengine,andcheck
theoillevel.Iftheoillevelislow,butadding
oildoesnotcausethelighttogooutwhenthe
engineisstarted,shutofftheengineimmediately,
andcontactyourAuthorizedServiceDealerfor
assistance.
Checktheoperationofthewarninglightsasfollows:
1.Engagetheparkingbrake.
2.TurnthekeyswitchtotheON/PREHEATposition,
butdonotstarttheengine.
Note:Theoil-pressurelightshouldglowred.
Ifthelightdoesnotfunction,eitherabulbis
burnedoutorthereisamalfunctioninthe
systemthatyoumustrepair.
Note:Ifenginewasjustshutoff,itmaytake1
to2minutesforthelighttocomeon.
ChargeIndicator
Thechargeindicatorilluminateswhenthebattery
discharges.Ifthelightilluminatesduringoperation,
stopthemachine,shutofftheengine,andcheckfor
possiblecauses,suchasthealternatorbelt(Figure5).
Important:Ifthealternatorbeltislooseor
broken,donotoperatethemachineuntilthe
adjustmentorrepairiscomplete.Failureto
observethisprecautionmaydamagetheengine.
Checktheoperationofthewarninglightsasfollows:
•Engagetheparkingbrake.
•TurnthekeyswitchtotheON/PREHEATposition,
butdonotstarttheengine.Thechargeindicator
andoil-pressurelightsshouldglow.Ifanylight
doesnotfunction,eitherabulbisburnedoutor
thereisamalfunctioninthesystemthatyoumust
repair.
FuelGauge
Thefuelgaugeshowstheamountoffuelinthetank.
ItdisplaysonlywhenkeyswitchisintheONposition
(Figure5).
Asinglebarindicatesalowfuelleveland1ashing
barindicatesthatthefueltankisnearlyempty.
USBPowerPoint
UsetheUSBpowerpoint(Figure4)topowermobile
devices.
Important:WhenyouarenotusingtheUSB
powerpoint,inserttherubberplugtoprevent
damagetothepowerpoint.
ChokeControl
Tostartacoldengine,closethecarburetorchoke
bypullingthechokecontrol(Figure4)outtotheON
position.Aftertheenginestarts,regulatethechoke
tokeeptheenginerunningsmoothly.Assoonas
possible,openthechokebypushinginthechoke
controltotheOFFposition.Awarmenginerequires
littleornochoking.
16

Specications
Note:Specicationsanddesignaresubjecttochangewithoutnotice.
Overallwidth160cm(63inches)
Withoutbed:326cm(128-1/4inches)
Withfullbed:331cm(130-3/8inches) Overalllength
With2/3bedinrear-mountinglocation:346cm(136-3/8inches)
Baseweight(dry)838kg(1,848lb)
Ratedcapacity(includes91kg(200lb)operator,
91kg(200lb)passenger,andloadedattachment)1362kg(3,002lb)
Grossvehicleweight(GVW)2359kg(5,200lb)
Tongueweight272kg(600lb)
TowcapacityMaximumtrailerweight1,587kg(3,500lb)
Groundclearance18cm(7inches)withnoload
Wheelbase178cm(70inches)
Front:117cm(46inches)
Wheeltread(centerlinetocenterline)Rear:121cm(47-11/16inches)
Height190.5cm(75inches)tothetopoftheROPS
Attachments/Accessories
AselectionofT oroapprovedattachmentsandaccessoriesisavailableforusewiththemachinetoenhance
andexpanditscapabilities.ContactyourAuthorizedServiceDealerorDistributororgotowww.T oro.comfora
listofallapprovedattachmentsandaccessories.
Toensureoptimumperformanceandcontinuedsafetycerticationofthemachine,useonlygenuineT oro
replacementpartsandaccessories.Replacementpartsandaccessoriesmadebyothermanufacturerscouldbe
dangerous,andsuchusecouldvoidtheproductwarranty.
18

Operation
Note:Determinetheleftandrightsidesofthe
machinefromthenormaloperatingposition.
BeforeOperation
BeforeOperationSafety
GeneralSafety
•Neverallowchildrenorpeoplewhoarenottrained
orphysicallycapabletosafelyoperateorservice
themachine.Localregulationsmayrestrictthe
ageoftheoperator.Theownerisresponsiblefor
trainingalloperatorsandmechanics.
•Becomefamiliarwiththesafeoperationofthe
equipment,operatorcontrols,andsafetysigns.
•Shutoffthemachine,removethekey,andwait
forallmovementtostopbeforeyouleavethe
operator’sposition.Allowthemachinetocool
beforeadjusting,servicing,cleaning,orstoringit.
•Knowhowtostopandshutoffthemachinequickly.
•Ensurethattherearenotmoreoccupants(youand
yourpassenger(s))thanthenumberofhandholds
equippedonthemachine.
•Checkthatallsafetydevicesanddecalsarein
place.Repairorreplaceallsafetydevicesand
replaceallillegibleormissingdecals.Donot
operatethemachineunlesstheyarepresentand
functioningproperly.
FuelSafety
•Useextremecareinhandlingfuel.Itisammable
anditsvaporsareexplosive.
•Extinguishallcigarettes,cigars,pipes,andother
sourcesofignition.
•Useonlyanapprovedfuelcontainer.
•Donotremovethefuelcaporllthefueltank
whiletheengineisrunningorhot.
•Donotaddordrainfuelinanenclosedspace.
•Donotstorethemachineorfuelcontainerwhere
thereisanopename,spark,orpilotlight,such
asonawaterheaterorotherappliance.
•Ifyouspillfuel,donotattempttostarttheengine;
avoidcreatinganysourceofignitionuntilthefuel
vaporshavedissipated.
PerformingDaily
Maintenance
ServiceInterval:Beforeeachuseordaily
Beforestartingthemachineeachday,performthe
EachUse/DailyprocedureslistedinMaintenance
(page29).
CheckingtheTirePressure
ServiceInterval:Beforeeachuseordaily
Fronttiresairpressurespecication:220kPa(32
psi)
Reartiresairpressurespecication:124kPa(18
psi)
Important:Checkthetirepressurefrequently
toensureproperination.Ifthetiresarenot
inatedtothecorrectpressure,thetireswillwear
prematurelyandmaycausethe4-wheeldriveto
bind.
Figure11showsanexampleoftirewearcausedby
under-ination.
g010294
Figure11
1.Under-inatedtire
Figure12showsanexampleoftirewearcausedby
over-ination.
g010293
Figure12
1.Over-inatedtire
19

AddingFuel
•Forbestresults,useonlyclean,fresh(lessthan
30daysold),unleadedgasolinewithancetane
ratingof87orhigher((R+M)/2ratingmethod).
•Ethanol:Gasolinewithupto10%ethanol
(gasohol)or15%MTBE(methyltertiarybutyl
ether)byvolumeisacceptable.Ethanoland
MTBEarenotthesame.Gasolinewith15%
ethanol(E15)byvolumeisnotapprovedforuse.
Neverusegasolinethatcontainsmorethan
10%ethanolbyvolume,suchasE15(contains
15%ethanol),E20(contains20%ethanol),orE85
(containsupto85%ethanol).Usingunapproved
gasolinemaycauseperformanceproblemsand/or
enginedamagewhichmaynotbecoveredunder
warranty.
•Donotusegasolinecontainingmethanol.
•Donotstorefueleitherinthefueltankorfuel
containersoverthewinterunlessyouuseafuel
stabilizer.
•Donotaddoiltogasoline.
UsingStabilizer/Conditioner
Usefuelstabilizer/conditionerinthemachinetokeep
thefuelfreshlongerwhenusedasdirectedbythe
fuel-stabilizermanufacturer.
Important:Donotusefueladditivescontaining
methanolorethanol.
Addtheamountoffuelstabilizer/conditionertofresh
fuelasdirectedbythefuel-stabilizermanufacturer.
FillingtheFuelTank
Fuel-tankcapacity:25L(6.5USgallons).
1.Cleantheareaaroundthefuel-tankcap.
2.Removethefuel-tankcap(Figure13).
g009814
Figure13
1.Fuel-tankcap
3.Fillthetanktoapproximately25mm(1inch)
belowthebottomofthellerneck,andinstall
thecap.
Note:Donotoverllthefueltank.
4.Wipeupanyspilledfueltopreventarehazard.
BreakinginaNewMachine
ServiceInterval:Aftertherst100hours—Perform
theguidelinesforbreakinginanew
machine.
Performthefollowingtoprovideproperperformance
forthemachine:
•Ensurethatthebrakesareburnished;referto3
BurnishingtheBrakes(page12).
•Checktheuidandengine-oillevelsregularly.
Remainalertforsignsthatthemachineorits
componentsareoverheating.
•Afterstartingacoldengine,letitwarmupforabout
15secondsbeforeusingthemachine.
Note:Allowmoretimefortheenginetowarmup
whenoperatingincoldtemperatures.
•Varythemachinespeedduringoperation.Avoid
faststartsandquickstops.
•Abreak-inoilfortheengineisnotrequired.
Originalengineoilisthesametypespeciedfor
regularoilchanges.
•RefertoMaintenance(page29)foranyspecial,
low-hourchecks.
20
Table of contents
Other Toro Utility Vehicle manuals

Toro
Toro 07385H Workman HDX-D User manual

Toro
Toro TWISTER 1400 User manual

Toro
Toro Groundsmaster 7200 Series User manual

Toro
Toro Workman 133-3016 User manual

Toro
Toro 09833 User manual

Toro
Toro Workman GTX User manual

Toro
Toro 07252TC Workman 1100 User manual

Toro
Toro Workman MD User manual

Toro
Toro 07324 User manual

Toro
Toro 07167 User manual

Toro
Toro 7383 User manual

Toro
Toro 12004 User manual

Toro
Toro 7383 User manual

Toro
Toro MB-1600 User manual

Toro
Toro Workman HDX User manual

Toro
Toro 127-7377 User manual

Toro
Toro 07385 Workman HDX-D User manual

Toro
Toro Workman 07347 User manual

Toro
Toro TX Platform User manual

Toro
Toro Groundsmaster 7210 User manual