manuals.online logo
Brands
  1. Home
  2. •
  3. Brands
  4. •
  5. Toshiba
  6. •
  7. UPS
  8. •
  9. Toshiba 4400 Series User manual

Toshiba 4400 Series User manual

Other manuals for 4400 Series

4

This manual suits for next models

3

Other Toshiba UPS manuals

Toshiba G9000 SERIES User manual

Toshiba

Toshiba G9000 SERIES User manual

Toshiba 4200FA XT Guide

Toshiba

Toshiba 4200FA XT Guide

Toshiba UE3G2L036C61T User manual

Toshiba

Toshiba UE3G2L036C61T User manual

Toshiba 1600XP SERIES User manual

Toshiba

Toshiba 1600XP SERIES User manual

Toshiba UPSMON PRO T1000 Series User manual

Toshiba

Toshiba UPSMON PRO T1000 Series User manual

Toshiba 4200FA Series User manual

Toshiba

Toshiba 4200FA Series User manual

Toshiba G2020 Series User manual

Toshiba

Toshiba G2020 Series User manual

Toshiba T-Series T1000 User manual

Toshiba

Toshiba T-Series T1000 User manual

Toshiba 1600EP Series User manual

Toshiba

Toshiba 1600EP Series User manual

Toshiba TOSNIC-7000S User manual

Toshiba

Toshiba TOSNIC-7000S User manual

Toshiba Black Gold Series User manual

Toshiba

Toshiba Black Gold Series User manual

Toshiba 4400 Series User manual

Toshiba

Toshiba 4400 Series User manual

Toshiba G9000 SERIES User manual

Toshiba

Toshiba G9000 SERIES User manual

Toshiba UC1A1A020C6TB Installation manual

Toshiba

Toshiba UC1A1A020C6TB Installation manual

Toshiba Satellite 1700 Series Instruction Manual

Toshiba

Toshiba Satellite 1700 Series Instruction Manual

Toshiba T1000 Series User manual

Toshiba

Toshiba T1000 Series User manual

Toshiba 4400 Series User manual

Toshiba

Toshiba 4400 Series User manual

Toshiba G8000MM Series User manual

Toshiba

Toshiba G8000MM Series User manual

Toshiba G9000 SERIES User manual

Toshiba

Toshiba G9000 SERIES User manual

Toshiba 1500 Series User manual

Toshiba

Toshiba 1500 Series User manual

Toshiba G9000 SERIES User manual

Toshiba

Toshiba G9000 SERIES User manual

Toshiba 1600EP Series User manual

Toshiba

Toshiba 1600EP Series User manual

Toshiba UNINTERRUPTIBLE POWER SYSTEM 1600XP User manual

Toshiba

Toshiba UNINTERRUPTIBLE POWER SYSTEM 1600XP User manual

Toshiba 4200 FA CT User manual

Toshiba

Toshiba 4200 FA CT User manual

Popular UPS manuals by other brands

AEG Protect 3.M 2.0 manual

AEG

AEG Protect 3.M 2.0 manual

Alpha Novus FXM 650 Installation and operation manual

Alpha

Alpha Novus FXM 650 Installation and operation manual

CyberPower RB12120X2A user manual

CyberPower

CyberPower RB12120X2A user manual

Pylontech Victron & Pylontech US5000 manual

Pylontech

Pylontech Victron & Pylontech US5000 manual

BEL LDX-U20 user manual

BEL

BEL LDX-U20 user manual

Mustek PowerMust 530(B) Plus Startup manual

Mustek

Mustek PowerMust 530(B) Plus Startup manual

Emerson Liebert NXL series Operation and maintenance manual

Emerson

Emerson Liebert NXL series Operation and maintenance manual

MAKELSAN BOXER SERIES user manual

MAKELSAN

MAKELSAN BOXER SERIES user manual

Block PC-0524-400-0 manual

Block

Block PC-0524-400-0 manual

CyberPower CP585LCD user manual

CyberPower

CyberPower CP585LCD user manual

Eaton 3S Advanced user's guide

Eaton

Eaton 3S Advanced user's guide

CyberPower Office Tower Series UPS 1000 user manual

CyberPower

CyberPower Office Tower Series UPS 1000 user manual

CyberPower BM100 quick start guide

CyberPower

CyberPower BM100 quick start guide

Best Power 610 quick start guide

Best Power

Best Power 610 quick start guide

Best Power Unity/I UT3K user manual

Best Power

Best Power Unity/I UT3K user manual

Mustek PowerMust 400 Offline user manual

Mustek

Mustek PowerMust 400 Offline user manual

Xantrex Trace 512 UR-UPS owner's manual

Xantrex

Xantrex Trace 512 UR-UPS owner's manual

Forza SL-1501UL user manual

Forza

Forza SL-1501UL user manual

manuals.online logo
manuals.online logoBrands
  • About & Mission
  • Contact us
  • Privacy Policy
  • Terms and Conditions

Copyright 2025 Manuals.Online. All Rights Reserved.

1
4400 Series UPS Seismic Kit Installation Instructions – 94016-002
4400 Series UPS Seismic Adapter Kit
Installation Instructions
Date: March 2020
Doc. No.: 94016-002
The 4400 Series cabinets can be installed to meet California OSHPD seismic specications using the
optional Seismic Kit and the oor anchorages specied below.
These instructions describe how to install the seismic adapter kits on the 4400 Series UPS, Battery , and
Auxiliary Cabinets. There is a SEISMIC KIT for each cabinet style: 15-30 kVA, 50 kVA, and 80 kVA.
1. 4400 15-30kVA Seismic Installation
2. 4400 50kVA Seismic Installation
3. 4400 80kVA Seismic Installation
1 4400 15-30kVA Seismic Installation
Table 1 lists the contents of the 4400 15-30kVA Seismic Kit. Figure 1.1 shows the order of assembly for
the [bolt + lockwasher + washer] fastener group.
TABLE 1 15-30KVA SEISMIC CONTENTS
440300SEISMICKIT Contents
No. P/N* Description Quan
1 93437 TOP SEISMIC BRACKET 30kVA) 1
3 67813 BASE MOUNTING BRACKET, 1
4-a –Hex Bolt, 1/4—20,1-1/2” 1
4-b –Flat Washer, 1/4 1
4-c –E—Ring, F/0.25 Shaft 1
11-a –Hex Bolt, 5/16—18 x 1” 10
11-b –Lock Washer, 5/16 10
11-c –Flat Washer, 5/16 10
–94016 4400 Seismic Kit Installation
Manual
1
a
b
c
FIGURE 1.1: FASTENER
GROUP (BOLT +LOCK WASH-
ER + WASHER) Cabinet Footprint
1.75 in
(44.4 mm)
2.75 in
(70 mm)
2.0 in
(51 mm)
Conduit Knock-out
(3 Places)
34.05 in.
(865 mm)
12 in (305 mm) 12 in (305 mm)
9.22 in (234 mm)
4.28 in
(109 mm)
5.55 in
(141 mm)
Base Plate Footprint
1/2 in. Bolt (6)
FIGURE 1.2: 15-30KVA SEISMIC
ANCHORAGE - FLOOR PATTERN
24400 Series UPS Seismic Kit Installation Instructions – 94016-002
15-30 kVA Seismic Adapter Kit (Cont.)
1. Prepare the oor anchorages. Arrange the anchorages to ac-
commodate the nal layout including placement of ancillary bat-
tery and/or Auxiliary cabinets. (Figure 1.2)
2. Prepare the wall anchorages. Key measurements o󰀨 the an-
chorage placement in Step 1. (Figure 1.3)
3. Table 1 lists the components of the 30kVA Seismic Kit. Figure
1.5 show the Seismic anchorage components in the Seismic Kit
for the 30kVA cabinets.
4. Assemble the fastener groups in Table 1, [4a-4c], [10a-10c], and
[11a-11c] as shown in Figure 1.1.
5. Secure the Top Seismic Bracket [1] to the top rear of the UPS
using two (2) fastener group [11]. (Figure 1.4)
6. Secure the Base Mounting Bracket, [3], to the oor anchors
installed in Step 1.
7. Roll the 15-30 kVA UPS cabinet between the two vertical sides of
the Base Mounting Bracket, [4]. (Figure 1.6)
8. Line up the UPS so the bolt holes on the Bottom Seismic Brack-
ets line up with the holes on the Seismic Base Plate vertical
sides.
9. Secure the UPS to the Seismic Base Plate using the remaining
eight (8) fastener group [11]. Insert the bolts through the Seismic
Bracket to the welded nuts on the Seismic Base Plate. (Figure
1.6)
10. Secure the Top Seismic Bracket, [1], to the wall anchors installed
in Step 2.
11. Once installation is complete, use the single Fastener Group [4]
to secure the door of the UPS. (Figure 1.7)
11
11
1
FIGURE 1.3: 15-30KVA SEISMIC
ANCHORAGE - WALL PATTERN
66.44 in. (1688 mm)
10.05 in
(255 mm)
5 in (127 mm)
1/4” Bolt
Anchor (2)
9.27 in
(471 mm)
Base Mounting Bracket
Cabinet Wall Footprint
P/N 440300SEISMICKIT
1
2
3
4
FIGURE 1.4: TOPSEISMICBRACKETINSTALLATION FIGURE 1.5: SEISMIC KIT
COMPONENTS (15-30 KVA)
3
4400 Series UPS Seismic Kit Installation Instructions – 94016-002
15-30 kVA Seismic Adapter Kit (Cont.)
11
11
11 11
11
11
Slide UPS into
Base Plate
FIGURE 1.6: INSTALLING ON SEISMIC BASE PLATE
FIGURE 1.7: SEISMIC DOOR ANCHOR (15-30 KVA)
4
44400 Series UPS Seismic Kit Installation Instructions – 94016-002
FIGURE 1.8: SEISMIC 15-30 KVA DIMENSAIONAL DRAWING
5
4400 Series UPS Seismic Kit Installation Instructions – 94016-002
2 4400 50kVA Seismic Installation
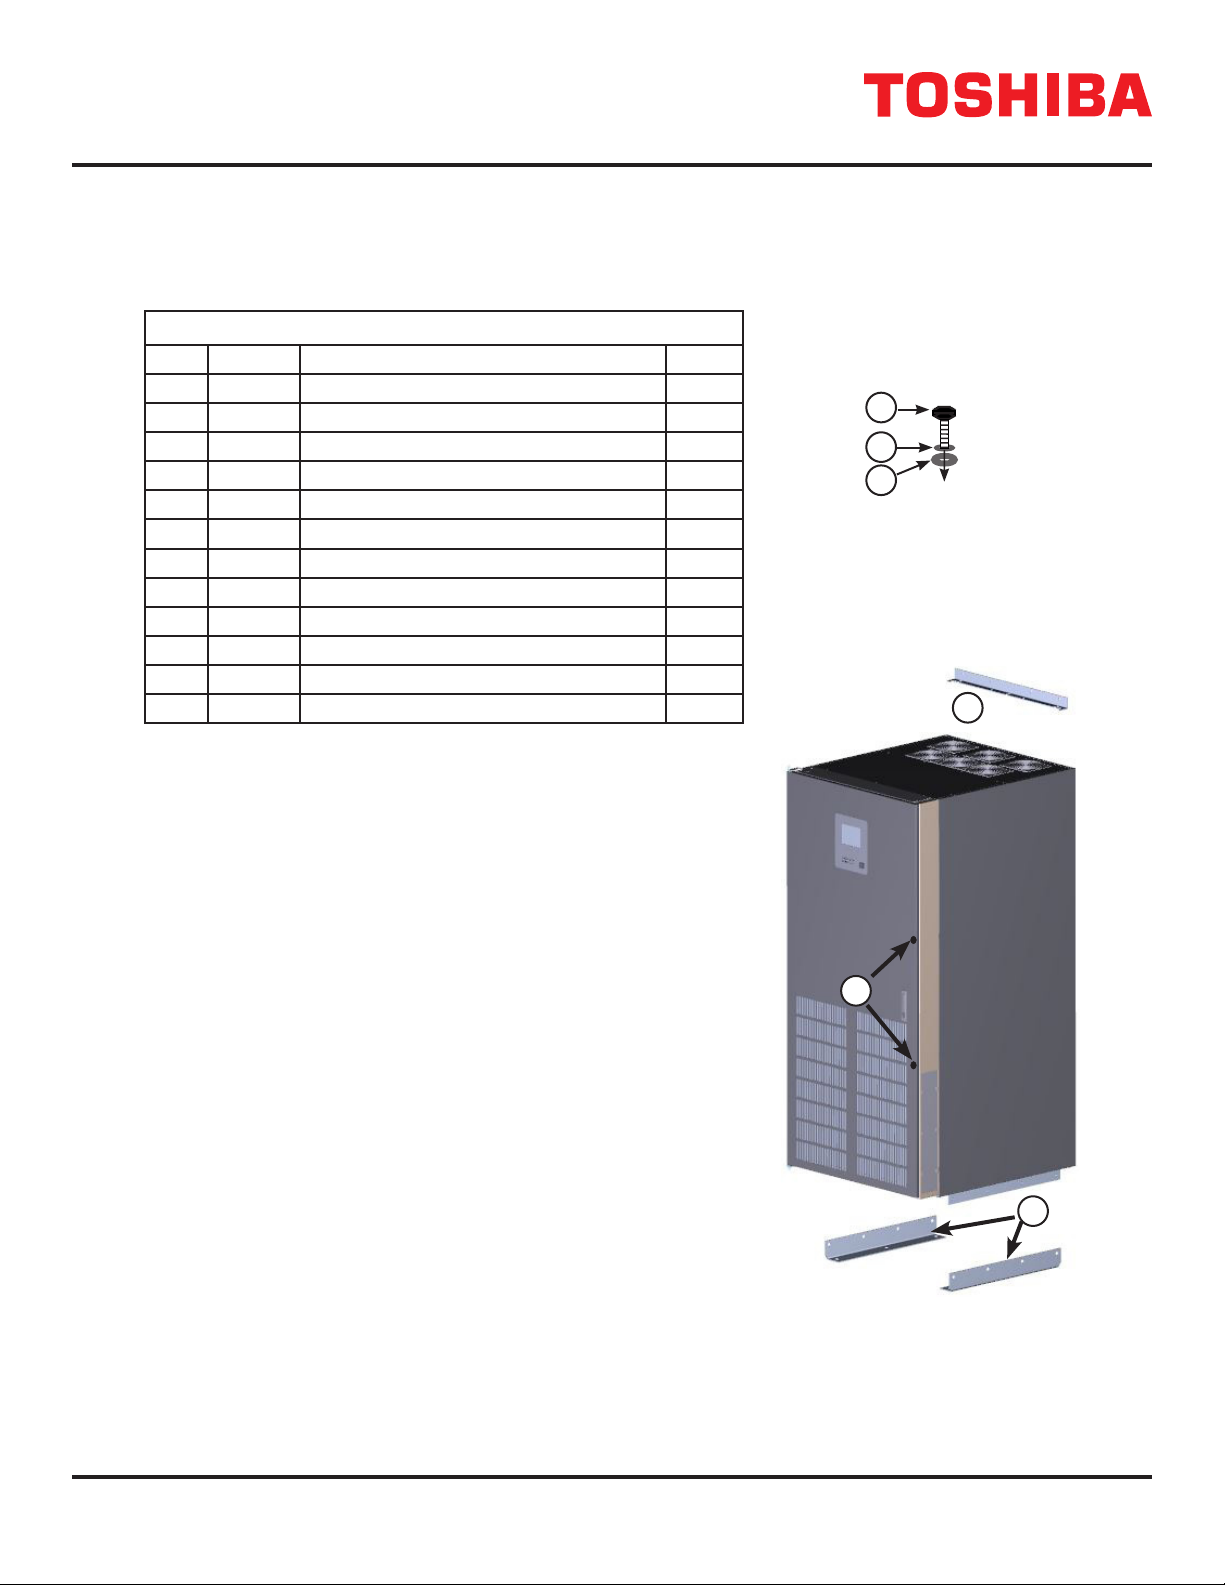
Table 2 lists the contents of the 4400 50kVA (4400500SEISMICKIT). Figure 2.1 shows the order of
assembly for the [bolt + lockwasher + washer] fastener group.
TABLE 2 50 KVA SEISMIC KIT CONTENTS
440500SEISMICKIT Contents
No. P/N* Description Quan
5 66437 TOP SEISMIC BRACKET 1
667193 SEISMIC MOUNTING CHANNEL 2
7-a –Hex Bolt, 1/4—20,1-1/2” 1
7-b –Flat Washer, 1/4 1
7-c –E—Ring, F/0.25 Shaft 1
10-a –Hex Bolt, 1/2—13 x 3/4” 8
10-b –Lock Washer, 1/2 8
10-c –Flat Washer, 1/2 8
11-a –Hex Bolt, 5/16—18 x 1” 4
11-b –Lock Washer, 5/16 4
11-c –Flat Washer, 5/16 4
–94016 4400 Seismic Kit Installation Manual 1
1. Prepare the oor anchorages. Arrange the anchorages to ac-
commodate the nal layout including placement for ancillary
battery and/or Auxiliary cabinets. (Figure 2.3)
2. Prepare the wall anchorages. Key measurements o󰀨 the an-
chorage placement in Step 1. (Figure 2.4)
3. Table 2 lists the components of the 50kVA Seismic Kit. Figure
2.2 shows the Seismic anchorage components in the Seismic Kit
for the 50kVA cabinets.
4. Assemble the fastener groups in Table 2, [7a-7c], [10a-10c], and
[11a-11c] as shown in Figure 2.1.
5. Secure the Top Seismic Bracket [5] to the top rear of the UPS
using three (3) fastener group [11]. (Figure 2.5)
6. Position the UPS over the oor anchors
7. Slip each Seismic Mounting Channel [6] over the three oor
anchors on each side of the UPS.
8. Tilt the Base bracket up against the UPS bottom bracket on the
UPS base.
9. Align the holes in the Seismic Mounting Channels [6] with the
UPS bottom brackets.
10. Use the remaining eight (8) fastener group [11] to secure the
Seismic Mounting Channels [6] to the UPS bottom brackets.
(Figure 2.6, Figure 2.7)
11. Secure the Top Seismic Bracket to the wall anchors using 5/16” Bolts.
12. Once installation is complete, secure the door of the UPS using the two
(2) Fastener Group [7]. (Figure 2.8)
a
b
c
FIGURE 2.1: FASTENER
GROUP (BOLT +LOCK
WASHER + WASHER)
P/N 440500SEISMICKIT
5
6
7
5
FIGURE 2.2: SEISMIC KIT
COMPONENTS (50 KVA)
64400 Series UPS Seismic Kit Installation Instructions – 94016-002
FIGURE 2.3: 50KVA SEISMIC
ANCHORAGE - FLOOR PATTERN
28.06 in. (713 mm)
11.5 in. (292 mm) 11.5 in. (292 mm)
4.59 in
(112 mm)
2.03 in
(51 mm)
37.2 in. (944 mm)
32.1 in. (816 mm)
5/8 in. Bolt Anchor (6)
FIGURE 2.6: BOTTOMSEISMICBRACKETINSTALLATION
(FLOOR AND ANCHORS NOT SHOWN)
11
11
11
11
11
11
11
11
Bottom
Bracket
P/N 67193
6
6
FIGURE 2.4: 50KVA SEISMIC
ANCHORAGE - WALL PATTERN
5/16 in. Bolt
Anchor (4)
7.0 in
(178 mm)
75.01 in. (1905 mm)
7.0 in
(178 mm)
10.0 in
(254 mm)
5.0 in
(127 mm)
14.03 in
(356 mm)
Seismic
Mounting
Channel
32.1 in. (816 mm)
4.06 in
(103 mm)
FIGURE 2.5: TOP SEISMIC BRACKET INSTALLATION
11 11 11
5
Top Bracket
P/N 66437
7
4400 Series UPS Seismic Kit Installation Instructions – 94016-002
7
7
Anchor Bolt
5/16 in x 18
Press Nut
5/16 in x 18 Bolt
5/16 in Lock Washer
5/16 Washer
11 Fastener Group
FIGURE 2.7: 50 KVA SEISMIC FLOOR ANCHOR - DETAIL
FIGURE 2.8: SEISMIC DOOR
ANCHOR (50KVA)
84400 Series UPS Seismic Kit Installation Instructions – 94016-002
FIGURE 2.9: SEISMIC 50 KVA DIMENSAIONAL DRAWING
9
4400 Series UPS Seismic Kit Installation Instructions – 94016-002
3 4400 80kVA Seismic Installation
Table 3 lists the contents of the 4400 80kVA Seismic Kit 4400800SEISMICKIT. Figure 3.1 shows the order
of assembly for the [bolt + lockwasher + washer] fastener group.
TABLE 3 80 KVA SEISMIC KIT CONTENTS
440800SEISMICKIT Contents
No. P/N* Description Quan
5 66437 TOP SEISMIC BRACKET 1
7-a –Hex Bolt, 1/4—20,1-1/2” 2
7-b –Flat Washer, 1/4 2
7-c –E—Ring, F/0.25 Shaft 2
11-a –Hex Bolt, 5/16—18 x 1” 4
11-b –Lock Washer, 5/16 4
11-c –Flat Washer, 5/16 4
–94016 4400 Seismic Kit Installation Manual 1
80 kVA
1. Prepare the oor anchorages. Arrange the anchorages to ac-
commodate the nal layout including placement for ancillary
battery and/or Auxiliary cabinets. (Figure 3.3)
2. Prepare the wall anchorages. Key measurements o󰀨 the an-
chorage placement in Step 1. (Figure 3.4)
3. Table 3 lists the components of the 80kVA Seismic Kit. Figure
3.2 show the Seismic anchorage component in the Seismic Kit
for the 80kVA cabinets.
4. Assemble the fastener groups in Table 3, [7a-7c] and
[11a-11c] as shown in Figure 3.1.
5. Secure the Top Seismic Bracket [5] to the top rear of the UPS
using three (3) fastener group [11]. (Figure 3.5)
6. Position the 80 kVA cabinet over the four oor anchors and se-
cure the unit.
7. Secure the Top Seismic Bracket to the wall anchors using 5/16”
Bolts.
8. Once installation is complete, secure the door of the cabinet us-
ing the two (2) Fastener Group [7]. (Figure 2.8)
a
b
c
FIGURE 3.1: FASTENER
GROUP (BOLT +LOCK
WASHER + WASHER)
P/N 440800SEISMICKIT
80 kVA 5
7
FIGURE 3.2: SEISMIC KIT
COMPONENTS (80 KVA)
10 4400 Series UPS Seismic Kit Installation Instructions – 94016-002
FIGURE 3.3: 80KVA SEISMIC
ANCHORAGE - FLOOR PATTERN
27.74 in. (704 mm)
27.1 in. (689 mm)
2.5 in
(64 mm)
2.5 in
(64 mm)
37.2 in. (944 mm)
32.1 in. (816 mm)
5/8 in. Bolt Anchor (4)
FIGURE 3.4: 80KVA SEISMIC
ANCHORAGE - WALL PATTERN
5/16 in. Bolt
Anchor (4)
7.0 in
(178 mm)
74.98 in. (1904 mm)
7.0 in
(178 mm)
10.0 in
(254 mm)
5.0 in
(127 mm)
13.55 in
(344 mm)
Base
C-Channel
32.1 in. (816 mm)
11 11 11
FIGURE 3.5: TOP SEISMIC BRACKET INSTALLATION
5