Trevi AVX 530 BT User manual

DIFFUSORI AMPLIFICATI CON
RADIO FM, BT, LETTORE MP3/USB/
SD/AUX IN
Manuale d'uso e collegamento
AMPLIFIED SPEAKERSWITH FM RA-
DIO,BT,MP3PLAYER/USB/SD/AUXIN
Connection and Operation Manual
HAUT-PARLERURS AMPLIFIEE AVEC
RADIO FM, BT, LECTEUR MP3/USB/
SD/AUX IN
Mode d'emploi et branchement
AKTIVLAUTSPRECHER MIT
FM RADIO, BT, MP3-SPIELER/USB/
SD/AUX IN
Gebrauchs- und Anschlusshandbuch
ALTAVOZ AMPLIFICADO CON
RADIO FM, BT, LECTOR DE MP3/USB/
SD/AUX IN
Manual para el uso y la conexión
AVX 530 BT
MANUALE ISTRUZIONI
INSTRUCTION'S MANUAL
BASS
REFLEX
BT
CONNECTION
USB/SD
AUX IN
60W
MAX
FM
RADIO

WARNING!
WARNING:DO NOT OPENTHE SET.NEITHER CONTROLS OR SPARE
PARTSTO BE USED BYTHE USERARETO BE FOUND INSIDE IT.APPLYTO
AUTHORISEDTREVI CENTERS FOR SERVICE OPERATIONS.
ATTENZIONE
RISCHIO DI SCOSSE
ELETTRICHE!
NON ESPORRE A PIOGGIA
E UMIDITÀ
ATTENZIONE:NONAPRITE L'APPARECCHIO.ALL'INTERNO NONVI
SONOCOMANDIMANIPOLABILIDALL'UTENTE NE PARTIDIRICAMBIO.
PERTUTTE LE OPERAZIONI DI SERVIZIO RIVOLGERSIAD UN CENTRO
DI ASSISTENZA AUTORIZZATO TREVI
DANGER OF ELECTRIC SHOCK!
DO NOT EXPOSE TO
RAIN OR HUMIDITY
ATTENTION
ATTENTION:NE PAS OUVRIR L’APPAREIL,A L’INTERIEUR IL N’YA PAS
DE COMMANDES A MANIPULER PAR L’UTILISATEUR OU DE PIECES
DE RECHANGE.POURTOUTES LES OPERATIONS DE SERVICE IL FAUT
S’ADRESSER A UN SERVICE D’ASSISTANCE AUTORISE TREVI.
RISQUE DE DECHARGES
ELECTRIQUES
NE PAS EXPOSER A LA PLUIE ET
A L’HUMIDITE
ACHTUNG
ACHTUNG:DAS GERÄT NICHT ÖFFNEN.IM INNERN BEFINDEN SICH
KEINEVOM BENUTZER SELBST INSTANDSETZBARENTEILEUNDAUCH
KEINE ERSATZTEILE. FÜR JEGLICHE SERVICEARBEITEN, WENDEN SIE
SICH BITTE AN EINE TREVI AUTORISIERTEN KUNDENDIENSTSTELLE.
GEFAHR ELEKTRISCHER SCHLÄGE
NICHT DER FEUCHTIGKEIT UND
DEM REGEN AUSSETZEN
ATENCION
ATENCION:NOABRIR ELAPARATO,EN SU INTERIOR NO HAY MAN-
DOS QUE PUEDAN SER MANIPULADOS POR EL USUARIO NI PARTES
DEREPUESTO.PARATODAS LAS OPERACIONESDESERVICIODIRIGIRSE
A UN CENTRO DE ASISTENCIA AUTORIZADO TREVI.
PELIGRO DE CHOQUES
ELECTRICOS
NO EXPONER A LLUVIAY
HUMEDAD
ATENÇÃO
PERIGO DE CHOQUES ELÉTRICOS
NÃO EXPOR A CHUVA E UMIDADE
ATENÇÃO: NÃO ABRIR O APARELHO. NO INTERIOR DO MESMO
NÃO EXISTEM COMANDOS OU PEÇAS DE SUBSTITUIÇÃO QUE
POSSAM SER MANIPULADOS PELO USUÁRIO.EM CASO DE EVENTUAL
OPERAÇÃO DE SERVIÇO, DIRIGIR-SE A UM CENTRO DE ASSISTÊNCIA
AUTORIZADO TREVI
PROSOCH
PROSOCH. MHN ANOIGETE THN SUSKEUH. DEN UPARCOUN STO
ESWTERIKO THS ENTOLES POU NA MPOREI NA CEIRISTEI O
KATANALWTHS OUTE ANTALLAKTIKA TMHMATA. GIA OPO-
IADHPOTE EPISKEUH H¢ SUNTHRHSH APEUQUNQEITE SE ENA
APO TA EXOUSIODOTHMENA KENTRA ANTIPROSWPEIAS TREVI.
KINDUNOS HLEKTROPLHXIAS
MHN EKQETETE
SE BROCH KAI UGRASIA
WARNINGS AVX 530 bt

COMANDI / CONTROLS / COMMANDES / KONTROLLE / CONTROLES
1
23
4
5
6
7
8
9
10
12
13
11
14
15
16
3
AVX 530 bt

CONNESSIONE A DISPOSITIVI ESTERNI
CONNECTINGTO EXTERNAL DEVICES
CONNEXION À DES PÉRIPHÉRIQUES EXTERNES
VERBINDUNG MIT EXTERNEN GERÄTEN
CONEXIÓN A DISPOSITIVOS EXTERNOS
Telefoni cellulari/
Smartphone
DVD/Mpeg4 Player
TV/Monitor
*All'uscita audio RCA (Cavo RCA/RCA non incluso)
To RCA audio output (RCA/RCA cable not included)
À la sortie audio RCA (câble RCA/RCA non fourni)
RCA Audioausgang (RCA/RCA-Kabel nicht im Lieferumfang enthalten)
A la salida de audio RCA (RCA/RCA cable no incluido)
**AllapresacufaoLine-outdeldispositivo
ToheadphonessocketorLine-outofdevice
Prise d’écouteurs ou de Line-out appareil
Kopfhörerbuchse oder Line-out des Geräts
TomadeauricularesoLine-outdedispositivo
Personal Computer/
Notebook
MP3 Player
**
** **
**
*
4
AVX 530 bt

AVVERTENZE E NOTE D'USO
• Posizionarel’apparecchiosuunasuperciepiana.
• Posizionare l’apparecchio in modo che ai suoi lati ci sia sempre abbastanza spazio per la libera circolazione
dell’aria (almeno 10 cm).
• Non collocare nessun oggetto sopra l’apparecchio.
• L’apparecchionondeveessereespostoastillicidiooaspruzzid’acqua.Nessunoggettopienodiliquido,
qualivasi,deveesserepostosull’apparecchio.
• Sedeiliquidipenetranoall’internodell’apparecchioscollegareimmediatamentelaspinadallapresaeportare
l’apparecchioalpiùvicinocentroassistenzaautorizatoTREVI.
• Nessunasorgentediammanuda,qualicandeleaccese,deveesserepostasull’apparecchio.
• Icavidevonoesserenascostieprotettiondeevitarel’inciampodapartediqualcunoelaconseguentecaduta
dell’apparecchio.
• Tenere l’apparecchio lontano dai seguenti luoghi:
vicinoacampimagnetici;
vicinoafontidicalore(caloriferi,stufe,raggidirettidelsole,ecc...);
vicinoazoneumide(stanzedabagno,piscine,ecc...);
zonepolverose;zonesoggetteafortivibrazioni.
• Scollegareilcavodialimentazioneduranteitemporalioperlunghiperiodidiinutilizzo.
• Istruire al corretto utilizzo bambini e persone con scarse conoscenze del prodotto.
• Ascoltareavolumealtoperlungotempo,potrebbedanneggiareilvostroudito.
• Conservareilseguentemanualed’uso.
CURA E MANUTENZIONE
Perlapuliziasiconsiglial’usodiunpannomorbido,leggermenteinumidito.Evitatesolventiosostanzeabrasive.
IMPORTANTE
Labuonacostruzionediquestoapparecchionegarantisceperlungotempoilperfettofunzionamento.Se
tuttaviadovessepresentarsiqualcheinconveniente,saràopportunoconsultareilpiùvicinoCentroAssistenza
Treviautorizzato.
TREVI persegueunapoliticadicontinuaricercaesviluppo,pertantoiprodottipossonopresentarecarat-
teristichediversedaquelledescritte.
COLLEGAMENTO DEGLI ALTOPARLANTI
Collegarel'altoparlantesatelliteall'altoparlanteamplicatotramiteilcavoindotazione,nellarelativauscita
Conutilizzodiauricolariocufe:
Perevitarepossibilidanniall’udito,limitareiltempodiascoltoavolumielevati.
DESCRIZIONE COMANDI
1. Ingresso SD Card.
2. Tasto , riproduzione brano precedente.
3. Tasto,attivalariproduzione/pausadiunbrano,
cambio funzione.
4. Tasto ,riproduzionebranosuccessivo,comando
accensione/standby.
5. Ingresso USB.
6. Indicatore led di stato/accoppiamento Bluetooth.
7. Controllovolumegenerale.
8. TREBLE, controllo toni alti.
9. BASS, controllo toni bassi.
10.Presacufa,ingressojackØ3,5mm.
11.BassReex.
12.Presa per collegamento antenna FM.
13.Ingresso AUDIO INPUT (prese rossa e bianca).
14.Cavodialimetazione240V~50Hz.
15.Interruttore di accensione ON/OFF.
16 Uscita AUDIO OUTPUT per collegamento alto-
parlante satellite (OUTPUT).
INDICAZIONI COLORI LED
COLORE FUNZIONE
Rosso - Apparecchio acceso.
- Funzione AUDIO INPUT.
Rosso
lampeggiante
- Funzione Stand-by.
-RiproduzioneledaUSB/
SD.
Blu -Dispositivoesterno
collegato/accoppiato.
-Riproduzioneletramite
Bluetooth.
Blu
lampeggiante
- Funzione Bluetooth,ricerca
dispositivo per accoppia-
mento
Rosa - Funzione RADIO
5
AVX 530 bt
ITALIANO

AUDIO OUTPUT (16).
ACCENSIONE, STAND-BY E REGOLAZIONI
1. Portare l’interruttore di accensione ON/OFF (15) sulla posizione ●perportarel'apparecchioinmodalità
Stand-by.
2. Peraccenderel’apparecchiotenerepremutoperqualchesecondoiltasto(4);l'apparecchiosiattiverà
dalla funzione Stand-by.
3. Regolareilvolumegeneraletramiteilrelativocontrollo(7).
4. Regolareitonialtiebassitramiteirelativicontrolli(8e9).
5. Perriportarel’apparecchioinmodalitàStand-by,tenerepremutoperqualchesecondoiltasto(4).
6. Perspegnerecompletamentel'apparecchio,premerenuovamentel’interruttorediaccensioneON/OFF
(15).
FUNZIONAMENTO RADIO
1. Collegareilconnettoredellod'antenna(indotazione)allapresa(12).
2. Accenderel'apparecchioetenerepremutoperqualchesecondoiltasto(4);l'apparecchiosiattiverà
dalla funzione Stand-by.
3. Tenerepremutoperqualchesecondoiltasto(3),ripeterel'operazionenoaselezionarelafunzione
RADIO (Led colore Rosa).
4. Effettuare la sintonia e memorizzazione automatica delle stazioni radio premendo il tasto(3);l'appa-
recchioeffettuerà,automaticamente,unascansionedituttelestazioniradiopresentielememorizzerà.
Per richiamare le stazioni memorizzate premere i tasti (2) o (4).
NOTA: Per ottenere la migliore ricezione in FM estendete e orientate l’antenna. Se la ricezione non è buona provate
a regolare diversamente l’orientamento dell’antenna, comunque la qualità della ricezione in FM dipende molto
dal luogo dove è posto l’apparecchio.
UTILIZZO DEL LETTORE MP3
1. InserireunamemoriaSDnell’ingressoSDCard(1)e/oundispositivoUSBnell’ingressoUSB(5).Laripro-
duzionesiavvieràautomaticamante.
2. Premere il tasto(3)perarrestaremomentaneamentelariproduzione.Ripremerlonuovamenteper
riavviarla.
3. Premere il tasto (2) o (4)perportarsisullatracciasuccessivaoprecedente.
4. Tenerepremutoperqualchesecondoiltasto(3) per commutare tra gli ingressi USB e SD (TF card)
se entrambe le memorie sono inserite.
UTILIZZO DELL'INGRESSO AUDIO INPUT
1. CollegareiconnettoriRCAdiuncavoaudioall'ingressoAUDIOINPUT(13)postosulretrodell'altopar-
lanteamplicatoeiljackdelcavoaudioallapresacufaoall’uscitaline-outdiunasorgenteaudio(TV/
Monitor,Tablet, telefoni cellulari, lettori MP3, lettori DVD/Mepg4, schede audio per computer, ecc...).
2. Tenerepremutoperqualchesecondoiltasto(3),ripeterel'operazionenoaselezionarelafunzione
AUDIO INPUT (Led colore Rosso).
NOTA: si consiglia di non impostare un volume troppo alto della sorgente audio per non saturare l’ingresso dei diffusori.
UTILIZZO DELLA SORGENTE BLUETOOTH
1. Tenerepremutoperqualchesecondoiltasto(3),ripeterel'operazionenoaselezionarelafunzione
BLUETOOTH (Led colore BLU).
2. L'indicatoreled(6)cominceràalampeggiareallaricercadidispositividaaccoppiare.
3. AvviarelafunzioneBluetoothsuldispositivodaaccoppiareericercarelospeakernominato"AVX530BT"
o"Music_BT01"einserireilcodicedisicurezza(PIN)0000 se richiesto.
4. Adaccoppiamentoavvenutoverràemessounsuonoacusticoel'indicatoreled(6)rimarràblusso.
5. Utilizzare i tasti (3), (4) e (2) come per l'utilizzo del lettore MP3 per gestire la riproduzione dei
brani.
CARATTERISTICHE TECNICHE
Alimentazione:............................................240V~50Hz
Potenza massima audio: ........................................60W
Potenza di trasmissione Bluetooth: ...............2,5mW
FrequenzaditrasmissioneBluetooth: ..........2,4GHz
Rapporto S/N: ...................................................>=75dB
Separazione: .......................................................>=50dB
Dimensioniunità: .............................. 143x250x175mm
ALTOPARLANTI
Rispostainfrequenza: ............................40Hz-20KHz
Woofer: .........................................................................4"
Tweeter: ........................................................................1"
SEZIONE RADIO
Bandadifrequenza:........................... FM87,5-108MHz
6
AVX 530 bt ITALIANO

WARNINGS AND NOTES FOR USE
• Placethedeviceonaatsurface.
• Placethedevicesothatitssidesthereisalwaysenoughspaceforairtocirculatefreely(atleast10cm).
• Do not place anything on top of the unit.
• Theapparatusshallnotbeexposedtodrippingorsplashingwater.Noobjectslledwithliquid,suchas
vases,shouldbeplacedontheunit.
• Ifliquidspenetrateinsidethedeviceimmediatelydisconnecttheplugfromthesocketandtakeittothe
nearestservicecenterautorizatoTREVI.
• Nonakedamesources,suchaslightedcandles,shouldbeplacedon.
• Cablesshouldbehiddenandprotectedinordertoavoidstumblingfromsomeoneandtheconsequent
fall of the appliance.
• Keep the unit away from the following places:
nearmagneticelds;
nearheatsources(radiators,stoves,directsunlight,etc...);
nearwetlands(bathrooms,swimmingpools,etc...);
dustyareas;areassubjecttostrongvibration.
• Unplugthepowercableduringthunderstormsorlongperiodsofinactivity.
• Instruct the proper use children and people with little knowledge of the product.
• Listenathighvolumeforalongtime,candamageyourhearing.
• Keep the following user manual.
CARE AND MAINTENANCE
Forcleaningwerecommendtheuseofasoft,slightlydampcloth.Avoidsolventsorabrasives.
IMPORTANT
Thegoodconstructionofthismachineguaranteestheperfectfunctioningforalongtime.However,should
presentsomeinconvenience,youshouldconsultyournearestAuthorisedServiceCentreTrevi.
TREVI pursuesapolicyofcontinuousresearchanddevelopmentpolicy,therefore,theproductmayshow
different characteristics from those described.
DESCRIPTION OF CONTROLS
1. SD input
2. PREV button
3. button, PLAY/PAUSE, change function
4. , NEXT button, control power ON/standby.
5. USB input
6. Led indicator
7. GeneralVolume control
8. TREBLE
9. BASS
10. Earphone/HeadphonejackØ3,5mm
11. BassReexhole
12. Antenna FM Radio
13. AUDIO INPUT (red and white plugs)
14. Powersupplycable240V~50Hz
15. ON/OFF switch
16. Output for satellite speaker
LED COLOURS INDICATIONS
COLORS FUNCTION
Red - Power turned on.
- AUDIO INPUT function.
Red blinking - Stand-by function.
-PlaybacklefromUSB/SD.
Blue - External device connected/
coupled.
-PlaybacklefromBluetooth.
Blue blinking - Bluetooth function, search
deviceforpairing
Pink - RADIO function
With earphone or headphones use:
To prevent possible hearing damage, limit the amount of time listening at high volumes.
CONNECTING SPEAKERS
1. ConnectthesatellitespeakertotheampliedspeakerusingthesuppliedcableinitsAUDIOOUTPUT
(16).
POWER AND ADJUSTMENTS
1. TurntheON/OFFpowerswitch(9)toposition1toswitchonthedevice.
2. Adjusttheoverallvolumethroughitscontrol(19).
3. TurntheON/OFFpowerswitch(9)toposition0toswitchoffthedevice.
7
AVX 530 bt
ENGLISH

USINGTHE MP3 PLAYER
1. Turn the ON/OFF power switch (15) to position ●to switch the system to standby mode.
2. To turn the unit on hold for a few seconds the button (4);theunitwillactivatethestandbyfunction.
3. Adjusttheoverallvolumeusingitscontrol(7).
4. Adjustthetrebleandbassthroughitscontrols(8e9).
5. To allow the unit to stand-by mode, press and hold for a few seconds the button (4).
6. To completely turn off the unit, press the ON/OFF power switch (15).
RADIO FUNCTION
1. Connect the antenna wire (supplied) connector to the socket (12).
2. Turn on the unit and hold for a few seconds the button (4);theunitwillactivatethestandbyfunction.
3. Hold for a few seconds(3) button, repeat the process until you select the RADIO (Pink color LED
function).
4. Carry out the tuning and auto store radio stations by pressing the button(3);theunitwillautomatically
scanalltheavailableradiostationsandstore.Torecallstationsinmemorypressthe(2) or (4).
NOTE: For the best FM reception, extend and turn the aerial. If the reception is not good try adjusting unlike the
antenna, however, the quality of the FM reception depends on the place where you place the unit.
MP3 PLAYER
1. InsertanSDMemoryCardSDinthelobby(1)oraUSBdeviceintotheUSBport(5).Theplaybackwill
start automatically.
2. Press the(3) button to stop playback. Press again to restart.
3. Press the (2) or (4)tomovetothenextorprevioustrack.
4. Press and hold the button for a few seconds(3) to switch between USB and SD inputs (TF card) if
both memories are inserted.
AUDIO INPUT USE
1. ConnecttheRCAconnectorsofanaudiocabletotheAUDIOINPUTinput(13)ofampliedspeakerand
thejackplugtotheheadphonejackorline-outoutputofanaudiosource(TV/Monitor,Tablet,smartphone,
MP3 players, DVD/Mepg4 players, computers, etc...).
2. Press and hold for a few seconds(3) button, repeat the process until you select the AUDIO INPUT
function (Red color LED).
NOTE: it is advisable not to set too high a volume for the audio source does not overdrive the input of the speakers.
USE OFTHE BLUETOOTH
1. Press and hold the button for a few seconds(3) button, repeat the process until you select the
BLUETOOTH function (BLUE LED).
2. TheLEDindicator(6)willstartashinglookingfordevicestobecoupled.
3. StarttheBluetoothfeatureonthedevicetobecoupledandsearchthespeakernamed"AVX530BT"or
"Music_BT01"andenterthesecuritycode(PIN)0000ifrequired.
4. For mating occurred, a tone sound and the LED indicator (6) will remain blue.
5. Use the buttons(3), (4) e (2) how to use the MP3 player to control the playback of songs.
TECHNICAL CHARACTERISTICS
PowerSupply:..............................................240V~50Hz
Max Audio power: ..................................................60W
Bluetooth transmission power:........................2,5mW
Bluetooth transmission: ....................................2,4GHz
S/N Ratio: ...........................................................>=75dB
Separation: .........................................................>=50dB
Speakers Dimensions: ......................143x250x175mm
SPEAKERS
FrequencyResponse:..............................40Hz-20KHz
Woofer: .........................................................................4"
Tweeter: ........................................................................1"
RADIO
Bandfrequency: ................................. FM87,5-108MHz
8
AVX 530 bt ENGLISH

ENGLISH FRANÇAIS
RACCORDEMENT DES ENCEINTES
1. Connectezl’enceintesatellitepourlehaut-parleurampliéàl’aideducâblefournidanssasortieAUDIO
OUTPUT (16).
AVERTISSEMENTS ET NOTES D'UTILISATION
• Placer l'appareil sur une surface plane.
• Placerl'appareildesortequesescôtés,ilyatoujoursassezd'espacepourl'airdecirculerlibrement(au
moins 10 cm).
• Ne placez rien sur le dessus de l'appareil.
• L'appareilnedoitpasêtreexposéàdeséclaboussuresd'eau.Aucunobjetremplideliquide,commedes
vases,doiventêtreplacéssurl'appareil.
• Sidesliquidespénètrentàl'intérieurdudispositifimmédiatementdébrancherlachedelapriseetle
prendreaucentredeserviceleplusprocheautorizatoTREVI.
• Aucunesourcedeammenue,tellequedesbougiesallumées,doiventêtreplacéssur.
• Lescâblesdoiventêtrecachésetprotégésand'éviterd'achoppementdequelqu'unetlachuteconséquente
de l'appareil.
• Gardezl'appareildanslesendroitssuivants:
àproximitédechampsmagnétiques;
sourcesprochesdechaleur(radiateurs,fours,lumièredirectedusoleil,etc...);
zoneshumidesàproximité(lessallesdebains,piscines,etc...);
zonespoussiéreuses,leszonessoumisesàdefortesvibrations.
• Débranchezlecâbled'alimentationpendantlesoragesoudelonguespériodesd'inactivité.
• Demandezàlabonneutilisationdesenfantsetdespersonnesavecpeudeconnaissanceduproduit.
• Écoutezàunvolumeélevépendantunelonguepériode,peutendommagervotreouïe.
• Conservezlemoded'emploici-dessous.
SOINS ET ENTRETIEN
Pourlenettoyage,nousrecommandonsl'utilisationd'unchiffondoux,légèrementhumide.Évitezlessolvants
ou abrasifs.
IMPORTANT
La bonne construction de cette machine garantit le parfait fonctionnement pendant une longue période.
Cependant,devraitprésentercertainsinconvénients,vousdevriezconsultervotreplusprochedeServices
AgrééCentreTrevi.
TREVI poursuitunepolitiquederecherchecontinueetlapolitiquededéveloppement,parconséquent,les
produitspeuventprésenterdescaractéristiquesdifférentesdecellesdécrites.
Avec écouteurs ou un casque d'utilisation:
Pour prévenir d'éventuelles lésions auditives,limiter la quantité de temps d'écoute à volume élevé.
DESCRIPTION DES CONTRÔLES
1. Entrée SD
2. Touche , précédente lecture de la piste.
3. Touche ,jeuactif/pauseunechanson,fonction
de changement.
4. Touche ,pistesuivantecommandedelecture/
veille.
5. Entrée USB
6. LED indicateur d'état/d'appariement Bluetooth.
7. Contrôleduvolumegénéral
8. TREBLE,contrôledesaigus.
9. BASS,bassdecontrôle.
10. Prisecasque,entréejackØ3,5mm
11. TroudeBassReex
12. FM connexion prise d'antenne.
13. EntréeAUDIOINPUT(chesrougeetblanche)
14. Câbled'alimentation240V~50Hz
15. Interrupteur ON/OFF
16. Sortie pour haut-parleur satellite
COULEURS INDICATIONS LED
COLORS FUNCTION
Rouge - Alimentation sous tension.
- Fonction AUDIO INPUT.
Rouge
clignotant
- Stand-by.
-LalecturedeschiersUSB/SD.
Bleu - Dispositif externe connecté/
couplé.
-LecturedechiersviaBluetooth.
Bleu
clignotant
- Fonction Bluetooth, recherche
pourl'appariement de l'appareil
Rose - Fonction RADIO
9
AVX 530 bt
FRANÇAIS

DEUTSCH ESPAÑOL
MISE SOUSTENSION ET RÉGLAGE
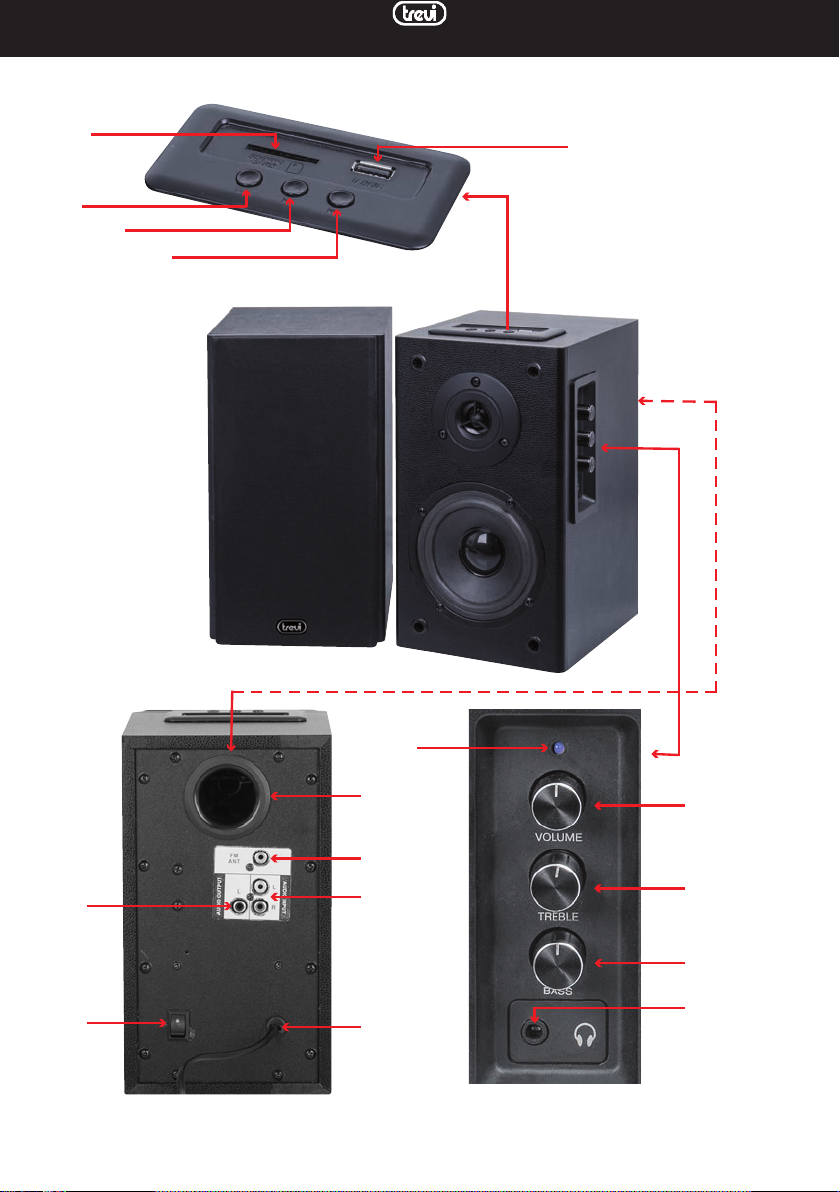
1. TournezleinterrupteurON/OFF(15)àlaposition●pourmettrelesystèmeenmodeveille.
2. Pourmettrel'unitéenattentependantquelquessecondessurlebouton(4);l'unitévaactiverlafonction
deveille.
3. Réglezlevolumeglobalàl'aidedesoncontrôle(7).
4. Réglezlesaigusetlesgravesgrâceàsescommandes(8et9).
5. Pourpermettreàl'unitédestand-bymode,appuyezetmaintenezpendantquelquessecondessurlebouton
(4).
6. Pouréteindrecomplètementl'appareil,appuyezsurinterrupteurON/OFF(15).
FONCTIONNEMENT DE LA RADIO
1. Branchezleconnecteurducâbled'antenne(fourni)àlaprise(12).
2. Allumezl'appareiletmaintenezpendantquelquessecondessurlebouton(4);l'unitévaactiverlafonction
deveille.
3. Tenir un(3),boutonquelquessecondes,répéterleprocessusjusqu'àcequevoussélectionnezlaradio
(fonction Rose LED de couleur).
4. Effectuerlesstationsderadiotuningetlamémorisationautomatiqueenappuyantsurlebouton(3);
l'l'unitérechercheautomatiquementtouteslesstationsderadiodisponiblesetmagasin.Pourrappelerles
stations dans la presse de mémoire les boutons (2) ou (4).
NOTE: Pour la meilleure réception FM, étendre et tourner l'antenne. Si la réception est pas bon essayer de régler
la différence de l'antenne, cependant, la qualité de la réception FM dépend de l'endroit où vous placez l'appareil.
UTILISATION DU LECTEUR MP3
1. InsérezunecarteSDdemémoireSDdanslehall(1)etouunpériphériqueUSBdansleportUSB(5).La
lecturedémarreautomatiquementbranche.
2. Appuyez sur la touche(3)pourarrêterlalecture.Appuyezànouveaupourredémarrer.
3. Appuyez sur la (2) ou (4)pourpasseràlapistesuivanteouprécédente.
4. Appuyezetmaintenezenfoncéleboutonpendantquelquessecondes(3) pour basculer entre les
entrées USB et SD (carte de TF) si les deux mémoires sont insérées.
UTILISATION DE AUDIO INPUT
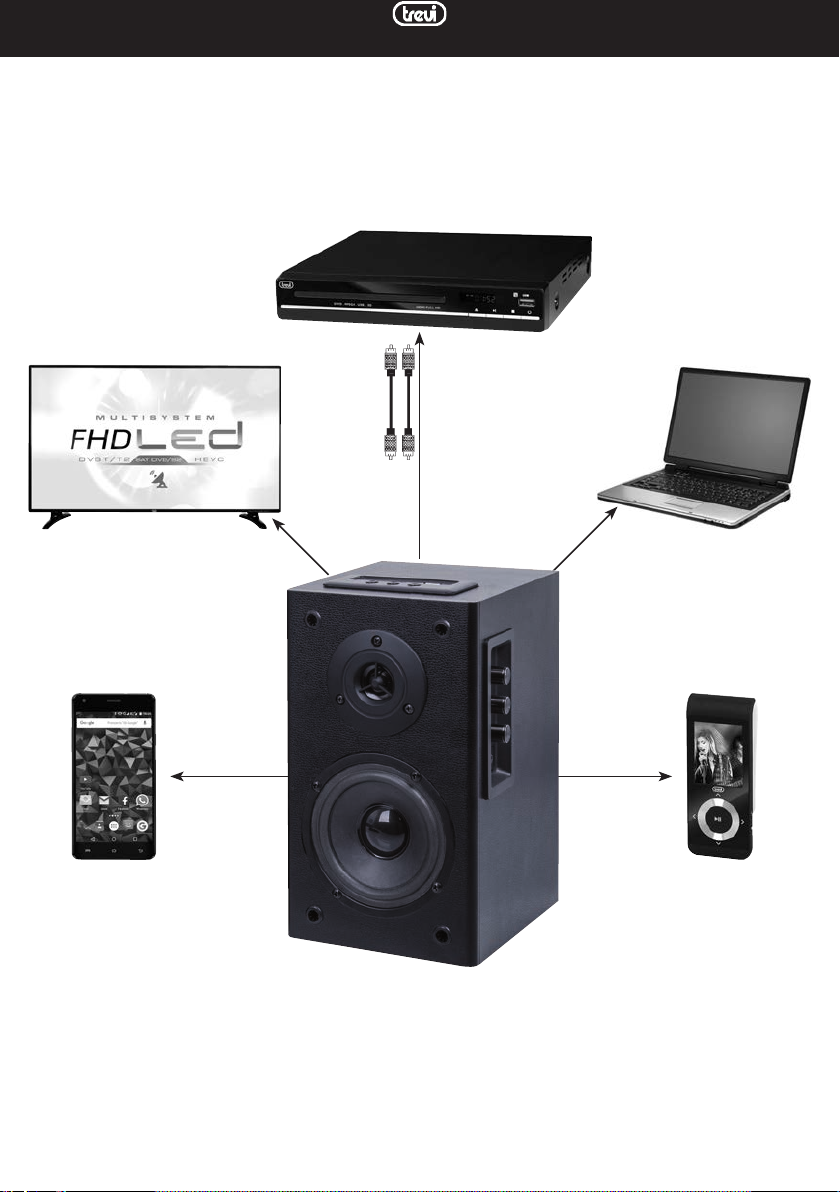
1. BranchezlesconnecteursRCAàuncâbleaudioàl'entréeAUDIO(13)surlehaut-parleurarrièreamplié
etlapriseaudioducâbleàlaprisecasqueoulasortiedelignedesortied'unesourceaudio(TV/Monitor,
tablette, téléphones mobiles, lecteurs MP3, lecteur DVD/MPEG4, cartes son d'ordinateur, etc...).
2. Appuyezetmaintenezpendant(3)boutonquelquessecondes(3),répétezleprocessusjusqu'àceque
voussélectionnezlafonctionAUDIOINPUT(RedLEDdecouleur).
REMARQUE: il est conseillé de ne pas xer un volume trop élevé pour la source audio n'overdrive pas l'entrée des
haut-parleurs.
UTILISATION DE BLUETOOTH
1. Appuyezetmaintenezleboutonpendantquelquessecondes(3),répétezleprocessusjusqu'àceque
voussélectionnezlafonctionBLUETOOTH(BLEULED).
2. L'indicateurLED(6)semetàclignoteràlarecherched'appareilsàcoupler.
3. DémarrerlafonctionBluetoothsurl'appareilpourêtrecoupléetrecherchelehaut-parleurnommé"AVX
530BT"ou"Music_BT01"etentrezlecodedesécurité(PIN)0000sinécessaire.
4. Pour l'accouplement a eu lieu, un son de tonalité et l'indicateur LED (6) restera solide bleu.
5. Utilisez les boutons (3), (4) et (2)commentutiliserlelecteurMP3pourcontrôlerlalecturedes
chansons.
CARACTÉRISTIQUESTECHNIQUES
Blocd'alimentation:....................................240V~50Hz
Puissance sonore maximale: .................................60W
Puissance de transmission Bluetooth: ............2,5mW
Bande de transmission Bluetooth: ..................2,4GHz
S/N Ratio: ...........................................................>=75dB
Séparation: .........................................................>=50dB
Dimensions Haut-parleurs: .............143x250x175mm
HAUT-PARLEURS
Réponseenfréquence:............................40Hz-20KHz
Woofer: .........................................................................4"
Tweeter: ........................................................................1"
RADIO
Bandedefréquence:......................... FM87,5-108MHz
10
AVX 530 bt FRANÇAIS

ANSCHLUSS LAUTSPRECHER
1. VerbindenSiedieSatelliten-LautsprechermitderverstärktenLautsprecherüberdasmitgelieferteKabel
in seinem Ausgang AUDIO OUTPUT (16).
WARNHINWEISE UND HINWEISE ZUR ANWENDUNG
• Stellen Sie das Gerät auf eine ebene Fläche.
• StellenSiedasGerätso,dassseineSeitenimmergenügendRaumfürdieLuftfreizirkulierenkann(min-
destens 10 cm).
• Stellen Sie nichts oben auf das Gerät.
• DasGerätdarfnichtmitWasseroderSpritzwasserausgesetztwerden.KeineGegenstände,diemitFlüs-
sigkeitgefülltist,wieVasen,aufdasGerätgestelltwerden.
• WennFlüssigkeitenindasGerätsofortdenSteckerausderSteckdoseeindringenundeszumnächsten
Service-CenterautorizatoTREVInehmen.
• Keine offenen Flammen, wie brennende Kerzen, platziert werden.
• DieKabelsolltenversteckt,umundgeschütztwerden,umzuverhindern,jemandstolpertundderdaraus
resultierenden Sturz des Gerätes.
• Halten Sie das Gerät aus folgenden Orten:
inderNähevonMagnetfeldern;
inderNähevonWärmequellen(Heizkörpern,Öfen,direkterSonneneinstrahlung,etc...);
inderNähevonFeuchtgebieten(Bäder,Schwimmbäder,etc...);
staubige Flächen, Bereiche mit starkenVibrationen.
• ZiehenSiedasNetzkabelwährendeinesGewittersoderlängererInaktivität.
• WeisendieordnungsgemäßeVerwendungKinderundMenschenmitwenigWissenüberdasProdukt.
• BeihoherLautstärkefüreinelangeZeithören,kanndasGehörschädigen.
• Halten Sie die folgende Bedienungsanleitung.
PFLEGE
Zur Reinigung empfehlen wir dieVerwendung eines weichen,leicht feuchtenTuch.Vermeiden Sie Lösungsmittel
oder Schleifmittel.
WICHTIG
DieguteKonstruktiondieserMaschinegarantiertdieeinwandfreieFunktionfüreinelangeZeit.Allerdingssollten
einigeUnannehmlichkeitenpräsentieren,solltenSieIhrennächstgelegenenService-CenterTrevikonsultieren.
TREVI einePolitikderkontinuierlichenForschungs-undEntwicklungspolitikverfolgt,daherkanndasProdukt
zeigenunterschiedlicheEigenschaftenvondenenbeschrieben.
Mit der Verwendung von Ohr- oder Kopfhörer:
Um Hörschäden zu vermeiden, beschränken die Menge an Zeit bei hoher Lautstärke.
BESCHREIBUNG DER STEUERELEMENTE
1. Eingang SD
2. Taste ,PREV
3. Taste , PLAY/PAUSE, Änderungsfunktion
4. Taste , NEXT, Steuerung einschalten/Standby.
5. Eingang USB
6. LED Anzeige
7. Allgemeine Lautstärkeregler
8. TREBLE
9. BASS
10. KopfhöreranschlussjackØ3,5mm
11. Bassreex-Loch
12. FM-Radio Antenne
13. EingangAUDIOINPUT (rotenund weißenStecker)
14. Stromversorgungskabel240V~50Hz
15. Schalter ON/OFF
16. AusgangfürSatelliten-Lautsprecher
LED-FARBANZEIGEN
FARBEN FUNKTION
Rot - Gerät eingeschaltet.
- AUDIO INPUT-Funktion.
Rot blinkt - Stand-by-Funktion.
-Wiedergabe-Datei vonUSB/
SD.
Blau -Externes Gerätangeschlossen/
gekoppelt.
- Wiedergabedatei von Blue-
tooth.
Blau blinkt -Bluetooth-Funktion,Suchgerät
fürdiePaarung
Rosa - RADIO-Funktion
11
AVX 530 bt
DEUTSCH

ENERGIE UND EINSTELLUNGEN
1. Schalten Sie den ON/OFF-Schalter (15) auf Position ●das System in den Standby-Modus zu wechseln.
2. UmdasGerätzuhalten,füreinpaarSekundendieTaste(4);drehen;wirddasGerätindenStandby-
Funktionzuaktivieren.
3. Stellen Sie die Gesamtlautstärke mit seiner Kontrolle (7).
4. Stellen Sie die Höhen und Tiefen durch seine Kontrollen (8 und 9).
5. DamitdasGerätfüreinpaarSekunden,umdie(4)indenStand-by-Modus,drückenundhalten.
6. ZumAusschaltendasGerätvollständig,drückenSiedieSchalterON/OFF(15).
RADIOBETRIEB
1. Schließen Sie den Stecker des Antennendraht (mitgeliefert) an die Buchse (12).
2. SchaltenSiedasGeräteinundhaltenSiefüreinpaarSekundendieTaste(4);wirddasGerätinden
Standby-Funktionzuaktivieren.
3. HaltenSiefüreinpaarSekunden(3),drücken,wiederholenSiedenVorgang,bisSiedieRADIO(rosa
Farbe LED-Funktion) wählen.
4. FührenSiedieTuningundAutoradiosenderspeicherndurchDrückenderTaste(3);dasGerätauto-
matischalleverfügbarenRadiosenderundSpeicherscannen.ZumAbrufenvonabgespeichertenSendern
drückenSiedie(2) Tasten oder (4).
HINWEIS: Für die beste UKW-Empfang, zu erweitern und die Antenne drehen.Wenn der Empfang nicht guter
Versuch ist im Gegensatz zu der Antenne eingestellt wird, hängt jedoch die Qualität der UKW-Empfang auf der
Stelle, wo Sie das Gerät.
VERWENDUNG DES MP3- PLAYER
1. Legen Sie eine SD-Speicherkarte SD in der Lobby (1) oder ein USB-Gerät an den USB-Anschluss (5). Die
Wiedergabe startet automatisch eingesteckt wird.
2. DrückenSiedie(3)umdieWiedergabezustoppen.DrückenSieerneutzustarten.
3. DrückenSiedie(2) und (4)zumnächstenodervorherigenTitelzubewegen.
4. DrückenundhaltenSiedieTastefüreinigeSekunden(3) um zwischen USB und SD-Eingänge (TF-
Karte), wenn beide Speicher eingesetzt werden.
VERWENDEN SIE EINGANG AUDIO INPUT
1. SchließenSiedieRCA-SteckeraneinAudiokabelandenAudio-Eingang(13)aufderRückseiteLautsprecher
verstärktunddieAudiobuchsedesKabelsandieKopfhörerbuchseoderLine-Out-AusgangeinerAudio-
quelle(TV/MonitorTablette,Handys,MP3-Player,DVD/MPEG4-Player,Computer-Soundkarten,etc...).
2. DrückenundhaltenSiefüreinpaarSekunden(3),drücken,wiederholenSiedenVorgang,bisSiedie
AUDIO INPUT-Funktion (rote Farbe LED) wählen.
HINWEIS: es ist nicht eingestellt zu hohe Lautstärke der Audioquelle ratsam ist,die Eingangsleistung der Lautsprecher
nicht übersteuern.
VERWENDUNGVON BLUETOOTH
1. DrückenundhaltenSiedieTastefüreinpaarSekunde(3), wiederholen Sie den Vorgang, bis Sie die
Bluetooth-Funktion (blaue LED) wählen.
2. DieLED-Anzeige(6)beginntzublinkenfürGerätesuchengekoppeltwerden.
3. StartenSiedieBluetooth-FunktionaufdemGerätgekoppeltwerdenunddieLautsprechernamens"AVX
530BT"oder"Music_BT01"suchenunddenSicherheitscode(PIN)0000eingeben,fallserforderlich.
4. FürPaarungaufgetretenist,einTonunddieLED-Anzeige(6)solidblaubleiben.
5. Verwenden Sie dieTasten(3), (4) und (2)wiedenMP3-Playerzuverwenden,umdieWiedergabe
vonSongszusteuern.
TECHNISCHE MERKMALE
Netzteil:........................................................240V~50Hz
Gesamtleistung: .......................................................70W
Bluetooth-Sendeleistung: ...................................2,5mW
Bluetooth Übertragungsbandbreite: ...............2,4GHz
S/N-Verhältnis: ..................................................>=75dB
Trennung: ............................................................>=50dB
Lautsprechergröße: ..........................143x250x175mm
SPRECHER
Frequenzgang:............................................40Hz-20KHz
Woofer: .........................................................................4"
Tweeter: ........................................................................1"
RADIO ABSCHNITT
Bandfrequenz:..................................... FM87,5-108MHz
12
AVX 530 bt DEUTSCH

CONEXIÓN DE LOS ALTAVOCES
1. ConecteelparlantesatélitealaltavozamplicadoutilizandoelcableensusalidaAUDIOOUTPUT(16).
ADVERTENCIASY NOTAS DE USO
• Coloqueeldispositivosobreunasupercieplana.
• Coloqueeldispositivodemodoquesusladossiemprehayespaciosucienteparaqueelairecircule
libremente (por lo menos 10 cm).
• Nocoloquenadaencimadelaunidad.
• Elaparatonodebeexponerseagoteososalpicadurasdeagua.Losobjetosquecontenganlíquidos,como
oreros,debesercolocadoenlaunidad.
• Siloslíquidospenetrenenelinteriordeldispositivodesconecteinmediatamenteelenchufedelatomay
llevarloalcentrodeserviciomáscercanoautorizatoTREVI.
• Nohayfuentedellamas,comounavelaencendida,sedebencolocaren.
• Loscablesdebenestarocultosyprotegidosconelndeevitareltropiezodealguienylaconsiguiente
caídadelaparato.
• Mantengalaunidadalejadadeloslugaressiguientes:
cercadecamposmagnéticos;
fuentescercanasdecalor(radiadores,estufas,luzsolardirecta,etc...);
cercadezonashúmedas(baños,piscinas,etc...);
áreaspolvorientas,áreassujetasafuertesvibraciones.
• Desconecteelcabledealimentacióndurantetormentaseléctricasolargosperíodosdeinactividad.
• Instruir al uso de los niños y las personas con poco conocimiento adecuado del producto.
• Escucheaunvolumenaltodurantemuchotiempo,puededañarsuaudición.
• Mantenga el siguiente manual de usuario.
CUIDADOY MANTENIMIENTO
Paralalimpiezaserecomiendaelusodeunpañosuave,ligeramentehúmedo.Evitardisolventesoabrasivos.
IMPORTANTE
Labuenaconstruccióndeestamáquinagarantizaelperfectofuncionamientodurantemuchotiempo.Sinembargo,
debepresentaralgunosinconvenientes,debeconsultarasumáscercanocentrodeservicioautorizadodeTrevi.
TREVI sigueunapolíticadecontinuainvestigaciónylapolíticadedesarrollo,porlotanto,elproductopuede
mostrarcaracterísticasdiferentesalasdescritas.
Con auriculares o auriculares de uso:
Para evitar los posibles daños a la audición, limitar la cantidad de tiempo que escucha a un
volumen alto.
DESCRIPCIÓN DE LOS CONTROLES
1. Entrada SD
2. Botón , reproducción de la pista anterior.
3. Botón, Play/pausa, selección de la función.
4. Botón , reproducción de la pista siguiente, en-
cendido/en espera.
5. Entrada USB
6. LEDindicadordeestado/emparejamiento
Bluetooth.
7. Controldevolumengeneral
8. TREBLE, controlar los tonos altos.
9. BASS,elbajocontrol.
10.Tomadeauriculares,entradajackØ3,5mm.
11.AgujerodeBassReex
12.FM conexión de toma de antena.
13.EntradaAUDIOINPUT(conectoresrojosy
blancos).
14.Cabledealimentación240V~50Hz.
15.Interruptor ON/OFF
16SalidaAUDIOOUTPUTparaaltavozsatélite.
INDICACIONES LED COLORES
COLOR FUNCIÓN
Rojo -Laalimentaciónactivada.
- Función AUDIO INPUT.
Parpadeando
en rojo
- Función Stand-by.
- La reproducción de los
archivosdeUSB/SD.
Azul -Dispositivoexterno
conectado/acoplada.
-Elarchivodereproducción
atravésdeBluetooth
Parpadeando
en azul
- La función Bluetooth,
búsquedadeemparejamien-
todeldispositivo
Rosa - Función RADIO
13
AVX 530 bt
ESPANOL

ENCENDIDOY AJUSTES
1. ColoqueelinterruptorON/OFFdepotencia(15)alaposición●para cambiar el sistema al modo de
espera.
2. Para apagar la unidad en espera durante unos segundos el botón (4);launidadactivarálafunciónde
espera.
3. Ajusteelvolumengeneralconsucontrol(7).
4. Ajustarlosagudosygravesatravésdesuscontroles(8y9).
5. Parapermitirquelaunidadamododeespera,pulseymantengapulsadoduranteunossegundoselbotón
(4).
6. Para apagar completamente la unidad, pulse el interruptor ON/OFF (15).
FUNCIONAMIENTO DE LA RADIO
1. Conectar el conector del cable de la antena (suministrado) a la toma (12).
2. Encienda la unidad y mantener durante unos segundos el botón (4);launidadactivarálafunciónde
espera.
3. Mantenga la presión durante unos segundos un botón(3),repetirelprocesohastaqueseselecciona
la radio (función Rosa LED de color).
4. Llevaracabolasestacionesderadiodesintonizaciónymemorizaciónautomáticapulsandoelbotón(3);
launidadbuscaráautomáticamentetodaslasemisorasderadiodisponiblesytienda.Pararecuperarlas
emisoras en la memoria, presione los botones (2) o (4).
NOTA: Para obtener la mejor recepción FM,extienda y gire la antena.Si la recepción no es buena prueba de ajuste a
diferencia de la antena,sin embargo,la calidad de la recepción de FM depende del lugar donde se coloca la unidad.
USO DEL REPRODUCTOR MP3
1. InserteunatarjetaSDtarjetadememoriaSDenelvestíbulo(1)y/oundispositivoUSBenelpuertoUSB
(5).Lareproducciónseiniciaráautomáticamenteseconecta.
2. Pulse el botón(3)paradetenerlareproducción.Presionedenuevoparareiniciar.
3. Pulse el botón (2) o (4) para ir a la pista anterior o siguiente.
4. Pulse y mantenga pulsado el botón durante unos segundos(3) para cambiar las entradas USB y SD
(TF) si se insertan las dos memorias.
ENTRADA DE AUDIO INPUT
1. Conecte los conectores RCA de un cable de audio a la entrada de audio (13) en la parte posterior del
altavozamplicadoylatomadeaudiodelcablealatomadeauricularesosalidadelíneadesalidadeuna
fuentedeaudio(TV/Monitor,tabletas,teléfonosmóviles,reproductoresdeMP3,reproductordeDVD/
MPEG4,tarjetasdesonido,etc...).
2. Pulse y mantenga pulsado el botón durante unos segundos(3),repiteelprocesohastaqueseseleccione
lafunciónAUDIOINPUT(LEDdecolorrojo).
NOTA: Es recomendable no establecer un volumen demasiado alto para la fuente de audio no saturar la entrada de
los altavoces.
USO DE BLUETOOTH
1. Pulse y mantenga pulsado el botón durante unos segundos(3),repitaelprocesohastaqueseselecciona
la función BLUETOOTH (LED azul).
2. ElindicadorLED(6)comienzaaparpadearenbuscadedispositivosparaacoplarse.
3. ComienzalafunciónBluetootheneldispositivoparaacoplarseybuscarelaltavozllamado"AVX530BT"
o"Music_BT01"eintroduzcaelcódigodeseguridad(PIN)0000,siesnecesario.
4. Paraelapareamientoseprodujo,unsonidodetonoyelindicadorLED(6)seguiránsiendodecolorazul.
5. Utilice los botones(3), (4) y (2) cómo utilizar el reproductor de MP3 para controlar la repro-
ducción de canciones.
CARACTERÍSTICASTÉCNICAS
Fuentedealimentación:............................240V~50Hz
Potencia max total: .................................................60W
Potencia de transmisión Bluetooth: ................2,5mW
Banda de transmisión Bluetooth: ....................2,4GHz
Relación S/N: .....................................................>=75dB
Separación: .........................................................>=50dB
Dimensionesdelaltavoz:................143x250x175mm
ALTAVOCES
Respuesta de frecuencia: .......................40Hz-20KHz
Woofer: .........................................................................4"
Tweeter: ........................................................................1"
SECCIÓN DE RADIO
Banda de frecuencia: ......................... FM87,5-108MHz
14
AVX 530 bt ESPANOL

INFORMAZIONI AGLI UTENTI ai sensi del
Decreto Legislativo N° 49 del 14 Marzo 2014
“Attuazione della Direttiva 2012/19/UE sui riuti di
apparecchiature elettriche ed elettroniche (RAEE)”
Il simbolo del cassonetto barrato riportato sull’apparec-
chiaturaindica cheilprodottoallane dellapropriavita
utiledeveessereraccoltoseparatamentedaglialtririuti.
L’utentedovrà,pertanto,conferirel’apparecchiaturaintegra
deicomponentiessenzialigiuntaanevitaagliidoneicentri
diraccoltadifferenziatadeiriutielettroniciedelettrotecnici,
oppurericonsegnarlaalrivenditorealmomentodell’acquisto
dinuovaapparecchiaturaditipoequivalente,inragionedi
unoa uno,oppure1a zeroperleapparecchiatureaventi
lato maggiore inferiore a 25 cm. L’adeguata raccolta diffe-
renziataperl’avviosuccessivodell’apparecchiaturadimessa
al riciclaggio, al trattamento e allo smaltimento ambientale
compatibilecontribuisceadevitarepossibilieffettinegativi
sull’ambienteesullasaluteefavorisceilriciclodeimaterialidi
cuiècompostal’apparecchiatura.Losmaltimentoabusivodel
prodotto da parte dell’utente comporta l’applicazione delle
sanzioniamministrativedicuialD.Lgsn.DecretoLegislativo
N°49 del 14 Marzo 2014.
INFORMATIONTO USERS
pursuant to Legislative Decree No. 49 of March 14,
2014
"Implementation of Directive 2012/19/EU onWaste
Electrical and Electronic Equipment (WEEE)"
This wheeled bin symbol on the product indicates that at
the end of its life must be collected separately from other
waste. The user must, therefore, take the remote control
integrates the essential components that got to its life to the
appropriate differentiated collection centers for electronic
and electro-technical waste,or return it to the dealer when
purchasinganewapplianceofequivalenttype,intermsof
onetoone,oronetozeroforequipmenthavinglongerside
of less than 25 cm.Appropriate separate collection for the
decommissioned equipment for recycling, processing and
environmentallycompatibledisposalhelpspreventnegative
impactontheenvironmentandhumanhealthandpromo-
tes recycling of the materials making up the product. Illegal
dumping of the product by the user entails the application
ofadministrativesanctionsstatedinLegislativeDecreen.
LegislativeDecreeNo.49ofMarch14,2014..
UTILISATEURS INFORMATION
conformémentaudécretlégislatifn°49du14Mars,2014
"La mise en œuvre de la directive 2012/19/UE relative
aux déchets d'équipements électriques et électroni-
ques (DEEE)"
Cesymboledepoubellesurrouessurleproduitindiqueque,
àlandesaduréedeviedoitêtrecollectéséparémentdes
autresdéchets.L'utilisateurdoitdoncprendrelecontrôle
àdistanceintègrelesélémentsessentielsquiontobtenuà
saviedanslescentresdecollectedifférenciésappropriés
pourlesdéchetsélectroniquesetélectro-technique,oule
retournerchezleconcessionnairelorsdel'achatd'unnouvel
appareildetypeéquivalent,entermesdeunàun,ouunà
zéro pour les équipements ayant plus côté de moins de
25cm.collecteséparéeappropriéepourl'équipementmis
horsservicepourlerecyclage,letraitementetl'élimination
respectueusedel'environnementcontribueàéviterleseffets
négatifssurl'environnementetlasantéhumaineetfavorisele
recyclagedesmatériauxquicomposentleproduit.ledumping
illégal du produit par l'utilisateur entraîne l'application des
sanctionsadministrativesprévuesparledécretlégislatifn°
49 du 14 Mars 2014.
BENUTZER INFORMATION
gemäß Gesetzesdekret Nr 49 von 14,März 2014
"Die Umsetzung der Richtlinie 2012/19/EU über die
Entsorgung von Elektro- und Elektronik-Altgeräte
(WEEE)"
DiesesMülleimersSymbolaufdemProduktzeigtan,dass
mussamEndeseinesLebensvonanderenAbfällengetrennt
gesammelt werden. Der Benutzer muss daher nehmen die
Fernbedienung die wesentlichen Komponenten integriert,
diefürelektronischeundelektrotechnischeAbfälleindie
entsprechenden differenzierten Sammelstellen zu seinem
Lebenbekam,oderesandenHändlerzurückgeben,wenn
ein neues Gerät gleichwertiger Art Kauf in Bezug auf 12.59,
odereinefürGerätemitlängerenSeitevonwenigerals25
cmaufNull.Dieangemessene,getrennteSammlungfürdie
stillgelegteAnlagenfürRecycling,Aufbereitungundumwelt-
gerechte Entsorgung trägt dazu bei, die Umwelt und die
menschlicheGesundheitnegativeAuswirkungenzuvermeiden
undbegünstigtdasRecyclingderMaterialiendasProdukt
zusammengesetzt. Illegal Dumping des Produkts durch den
BenutzerbringtdieAnwendungvonVerwaltungssanktionen
inLgsangegebenDekr49von14.März2014.
USUARIOS DE LA INFORMACIÓN de con-
formidad con el Decreto Legislativo N ° 49 del 14 de
marzo 2014
"Aplicación de la Directiva 2012/19/UE sobre residuos
de aparatos eléctricos y electrónicos (RAEE)"
Estesímbolodecontenedorderuedasenelproductoindica
quealnaldesuvidaútildebeserrecogidoseparadamente
delosdemásresiduos.Elusuariodebe,porlotanto,tomar
elcontrolremotointegraloscomponentesesencialesque
llegaronasuvidaútilaloscentrosadecuadosderecogida
deresiduoselectrónicosyelectrotécnicos,odevolverloal
distribuidoralcomprarunnuevoaparatodetipoequivalente,
entérminosdeunoauno,ounoaceroparaelequipoque
tieneladomáslargodemenosde25cm.larecogidaselectiva
apropiadoparaelequipofueradeservicioparasureciclaje,
tratamiento y eliminación ambientalmente compatible ayuda
a prevenir el impacto negativo sobre el medio ambiente
ylasalud,favoreciendoelreciclajedelos materialesque
componenelproducto.elvertidoilegaldelproductopor
parte del usuario implica la aplicación de sanciones admini-
strativasestablecidasenelDecretoLegislativoN°49de14
de marzo de 2014.
15
AVX 530 bt
15
CORRECT DISPOSAL WARNINGS AVX 530 bt

UK PLUG ONLY
WIRES CONNECTIONSTO A UKTHREE-PIN PLUG
The wires in this mains lead are coloured in accordance with the following wiring
codes:
Blue: Neutral
Brown: Live
Thewiresin this mains lead mustbe connectedto the terminals inthe plug as follows:
Blue wire:..............................N or Black
Brown wire:.........................L or Red
Neither wire is to be connected to the earth
(E or W) terminal of three-pin plug.
Shouldthefusefailintheplugremovetheplug
form the wall socket and replace the fuse with
a3Amp.ASTAapprovedBS1362fuse.
DICHIARAZIONE DI CONFORMITÀ UE SEMPLIFICATA
IlfabbricanteTREVIdichiaracheiltipodiapparecchiaturaradioAVX530BTè
conformealladirettiva2014/53/UE.
IltestocompletodelladichiarazionediconformitàEUèdisponibilealseguente
indirizzoInternetwww.trevi.it
SIMPLIFIED EU DECLARATION OF CONFORMITY
HerebyTREVISpadeclaresthattheradioequipmenttypeAVX530BTisin
compliancewithdirective2014/53/EU.
ThefulltextoftheEUdeclarationofconformityisavailableatthefollowing
internetaddresswww.trevi.it
Trevi S.p.a.
Strada Consolare Rimini-San Marino, 62
47924 Rimini (Rn) Italia
Tel. 0541/756420 Fax 0541/756430
www.trevi.itE-mail:info@trevi.it Made in CHINA
Table of contents
Languages:
Other Trevi Speakers manuals

Trevi
Trevi AVX 575USB User manual

Trevi
Trevi XP 72 BT User manual

Trevi
Trevi AVX 565 User manual

Trevi
Trevi XR 8A30 User manual

Trevi
Trevi XR 74 BT User manual

Trevi
Trevi XR 85 BT User manual

Trevi
Trevi AVX 570 S2 User manual

Trevi
Trevi XR 86 BT User manual

Trevi
Trevi SB 8312 TV User manual

Trevi
Trevi XR 8A10 User manual

Trevi
Trevi SH 8420 BT User manual

Trevi
Trevi XF 1850KB User manual

Trevi
Trevi SR 8410BT User manual

Trevi
Trevi XT 10A8 BT User manual

Trevi
Trevi XR 180 BT User manual

Trevi
Trevi XB 75 BT User manual

Trevi
Trevi XF 500 User manual

Trevi
Trevi XR 8A15 User manual

Trevi
Trevi SB 8310TV User manual

Trevi
Trevi XR JUMP User manual