manuals.online logo
Brands
  1. Home
  2. •
  3. Brands
  4. •
  5. Trixie
  6. •
  7. Pet Care Product
  8. •
  9. Trixie TX4 User manual

Trixie TX4 User manual

Art.-Nr. XXXXX
Bedienungs-
anleitung
Futterautomat T X4
Instruction manual
Conseils d‘utilisation
Modo d‘uso
Manual de instrucciones
Art.-Nr. 24381
n
ungs
-
24381_Gebrauchsanleitung.indd 1 21.10.11 15:42
TRIXIE Heimtierbedarf GmbH & Co. KG · D-24963 Tarp · www.trixie.de
Vor dem Gebrauch des Futterautomaten:
1. Legen Sie die Batterien in die auf der Unterseite
vorgesehenen Batteriefächer ein.
2. Schalten Sie den Hauptschalter neben den Batterie-
fächern auf ON. Der Futterautomat macht nun einen
Probelauf.
3.Befüllen Sie nun, je nach Anzahl der Mahlzeiten, die
Näpfe. Nehmen Sie hierfür die Abdeckung ab, indem
Sie unter den Rand greifen und ziehen. Danach kön-
nen Sie den Deckel und die kleine Abdeckung für den
Einzelnapf einfach abheben. Beachten Sie, dass das
Futter nicht über den Rand des Napfes gefüllt werden
darf.
4.Sind die Näpfe gefüllt, werden die Deckel in folgender
Reihenfolge wieder auf den Futterautomaten gesetzt:
• Positionieren Sie als erstes die obere Abdeckung so
auf dem Futterautomaten, dass sie fest in der Ausspa-
rung sitzt.
• Setzen Sie danach die kleine Abdeckung für den
Einzelnapf auf den nicht abgedeckten Napf. Die Öse
muss über den kleinen Haken des anderen Deckels
gelegt werden.
Einstellen der Fütterungszeit:
Durch Drücken der SET TIME-Taste können Sie die
Fütterungszeit einstellen. Drücken Sie diese Taste so
lange bis der gewünschte Fütterungsmodus blinkt
(4, 8, 12 oder 24 Std.). Durch drücken der START
RESET-Taste bestätigen Sie den gewünschten
Fütterungstakt.
Nach dem Drücken der START-Taste fährt der Napf
in Startposition. Falls Sie alle Näpfe gefüllt haben,
schieben Sie den kleinen Deckel über den offenen
Napf, nachdem der Futterautomat in Startposition
gegangen ist.
Das Fütterungsprogramm startet ab dem Zeitpunkt
der Bestätigung.
Programmiermöglichkeiten:
• 1 Tag mit 4 verschiedenen Fütterungszeiten (alle
4 oder 8 Std.)
• 2 Tage mit jeweils 2 Fütterungen (alle 12 Std.)
• 4 Tage mit einmaliger Fütterung pro Tag zur gleichen
Uhrzeit (24 Std.)
Bitte bedenken Sie, dass dieser Futterautomat keine
Kühlung besitzt. Wählen Sie deshalb bei Fütterungen,
die über 1 Tag laufen, entsprechend die Nahrung aus.
쮕Bedienungsanleitung
Futterautomat TX4
24381_Gebrauchsanleitung.indd 2 21.10.11 15:42
TRIXIE Heimtierbedarf GmbH & Co. KG · D-24963 Tarp · www.trixie.de
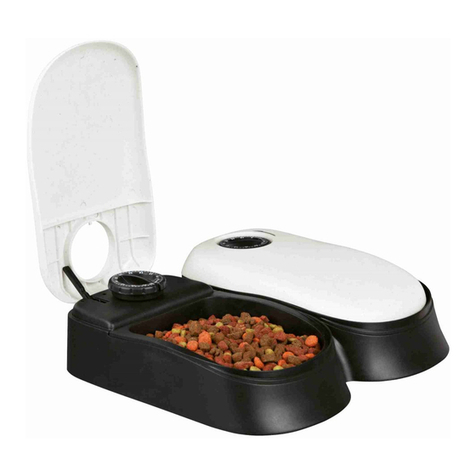
Before using the automatic food dispenser:
1. Insert the batteries in the battery compartment at
the base of the dispenser.
2. Turn the main switch next to the battery compart-
ment to ON. The feeder will now carry out a test run.
3.Fill the bowls, depending on how many meals you
require. To do so, remove the upper cover by holding
under the rim and pulling. Then you can simply lift
out the lid and the small cover for the individual
bowl. Remember that the food must not be higher
than the rim of the bowl.
4.When the bowls are full, replace the lids in the fol-
lowing order:
• position the first of all, so that it rests securely in the
notch.
• place the lid for the individual bowl on the uncovered
bowl. The eye must be placed over the small hook on
the other lid.
Avant d’utiliser le distributeur de nourriture:
1. Insérez les piles dans leur compartiment situé sur la
base du distributeur.
2. Mettez le contact à coté des piles sur ON. Le distribu-
teur démarre seul un test de fonctionnement.
3.Remplissez les bacs en fonction de la quantité de
nourriture. Pour se faire, maintenir la base et tirer
le couvercle. Vous pouvez alors enlever le couvercle
et l’opercule du petit récipient. N’oubliez pas que la
nourriture ne doit pas dépasser le rebors du distribu-
teur.
4.Quand les bacs sont pleins, replacez les couvercles
comme suit:
5. Placez le couvercle supérieur en premier en le sécuri-
sant dans les encoches.
6.Placez le couvercle individuel du bac sur le bac non
couvert. L’œil doit être place sur le petit crochet du
couvercle suivant.
Setting the feeding time:
Press SET TIME button to program the feeding time.
Press and hold the button until the feeding mode
that you want flashes (4, 8, 12 or 24 hrs.). Press the
START RESET button to confirm one feeding cycle.
After pressing the START button, the bowl will move
into the starting position. If you have filled all the
bowls, slide the small lid over the open bowl after the
feeder has moved into the starting position.
The feeding program starts as from the point of
confirmation.
Programming Options:
• 4 different feeding times (every 4 or 8 hrs.)
• 2 days with 2 feeds each (every 12 hrs.)
• 4 days with one feed per day at the same time of day
(24 hrs.)
Please note that the feeder has no method of cooling
food. For feeding longer than one day, please select
suitable food.
Programmer l’heure de distribution:
Le bouton SET TIME permet de programmer l’heure
de distribution. Maintenez pressé le bouton jusqu’au
clignotement du cycle souhaité (4, 8, 12 ou 24 hrs.).
Appuyez sur le bouton START RESET pour confirmer
le cycle de distribution.
Une fois appuyé sur le bouton START, le bac se met
en position de depart. Si vous avez rempli tous les
bacs, faites glisser le petit couvercle sur le bac ouvert
une fois que le distributeur s’est mis en position de
depart.
Le programme de distribution démarre dès le point de
confirmation.
Options de programmation:
• 4 programmes de distribution différents (toutes les
4 ou 8 hrs.)
• 2 jours avec 2 distributions quotidiennes (toutes les
12 hrs.)
• 4 jours avec une distribution par jour à la même
heure (24 hrs.)
Notez que le distributeur n’a aucune option pour
refroidir la nourriture. Au-delà d’une journée
d’utilisation, utilisez une nourriture appropriée.
Instruction manual
Conseils d’utilisation
Automatic Food Dispenser TX4
Distributeur automatique de nourriture TX4
24381_Gebrauchsanleitung.indd 3 21.10.11 15:42
TRIXIE Heimtierbedarf GmbH & Co. KG · D-24963 Tarp · www.trixie.de
Prima di utilizzare il distributore automatico:
1. Inserire le batterie nell’apposito scompartimento
situato alla base del distributore.
2. Accendere su ON l’interruttore principale accanto
allo scompartimento delle batterie. ll distributore
automaticamente effettuerà un test prova.
3.Riempire le ciotole in base al numero di pasti richiesti.
Per fare questo, rimuovere il coperchio superiore te-
nendo giù il bordo e tirando con decisione. Poi si può
semplicemente sollevare la copertura ed il piccolo
coperchio di ogni singola ciotola. Attenzione! Il cibo
non deve oltrepassare il bordo della ciotola.
4.Quando le ciotole sono state riempite, rimettere i
coperchi nell’ordine seguente:
• prima di tutto posizionare la copertura in modo che
appoggi saldamente nella tacca.
• poi mettere il piccolo coperchio della singola ciotola
sopra al contenitore scoperto. L’occhiello deve essere
posto sul piccolo gancio dell’altro coperchio.
Antes de empezar a usar el comedero automático:
1. Inserte las pilas en el compartimento correspondiente
situado en la base del comedero.
2. Gire a la posición de encendido (ON) el interruptor
principal situado al lado del compartimento de la
batería. En ese momento, el comedero iniciará una
prueba de funcionamiento.
3.Rellene cada bol en función de los que vaya a usar.
Para ello, retire la tapa superior sujetando la base
para tirar firmemente de la solapa que sobresale.
A continuación, simplemente tiene que levantar la
tapa y el recipiente pequeño de la comida individual.
Recuerde que la comida no debe ser superior al borde
del bol.
4.Cuando los bols estén llenos, coloque las tapas en el
siguiente orden:
• Coloque la tapa interior de manera que se apoye
firmemente en la ranura.
• Coloque esta misma tapa interior sobre el bol que
desee que esté destapado. Coloque el gancho de la
tapa exterior sobre el orificio de la interior.
Impostare il timer :
Il pulsante SET TIME serve per programmare l’orario
dei pasti. Tenere premuto il tasto finché inizia a
lampeggiare la modalità di alimentazione desiderata
(4, 8, 12 o 24 ore). Premere il tasto START RESET per
confermare un ciclo di alimentazione.
Dopo aver premuto il tasto START, la ciotola si spos-
terà nella posizione di partenza.
Una volta riempite tutte le ciotole e dopo che il distri-
butore si è spostato nella posizione di partenza, fare
scorrere il piccolo coperchio sopra la ciotola scoperta.
Il programma dell’alimentazione inizia dal momento
della conferma.
Regolare i pasti:
• 4 orari diversi (ogni 4 o 8 ore)
• 2 giorni con 2 pasti diversi ciascuno (ogni 12 ore)
• 4 giorni con solamente 1 pasto ciascuno alla stessa
ora (24 ore)
Nota: il distributore non ha un sistema di raffredda-
mento degli alimenti. Per pasti somministrati per più
di un giorno, si prega di scegliere gli alimenti adatti.
Configurar el tiempo de comida:
El botón SET TIME es para programar el tiempo de
comida. Mantenga pulsado el botón hasta que el
tiempo de alimentación empiece a parpadear (4, 8,
12 o 24 hrs.). Pulse el botón START RESET para confir-
mar el ciclo de tiempo que desee.
Después de pulsar el botón START, el bol se moverá a
la posición inicial. Si usted ha llenado todos los bols,
deslice la tapa interior hasta el bol abierto después de
que el comedero se haya movido a la posición inicial.
El programa de alimentación se inicia en el momento
en el que se ha confirmado.
Opciones de programación:
• 4 comidas al día (cada 4 u 8 horas).
• 2 días con 2 comidas cada uno (cada 12 hrs.)
• 4 días con una comida al día siempre a la misma hora
(24 hrs.)
Por favor, tenga en cuenta que el alimentador no tie-
ne un sistema de refrigeración de alimentos. Para la
alimentación de más de un día, por favor, seleccione
los alimentos adecuados.
Modo d‘uso
Manual de instrucciones
Distributore automatico di cibo TX4
Comedero automàtico TX4
24381_Gebrauchsanleitung.indd 4 21.10.11 15:42

Other Trixie Pet Care Product manuals

Trixie Turn Around User manual

Trixie

Trixie Turn Around User manual

Trixie 23888 User manual

Trixie

Trixie 23888 User manual

Trixie 12670 User manual

Trixie

Trixie 12670 User manual

Trixie 39346 User manual

Trixie

Trixie 39346 User manual

Trixie Muzzle Flex User manual

Trixie

Trixie Muzzle Flex User manual

Trixie Flower User manual

Trixie

Trixie Flower User manual

Trixie Curved Stream User manual

Trixie

Trixie Curved Stream User manual

Trixie TX2 User manual

Trixie

Trixie TX2 User manual

Trixie TX8 Smart User manual

Trixie

Trixie TX8 Smart User manual

Trixie Le Bistro User manual

Trixie

Trixie Le Bistro User manual

Trixie 39212 User manual

Trixie

Trixie 39212 User manual

Trixie TX5+1 User manual

Trixie

Trixie TX5+1 User manual

Trixie Dog Activity Memory Trainer 3.0 User manual

Trixie

Trixie Dog Activity Memory Trainer 3.0 User manual

Trixie TX9 User manual

Trixie

Trixie TX9 User manual

Trixie 44113 User manual

Trixie

Trixie 44113 User manual

Trixie Reptiland Reptile Rain User manual

Trixie

Trixie Reptiland Reptile Rain User manual

Trixie TX5 User manual

Trixie

Trixie TX5 User manual

Trixie TX4+1 User manual

Trixie

Trixie TX4+1 User manual

Trixie TX8 Smart User manual

Trixie

Trixie TX8 Smart User manual

Trixie TX7 User manual

Trixie

Trixie TX7 User manual

Trixie Vital Flow User manual

Trixie

Trixie Vital Flow User manual

Trixie 76080 User manual

Trixie

Trixie 76080 User manual

Trixie natura 62336 Datasheet

Trixie

Trixie natura 62336 Datasheet

Trixie Bubble Stream User manual

Trixie

Trixie Bubble Stream User manual

Popular Pet Care Product manuals by other brands

PawHut D00-164V00 manual

PawHut

PawHut D00-164V00 manual

Drinkwell AVALON-KA-41 operating guide

Drinkwell

Drinkwell AVALON-KA-41 operating guide

TRAVELIN K9 Pet-Pilot MAX Wicker 2019 owner's guide

TRAVELIN K9

TRAVELIN K9 Pet-Pilot MAX Wicker 2019 owner's guide

Drinkwell MINI-CA-17 operating guide

Drinkwell

Drinkwell MINI-CA-17 operating guide

Skylab F206 user manual

Skylab

Skylab F206 user manual

ULTRACOM KOIRA-GPS manual

ULTRACOM

ULTRACOM KOIRA-GPS manual

Martin System PRO TRAINER 3000 user guide

Martin System

Martin System PRO TRAINER 3000 user guide

Roverpet K889F Assembly instructions

Roverpet

Roverpet K889F Assembly instructions

Songmics LPI02 manual

Songmics

Songmics LPI02 manual

Askoll pure m instruction manual

Askoll

Askoll pure m instruction manual

Tunze Turbelle stream 6065 Instructions for use

Tunze

Tunze Turbelle stream 6065 Instructions for use

Digital Aquatics ReefKeeper user guide

Digital Aquatics

Digital Aquatics ReefKeeper user guide

Dogtra IQ CLIQ owner's manual

Dogtra

Dogtra IQ CLIQ owner's manual

OverEZ Chicken Coop 46OEZCKCP instruction manual

OverEZ Chicken Coop

OverEZ Chicken Coop 46OEZCKCP instruction manual

Sandaster SUNM01 manual

Sandaster

Sandaster SUNM01 manual

Bimar HI-PET PFC1 Instruction booklet

Bimar

Bimar HI-PET PFC1 Instruction booklet

Servco DTR500 manual

Servco

Servco DTR500 manual

iFetch iFetch quick start guide

iFetch

iFetch iFetch quick start guide

manuals.online logo
manuals.online logoBrands
  • About & Mission
  • Contact us
  • Privacy Policy
  • Terms and Conditions

Copyright 2025 Manuals.Online. All Rights Reserved.