manuals.online logo
Brands
  1. Home
  2. •
  3. Brands
  4. •
  5. U-Line
  6. •
  7. Dispenser
  8. •
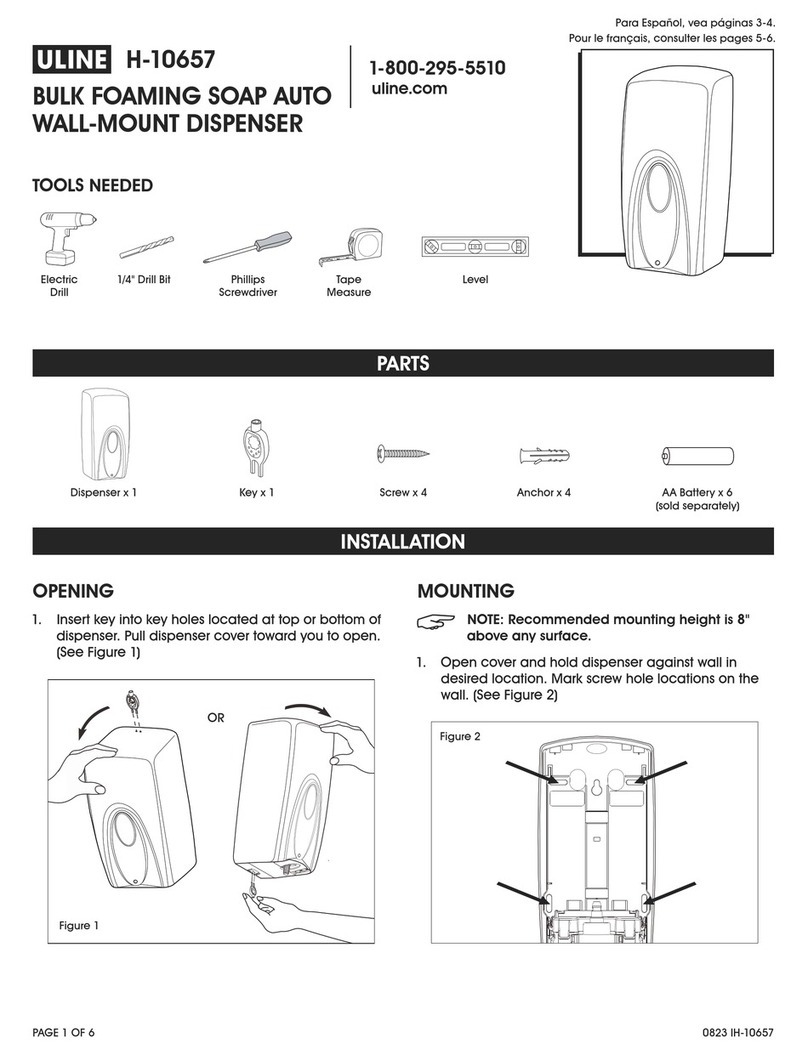
  9. U-Line H-10657 User manual

U-Line H-10657 User manual

Other U-Line Dispenser manuals
U-Line H-878 User manual

U-Line

U-Line H-878 User manual

U-Line CDE224B User manual

U-Line

U-Line CDE224B User manual

U-Line IH-99 User manual

U-Line

U-Line IH-99 User manual

U-Line H-6087 User manual

U-Line

U-Line H-6087 User manual

U-Line UCDE215 Installation manual

U-Line

U-Line UCDE215 Installation manual

U-Line H-9504 User manual

U-Line

U-Line H-9504 User manual

U-Line H-1713 User manual

U-Line

U-Line H-1713 User manual

U-Line UHDE215 Installation manual

U-Line

U-Line UHDE215 Installation manual

U-Line H-7983 User manual

U-Line

U-Line H-7983 User manual

U-Line TORK XPRESS H-1595 User manual

U-Line

U-Line TORK XPRESS H-1595 User manual

U-Line H-801 User manual

U-Line

U-Line H-801 User manual

U-Line H-1675 User manual

U-Line

U-Line H-1675 User manual

U-Line SLIMFOLD H-3456 User manual

U-Line

U-Line SLIMFOLD H-3456 User manual

U-Line EZ Pull Senior H-2534 User manual

U-Line

U-Line EZ Pull Senior H-2534 User manual

U-Line Better Pack 555eS User manual

U-Line

U-Line Better Pack 555eS User manual

U-Line H-2557 User manual

U-Line

U-Line H-2557 User manual

U-Line CDE215H User manual

U-Line

U-Line CDE215H User manual

U-Line H-2557 User manual

U-Line

U-Line H-2557 User manual

U-Line H-1585 User manual

U-Line

U-Line H-1585 User manual

U-Line TORK XPRESS H-4450 User manual

U-Line

U-Line TORK XPRESS H-4450 User manual

U-Line Tork Xpressnap H-5858 User manual

U-Line

U-Line Tork Xpressnap H-5858 User manual

U-Line H-1132 User manual

U-Line

U-Line H-1132 User manual

U-Line H-1130 User manual

U-Line

U-Line H-1130 User manual
U-Line H-2532 User manual

U-Line

U-Line H-2532 User manual

Popular Dispenser manuals by other brands

BOWMAN CL003-0111 manual

BOWMAN

BOWMAN CL003-0111 manual

SIKA Power Cure operating instructions

SIKA

SIKA Power Cure operating instructions

Silver King Majestic SK12MAJ Technical manual and replacement parts list

Silver King

Silver King Majestic SK12MAJ Technical manual and replacement parts list

Franke F3Dn Twin Service manual

Franke

Franke F3Dn Twin Service manual

HURAKAN HKN-MT1 manual

HURAKAN

HURAKAN HKN-MT1 manual

STIEBEL ELTRON UltraHot Plus Operation and installation instructions

STIEBEL ELTRON

STIEBEL ELTRON UltraHot Plus Operation and installation instructions

Bobrick B-828 troubleshooting guide

Bobrick

Bobrick B-828 troubleshooting guide

DAN DRYER 282 installation guide

DAN DRYER

DAN DRYER 282 installation guide

Essity Tork 473208 manual

Essity

Essity Tork 473208 manual

CBS SD300BU-88 COMPONENT MAINTENANCE MANUAL WITH ILLUSTRATED PARTS LIST
CBS

CBS SD300BU-88 COMPONENT MAINTENANCE MANUAL WITH ILLUSTRATED PARTS LIST
Sealey MK77 manual

Sealey

Sealey MK77 manual

Fluid Management Accutinter 1600 End user guide

Fluid Management

Fluid Management Accutinter 1600 End user guide

Franke DVS SD99-010 Installation and operating instructions

Franke

Franke DVS SD99-010 Installation and operating instructions

Graco Dispensit 1053-10C operation & maintenance

Graco

Graco Dispensit 1053-10C operation & maintenance

DPR SED02 user manual

DPR

DPR SED02 user manual

ITALTINTO i50 user manual

ITALTINTO

ITALTINTO i50 user manual

Coca-Cola FREESTYLE 9000 user guide

Coca-Cola

Coca-Cola FREESTYLE 9000 user guide

Hewi 805.06.150 Mounting instructions

Hewi

Hewi 805.06.150 Mounting instructions

manuals.online logo
manuals.online logoBrands
  • About & Mission
  • Contact us
  • Privacy Policy
  • Terms and Conditions

Copyright 2025 Manuals.Online. All Rights Reserved.

PAGE 1 OF 2 0723 IH-10657
H-10657
BULK FOAMING SOAP AUTO
WALL-MOUNT DISPENSER
1- 800 -295 -5510
uline.com
OPENING
1. Insert key into key holes located at top or bottom of
dispenser. Pull dispenser cover toward you to open.
(See Figure 1)
MOUNTING
NOTE: Recommended mounting height is 8"
above any surface.
1. Open cover and hold dispenser against wall in
desired location. Mark screw hole locations on the
wall. (See Figure 2)
Figure 2
TOOLS NEEDED
Electric
Drill
1/4" Drill Bit Phillips
Screwdriver
INSTALLATION
PARTS
Dispenser x 1 AA Battery x 6
(sold separately)
LevelTape
Measure
Screw x 4Key x 1 Anchor x 4
Figure 1
OR
PAGE 2 OF 2 0723 IH-10657
2. Set dispenser aside and drill into wall at four marked
locations. (See Figure 3)
3. Install provided anchors into drywall and secure
dispenser with provided screws.
INSTALLING BATTERIES
Open the dispenser and locate the battery
compartment on the left side of the dispenser. Place six
AA-cell Alkaline batteries in the proper orientation and
close the cover back into place. (See Figure 4)
INSTALLING CARTRIDGE
1. Place cartridge on top of control box with pump
facing front and downward. (See Figure 5)
2. Pull pump downward and clamp into groove of
control box. Ensure nozzle of the pump is fixed into
the groove of the push rod.
3. Close dispenser cover. The LED indicator will blink
green one time, indicating dispenser is ready
to use.
4. Place hand underneath the dispenser. The LED will
blink green and dispense soap.
WARNING! If the mounting distance is too close
to the basin or other obstacles, the LED will
blink green and red to remind user to remove
obstacles ahead of the sensor or to mount the
dispenser higher.
SETTING THE DISPENSING VOLUME
1. Press the button to turn the dispenser on/off.
2. Press to choose the volume of soap to dispense:
= Press once for the standard amount.
= Press again/twice for double the amount.
= Press a third time for triple the amount.
NOTE: If the red LED blinks frequently, the
voltage is low. Press to turn off. Replace the
batteries and the LED will become normal.
INSTALLATION CONTINUED
Figure 3
Figure 4
Figure 5
1
-800-295-551
0
uline.com