manuals.online logo
Brands
  1. Home
  2. •
  3. Brands
  4. •
  5. U-Line
  6. •
  7. Dispenser
  8. •
  9. U-Line H-2590 User manual

U-Line H-2590 User manual

This manual suits for next models

1

Other U-Line Dispenser manuals

U-Line CDE215H User manual

U-Line

U-Line CDE215H User manual

U-Line H-1918 User manual

U-Line

U-Line H-1918 User manual

U-Line H-1119 User manual

U-Line

U-Line H-1119 User manual

U-Line TORK H-5808 User manual

U-Line

U-Line TORK H-5808 User manual

U-Line CDE215F User manual

U-Line

U-Line CDE215F User manual

U-Line H-2274 User manual

U-Line

U-Line H-2274 User manual

U-Line H-1132 User manual

U-Line

U-Line H-1132 User manual

U-Line H-1172 User manual

U-Line

U-Line H-1172 User manual

U-Line H-7206 User manual

U-Line

U-Line H-7206 User manual

U-Line PURELL H-10644 User manual

U-Line

U-Line PURELL H-10644 User manual

U-Line TORK MATIC H-9952 User manual

U-Line

U-Line TORK MATIC H-9952 User manual

U-Line H-878 User manual

U-Line

U-Line H-878 User manual

U-Line H-7983 User manual

U-Line

U-Line H-7983 User manual

U-Line TORK H-5807 User manual

U-Line

U-Line TORK H-5807 User manual

U-Line TORK XPRESS H-1596 User manual

U-Line

U-Line TORK XPRESS H-1596 User manual

U-Line H-10657 User manual

U-Line

U-Line H-10657 User manual

U-Line H-1713 User manual

U-Line

U-Line H-1713 User manual

U-Line H-2624 User manual

U-Line

U-Line H-2624 User manual

U-Line PURELL ES6 User manual

U-Line

U-Line PURELL ES6 User manual

U-Line TORK PEAKSERVE H-9385 User manual

U-Line

U-Line TORK PEAKSERVE H-9385 User manual

U-Line TORK H-7177 User manual

U-Line

U-Line TORK H-7177 User manual

U-Line TORK H-5806 User manual

U-Line

U-Line TORK H-5806 User manual

U-Line TORK XPRESS H-1595 User manual

U-Line

U-Line TORK XPRESS H-1595 User manual

U-Line H-28 User manual

U-Line

U-Line H-28 User manual

Popular Dispenser manuals by other brands

BOWMAN CL003-0111 manual

BOWMAN

BOWMAN CL003-0111 manual

SIKA Power Cure operating instructions

SIKA

SIKA Power Cure operating instructions

Silver King Majestic SK12MAJ Technical manual and replacement parts list

Silver King

Silver King Majestic SK12MAJ Technical manual and replacement parts list

Franke F3Dn Twin Service manual

Franke

Franke F3Dn Twin Service manual

HURAKAN HKN-MT1 manual

HURAKAN

HURAKAN HKN-MT1 manual

STIEBEL ELTRON UltraHot Plus Operation and installation instructions

STIEBEL ELTRON

STIEBEL ELTRON UltraHot Plus Operation and installation instructions

Bobrick B-828 troubleshooting guide

Bobrick

Bobrick B-828 troubleshooting guide

DAN DRYER 282 installation guide

DAN DRYER

DAN DRYER 282 installation guide

Essity Tork 473208 manual

Essity

Essity Tork 473208 manual

CBS SD300BU-88 COMPONENT MAINTENANCE MANUAL WITH ILLUSTRATED PARTS LIST
CBS

CBS SD300BU-88 COMPONENT MAINTENANCE MANUAL WITH ILLUSTRATED PARTS LIST
Sealey MK77 manual

Sealey

Sealey MK77 manual

Fluid Management Accutinter 1600 End user guide

Fluid Management

Fluid Management Accutinter 1600 End user guide

Franke DVS SD99-010 Installation and operating instructions

Franke

Franke DVS SD99-010 Installation and operating instructions

Graco Dispensit 1053-10C operation & maintenance

Graco

Graco Dispensit 1053-10C operation & maintenance

DPR SED02 user manual

DPR

DPR SED02 user manual

ITALTINTO i50 user manual

ITALTINTO

ITALTINTO i50 user manual

Coca-Cola FREESTYLE 9000 user guide

Coca-Cola

Coca-Cola FREESTYLE 9000 user guide

Hewi 805.06.150 Mounting instructions

Hewi

Hewi 805.06.150 Mounting instructions

manuals.online logo
manuals.online logoBrands
  • About & Mission
  • Contact us
  • Privacy Policy
  • Terms and Conditions

Copyright 2025 Manuals.Online. All Rights Reserved.

0810 IH-2590PAGE 1 OF 3
1-800-295-5510
uline.com
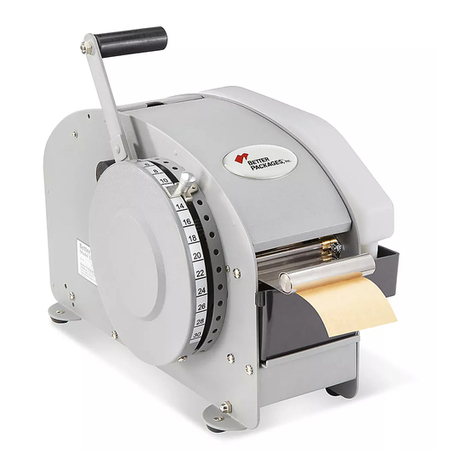
HEAVY DUTY AUTOMATIC
TAPE DISPENSER
H-2590
1. When using automatic feed, remove the first piece
of tape. The unit will automatically feed and cut the
next piece at the preset length.
2. Feed length can be easily set using thumbwheel
controls.
3. Hold down shaft increases accuracy by maximizing
tape adhesion to the feed rollers.
4. The blade is easy to remove and replace.
5. Optional serrated blade for hard to cut materials.
6. Tape Length Display – Shows preset feed length.
Four-digit display can be set from 50-9999mm
(2" - 393").
7. Interval Knob – Sets delay time before dispensing
next piece.
8. Auto/Manual Switch – Toggles operating mode
between manual (press tape advance button
to dispense) and auto (automatic feed and cut
when piece is removed).
9. Power Switch – Press to turn power on and off.
10. Tape Advance Button – Press to feed and cut one
piece of tape to the preset length.
11. Hold Down Shaft – Increases adhesion to feed roller.
12. Reel Holder – 3" core to hold material.
13. Alarm – Lights when there is a malfunction in the unit.
FEATURES
REEL HOLDER
TAPE ADVANCE BUTTON
POWER SWITCH
ALARM
HOLD DOWN SHAFT
(UNDER TOP COVER)
MODE SELECTION
(MANUAL, AUTO & INTERVAL)
TAPE LENGTH DISPLAY
INTERVAL KNOB
0810 IH-2590PAGE 2 OF 3
1. After tape has been loaded and fed, turn power
switch off.
2. Set tape length display to required length using the
push buttons above and below the
numerical display.
NOTE: The length shown is in millimeters.
3. Flip auto/manual switch to desired location.
4. AUTO: When the cut piece of tape is removed from
the machine, the next piece is automatically fed
and cut. The interval knob will set the time delay
before the next piece is dispensed. Maximum delay
is 25 seconds.
5. MANUAL: The tape advance button must be pressed
each time a piece of tape is needed.
6. The tape will then be fed and cut.
7. Turn power switch on.
8. Press tape advance button to begin dispensing
tape.
NOTE: Tape lengths vary depending on
material. Verify length of first piece.
1. With power switch off, plug power cord into
dispenser and then into wall outlet.
2. Make sure machine is grounded properly.
3. Set the tape length display to 200mm.
4. Set the auto/manual switch to manual.
5. Turn dispenser power switch on, switch will be
illuminated.
6. Place tape roll on reel holder.
7. Put reel holder into reel holder slots.
8. Open latched top cover and remove metal hold
down shaft.
9. Press end of tape firmly onto metal feed roller, then
replace hold down shaft over tape and close top
cover.
10. Press tape advance button.
11. Remove tape then press tape advance button
again to ensure proper feeding.
SET-UP
OPERATION
SPECIFICATIONS
MODEL
#
TAPE
WIDTH
CUT
LENGTH
MAX.
OUTSIDE
DIAMETER
CORE
DIAMETER**
ACCURACY
OF CUT
*
TAPE
CUTTER
FEED
TYPE
LENGTH
SETTING WEIGHT DIMENSIONS
TDA080 .25 to 3.15"
(6.4 to 8.0mm)
2 to 394"
(50 to 9999mm)
9"
(251mm)
3"
(76.2mm)
+/- 0.4"
(1mm) Automatic Automatic Digital 21lbs.
(9.5kg)
9"(L) x 6.625"(W) x 12"(H) /
229mm(L) x 168mm(W) x 305(H)
• Auxiliary stand available for diameters up to 24”.
* Dependent on material.
** Other sizes available.
0810 IH-2590PAGE 3 OF 3
When problems occur, carry out the following procedures. If the tape dispenser does not operate normally after
following the troubleshooting procedures, contact your supplier.
WEEKLY
Wipe feed rollers and blade with proper solvent to
remove adhesive build-up.
MONTHLY
Apply silicone oil to #242 blade roller. Inspect pressure
rollers and cutting blade for wear.
TROUBLESHOOTING
MAINTENANCE
OPERATING ISSUE RECOMMENDATIONS
No power light / tape does not feed. Unplug unit and plug in again.
Turn power switch off, wait 5 seconds, turn unit back on.
Check that front panel is closed securely, and safety
interlock is engaged.
Verify that the fuse has not blown.
Check that Tape Length Display is 40mm or greater.
Tape does not feed when unit is in
auto mode.
Check that Auto/Manual Switch is in correct position.
Turn Interval Knob all the way counterclockwise.
Wait 1 full second after tape is cut before removing
tape from machine.
Blade sticks in closed position Apply silicon oil to #242 Blade Roller.
CHICAGO • ATLANTA • DALLAS • LOS ANGELES • MINNEAPOLIS • NYC/PHILA