manuals.online logo
Brands
  1. Home
  2. •
  3. Brands
  4. •
  5. U-Line
  6. •
  7. Food Saver
  8. •
  9. U-Line H-1250 User manual

U-Line H-1250 User manual

Page 1 of 3 0714 IH-1250
1- 800-295-5510
uline.com
Foot-operated
Impulse sealer
H-1250
SAFETY
1. Read all instructions before use and save these
instruction for later use.
2. Follow all warnings and instructions marked on
the product.
3. Unplug this product from the power source before
cleaning and/or changing any parts.
4. Do not rest anything on the power cord. Do not
place the machine where the power cord may be
stepped on or pulled.
5. Always keep out of reach of children and pets.
6. This sealer should only be in use with an operator in
attendance.
7. Never insert clothing, hand or fingers between the
sealing jaws of sealers or into the feed opening of
continuous sealers.
8. Never touch the heating elements with bare hands
while the sealer is plugged into a power source, in
operation, or just finished operation. It is HOT.
9. Be sure to check for worn parts before starting
operation.
10. Do not operate with a damaged power cord or plug.
11. Always keep the unit clean. Do not use water.
Silicone spray may be used to clean the unit. Be
sure the unit is unplugged from the power source
before cleaning.
12. When changing blade (for sealer with cutter), be
careful of the sharp edge.
13. When changing the Teflon adhesive, be sure that
the entire surface under the heating element is
covered with Teflon adhesive. Bend down the excess
Teflon adhesive on both ends. This will prevent the
heating element from breaking and the machine
from grounding.
14. When replacing fuse, be sure the exact voltage and
ampere is used.
15. Be sure to keep a record of your model number.
Specify this number when ordering
16. When replacing any parts, be sure to mark down the
exact locations of the connections, and the orders
of the different pieces.
WARNING! Never connect the sealer’s
power cord to outlet during assembly.
Page 2 of 3 0714 IH-1250
NOTE: Before operating, check the heater
(heating element), Teflon cover, Teflon
adhesive, and the sealing pad (silicon rubber).
1. Insert the Power Cord into the correct receptacle (110V).
2. Turn the power switch ON.
3. Set the timer knob to lowest setting. Always start with
a low setting and increase gradually. Thicker bags
need a higher setting.
4. Place the end of the bag under the sealing arm
and press the pedal down gently, but firmly. Hold for
2-3 seconds. The red light will go out when sealing
time is complete.
a. If the seal is broken or damaged, decrease the
sealing time.
b. If the seal is not fully welded, increase the
sealing time.
c. If the sealing material sticks to the sealing pad,
decrease the congealing time.
d. If the width of the seal is not perfect or does
not match the size of the element, increase the
congealing time. (Congealing time is necessary
for sealing.)
5. When red light goes out, keep pressing the pedal for
2-3 seconds.
NOTE: Must wait until congealing time is up.
6. Release the Pedal.
ADDITIONAL INFORMATION
1. Always keep the sealer clean. Remove any residue
found on the platform and Teflon cover. Silicon spray
may be used for this purpose.
2. When replacing the heating elements, always check
the condition of the bottom Teflon tape.
3. A worn Teflon Adhesive can cause the heating
element to break. Use only Thermoelectric wire of
the identical specifications.
4. Occasionally check the condition of the silicon
rubber for wear or burns. A damaged silicon rubber
will affect the quality of the seal.
5. Be sure to turn OFF the power or unplug before
replacing any parts.
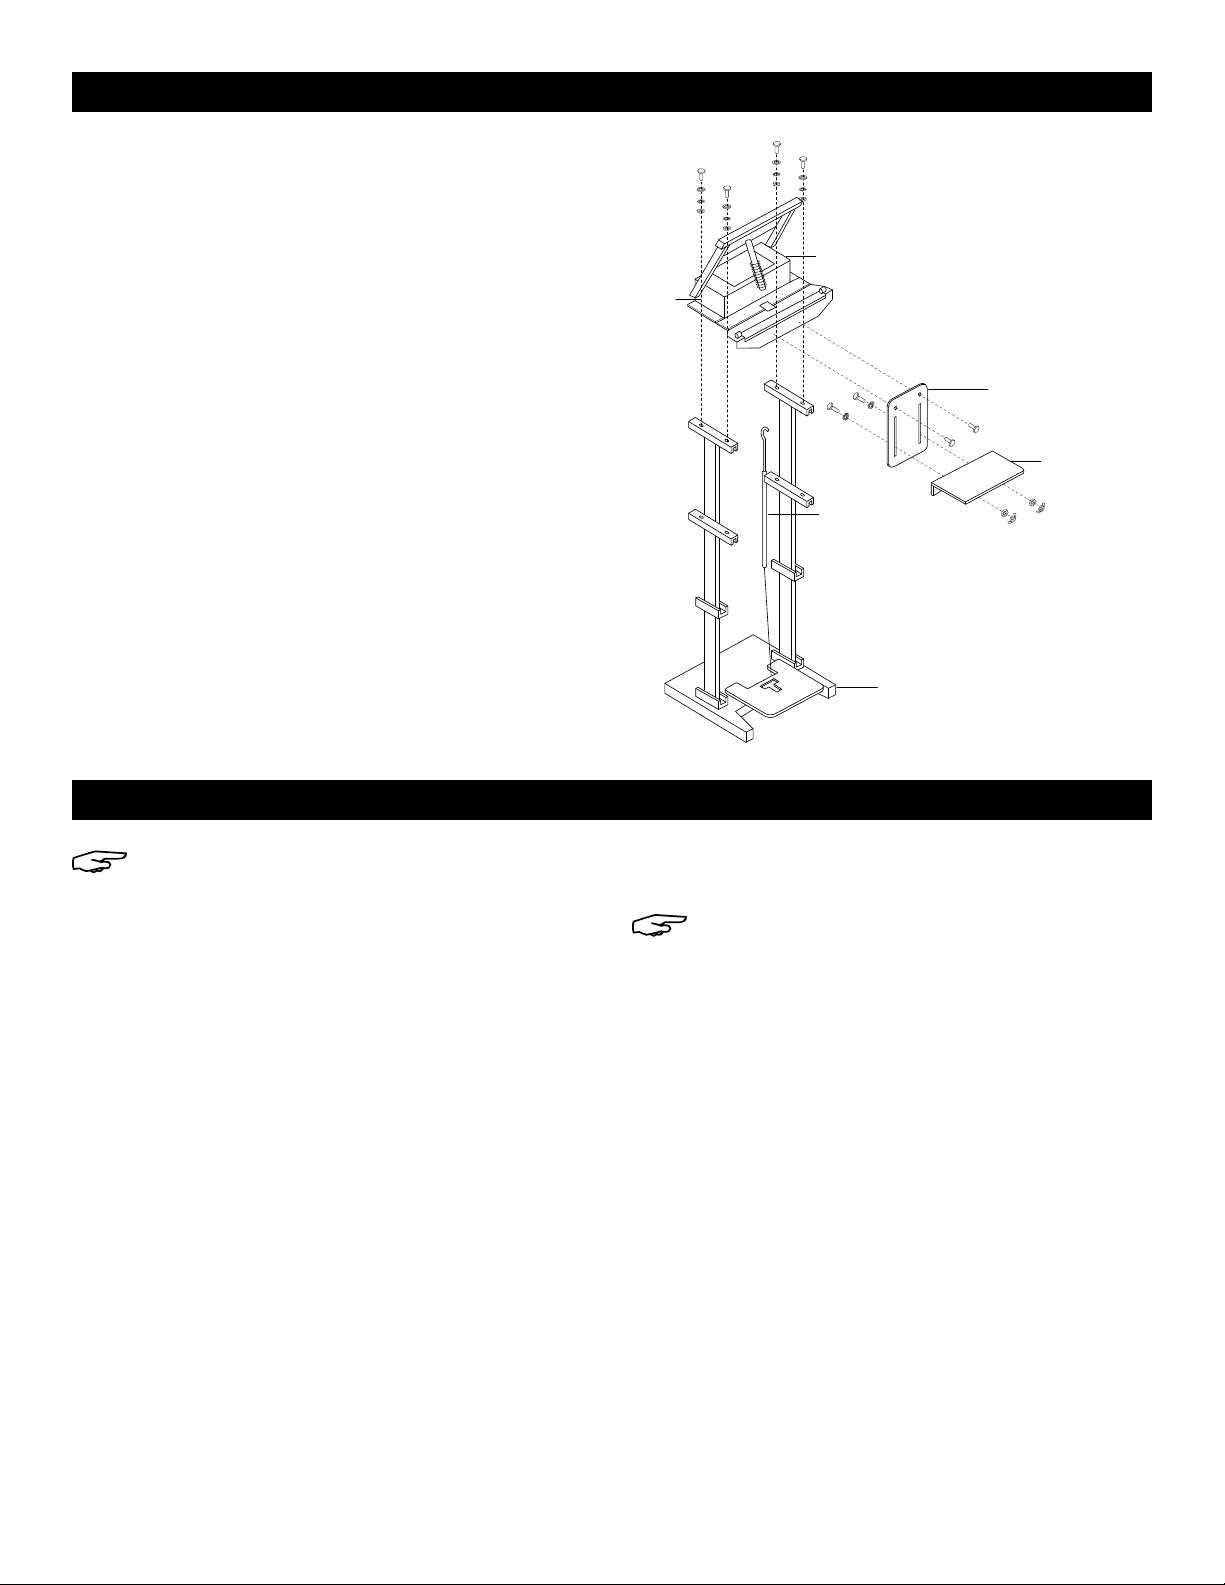
1. Position the pedestal on the floor standing upright.
2. Mount the complete sealer assembly to the top of
the pedestal and attach with four screws.
3. Position spring under the sealer’s upper level. The
pull-rod goes through the spring and is fastened to
the upper level.
4. With foot pedal metal rod in hand, gently push
down upper jaw to meet with lower jaw. While jaws
are compressed, reach under unit and hook the
metal foot pedal rod into the bottom of the spring
bar where the 1/2" hole is exposed.
5. With jaws still compressed, lift up the foot pedal to
45˚ angle and slide the metal foot pedal rod into
one of two pre molded slots. This will create tension
on the foot pedal and cause the pedal to stand
upright at 45˚.
6. Sealer is now ready to be used.
TO INSTALL OPTIONAL WORKING TRAY AND COVER
1. Remove center screws from bottom sealing jaw.
2. Install the working plate set A & B as shown.
OPERATION
ASSEMBLY
Control Set
Sealer
Assembly
Working Tray
Pull Rod
Working Plate
Pedestal
Page 3 of 3 0714 IH-1250
TROUBLESHOOTING
Most sealers work on the principle that when the sealing
arm is pressed down, it activates a microswitch which
allows electric current to pass through the heating
element (wire).
The timer automatically controls the sealing time. If there
is no timer, then the sealing time is manually controlled.
Sealing is followed by cooling (the amount of time
needed for the seal to set). This affects the beauty of
the seal. In manual operation, this is dependent on how
long the sealing arm is pressed after the pilot light goes
off. In the automatic operation, this is the
congealing time.
OPERATING ISSUE CAUSES RECOMMENDATIONS
Not sealing. Disconnected plug. Check or change the plug.
Not sealing.
Power lamp is on.
Heater (heating element) is broken.
Spring hook or mounting spring is loose or
poorly connected.
Replace the heater.
Replace or tighten spring hook
connection.
Sealing lamp is on. Loose or poor contact. Terminals and
heating element are poorly connected.
Clean the terminals and adjust if needed.
Teflon cloth burnt. Timer malfunction prolonged heating time. Replace timer or decrease the timer
setting.
Heating wire broken. Worn Teflon adhesive under the element. Replace Teflon adhesive.
Seal is wrinkled. Heating timer is set too high or cooling time
is not enough.
Lower the timer setting.
Continue pressing the upper leveler for 1-2
seconds after the pilot light goes off.
Imperfect sealing. Worn Teflon cloth. Worn silicon rubber. Replace the Teflon cloth. Replace the
silicon rubber.
Broken seal. Prolonged sealing time. Decrease timer setting.
Not fully welded
seal. Sealing time too short. Increase sealing time.
Seal is sticking. Dirty Teflon cloth. Dirty silicone rubber. Clean the Teflon cover. Clean the silicon
rubber.
π CHICAGO • ATLANTA • DALLAS • LOS ANGELES • MINNEAPOLIS • NYC/PHILA • SEATTLE • MEXICO • CANADA
1-800-295-5510
uline.com

Other manuals for H-1250

1

Other U-Line Food Saver manuals

U-Line H-1256 User manual

U-Line

U-Line H-1256 User manual

U-Line FOODSAVER H-3404 User manual

U-Line

U-Line FOODSAVER H-3404 User manual

U-Line H-1254 User manual

U-Line

U-Line H-1254 User manual

U-Line H-173 User manual

U-Line

U-Line H-173 User manual

U-Line H-4015 User manual

U-Line

U-Line H-4015 User manual

U-Line H-86 User manual

U-Line

U-Line H-86 User manual

U-Line FOODSAVER FM 5200 User manual

U-Line

U-Line FOODSAVER FM 5200 User manual

U-Line H-2065 Instruction manual

U-Line

U-Line H-2065 Instruction manual

U-Line H-1250 User manual

U-Line

U-Line H-1250 User manual

U-Line H-6705 Instruction manual

U-Line

U-Line H-6705 Instruction manual

U-Line H-1069 User manual

U-Line

U-Line H-1069 User manual

U-Line H-529 User manual

U-Line

U-Line H-529 User manual

U-Line DELUXE H-779 User manual

U-Line

U-Line DELUXE H-779 User manual

U-Line H-1069C User manual

U-Line

U-Line H-1069C User manual

U-Line H-86 User manual

U-Line

U-Line H-86 User manual

U-Line H-161 User manual

U-Line

U-Line H-161 User manual

U-Line H-161 User manual

U-Line

U-Line H-161 User manual

U-Line H-57 Instruction Manual

U-Line

U-Line H-57 Instruction Manual

U-Line H-2378 Delux User manual

U-Line

U-Line H-2378 Delux User manual

U-Line H-1069 User manual

U-Line

U-Line H-1069 User manual

U-Line H-161 User manual

U-Line

U-Line H-161 User manual

U-Line H-1069 User manual

U-Line

U-Line H-1069 User manual

U-Line H-8013 User manual

U-Line

U-Line H-8013 User manual

U-Line H-243 User manual

U-Line

U-Line H-243 User manual

Popular Food Saver manuals by other brands

FoodSaver FS1000 Series owner's manual

FoodSaver

FoodSaver FS1000 Series owner's manual

FoodSaver V1085 quick start

FoodSaver

FoodSaver V1085 quick start

B&G 603 Parts List & Maintenance Manual

B&G

B&G 603 Parts List & Maintenance Manual

3M 3M-Matic 800asb Instructions and parts list

3M

3M 3M-Matic 800asb Instructions and parts list

Princess 492966 User instructions

Princess

Princess 492966 User instructions

Avid Armor A100 user manual

Avid Armor

Avid Armor A100 user manual

Braukmann CASO DESIGN VC15 Original operating manual

Braukmann

Braukmann CASO DESIGN VC15 Original operating manual

SOLIS EASYVAC PRO BLACK quick start guide

SOLIS

SOLIS EASYVAC PRO BLACK quick start guide

Rx Systems AutoSealer 1002 user guide

Rx Systems

Rx Systems AutoSealer 1002 user guide

Hyundai BS 221 instruction manual

Hyundai

Hyundai BS 221 instruction manual

Maxima 09501000 user manual

Maxima

Maxima 09501000 user manual

CASO DESIGN VacuChef 50 instruction manual

CASO DESIGN

CASO DESIGN VacuChef 50 instruction manual

FoodSaver Vacuum Sealing System user manual

FoodSaver

FoodSaver Vacuum Sealing System user manual

3M Matic 700r-s Instructions and parts list

3M

3M Matic 700r-s Instructions and parts list

3M 40800 Instructions and parts list

3M

3M 40800 Instructions and parts list

Menuett 802-559 operating instructions

Menuett

Menuett 802-559 operating instructions

G.Mondini TRAVE-350 Technical documentation

G.Mondini

G.Mondini TRAVE-350 Technical documentation

M. J. MAILLIS GROUP SIAT SK20 Operation and maintenance manual

M. J. MAILLIS GROUP

M. J. MAILLIS GROUP SIAT SK20 Operation and maintenance manual

manuals.online logo
manuals.online logoBrands
  • About & Mission
  • Contact us
  • Privacy Policy
  • Terms and Conditions

Copyright 2025 Manuals.Online. All Rights Reserved.