-2-
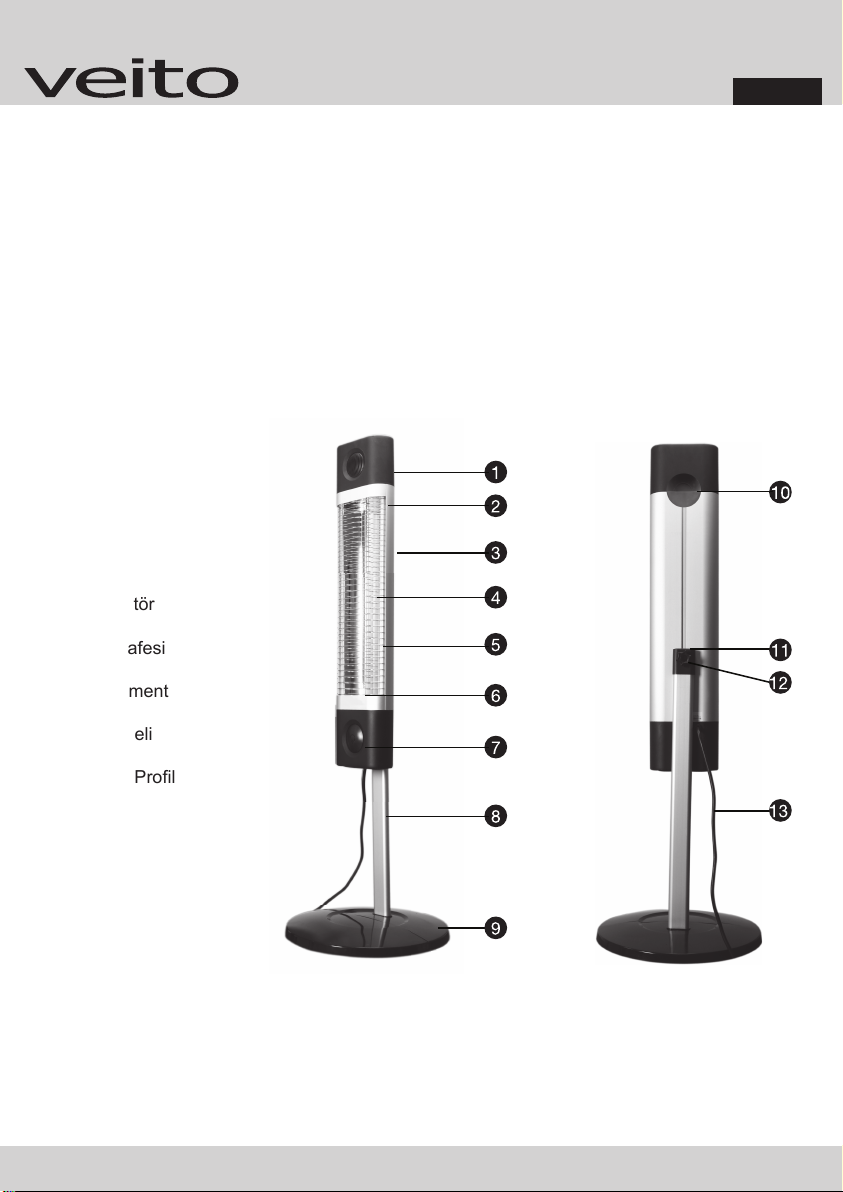
Karbon Infrared Isıtıcı
• Veito karbon infrared ısıtıcıyı tercih ettiğiniz için teşekkür ederiz. Lütfen ısıtıcınızı kullanmadan önce
talimatların tamamını dikkatlice okuyunuz.
• Talimatları okuduktan sonra, bütün kullanıcıların ulaşabileceği bir yerde muhafaza ediniz.
• Verilen talimatlar doğru uygulanmadığı takdirde oluşabilecek zararlardan firmamız sorumlu değildir.
• Bu ürün sekiz yaş ve üzerinde herhangi bir fiziksel, duygusal ve zihinsel yetersizliği bulunmayan
kişilerin, sadece kullanım koşullarını yeterince anlaması durumunda kullanıma uygundur.
Güvenlik Önlemleri
Bu önlemler kullanıcıların elektrikli aletleri kullanırken yangın, elektrik çarpması ve kişisel yaralanma
riskini azaltmak için düzenlenmiştir. Bu güvenlik önlemlerini okuduğunuza ve ürünü doğru şekilde
kullandığınıza emin olunuz:
Isıtıcıyı monte etmeden ve kullanmadan önce talimatların tamamını okuyunuz.
Bu ısıtıcı 220-240VAC 50/60Hz besleme geriliminde çalıştırılmak üzere tasarlanmıştır.
Bu ısıtıcıyı sadece bu kılavuzda belirtildiği gibi kullanın. Üretici tarafından önerilmeyen her türlü
kulanım yangına, elektrik çarpmasına veya kişisel yaralanmalara neden olabilir.
Bu ürün, fiziksel, duyumsal ya da zihinsel engelli veya deneyimsiz ve/veya deneyim eksikliği olan
kişilerin (çocuklar da dahil) kullanmaları için tasarlanmamıştır. Bu kişiler bu ürünü sadece
emniyetlerinden sorumlu bir kişinin denetimi altında veya bu kişiden ürünün nasıl çalıştırılacağı ile
ilgili talimat almaları durumunda kullanabilirler.
Çocuklar, cihaz ile oynamadıklarından emin olmak için gözetim altında bulundurulmalıdır.
Isıtıcının güvenlik kafesi ısıtma elemanlarına direkt erişimi önlemek amacıyla tasarlanmıştır ve ısıtıcı
kullanımda iken yerinde olmalıdır.
Güvenlik kafesi küçük çocuklar ve sakat kişiler için tam koruma sağlamaz.
Herhangi bir yanıcı/patlayıcı sıvı veya gaz ısıtıcının etrafında bırakılmamalı ya da ısıtıcının yakınında
kullanılmamalıdır.
Kullanmadan önce hem fişin hem de prizin temiz ve tozsuz olduğundan emin olun.
Güç kablosunda ve fişte aşınma veya hasar olup olmadığını düzenli aralıklarla kontrol edin ve hasarlı
güç kablosu, fiş ya da gevşek prizleri kesinlikle kullanmayınız ve asla elektrik kablosuna ek yapmayın.
Herhangi bir şekilde ısıtıcı arızalanmışsa, düşmüşse ya da hasar görmüşse kesinlikle çalıştırmayın.
Isıtıcının fişini prizden çıkarmak için ısıtıcıyı kapatın, fişi kavrayın ve prizden çekin. Fişi prize takarken
ya da prizden çıkarırken uygun biçimde tuttuğunuzdan emin olun. Asla fişe ıslak elle dokunmayın ve
ısıtıcıyı kablosundan asılarak çekmeyin.
TR