Vendors Exchange BEVMAX User manual

1
INSTALLATION GUIDE
R
BEVMAX MEDIA HANG
VE1021164 - BEVMAX - MEDIA PANEL INSTALLATION MANUAL
R
www.veii.com
1.800.321.2311
8700 BROOKPARK ROAD
CLEVELAND, OHIO 44129

2
INSTALLATION GUIDE
TABLE OF CONTENTS
Disassembly / Assembly Process for BevMax Media
R
REMOVE DOOR
STEP 1. REMOVE EXISTING PAYMENT SYSTEMS.............................................. 5
STEP 2. REMOVE OEM DELIVERY PORT ............................................................... 5
STEP 3. REMOVE OLD HARNESSING .................................................................... 6
STEP 4. REMOVING OEM DOOR.............................................................................. 6
STEP 5. MOUNT NEW CONTROLLER & NEW DOOR HINGE .......................... 6
INSTALL NEW DOOR
STEP 1. SECURE BEVMAX - MEDIA DOOR.......................................................... 7
STEP 2. INSTALL PAYMENT SYSTEMS .................................................................. 7
STEP 3. SECURE OEM DELIVERY PORT................................................................. 8
ATTACH HARNESS
STEP 1. INSTALL VENTURE HARNESSING........................................................... 9
STEP 2. INSTALL OTHER HARNESSING ...............................................................
9& 10
DIAGRAMS
STEP 1. CONTROLLER PORTS................................................................................. 11
STEP 2. VENTURE PORTS.......................................................................................... 12
VE1021164 - BEVMAX - MEDIA PANEL INSTALLATION MANUAL
www.veii.com
3
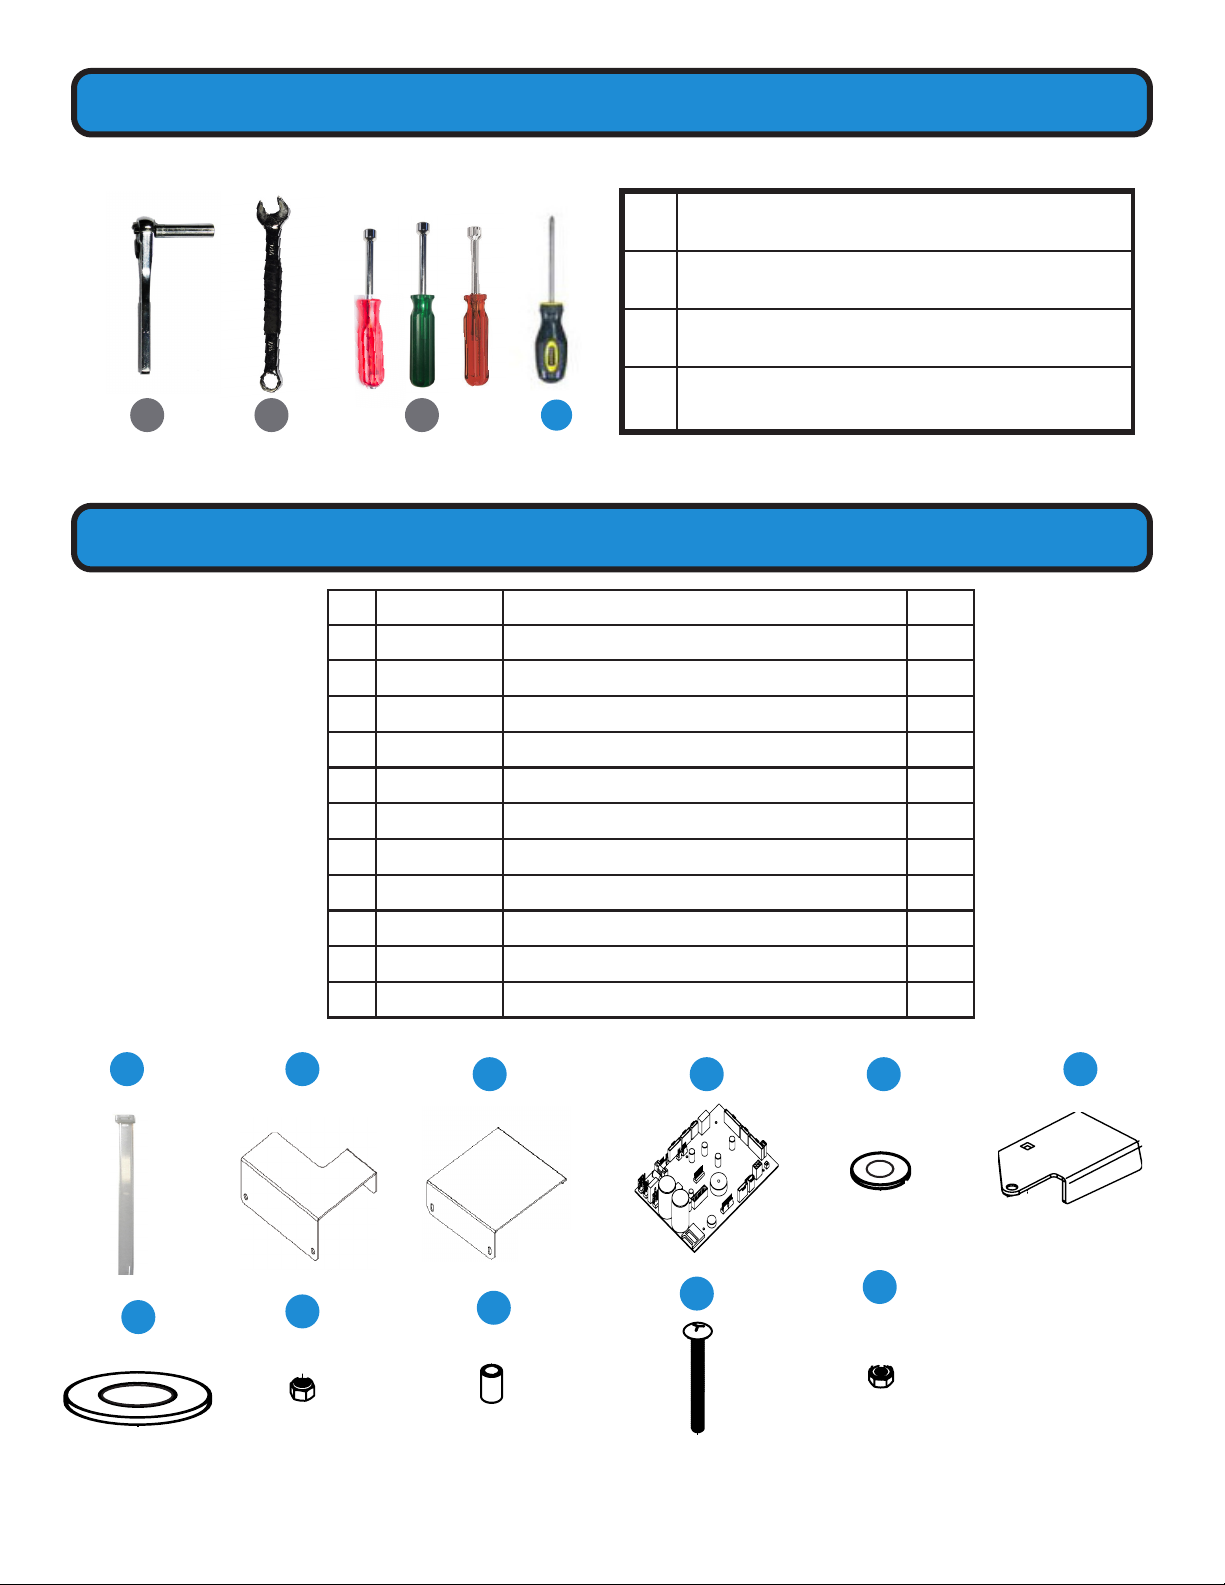
TOOLS REQUIRED
INCLUDED PARTS
A B C D
PART # DESCRIPTION QTY
1
VE4601K CABLE TIE 5
2
VE1019646 SWITCH CONTACT BRACKET 1
3
VE1019552
SWITCH CONTACT BRACKET, BEVMAX 1
4
VE1015694 BEVMAX BOARD 1
5
VE1017455
.313 ID X .75 OD X .066 THK , WASHER 3
6
VE1017933 UPPER PIN HINGE ASSEMBLY 1
7
VE1017457
.688 ID X 1.312 OD X .150 THK , BUSHING 2
8
VE6023M 3
9
VE1017454
5/16 ID 7/16 OD X 11/16 LG, BUSHING 1
10
VE1020754 2
11
VE7358 2
A5/16” SOCKET
B11/32” WRENCH (MIS3043A-combo pack)
C11/32”, 1/4”, 7/16” NUT DRIVERS
DPhillips Screw Driver
VE1021164 - BEVMAX - MEDIA PANEL INSTALLATION MANUAL
www.veii.com
13 4 5 6
89
10 11
2
7
4
4
7
INCLUDED HARNESSES
PART NUMBER HARNESS DESCRIPTION QTY
1VE1017068 MERCHANT RETURN BUTTON 1
2VE6822 MOTION SENSOR HARNESS 1
3VE1019772 VENTURE RS-232 DATA 1
4VE1020737 POWER HARNESS FOR VENTURE BOARD 1
5VE7320 MDB Y CABLE 1
6VE5817 DEX HARNESS FOR UCB 1
7VE1020990 DOOR SWITCH HARNESS FOR BEVMAX 1
8VE1016368 UCB TEMPERATURE SENSOR EXTENSION 1
9VE1015669 TEMPERATURE CABLE WITH PROBE , 4FT 1
1
98
23
56
VE1021164 - BEVMAX - MEDIA PANEL INSTALLATION MANUAL
www.veii.com
5
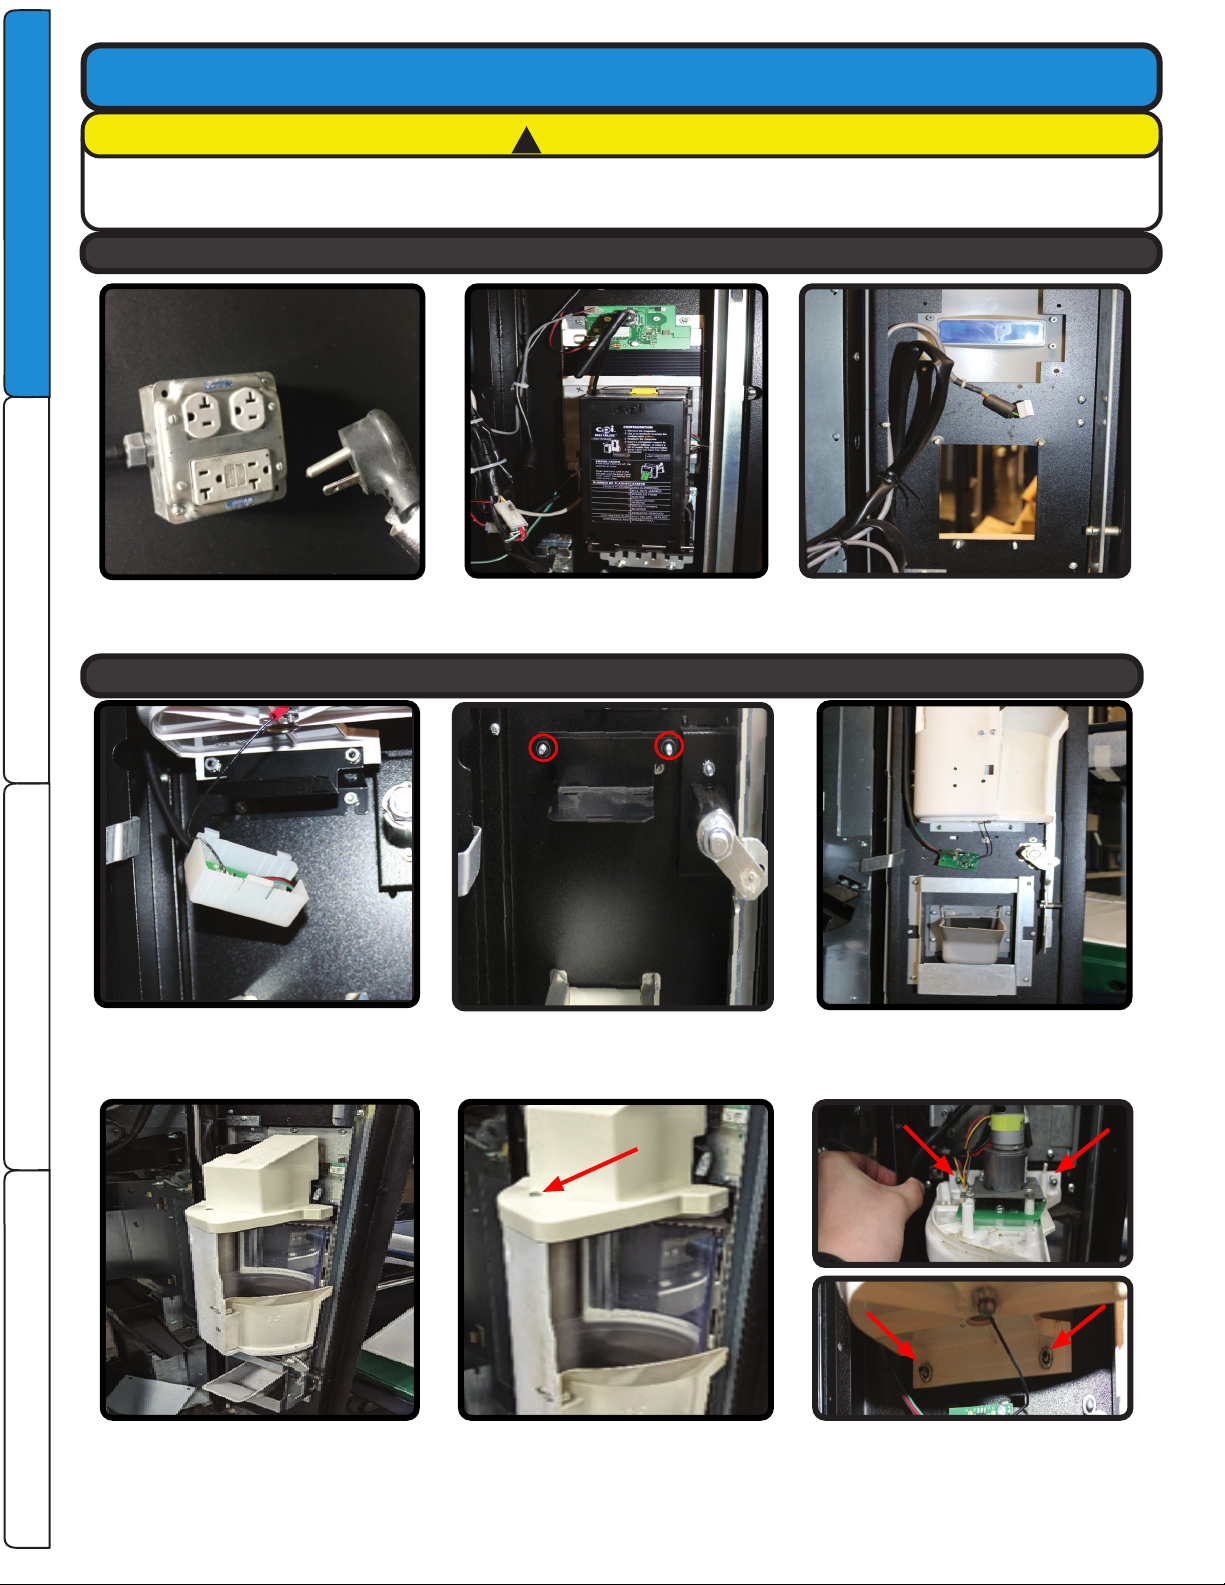
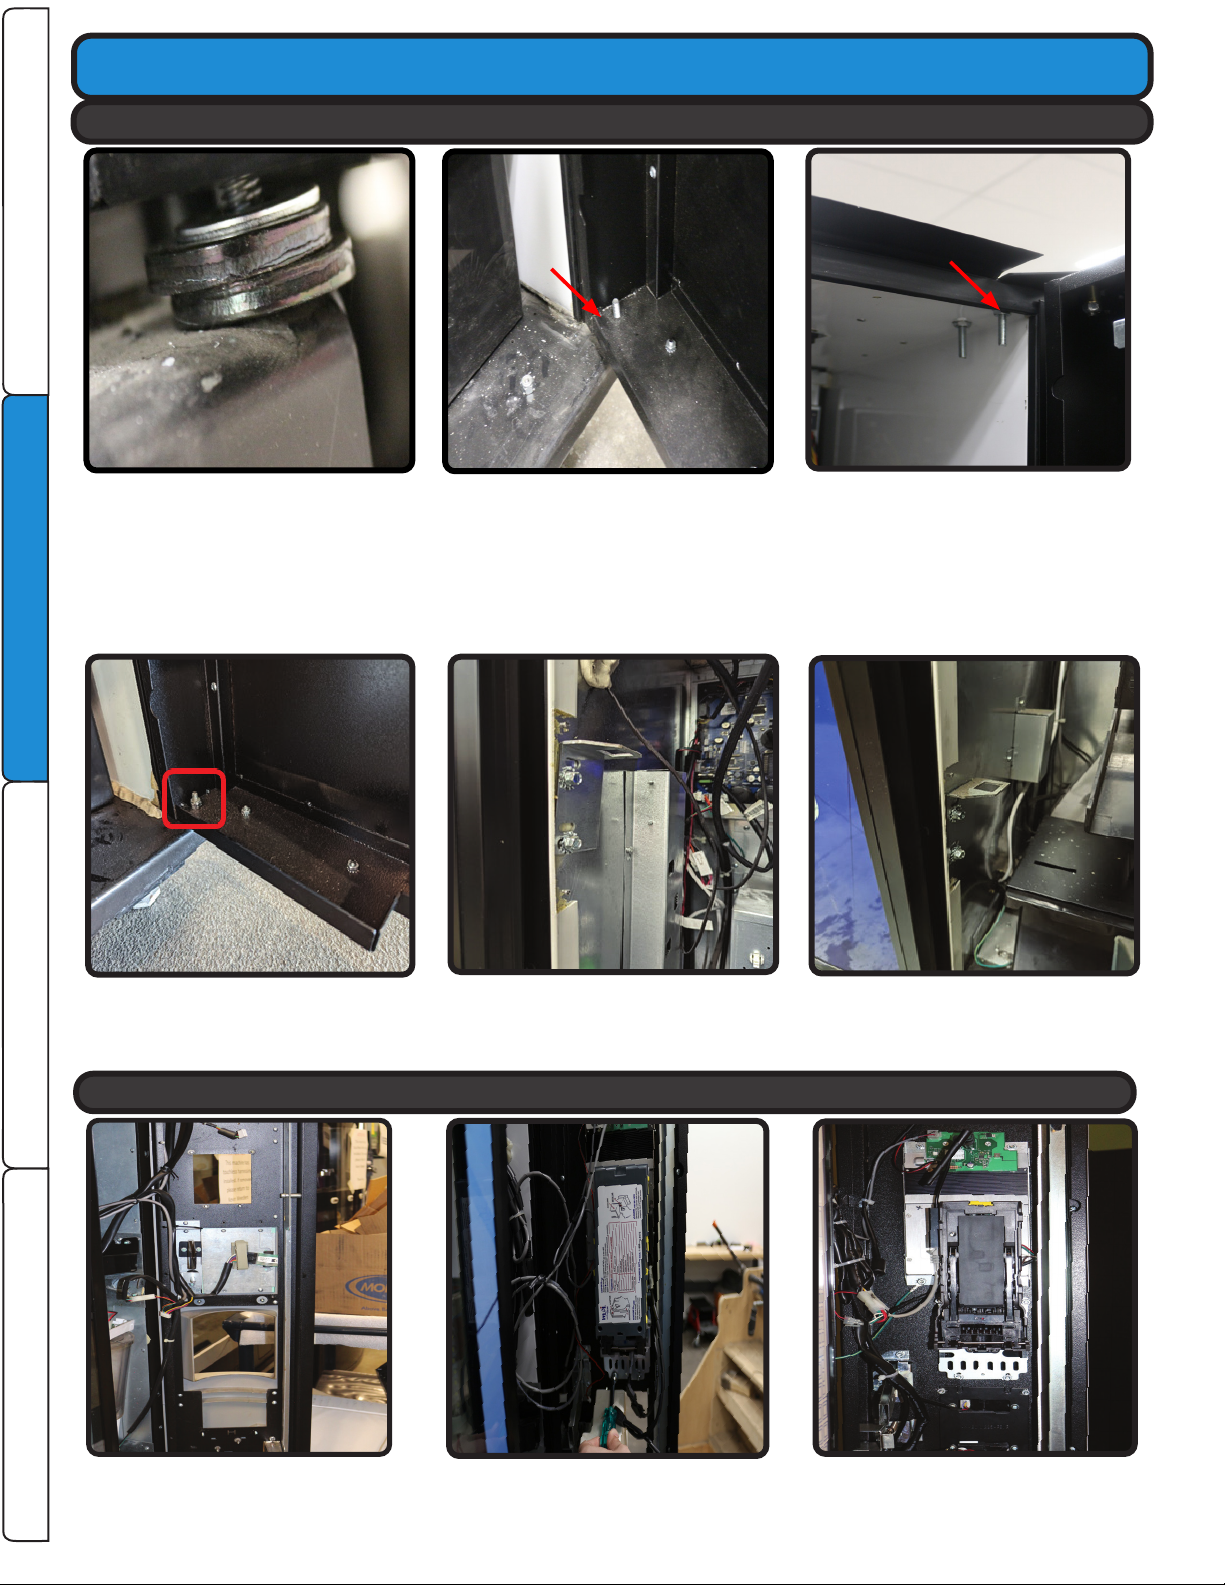
1.A) Unplug machine from power outlet
to prevent electrical shock.
2.B) Remove screw on top of the OEM delivery port marked in the picture above.
Remove the upper housing to reveal the screws that are used to secure the
OEM delivery port to the door.
2.A)electronic housing bracket,
then remove the bracket so that it can be installed later onto the new door.
2.C) Remove the (4) nuts securing the OEM
delivery port to the door. Set aside for
future use.
WARNING
before installing door. Failure to do so could result in electrical shock.
!
!
Step 2: Remove OEM Delivery Port
Step 1: Remove existing Pay Systems
1.B) Disconnect and remove any payment systems currently in the
door, set aside for future use.
REMOVE DOOR
INSTALL DOOR
DIAGRAMS REMOVE DOOR
ATTACH HARNESSES
VE1021164 - BEVMAX - MEDIA PANEL INSTALLATION MANUAL
www.veii.com
6
3.A) Disconnect all Harnesses and the
door to the cabinet.
4.B) Remove the two upper hinge nuts,
then remove the door switch(s) so
it can re-used later.
4.C)
4.A) Remove Lower hinge nut from the
door.
3.B) Disconnect all harnesses from
Controller.
3.C) Remove the OEM Control Board
from the cabinet, retaining the
5.B) Mount the new top hinge (VE1017933) to the curve BevMax panel with Washer
(VE1017455), bushing (VE1017454), and 1/4-20 nut (VE6023M).
5. A) Install the new BevMax control
board (VE1015694) utilizing the
retained hardware.
Step 3: Remove Old Harnessing
Step 4: Removing OEM door
Step 5: Mount New controller & New Door hinge
Remove Door
REMOVE DOOR INSTALL DOOR ATTACH HARNESSES DIAGRAMS
VE1021164 - BEVMAX - MEDIA PANEL INSTALLATION MANUAL
www.veii.com
Could have 2 door switches
or another variation
7
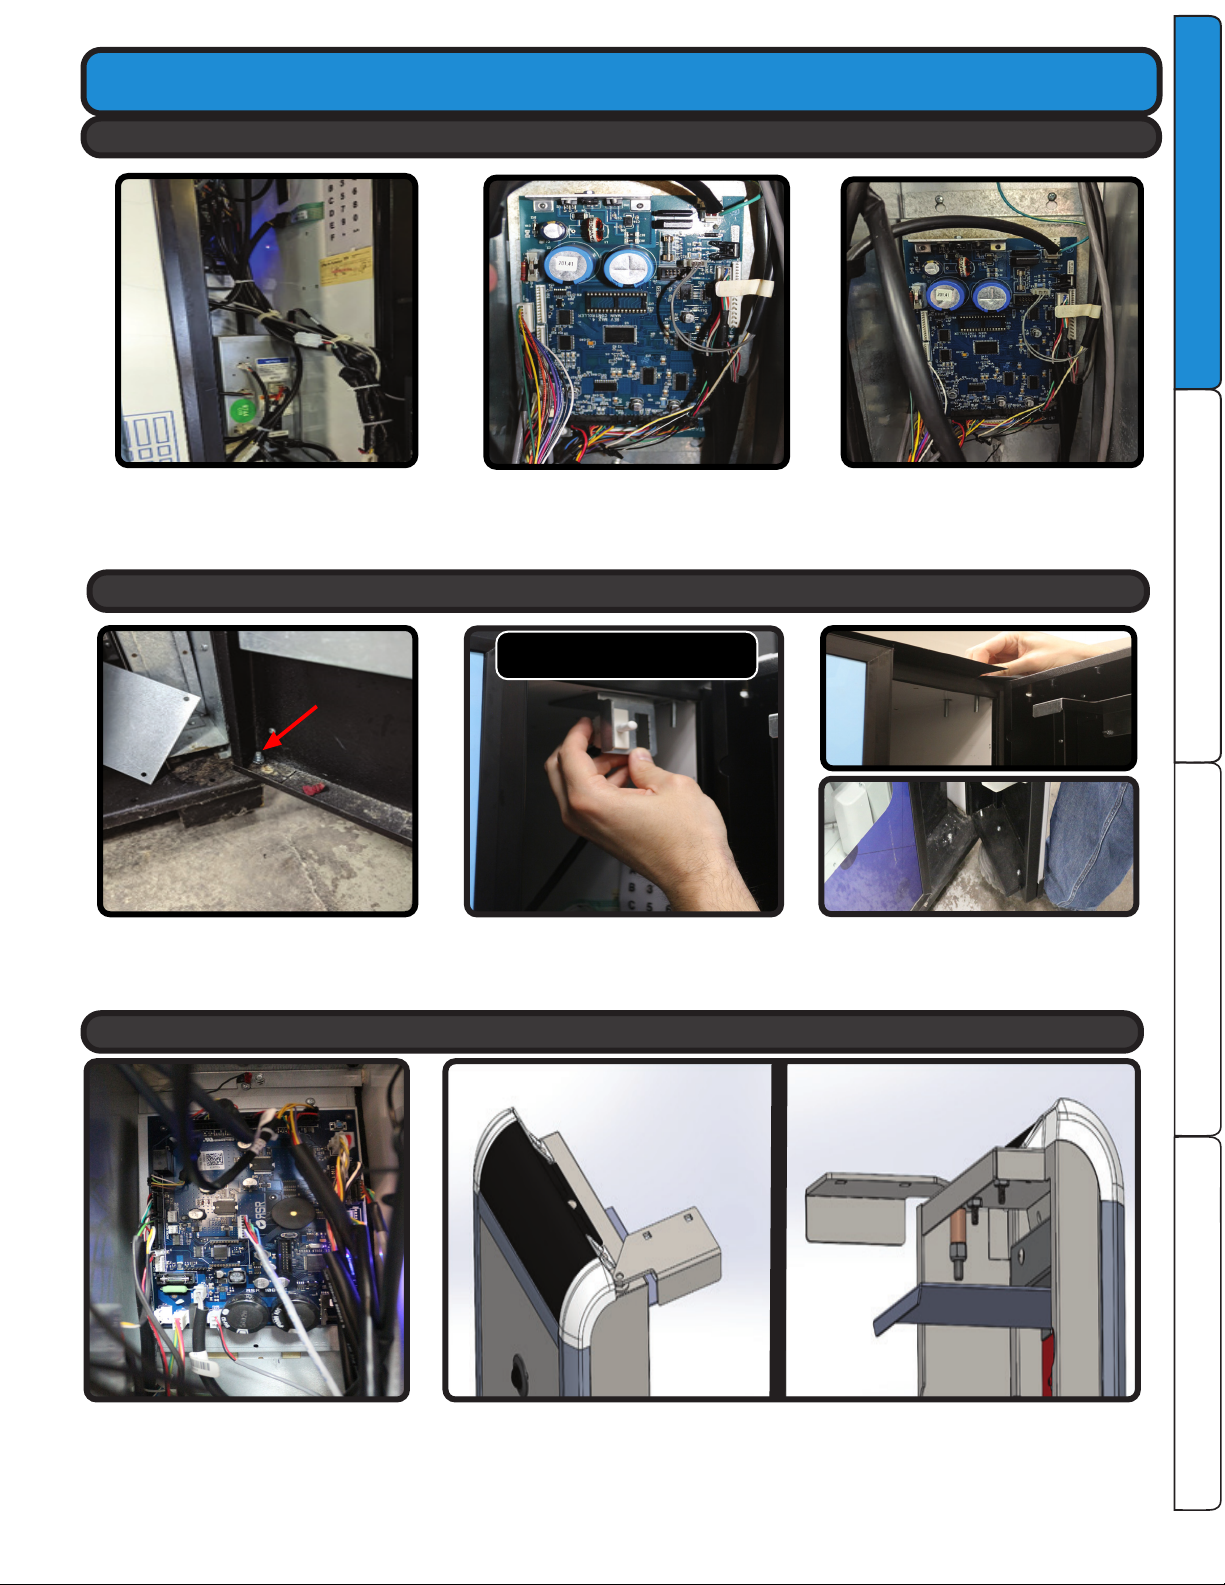
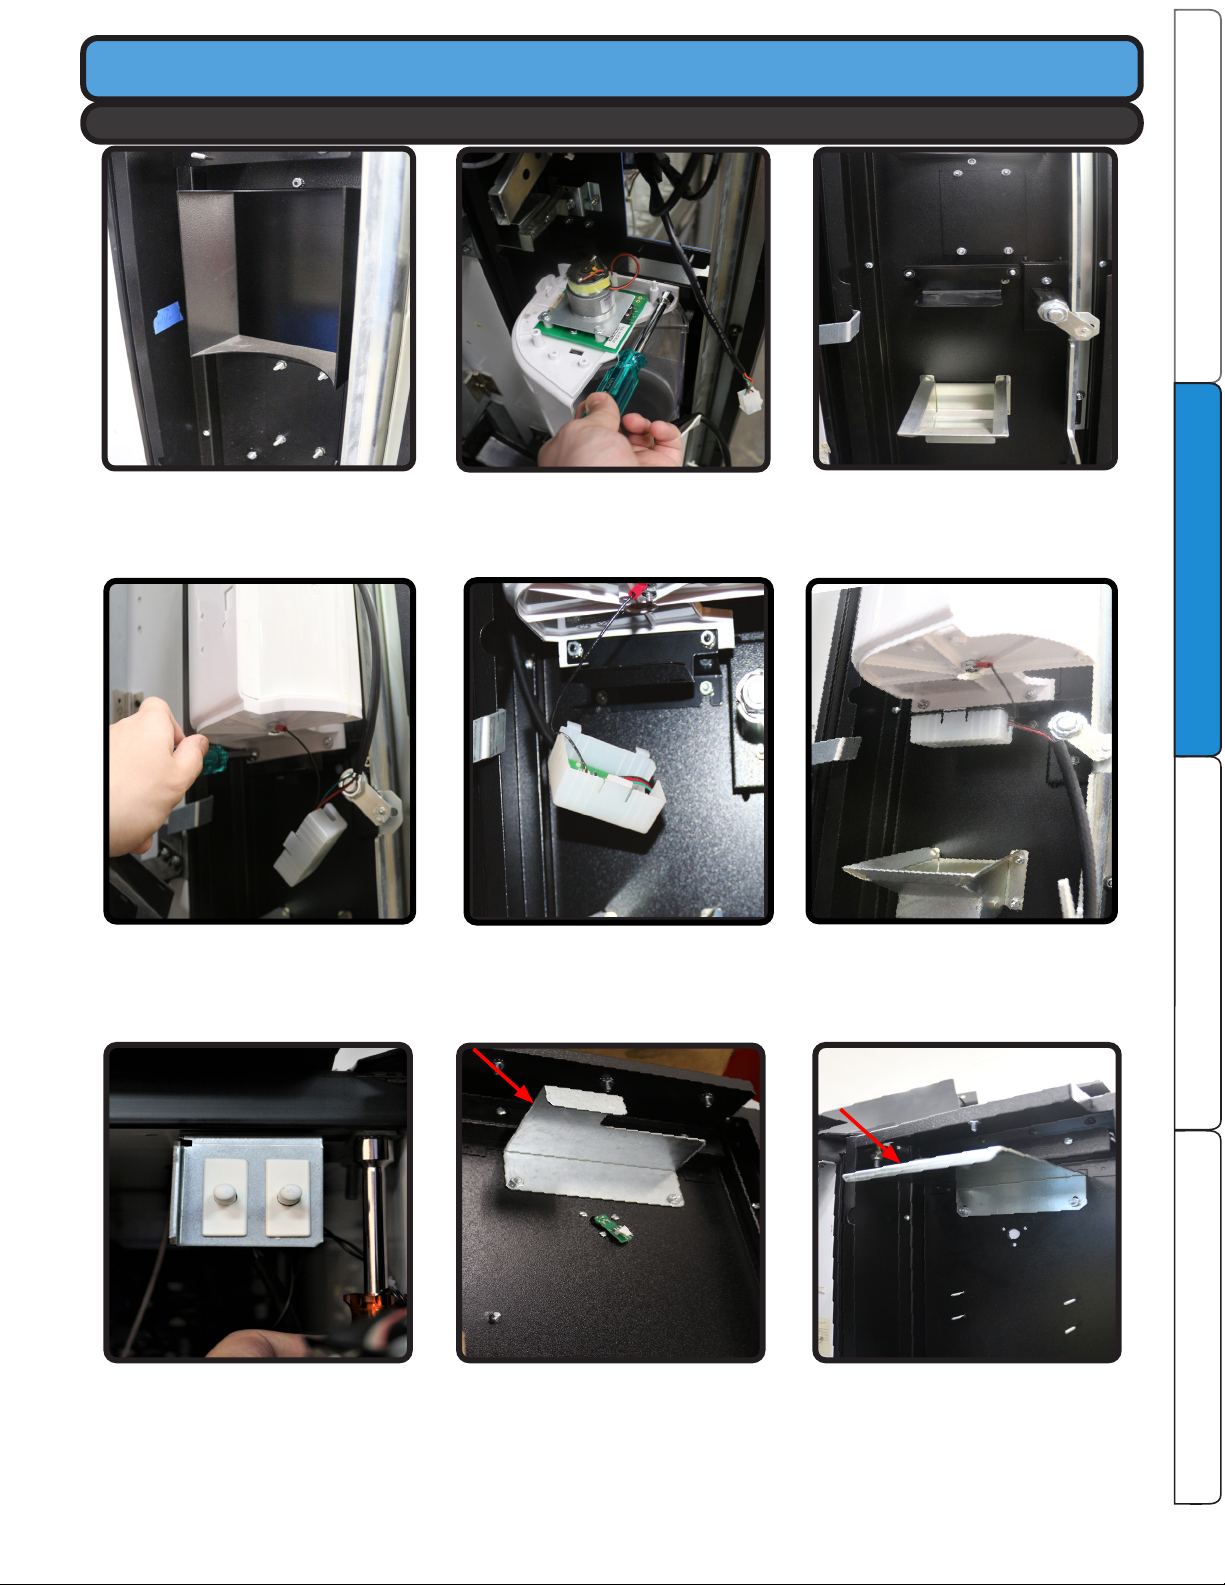
INSTALL NEW DOOR
1.E)
1.A) Place (2) .688 ID x 1.312 OD x.150
THK steel bushings (VE1017457) over
THK washer (VE1017455), will depend
on stud.
1.C) Mount top hinge of the new door to
the cabinet with the (2) 1/4-20 Carriage
Bolts (VE1020754) and (2) 1/4-20 Keps
Nuts (VE7358).
1.B) Place the new curve BevMax panel
1.D)
the included 1/4-20 Hex nut with
nylon insert (VE6023M).
Step 2: Install Payment Systems
Step 1: Secure BevMax- Media Door
2.A)
installing the OEM delivery port, as they sit behind it.
VE1021164 - BEVMAX - MEDIA PANEL INSTALLATION MANUAL
INSTALL DOOR
DIAGRAMS REMOVE DOOR
ATTACH HARNESSES
www.veii.com
8
3.A) Secure the OEM delivery port to the
will be used to secure the Delivery
Port and OEM board.
3.B) Secure the top of the OEM
delivery port to the top delivery
port mount with (2) nuts.
3.C) Secure the turret electronic
housing bracket to the lower
delivery port mount.
INSTALL NEW DOOR
3.D)Secure the bottom of the OEM
delivery port and turret electronic
housing bracket to the bottom
delivery port mount with (2) nuts.
3.F) Secure the door switch(s) and
bracket that were removed earlier
using a 7/16” nut driver. Ensure the
3.H) If the door switch doesnt match
the one in step 3.F , install switch
contact bracket (VE1019552)
instead.
3.G) Verify that the correct Switch contact
bracket is installed. Pictured above is
switch contact bracket (VE1019646)
which corresponds to the door switch in
step 3.F
3.E) Secure the OEM delivery board and cover to the turret electronic housing
bracket. Ensure the exposed wires are nested in the channels so that it will
clip into place and hold.
Step 3: Secure OEM Delivery Port
REMOVE DOOR INSTALL DOOR ATTACH HARNESSES DIAGRAMS
VE1021164 - BEVMAX - MEDIA PANEL INSTALLATION MANUAL
www.veii.com

9
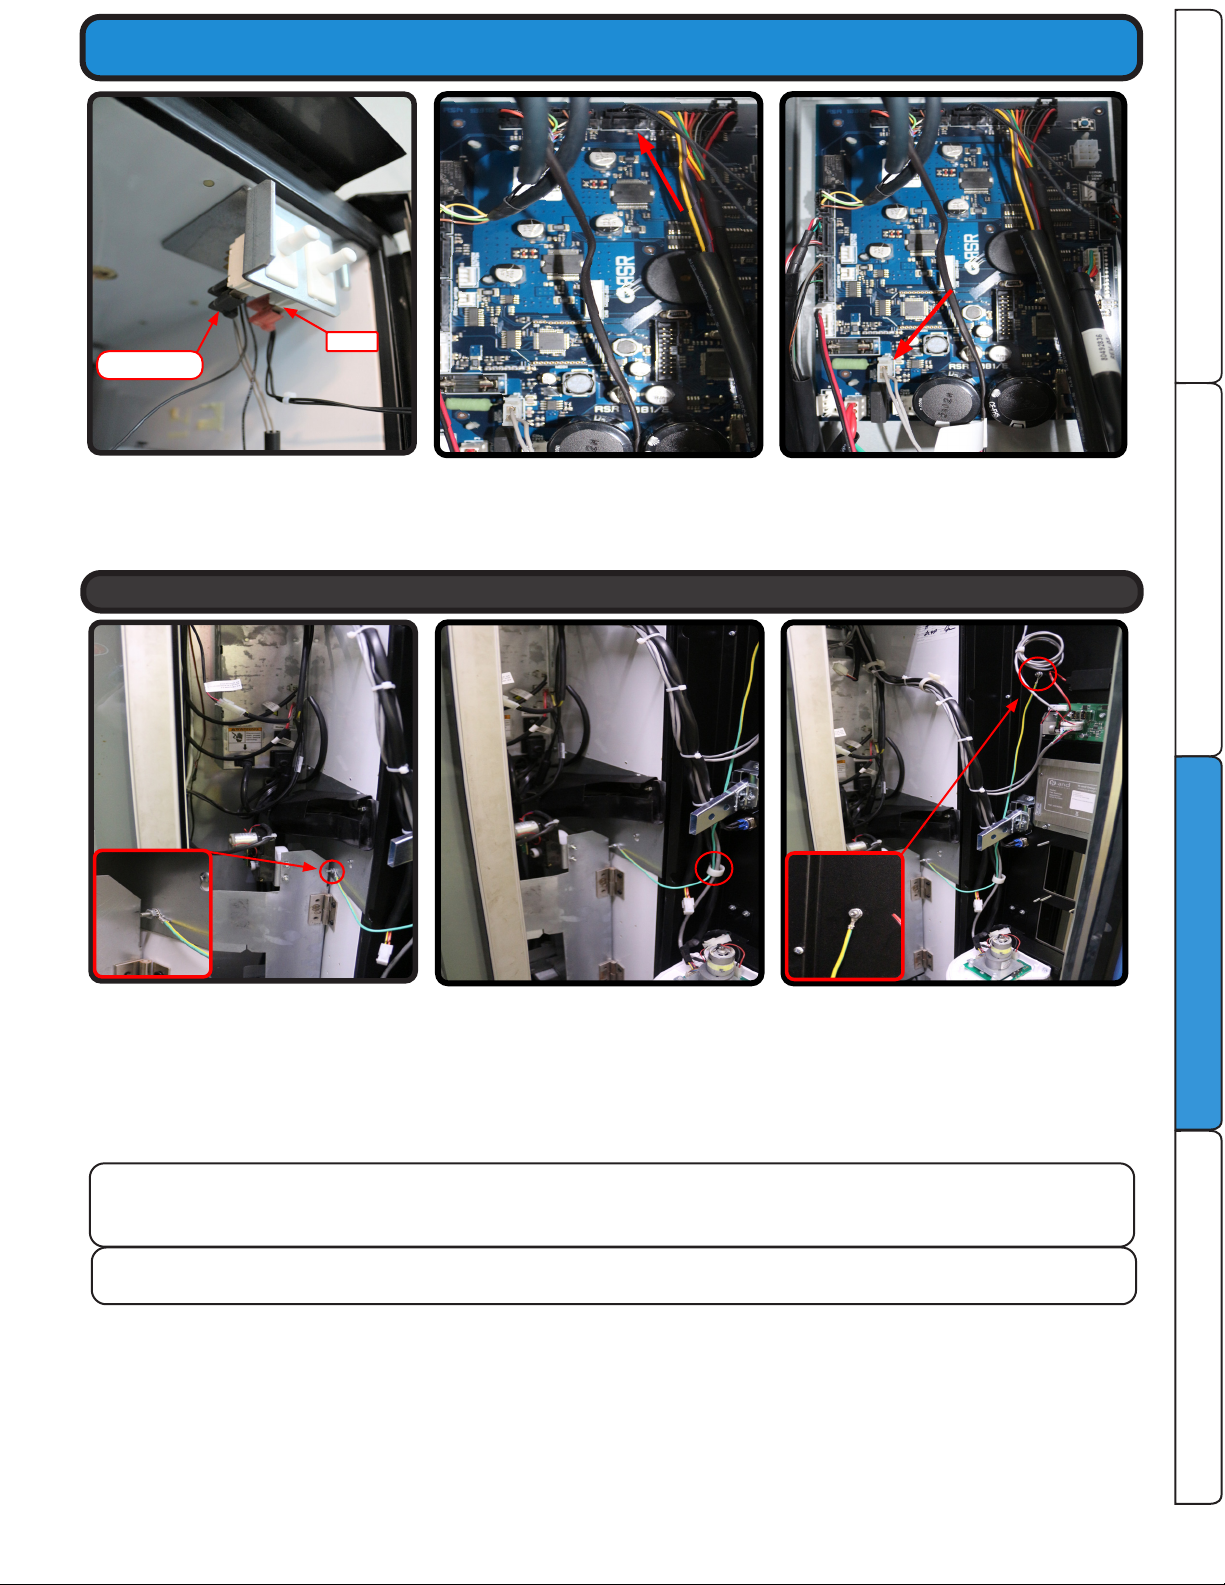
ATTACH HARNESSES
1.B) Install venture RS-232 data harness
(VE1019772) into the designated
2.B) Nest the temperature probe
(VE1015669) around the EVAP coil
inside the cabinet .
1.F) If using a cellular modem , connect
the modem to the venture board in
ignore this step.
1.C)
(VE6822
1.D)
sensor board (VE6822) stays upwards
and doesnt short.
2.C) Feed the temperature probe
(VE1015669) and extension
(VE1016368) into the side cabinet.
Connect extension to the control
board as shown.
1.A) Install venture power harness
(VE1020737) into the designated
2.A) Connect UCB temperature
sensor extension (VE1016368)
to temperature cable with probe
(VE1015669).
1.E) Install venture speaker
(VE1019798) into the designated
port on the back of the venture as
shown.
CAUTION
!
powering up machine.
Step 1: Install Venture Harnessing
Step 2: Install Other Harnessing
VE1021164 - BEVMAX - MEDIA PANEL INSTALLATION MANUAL
INSTALL DOOR
DIAGRAMS REMOVE DOOR
ATTACH HARNESSES
Board must point up
Board must point up
www.veii.com
10
2.E) Plug door switch harness
(VE1020990) into the designated port
on the control board as shown.
3.B) Route the Ground Wire through the
cable clip indicated above. Ensure the
wire is routed behind the coin chute.
This will help keep the wire tucked
and secure.
2.F) Plug the OEM door switch into the
designated port on the control board as
shown.
3.C) Locate the door stud shown above.
Secure the open end of the ground wire
to the stud using (1) nut.
2.D ) Connect door switch harness
(VE1020990) along with the OEM
door switch harness to the back
ports on the door switch as shown.
3.A ) Locate the cabinet stud indicated in
the picture above. Take the ground
wire that is sourced from the OEM
cabinet and secure it to the stud
using (1) nut.
ATTACH HARNESSES
REMOVE DOOR INSTALL DOOR ATTACH HARNESSES DIAGRAMS
Step 3: Install Ground Wire
VE1021164 - BEVMAX - MEDIA PANEL INSTALLATION MANUAL
www.veii.com
OEM
VE1020990
*Proceed to the next two pages for UCB & Venture Harnessing Diagrams*
Once install is complete you will need to specify the machine in use using the
program UCB menu.
This manual suits for next models
2
Table of contents
Other Vendors Exchange Vending Machine manuals


Popular Vending Machine manuals by other brands


Azkoyen
Azkoyen Zensia technical information

Azkoyen
Azkoyen STEP 74 technical information

SandenVendo
SandenVendo Snack Safety Point SVE SSP Programming manual

Intralot
Intralot Dreamtouch Smart manual

Westomatic
Westomatic Primo Compact Cleaning manual

Crane
Crane Dixie-Narco Glassfront BevMax 3 5800 Installation & setup guide