9
•Вставьте вилку сетевого шнура в электри-
ческую розетку.
•Перед началом стрижки включите
машинку, переведя выключатель (4) в
положение
•«I», и убедитесь, что машинка рабо-
тает без сбоев, а ход лезвий – плавный.
При избытке на лезвиях смазочного
масла выключите машинку, установив
выключатель (4) в положение «O», и уда-
лите лишнее масло при помощи сухой
ткани.
•Следите за состоянием сетевого шнура,
не допускайте его многократного пере-
кручивания, периодически отключайте
машинку и расправляйте сетевой шнур.
•Посадите человека таким образом, чтобы
его голова была примерно на уровне
ваших глаз, плечи человека прикройте
полотенцем, расчешите волосы при
помощи расчёски.
Напоминание
– Срезайте небольшое количество волос
за один проход — в случае необходимо-
сти всегда можно вернуться к уже обра-
ботанному участку для дополнительной
стрижки.
– Наилучшие результаты стрижки достига-
ются при работе с сухими, а не влажными
волосами.
– Расчёсывайте волосы расчёской для
выявления неровных прядей.
– Для первого раза после стрижки лучше
оставить более длинные волосы.
– По мере освоения машинки вы сможете
самостоятельно моделировать необхо-
димые причёски.
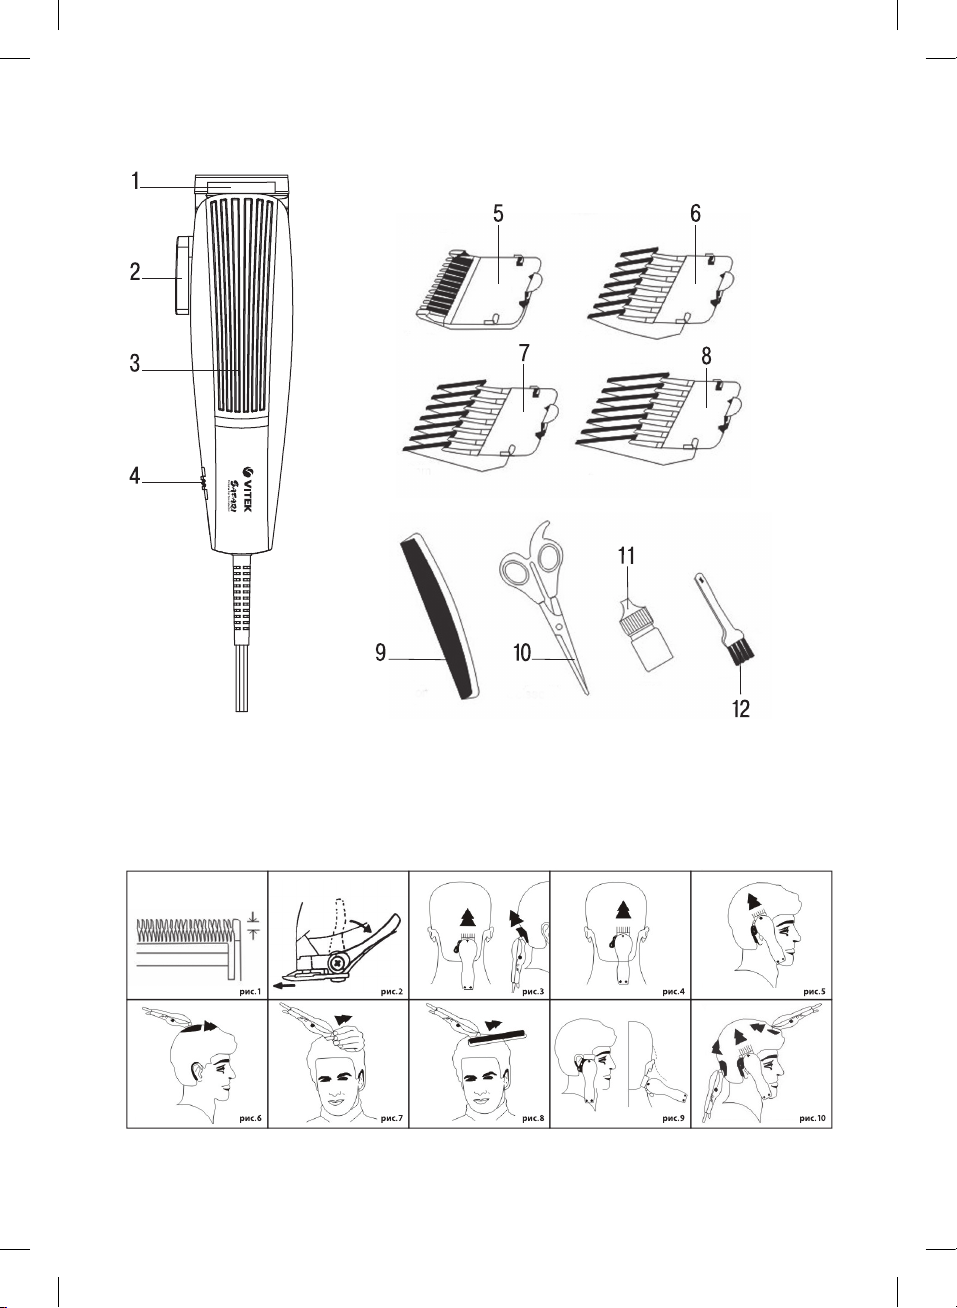
Насадки-расчёски
Длина волос зависит от используемой
насадки:
– насадка-расчёска (5): длина волос 3 мм
– насадка-расчёска (6): длина волос 6 мм
– насадка-расчёска (7): длина волос 9 мм
– насадка-расчёска (8): длина волос 12 мм
Установите выбранную насадку-расчё-
ску на лезвия зубьями вверх и нажмите на
выступ в нижней части насадки до её фик-
сации. Убедитесь, что насадка защёлкну-
лась на своём посадочном месте перед
началом стрижки. Для снятия насадки-
расчёски нажмите на фиксатор и снимите
насадку.
Шаг первый
Установите насадку-расчёску (5) 3 мм или
(6) 6 мм. Включите машинку выключателем
(4), установив его в положение «I». Держите
машинку таким образом, чтобы лезвия
были направлены вверх. Начинайте стрижку
с начала роста волос. Медленно переме-
щайте машинку по направлению вверх.
Подстригите все волосы снизу задней части
головы и около ушей (рис. 3, 4, 5).
Шаг второй
Отключите машинку выключателем (4),
переведя его в положение «O», и извле-
ките вилку сетевого шнура из электрической
розетки, установите насадку-расчёску для
более длинных волос (7) 9 мм или (8) 12 мм,
включите машинку и продолжайте стричь
волосы ближе к макушке головы (рис. 6).
Шаг третий — стрижка
в области висков
Отключите машинку и извлеките вилку сете-
вого шнура из электрической розетки, уста-
новите насадку-расчёску (5) 3 мм или (6)
6 мм и подстригите волосы на висках. Затем
установите насадку-расчёску (7) 9 мм или
(8) 12 мм и продолжайте стрижку по направ-
лению к макушке (рис.5).
Шаг четвертый — стрижка
в области темени
Используя насадку-расчёску (7) 9 мм или
(8) 12 мм, стригите волосы по направлению
от макушки к темени против направления
роста волос (рис.6).
•Волосы можно стричь против направле-
ния роста и по направлению роста, но
имейте в виду, что волосы, подстрижен-
ные против направления их роста, будут
короче волос, подстриженных по направ-
лению роста.
•Используйте насадки (5) 3 мм и (6) 6 мм
для очень короткой стрижки. Чтобы оста-
вить волосы немного длиннее, исполь-
зуйте насадки (7) 9 мм или (8) 12 мм.
IM VT-2577.indd 9 31.07.2017 9:26:25