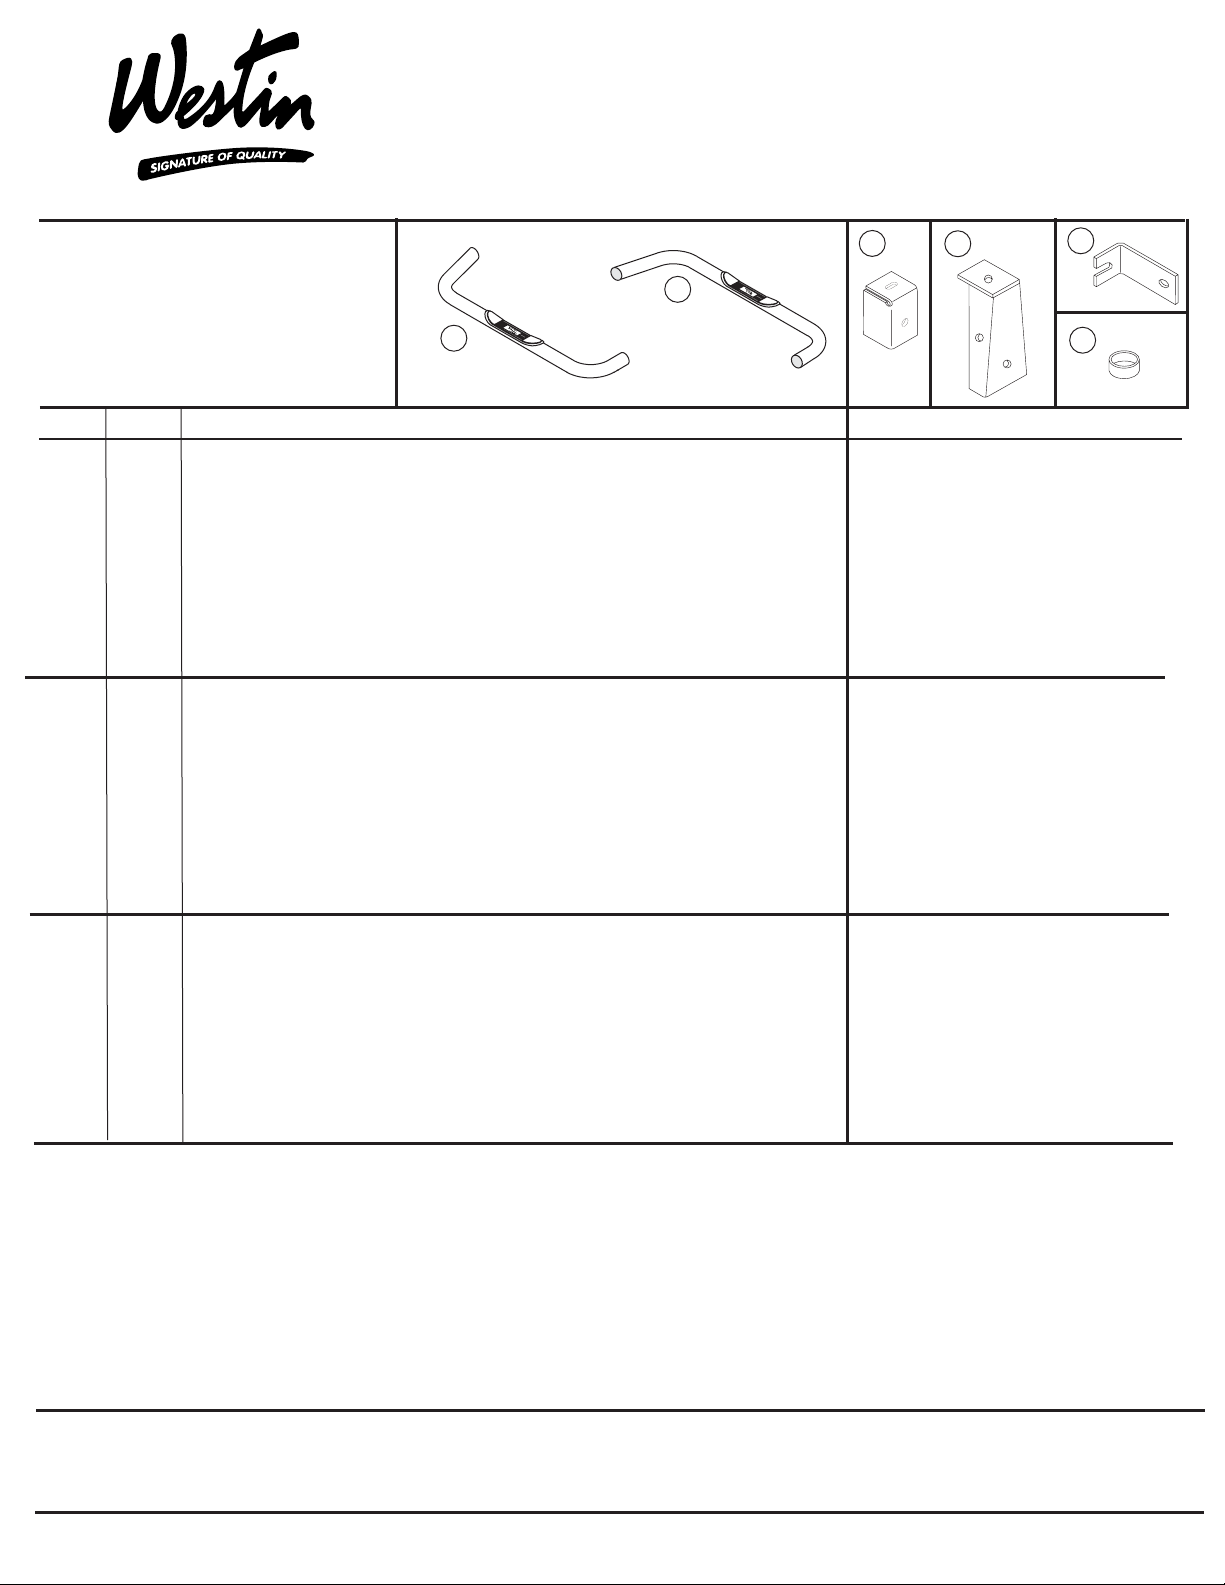
manuals.online logo
Brands
  1. Home
  2. •
  3. Brands
  4. •
  5. Westin
  6. •
  7. Automobile Accessories
  8. •
  9. Westin 25-0560 User manual

Westin 25-0560 User manual

3 2 FRONT BRACKET
4 2 REAR BRACKET
5 2 SUPPORT BRACE
64
7 4 1/2-13 X 1.75” HEX HEAD BOLT
8 2 1/2-13 X 1.50” HEX HEAD BOLT
9 8 1/2” FLAT WASHER
10 6 1/2” LOCK WASHER
11 2 1/2-13 HEX NUT
12
13 4 M12-1.75 HEX NUT
1,2 2 STEP BAR, PASSENGER (1) AND DRIVER (2)
4 1/2” EXTERNAL TOOTH LOCK WASHER
SPACER TUBE
QTY CONTENTS - CONTENIDO - CONTENU
TOOLS -
HERRAMIENTA
- OUTILS
3/4” SOCKET
3/4” WRENCH
19MM SOCKET
RATCHET
TORQUE WRENCH
APPLICATION: 1982-97 FORD RANGER REGULAR CAB
ITEM
APLICACIÓN: FORD RANGER CON CABINA REGULAR, MOD. 1982-97
APPLICATION: FORD RANGER CABINE REGULIÈRE 1982-97
AUTOMOTIVE PRODUCTS, INC.
STEP BAR ASSEMBLIES
25-0560
25-0565
ENSAMBLES DE ESTRIBOS
MONTAGES DE MARCHE-PIEDS
INSTRUCTIONS-INSTRUCCIONES-CONSIGNES
75-0126 REVISION C 9/3/08
STEP 1. Remove the contents from box and check for damage. Verify all parts are present. Read instructions com-
pletely before beginning.
Attach brackets to step bar using 1/2” fasteners as shown. Leave loose.
Attach step bar to body mounts as shown.
Loosen existing hex nut near rear body mount and slip rear brace behind hex nut. Attach other end of rear
brace to bracket using 1/2” fasteners as shown
Repeat installation for opposite side.
Make sure step bar and brackets are properly aligned with vehicle and tighten all fasteners. Recommended
torque value is 64 Ft. Lbs. for 1/2” fasteners.
STEP 2.
STEP 3.
STEP 4.
STEP 5.
STEP 6.
.
1,2 2 ESTRIBOS, LADO DEL ACOMPAÑANTE Y EL CONDUCTOR
3 2 SOPORTES DELANTERA
4 2 SOPORTES TRASERA
5 2 PIEZA DE SUJECIÓNDEL SOPORTE
64
7 4 PERNOS CON CABEZA HEXAGONAL DE 1/2-13 X 1,75”
8 2 PERNOS CON CABEZA HEXAGONAL DE 1/2-13 X 1,50”
9 8 ARANDELAS PLANAS DE 1/2”
10 6 ARANDELAS DE PRESIÓN DE 1/2”
11 2
12 4
13 4 ARANDELAS DE PRESIÓN DE M12-1,75
(1) (2)
TUBO SEPARADOR
TUERCAS HEXAGONALES DE 1/2-13
ARANDELAS DE PRESIÓN DE DENTADO EXTERIOR DE 1/2”
1,2 2 MARCHE-PIEDS, ET
3 2 SUPPORTS AVANT
4 2 SUPPORTS ARRIÈRE
5 2 RENFORTS POUR SUPPORTS
64
74
98
10 6
12 4
PASSAGER (1) CONDUCTEUR (2)
BOULON À TÊTE HEXAGONALE DE 1/2-13 X 1,75 PO
8 2 BOULON À TÊTE HEXAGONALE DE 1/2-13 X 1,50 PO
RONDELLE PLATE 1/2 PO
RONDELLE À FREIN 1/2 PO
11 2
É
13 4
TUBE D'ESPACEMENT
ÉCROUS HEXAGONAUX 1/2-13
RONDELLE À FREIN A DENTS EXT RIEURES,1/2 PO
ÉCROUS HEXAGONAUX M12-1,75
DADO DE 3/4”
LLAVE DE TUERCAS DE 3/4"
DADO DE 19MM
MANERAL
LLAVE DE TORQUE
DOUILLE 3/4 PO
Cl 3/4 PO
DOUILLE 19MM
CLIQUET
CL DE COUPLE
É
É
WO:
2
1
345
6
FINISH PROTECTION
Westin products have a high quality finish that must be cared for like any other exposed finish on the vehicle. Protect the finish with a non-abrasive automotive wax, (e.g.
Pure Carnauba) on a regular basis. The use of any soap, polish or wax that contains an abrasive is detrimental, as the compounds scratch the finish and open it to
corrosion.
PROTECCIÓN DEL ACABADO
Los productos Westin tienen un acabado de alta calidad que requiere del mismo cuidado que cualquier otro acabado expuesto del vehículo. Proteja el acabado con una
cera no abrasiva para automóviles (por ejemplo, Pure Carnauba) regularmente. El uso de cualquier jabón, pulidor o cera que contenga un abrasivo es nocivo, dado que
los componentes rayan el acabado y lo exponen a la corrosión.
PROTECTION DE LA FINISSION
Les produits Westin ont une finission de haute qualité qui requiert des soins, comme toute autre finission du véhicule exposée aux éléments. Protégez la finission à l’aide
d’une cire non-abrasive (par exemple, Pure Carnauba) de façon régulière. L’usage de tout savon, pâte à polir ou cire contenant un abrasif est nuisible, puisque les
composantes strient la finission et la laissent vulnérable à la corrosion.
PASO 1.
PASO 2..
PASO 3.
PASO 4.
PASO 5.
PASO 6.
Retire el contenido de la caja y verifique que ninguna pieza se haya dañado. Verifique que no falte ninguna pieza. Lea las instrucciones
completamente antes de comenzar.
Coloque los soportes sobre el estribo con los sujetadores de 1/2” como se muestra. No apriete.
Coloque el estribo en las bases de montaje como se muestra.
Afloje la tuerca hexagonal existente cerca de la base de montaje trasera y deslice la pieza de sujeción trasera por detrás de la tuerca
hexagonal. Coloque el otro extremo de la pieza de sujeción trasera en los soportes con los sujetadores de 1/2” como se muestra.
Repita el proceso de instalación para el lado opuesto.
Asegúrese de que el estribo y los soportes estén alineados correctamente y que los sujetadores estén apretados. Los valores de torque
recomendados son 64 libras-pies para los sujetadores de 1/2”.
ETAPE 1.
ÉTAPE 2.
ÉTAPE 3.
ÉTAPE 4.
ÉTAPE 5.
ÉTAPE 6.
Enlevez le contenu de la boîte et vérifiez pour tout dommage. Vérifiez que toutes les pièces y sont. Lisez complètement les instructions
avant de commencer.
Fixez les supports aux marche-pieds à l'aide des attaches 1/2 po tel qu'illustré. Ne pas serrer.
Fixez le marche-pieds aux montages de carosserie tel qu'illustré.
Desserrez l'écrou hexagonal existant situé près du montage de carosserie arrière et glissez le renfort arrière derrière l'écrou hexagonal.
Fixez l'autre bout du renfort arrière au support à l'aide des attaches 1/2 po tel qu'illustré.
Répétez ces actions pour l'autre côté.
Assurez-vous que le marchepied et les supports sont correctement alignés et ensuite serrez les attaches. Les valeurs de couple
recommandées sont de les attaches64 pieds-livres pour 1/2 po.
Thank You for choosing Westin products
For additional installation assistance please call
Customer service (800) 793-7846 or (507) 375-3559
Westin Automotive Products, Inc.
5200 N. Irwindale Ave. Suite 220
Irwindale, Ca. 91706
7
7
8
12
12
10
10
8
9
13
13
32
6
6
4
4
9
9
9
10
BODY MOUNT
BASE DE MONTAJE
FIXATION DE CAROSSERIE
INSTALLATION VIEW OF DRIVER SIDE SHOWN, PASSENGER SIDE OPPOSITE
VISTA DE LA INSTALACIÓN DEL LADO DEL CONDUCTOR OPUESTO AL LADO DEL ACOMPAÑANTE
ILLUSTRE: COTE CONDUCTEUR, EN FACE: COTE PASSAGER
NOTE: FRONT OF TUBE IS NOT
BENT TO 90 DEGREES.
NOTA: LA PARTE DELANTERA DEL TUBO NO ESTÁ
DOBLADA EN 90 GRADOS.
REMARQUE : LE DEVANT DU TUBE N'EST PAS
PLIÉ À 90 DEGRÉS.

This manual suits for next models

1

Other Westin Automobile Accessories manuals

Westin 22-1415 User manual

Westin

Westin 22-1415 User manual

Westin 27-1495 User manual

Westin

Westin 27-1495 User manual

Westin 30-0020 User manual

Westin

Westin 30-0020 User manual

Westin OUTLAW NERF STEP BARS User manual

Westin

Westin OUTLAW NERF STEP BARS User manual

Westin 32-0055 User manual

Westin

Westin 32-0055 User manual

Westin 27-1855 User manual

Westin

Westin 27-1855 User manual

Westin 32-2360 User manual

Westin

Westin 32-2360 User manual

Westin 58-41175 User manual

Westin

Westin 58-41175 User manual

Westin 40-1245 User manual

Westin

Westin 40-1245 User manual

Westin 46-24025 User manual

Westin

Westin 46-24025 User manual

Westin 23-1970 User manual

Westin

Westin 23-1970 User manual

Westin 58-41045 User manual

Westin

Westin 58-41045 User manual

Westin 32-2400 User manual

Westin

Westin 32-2400 User manual

Westin 46-22235 User manual

Westin

Westin 46-22235 User manual

Westin 65-1535 User manual

Westin

Westin 65-1535 User manual

Westin 30-0020 User manual

Westin

Westin 30-0020 User manual

Westin 57-9003 User manual

Westin

Westin 57-9003 User manual

Westin 27-1405 User manual

Westin

Westin 27-1405 User manual

Westin 32-1660 User manual

Westin

Westin 32-1660 User manual

Westin 30-0000 User manual

Westin

Westin 30-0000 User manual

Westin 22-1775 User manual

Westin

Westin 22-1775 User manual

Westin 25-3240 User manual

Westin

Westin 25-3240 User manual

Westin 33-0970 User manual

Westin

Westin 33-0970 User manual

Westin 57-6025 User manual

Westin

Westin 57-6025 User manual

Popular Automobile Accessories manuals by other brands

Magneti Marelli AC161 Installation instruction

Magneti Marelli

Magneti Marelli AC161 Installation instruction

FDI uEZ GUI Start here

FDI

FDI uEZ GUI Start here

JCROffroad JT Install instructions

JCROffroad

JCROffroad JT Install instructions

Rostra VOXXElectronics 250-1930 owner's guide

Rostra

Rostra VOXXElectronics 250-1930 owner's guide

TOP VEHICLE TECH GR3FORD5 installation manual

TOP VEHICLE TECH

TOP VEHICLE TECH GR3FORD5 installation manual

Safe Fleet PRIME DESIGN AR-2000-BLK manual

Safe Fleet

Safe Fleet PRIME DESIGN AR-2000-BLK manual

Skoda Fabia Combi 5J Fitting instructions

Skoda

Skoda Fabia Combi 5J Fitting instructions

Camcar 40077 Al Mounting instructions

Camcar

Camcar 40077 Al Mounting instructions

Camcar 40089 AL Mounting instructions

Camcar

Camcar 40089 AL Mounting instructions

Impac Tradesman 2000 installation manual

Impac

Impac Tradesman 2000 installation manual

DVB OFFROAD BRSB-01 installation manual

DVB

DVB OFFROAD BRSB-01 installation manual

Safari Snorkel SS385HF installation guide

Safari Snorkel

Safari Snorkel SS385HF installation guide

ULTIMATE SPEED 279746 Assembly and Safety Advice

ULTIMATE SPEED

ULTIMATE SPEED 279746 Assembly and Safety Advice

SSV Works DF-F65 manual

SSV Works

SSV Works DF-F65 manual

ULTIMATE SPEED CARBON Assembly and Safety Advice

ULTIMATE SPEED

ULTIMATE SPEED CARBON Assembly and Safety Advice

Witter F174 Fitting instructions

Witter

Witter F174 Fitting instructions

WeatherTech No-Drill installation instructions

WeatherTech

WeatherTech No-Drill installation instructions

TAUBENREUTHER 1-336050 Installation instruction

TAUBENREUTHER

TAUBENREUTHER 1-336050 Installation instruction

manuals.online logo
manuals.online logoBrands
  • About & Mission
  • Contact us
  • Privacy Policy
  • Terms and Conditions

Copyright 2025 Manuals.Online. All Rights Reserved.