WilTec 50035 User manual

Operation Manual
Incubator
ARTICLE 50035
Read and follow the operating instructions and safety information before using for the first time.
Technical changes reserved!
Due to further developments, illustrations, functioning steps and technical data can differ
insignificantly.
Updating the documentation
If you have suggestions for improvement or have found any irregularities please contact us.
© by WilTec Wildanger Techni GmbH Seite 11
http://www.WilTec.de
http://www.aoyue.eu
http://www.teichtip.de

The information contained in this document is subject to change without prior notice. o part of this
document can be copied or duplicated in another form without the prior written consent of WilTec
Wildanger Technik GmbH. The WilTec Wildanger Technik GmbH assumes no liability for any errors in
this user manual or the connection diagram.
Although WilTec Wildanger Technik GmbH has made every effort to make sure that this user manual
is complete, accurate and updated, errors cannot always be avoided. In the event of problems with
this user manual please complete and send this form back to us.
FAX-notification (+++49 2403 55592-15),
from: ________________________________________
Name: ________________
Firm:_____________________
Tel/Fax:__________________
I would li e to report the following mista es:
_______________________________ ____________________________________
Customer Service WilTec Wildanger Technik GmbH
e-mail: [email protected]
Tel:++ +49 2403 55592-0
Introduction
Thank you for purchasing this quality product. To minimize the ris of injury by means of fire or
electric shoc we urge that our clients ta e some basic safety precautions when using this
device. Please read the operation instructions carefully and ma e sure you have understood its
content.
Always use a grounded power connection with the appropriate mains voltage. You can find the
corresponding mains voltage on the type plate. If you have any doubts about the connection being
grounded, have it checked by a qualified professional. ever use a faulty electric cable.
Do not inspect the electrical part of the pressure pond filter in a wet or damp environment or when you
are wet yourself and protect it from direct sunlight. Install this device in a safe location so that nobody
can step on the cable, fall over or damage it. Disconnect the power plug before cleaning it and use
only a damp cloth for cleaning. Avoid using cleaning agents and make sure that no liquid enters the
electrical part of the pump.
The electric part of the device contains no parts that can be inspected or serviced by the user. Leave
the maintenance, adjustment and repair to qualified technical personnel. In case of unauthorised
intervention the 2-year warranty is no longer valid! Keep these operation instructions safe.
© by WilTec Wildanger Techni GmbH Seite 12
http://www.WilTec.de
http://www.aoyue.eu
http://www.teichtip.de

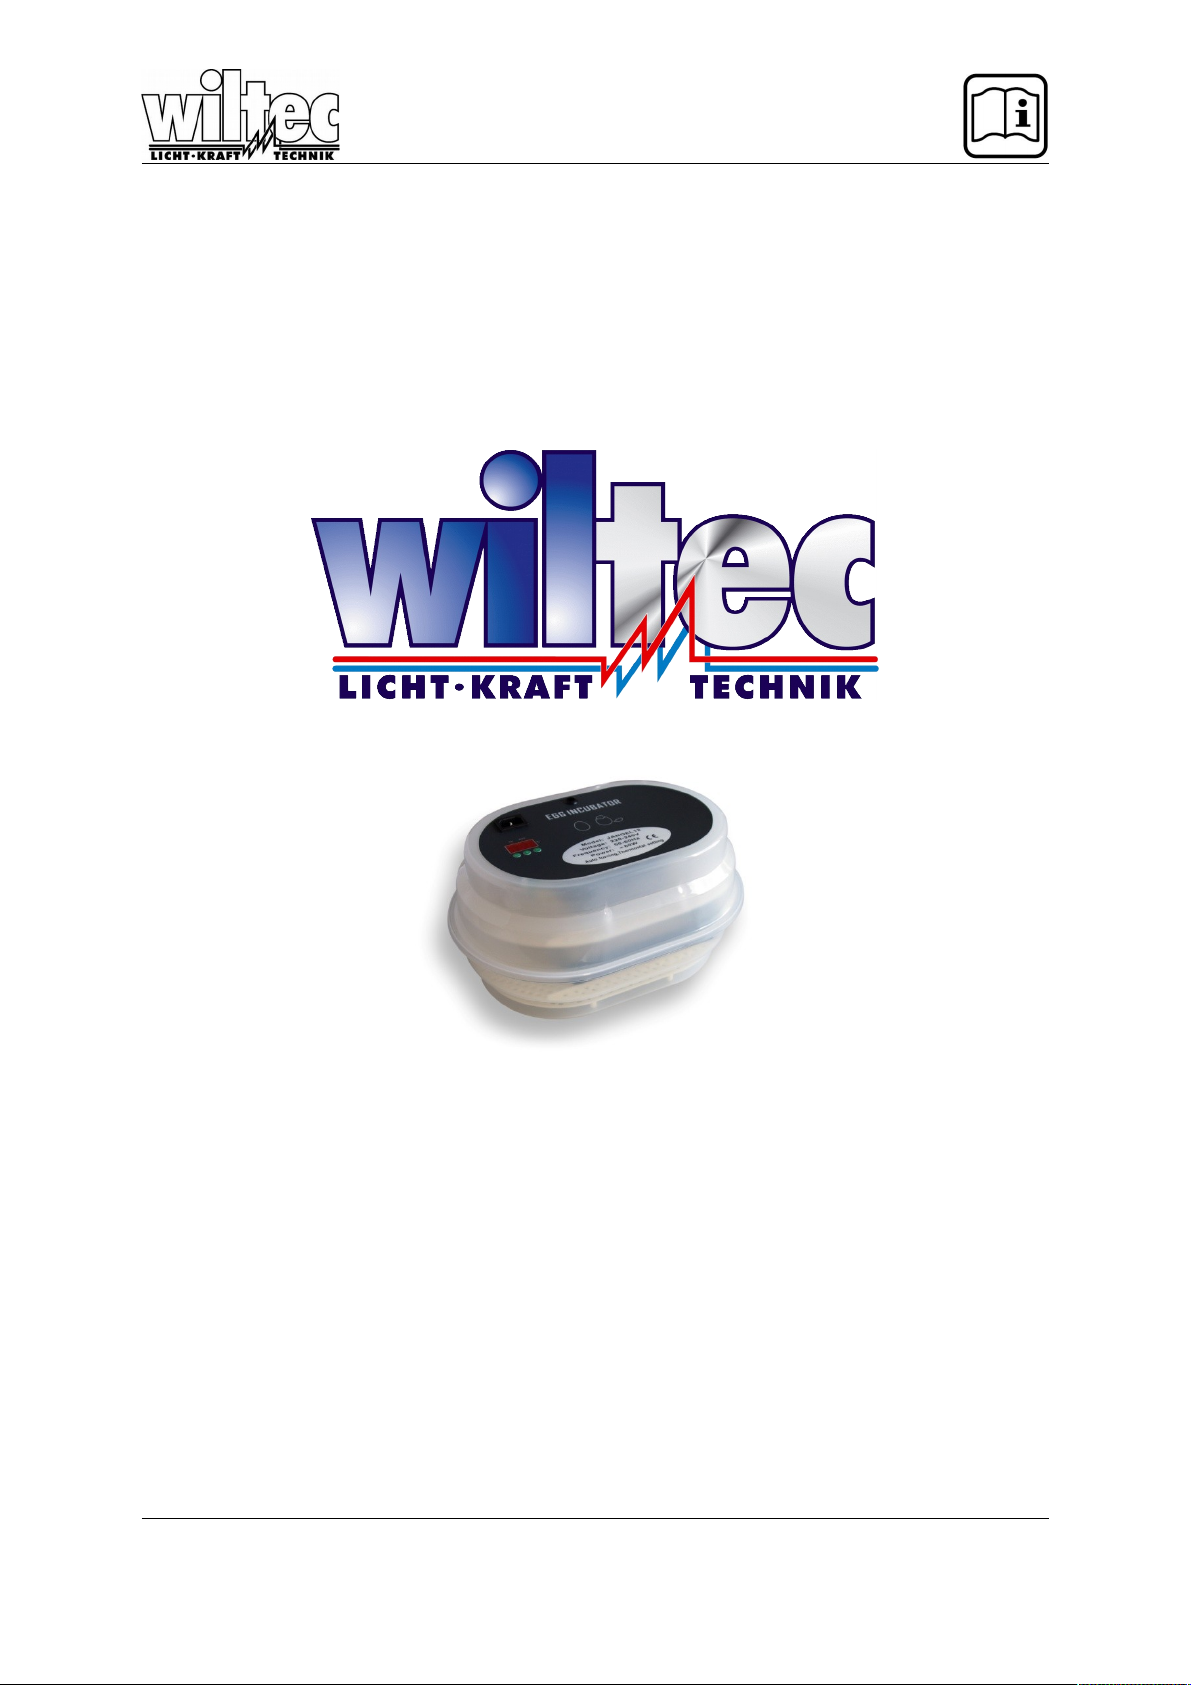
Unpack the incubator and check it regarding its completeness and function.
I. Note:
In case the ambient temperature is below 25°C you should provide for an insulation by
blankets, towels or insulating material. This reduces the heat output and helps to save
energy. Before first use, you should match the temperature as displayed by means of a
thermometer, if necessary, provide for a calibration (CA-parameter).
After a warm-up of 2 hours, the device can be operated.
II. Preliminary operation procedures:
1. Slide the grid (large meshes) (fig. 1) into the incubator.
2. Put the movable base egg tray (fig. 2) onto the grid.
3. Insert the separating strips (fig. 3) on the movable egg tray, according to the eggs´
size.
4. When placing the egg on the movable tray (fig. 5), make sure that there is a proper
distance of 5 mm from the grid to be turned easily. ow the lower part of the
incubator is to be filled with approx. 100 ml of water. The liquid level is to be checked
every two days so that the incubator is never operated without water. ever add more
than 100 ml of water each time. Please note the table regarding air humidity and
breeding period. Always operate the device on an appropriate working height (60-
100cm).
5. When closing the lid (fig. 7) the connecting stud has to be set accurately into the
longitudinal guide of the egg tray to make sure that the eccentric movement is
transmitted to the egg tray, too.
6. After having closed the lid turn on the power supply again and set the temperature as
described below (IV. Adjustment) If there is no time for the temperature setting, the
temperature for breeding can be set at 38°C from the first day and the temperature for
hatching at 37.5-37.8°C on the following days.
7. As for other poultry, the breeding base is to be removed 3 days before the usual stage
of hatching.
8. Remove the egg turner 3-4 days prior to the hatching stage and carefully set the eggs
onto the breeding tray (fig. 10/11). Check again the level of the liquid.
9. After having closed the lid, the hatching procedure can be observed again.
III. Important for security
1. The incubator can be operated with a voltage of 220-240V.
2. Make sure that nobody stumbles on the power cord.
3. Make sure to use a grounded socket that is secured properly. Overloading may lead to
fire or electrical damage.
4. In case of smoke or unusual odours, the device is to be disconnected from the mains
and the manufacturer contacted.
5. ever touch the power cord with wet hands, as this may cause electric shock.
6. This incubator must not be used outdoors.
7. Before cleaning the mains power plug has to be pulled.
8. Always operate the device in quite and ventilated places. Moreover, never store any
harmful and toxic chemicals or the like in the surroundings.
9. During operation, the ventilation opening must not be blocked.
© by WilTec Wildanger Techni GmbH Seite 15
http://www.WilTec.de
http://www.aoyue.eu
http://www.teichtip.de

IV. Adjustment of incubator:
1. <SET>
A: Adjustment of temperature
Press SET and <+> or <-> for adjusting of temperature. For a quicker setting press <+>
or <-> for 3 seconds. Press SET again to quit the menu.
B: Adjustment of menu
Press SET for 3 seconds to enter the system menu. Press <+> or <-> to select the
required menu setting. Press again <+> or <-> to enter the submenu. Press <+> or <->
again to set the parameters. Finally, press SET/RST or wait for 5 seconds for he system
to close automatically.
2. <+>: Increasing menu parameters
3. <->: Decreasing menu parameters
Operation:
Operating status:
As soon as the device is switched on, the red “working lamp” on the display´s left side is
glowing. LED indicates the actual temperature inside the incubator.
Instruction for function:
(HU+HD) heating element
HU and HD are factory-set and should not be modified by the user
himself.
(CA) calibration of temperature sensor
This Value is factory-set to 0°K. In case that the temperature is measured incorrectly
(test: place the thermometer for approx. 1 hour inside the closed breeding machine
and compare it with the displayed temperature) you can adjust the temperature
difference by the following means:
1. Adjust temperature sensor deviation to actual temperature
2. Press SET for 3 sec.
3. Press + or + until CA is displayed
4. Press SET again
5. By + and - you modify the parameter for the temperature difference
(HS+LS) Adjust the limit of the upper/ lower temperature
The upper / lower limit of temperature setting can be restricted
1. Temperature SET adjust upper limit
2. Press SET for 3 sec.
3. Press + or – until HS is displayed
4. Press SET again
5. By + and – you modify the parameter fort he temperature difference
Adjust lower limit
1. Press SET for 3 sec.
2. Press + or – until LS is displayed
3. Press SET again
4. By + and – you modify the parameter for the temperature difference. If there is
not pressed any button within 5 sec., the last value is saved and the manu is
quit.
© by WilTec Wildanger Techni GmbH Seite 16
http://www.WilTec.de
http://www.aoyue.eu
http://www.teichtip.de

Code Description Ran-
ge
Basic setting Unit
HU Parameter heating capacity 1-90 35
HD Parameter heating preservation 1-80 30
LS Set lower limit -
9.9~
HS
30 °C
HS Set upper limit LS~9
9.9
39,5 °C
CA Temperature correction -5~+5 -1,5 °C
AH Factory-set 0-15 0,8 °C
AL Factory-set 0-15 0,5 °C
Hygiene
Cleanliness and hygiene are essential for a high hatching ratio. A poor hygiene is often the reason for
the chicks´ death within the first 10 days after hatching. Always put clean eggs into the device.
Contaminated eggs are potential carriers of deseases which thrive particularly in warm and humid
environment. If you put dirty eggs into the device, it is recommended to clean them in warm water
(approx. 44-49°C) along with a disinfectant such as used in the household. Thereafter they are dried
with a soft paper towel. ever soak the eggs for a period longer than 4 minutes in order not to affect
the fertility. ever use cold water which promotes penetration of bacteria through the eggshell. Eggs
which have been sterilized by fumigation contribute essentially to hygiene.
Humidity
During the breeding period, humidity is essential. Refill the channels beyond the plastic tray with water
in order to prevent dehydration. By means of an egg tester (lamp) the egg is illuminated. In case the
bubble of air is too large, humidity is increased. The bubble has to be controlled depending on the type
of egg (see illustration). If you decide to make use of a hygrometer, there has to be used a special
hygrometer (for incubators) The three days before hatching the water channels are refilled once again
with warm water. Only refill with warm water. If the eggshell is particularly hard, you can make use of
a water-soaked sponge as a help for the breeding, so as to increase the humidity yet. Additionally, the
breeding temperature can be increased by 1°K at a maximum.
Hatching period
Three days before this phase, the turning device is removed and the eggs placed on the grid, thus
avoiding any possible injuries on the chicks caused by the turning procedure. After the hatching
procedure, the chicks are kept inside the breeding machine until their feathers have dried, but at the
latest after 24 hours.
Comment
Good breeding results are essentially dependent not only on the breeding material (eggs) but also on
the operation during the incubation period. There are several facts that lead to poor or even
unsuccessful hatching procedures. The reasons for such failure should always be analysed. After the
end of each breeding period, the lower part of the device and the channels are carefully cleaned and
disinfected.
© by WilTec Wildanger Techni GmbH Seite 17
http://www.WilTec.de
http://www.aoyue.eu
http://www.teichtip.de

poultry
num-
ber of
days
period of incubation
temperature humidity
°C %
±0.5
breeding period
temperature humidity
°C %
±0.5
bree-
ding
egg
weigh
t
chicken 21 38
55-75
37.5 65-85 100-
200
pigeon 18 38.5
55-75
37.8 65-85 30-40
domestic
chicken 21
37.9
55-75
37.5 65-85
45-55
Example
7. Chic en: Incubation period: 28-33 days. Temperature: the first 21 days 38.3°C; air humidity:
more than 10 days, approx. 45%, additionally to be refilled with water (20ml) after 18 days
55%, additionally to be refilled with water (20ml), cooling down for 10 min. Pay special
attention to the air bubble on the 7th and 14th day
8. Duc : Incubation period: 28-33 days. Temperature: the first 21 days 38.3°C; air humidity:
approx. 65%: additionally to be refilled with water (20ml); from the 7th up to the 21st day
cooling down daily for 20 min. From the 26th day to be refilled again with 20 ml of water. Pay
special attention to the air bubble on the 7th and 14th day
9. Goose: Incubation period: 28-33 days. Temperature: 38.3-38.9°C, air humidity 75% at the
start (large and small channels are refilled with water); from the 7th up to the 10th day cooling
down for 30 min every day. From the 15th day up to the 26th day, place the eggs into water
(38°C) for 30 sec. every 3rd or 4th day. From the 26th day additionally to be refilled with water
(approx.20-40 ml). Pay special attention to the air bubble on the 7th and 14th day.
10. Tur ey: Incubation period: approx. 28 days. Temperature: the 1st week 37.8°C, 2nd week from
38.3°C to 38.9°C; air humidity 60% (fill water into the large and medium channel) cooling
down once a day 5-10 min. From the 25th day fill with more water. Pay special attention to the
air bubble on the 7th and 14th day
11. Pheasant: Incubation period: 22 to 24 days. Temperature: 38.3-38.9°C; air humidity 60% at
the start (the large and medium channels) twice a day cooling down for 5 min. From the 22nd
day fill with water (20-40 ml). Pay special attention to the air bubble on the 8th and 16th day.
12. Quail: Incubation period: 16-17 days. Temperature: 38.3°C; air humidity 56% at the start
(additionally fill with water 20-30 ml); place the eggs quietly within the 1st 60 hours; from the
14th day fill with water (20-30 ml) Small quail eggs need not to be cooled.
Breeding of reptile eggs
Due to the large variety of reptiles this is just an example.
There is literature you can refer to. (Günther Köhler (ISB 3936180-11-3)
To achieve the best results of breeding it is essential to use eggs of the same type. It is
beneficial to make use of a hygrometer for the humidity surveillance. Make the eggs hatch on
a vermiculite and perlite cushion. Make always use of natural material, being absorbent but
also ensuring that the eggs are not kept too moist. Vermiculite and perlite can also be applied
in a mixed version. For disinfection the material is placed on a plastic wrap and sprinkled with
water, then it is put into the microwave for 1 min. Thereafter it is cooled down. ow the
material is filled into a can up to a height of 4-5cm. Finally the substrate is sprinkled with water
up to 2/3 of its weight
© by WilTec Wildanger Techni GmbH Seite 18
http://www.WilTec.de
http://www.aoyue.eu
http://www.teichtip.de

Agama: Incubation period approx. 52 to 91 days. Set the incubator as described at 25-31°C.
After a 24 hours warm-up the eggs are removed carefully from the terrarium and placed (2/3)
on a tin. Attention! ever change the position nor turn the eggs. Pay attention to the moisture
and keep the substrate wet in a way that no fungal or bacterial infections can occur. It may be
the case that the eggs change colour during the breeding process.
Species (Latin) °C days
Bartagam (Pogona Vitticeps) 27-31 55-86
Green iguana (Iguana Iguana) 26-32 64-139
Common collared li-
zard
(Crotaphytus-Collaris) 28-30 45-86
Leopard gecko (Eublepharis Maculari-
us)
26-31 45-65
Greek turtle (Testudeo Hermanni) 28-31 54-79
Corn snake (Elaphe Gutatta) 25-29 55-86
Python regius (Python Regius) 29-32 55-71
Agama (Gama Agama) 25-31 52-91
Sting agama (Agama Planiceps) 30 46
Water agame (Physignathus Lesu-
euri)
26-31 56-74
Indian lizard (Calotes versicolor) 25-27 70-79
Egyptian turtle (Testudeo Kleinman-
ni)
28-32 70-119
Lizard (Lacerta Saxicola) 28 37-40
African snake (Scabra) 27-30 52-90
© by WilTec Wildanger Techni GmbH Seite 19
http://www.WilTec.de
http://www.aoyue.eu
http://www.teichtip.de

Disposal regulations
EU guidelines regarding the disposal of scrap electric appliances (WEEE, 2012/19/EU) were
implemented in the law related to electrical and electronic equipment and appliances.
All WilTec electric devices that fall under the WEEE regulations are labelled with the crossed-out
wheeled waste bin logo. This logo indicates that this electric equipment must not be disposed with the
domestic waste.
The company WilTec Technik GmbH has been registrated in the German registry EAR under the
WEEE-registration number DE45283704.
Disposal of used electrical and electronic appliances
(intended for use in the countries of the European
Union and other European countries with a separate
collection system for these appliances).
The logo on the article or on its packaging points out
that this article must not be treated as normal
household waste but must be disposed to a recycling
collection point for electronic and electrical waste
equipment. By contributing to the correct disposal of
this article you protect the environment and the health
of your fellow men. Environment and health are
threatened by inappropriate disposal.
Materials’ recycling helps reduce the consumption of raw materials.
Additional information on recycling this article can be provided by your local community, municipal
waste disposal facilities or the store where you purchased the article.
Address:
WilTec Wildanger Technik GmbH
Königsbenden 12 / 28
D-52249 Eschweiler
Important notice:
The reprint or reproduction, even of excerpts, and any commercial use, even in part of this instructions
manual require the written permission of WilTec Wildanger Technik GmbH.
© by WilTec Wildanger Techni GmbH Seite 20
http://www.WilTec.de
http://www.aoyue.eu
http://www.teichtip.de
Other manuals for 50035
2
Table of contents
Other WilTec Accessories manuals

WilTec
WilTec 61341 User manual

WilTec
WilTec 51073 User manual

WilTec
WilTec 52170 User manual

WilTec
WilTec 51185 User manual

WilTec
WilTec 50033 User manual

WilTec
WilTec XPOtool 62822 User manual

WilTec
WilTec 50036 User manual

WilTec
WilTec 50035 User manual

WilTec
WilTec 50039 User manual

WilTec
WilTec 52168 User manual