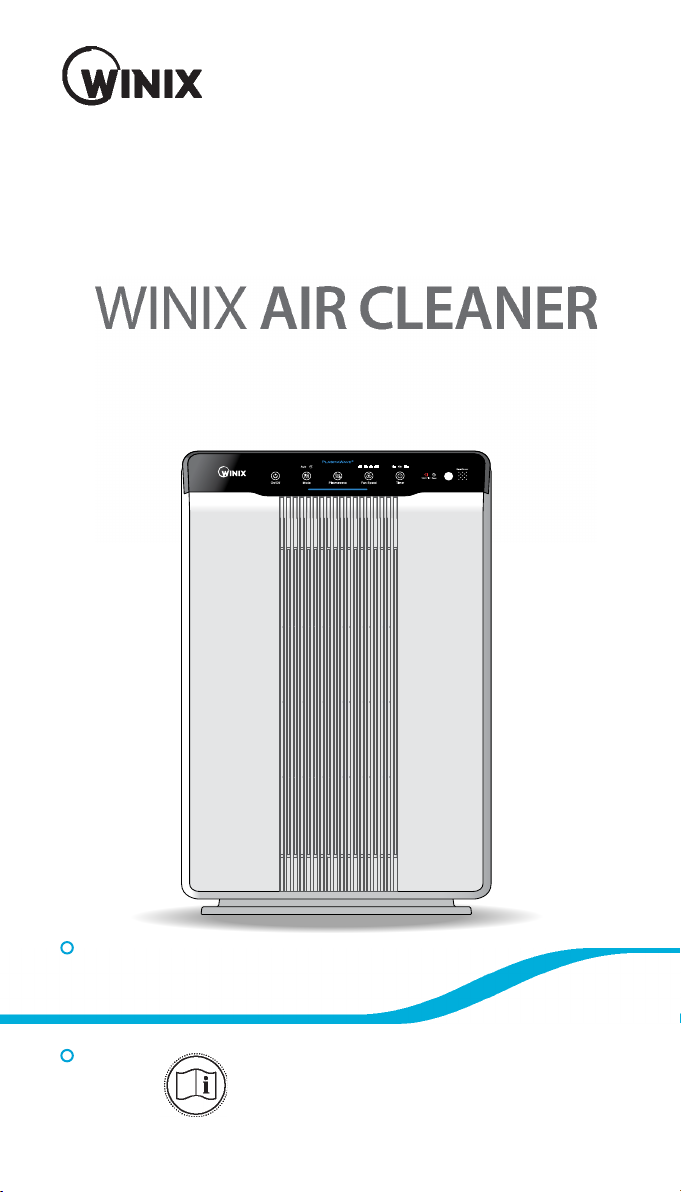
Winix 5300-2 User manual

5300-2
User Manual
xPlease read and follow all safety rules and instructions in
this manual before operating.
xThe product warranty is printed on the back of this guide,
so please keep it in a safe place for future use.
xThis product is manufactured for use only in USA/CA
Model
Use & Care
Guide

English
2
5300-2
CONTENTS
Set Up
Where to use 5
Installing the filters 6
Safety Instructions
Safety and Cautions 8
Operation
Initial Operation 9
Modes of Operation 10
Features and Settings 11
Care and Maintenance
Filter Care 13
Cleaning Care 17
Troubleshooting
Frequently Asked Questions 18
Unit Specifications 20
Product Warranty 22
This product is suitable for 120V only.
3-Stage Air Purification 3
Controls 4

English
3
5300-2
Light sensor
➊ Unit
➋ Pre-filter / (4) Odor
Absorbing Carbon Filters /
True HEPA Filter
➌ User Manual
PACKAGE
CONTENTS
Front panel
➋ True HEPA filter
Power cord with plug
(This product is suitable for
120V only.)
Odor
sensor
➊ Odor Absorbing Carbon
Filter
➌ PlasmaWave®
Control Panel / Display Panel
3-STAGE AIR PURIFICATION
Pre-filter

English
4
5300-2
소피아 2 영문
소피아 1
Air
Outlet
Vent
CONTROLS
Reset Button
After replacing a filter,
press the RESET button
for at least 5 seconds.
Fan Speed
Indicator
Indicates the
current fan speed.
Timer Indicator
If timer has been set, the
LED light indicates the set
time of operation.
PlasmaWave® Indicator
Indicates whether
PlasmaWave® is enabled or
disabled.
Air Quality
Indicator
Color-coded LED
indicates one of
three levels of air
quality.
Mode Button
Press to cycle through
and set the desired
mode of operation
(Auto, Sleep).
Power Button
Turns the unit on
or off.
Fan Speed Button
Enables Manual operation of the
unit. Press to cycle through and
set the desired fan speed (Low,
Medium, High, Turbo).
PlasmaWave
®
Button
Enables or disables
PlasmaWave
®
.
Light Sensor
Detects the
amount of
ambient light
within the
environment,
to adjust the
brightness
of the LED
indicators.
Timer Button
Press to cycle
through and set
desired length of
operation (1hr,
4hr, 8hr,[NO
TIMER])
Change Filter Indicator
LED light indicates when it is time to
change the filter.
Odor Sensor
When in Auto
Mode, detects the
amount of odor in
the environment
to adjust fan
speeds.

English
5
5300-2
WARNING Follow these instructions to reduce the risk of serious
injury or death and to reduce risk of damaging the unit.
WHERE TO USE
Do not use around mist or fumes from
industrial oil or around large quantities of
metallic dust
Do not install in any sort of motor or
transport vehicle (trucks, boats, ships, etc.)
Do not place near any flammable materials
(aerosols, fuel, gases etc.)
Do not place below any electrical outlet
Do not place around heating elements
Do not place in an area with excessive
amounts of noxious gases
Do not have unit facing into wind or draft
Do not place in excessively humid areas
where unit may become wet
Allow 12 ~ 18 in. of space between TVs, radios, and other electronic products
electromagnetic interference from certain electronics may cause product malfunction.
Place indoors away from direct sun light
direct exposure may cause product malfunction or failure.
Only place on hard, flat surfaces
flimsy or slanted surfaces may result in abnormal noise and vibrations.
This unit is not intended to be used to preserve documents or in art conservation.

English
6
5300-2
INSTALLING FILTERS
This product comes with all the required filters. The protective plastic
wrap must be removed from the filters before use
※ Operating the unit without removing the plastic wrap may result in
product failure.
※ Unplug and make sure the unit is turned off before installing filters.
③ Remove filters from protective plastic
wrap.
•Operating the unit without removing filters
from plastic wrap may cause abnormal
noise, deformation, or fire as a result of
overheating.
② Remove the filters from the unit, they
are protected inside a plastic wrap
① Remove the front panel by grasping
its upper edge and gently pulling
forward.
Latch
•Refer to pages 17 - 18 for details on how to replace filters.
Note

English
7
5300-2
※ Intervals between filter replacement may vary depending on environment.
※ For optimal use, Pre-filter can be cleaned once every 14 days which can extend
the life of other filters.
④ Install the filters until they fit securly
in place.
Filters must be installed in this order:
3True HEPA filter (rear)
2Carbon filter (middle)
1Pre-filter (front)
•
To install the Pre-filter, insert bottom
tabs into the slots on either side of
the lower part of the unit, then rotate
upward to insert the upper tabs into
the slots at the top part of the unit until
sides audibly click into place.
⑤ Replace the front panel by first
inserting the latch at the bottom
edge into the base of the unit, then
rotate the panel upward toward the
top of the unit until the magnets
pull the lid closed.
⑥ When to service and replace filters:
3
True HEPA
filter
2
Carbon filter
1
Pre-filter
Latch
Filter Indicator Light When to
service
When to replace
1Pre-filter none Clean once
every 14 days Permanent
2 Carbon filter none
Can NOT be
WASHED
Replace every 3
months
3 True HEPA filter Lasts up to
12 months
To purchase replacement
Winix filters:
(877)-699-4649
www.winixamerica.com
INSTALLING FILTERS

English
8
5300-2
SAFETY AND CAUTIONS
Before operating this equipment, carefully read and follow these safety
cautions
WARNING Follow these instructions to reduce the risk of serious
injury or death and to reduce risk of damaging the unit.
Do not pull on the power cord when
unplugging the unit
Do not touch the plug with wet hands
Do not plug additional appliances into the
same outlet or power supply
Unplug unit when not in operation for
extended periods of time
Do not tie or knot power cord when unit
is in operation
Do not unplug or move the unit while in
operation
If the unit becomes submerged in water,
unplug it and contact customer service
Cord can become damaged by forcefully
bending, pulling, twisting, bundling,
pinching or placing heavy objects on it
Ensure filters are inserted before running unit
running unit without filters can shorten the units life and cause electric shock or injury.
Be sure foreign objects are NOT inserted into the vents on the unit
objects can include pins, rods, and coins.
Do not touch any part of the interior of the unit with wet hands
the high voltage may cause electric shock.
Ensure unit intake and outlet vents do not become blocked
blockage may lead to increased internal termperatures causing product failure and derformation.
Do not use the unit as a step stool or place heavy objects on it
personal injury may occur or product failure and deformation.

English
9
5300-2
①
Insert the power cord into an electrical
outlet.
③
By default, when the unit first powers
on, the mode will be set to Auto with
PlasmaWave
®
enabled.
•When in Auto mode, the fan speed will
be automatically adjusted according to
the environments air quality.
•PlasmaWave
®
works to remove harmful
airborne contaminants.
소피아 2 영문
소피아 1
②
Press the ‘Power’ button.
소피아 2 영문
소피아 1
•During the first 30 seconds of power up, the Air Quality
Indicator will cycle through Blue, Yellow and Red colors. The
Smart Sensors take approximately 4 minutes to gauge the air
quality in the environment, after which normal operation will
begin.
Note
•In Auto mode, as the indoor air quality improves, the fan
speed will automatically be reduced to Low.
•When the unit is running, you may hear a chirping or buzzing
sound. The sound is from large particles passing through
PlasmaWave®, it is normal and does not signify product
failure. To disable PlasmaWave®, see page 12.
Note
INITIAL OPERATION

English
10
5300-2
1. Auto Mode
Enables auto operation based on the unit's air quality Smart Sensors.
소피아 2 영문
소피아 1
① Press the Mode button to select
Auto mode.
•The LED ‘Auto’ light will indicate
when Auto mode is activated, and
operation will begin.
•When in Auto mode the fan speed is automically adjusted
according to the indoor air quality. As the indoor air quality
improves, the fan speed will automatically be reduced. If the
indoor air quality decreases, the fan speed will automatically
increase.
Note
2. Sleep Mode
Press the Mode button to select
Sleep mode.
•The LED "Sleep" light will indicate when
Sleep mode is activated, and operation will
begin.
• When Sleep mode is selected, the fan speed is automatically
set to Low. The fan speed can be manually changed by
pressing the Fan Speed button, changing the unit into manual
mode.
• When Sleep Mode is activated, the Air Quality Indicator LED
light is disabled.
Note
AUTO & SLEEP
소피아 2 영문
소피아 1

English
11
5300-2
3. Manual Mode (setting fan speed)
Users can opt to manually set the fan speed to Low, Medium, High, or
Turbo.
• When Manual Mode is selected, Auto Mode is automatically
disabled.
Note
소피아 2 영문
소피아 1
소피아 2 영문
소피아 1
① Press the Fan Speed button to set
the desired fan speed.
4. Timer
The timer can be set to let the unit run for a specified period of time.
MANUAL & TIMER
① Press the Timer button to select
the desired length of time.
•When the Timer LED light will indicate
the selected length of operation.
•Every time the Timer button is
pressed, The Timer LED light will
cycle through the settings, (1hr, 4hr,
8hr, [NO TIMER]).

English
12
5300-2
6. Air Quality Indicator
When on, the LED light will indicate the current indoor air quality
according to three levels: BLUE (good), AMBER (fair), RED (poor).
• Air quality level is displayed on the indicator, based on the
Smart Sensors. Depending on the immediate environment,
the indicator may change frequently in color or stay the same
for lengthy periods of time.
Note
PLASMAWAVE®& AIR QUALITY INDICATOR
5. PlasmaWave®
By default, PlasmaWave
®
is enabled whenever the unit is powered on.
① Press the Plasmawave button,
when the unit is on, to enable or
disable this feature.
소피아 2 영문
소피아 1
•In Auto mode, as the indoor air quality improves, the fan
speed will automatically be reduced to Low.
•When the unit is running, you may hear a chirping or buzzing
sound. The sound is from large particles passing through
PlasmaWave®, it is normal and does not signify product
failure.
Note
소피아 2 영문
소피아 1
Air Quality Indicator

English
13
5300-2
Carbon filter / True
HEPA filter
※ Intervals between filter replacement may vary depending on environment.
※ For optimal use, Pre-filter can be cleaned once every 14 days which can extend
the life of other filters.
To purchase replacement
Winix filters:
(877)-699-4649
www.winixamerica.com
FILTER CARE
1. Know The Filters
When the Check Filter indicator LED is on, it is time to replace the True
HEPA filter.
• The filters’ life varies depending on the level of pollutants in
the air. The more dust present in the environment, the more
dust accumulates in the filters, shortening the life.
• If the filters are heavily soiled or have a bad odor, or if the fan
strength is significantly weakened, replace filters even if the
Change Filter indicator has not yet turned on.
Note
Filter Indicator Light When to
service
When to replace
1Pre-filter none Clean once
every 14 days Permanent
2 Carbon filter none
Can NOT be
WASHED
Replace every 3
months
3 True HEPA filter Lasts up to
12 months

English
14
5300-2
•For optimal performance, only Winix filters should be used
with this unit.
NOTICE
①
Remove the front panel by grasping its upper edge and gently pulling
forward.
②
Press on the Pre-filter tabs near the top of the filter, release and
remove.
③
Pull out the Carbon filter and True HEPA filter.
▶▶
Tabs
Pre-filter
Latch
FILTER CARE
2. Removing Filters
Turn the unit power off before removing filters.
①
Remove replacement filters from
protective plastic wrap.
•Operating the unit without removing
filters from plastic wrap may cause
abnormal noise, deformation, or fire as
a result of overheating.
3. Preparing New Filters

English
15
5300-2
①
After replacing the filters, turn the
power onto the unit and then use
a thin object, such as a paper clip,
to press the RESET switch for 5
seconds.
소피아 2 영문
소피아 1
Carbon
filter
① Insert the True HEPA filter first, then the Carbon filter.
② Insert the Pre-filter.
•
Insert bottom tabs of the Pre-filter into the slots on either side of the lower
part of the unit, then rotate upward to insert the upper tabs into the slots at the
top part of the unit until sides audibly click into place.
③
Replace the front panel by first inserting the latch at the bottom
edge into the base of the unit, then rotate the panel upward toward
the top of the unit until the magnets pull the lid closed.
▶
True
HEPA
filter
Latch
▶
Pre-filter
Tabs
4. Replacing Filters
5. Resetting The Unit
FILTER CARE

English
16
5300-2
6. Cleaning the filters
Intervals between filter cleaning may vary depending on the air quality.
•Do not use benzene, alcohol, or other volatile fluids, which
may cause damage or discoloration.
•The Pre-filter is resusable after cleaning, ensuring it is
completely dry.
•Do not use hot water over 104
o
F or volatile fluids such as
paint thinner.
•After washing the filter, allow it to dry completely in a well
ventilated area. Otherwise, it may develop a bad odor.
NOTICE
FILTER CARE
② Use a vacuum cleaner or soft
brush to clean the Pre-filter. If it
is excessively soiled, rinse in room
temperature water.
•Do not use detergent or soap.
•Allow the filter to dry for 24 hours or
more before using.
If the pre-filter becomes damaged or in any way needs replacement:
Please contact Winix
(877)-699-4649
www.winixamerica.com

English
17
5300-2
2. Cleaning the Exterior & Interior
CLEANING CARE
① Wipe with a soft damp cloth
using room temperature water.
Afterwards, wipe it down with a
clean dry cloth.
•To keep unit in peak condition, clean
every 1-2 months.
① Open the front panel and clean the
interior with a vacuum cleaner.
•For optimal perfomance, clean every
1-2 months.
•When cleaning the unit, always unplug the power cord first
and then wait until the unit has cooled down.
• Never disassemble, repair, or modify this unit yourself.
•Do not use flammable sprays or liquid detergents.
•Do not allow children to clean or maintain the unit.
•Before cleaning or maintaing, ensure unit is unplugged.
NOTICE

English
18
5300-2
Problem Check / Actions to take
It does not
turn on at all.
•Is the plug securely attached to the outlet?
-Make sure the outlet has power going to
it, and ensure the plug is secured.
•Is there a power outage?
-Check to see if other lights and electrical
equipment are working and try again.
It doesn’t work
in Auto Mode.
•Has Auto Mode been selected?
-Press the Mode button until Auto Mode is
selected.
•Is the sensor blocked or clogged?
-W i p e O d o r S e n s o r w i t h w e t c l o t h , t h e n
dry.
FREQUENTLY ASKED QUESTIONS

English
19
5300-2
Problem Check / Actions to take
It vibrates and makes
a lot of noise.
•
Is it running on a slanted or uneven surface?
-Move the unit to a hard, flat, even area of
the floor.
The power plug and
outlet feel hot.
•Is the plug securely plugged in?
-Make sure the plug is properly plugged
into the outlet.
There is a
strange smell.
•Is it being used in a place with a lot of
smoke, dust, or odors?
-Clean the air intakes on either side and
clean the pre-filter.
-Replace the Carbon and True HEPA filter.
The fan
strength is weak.
The unit is not
purifying the air.
•Is the Check Filter indicator light on?
-Change the filters as required.
The display
panel is dim.
•I
s the Light Sensor blocked by debris?
-When Auto Mode is on, Sleep Mode
is automatically activated when the Light
Sensor detects that the room is dark.
FREQUENTLY ASKED QUESTIONS

English
20
5300-2
Model Name
5300-2
Power Voltage AC120V/ 60Hz
Power Rate 70W
Room Area Served 360ft2
Dimensions 14.9 in(W) x 7.8 in(D) x 23.6 in(H)
Weight 17.6 lbs
Replacement Filter Filter A / Item: 115115
Pre-Filter Part #: 4521-0012-03
※ The exterior, design, and product specifications may be changed without prior notice
to improve product performance.
❖ Information regarding ENERGY EFFICIENCY RATING LABEL
The energy costs indicated on the ENERGY EFFICIENCY RATING LABEL may differ
from your actual energy costs, depending on your energy consumption, usage
hours, and billing changes, such as utility price increases.
UNIT SPECIFICATIONS
Warning: Change or modifications to this unit not expressly approved by the party responsible for
compliance could void the user's authority to operate the equipment.
Note: This equipment has been tested and found to comply with the limits for a Class B digital device,
pursuant to Part 15 of the FCC Rules. These limits are designed to provide reasonable protection against
harmful interference in a residential installation. This equipment generates, uses and can radiate radio
frequency energy and, if not installed and used in accordance with the instructions, and may cause harmful
interference to radio communications. However, there is no guarantee that interference will not occur in a
particular installation. If this equipment does cause harmful interference to radio or television reception,
which can be dteremined by turning the equipment off and on, the user is encouraged to try to correct the
interference by one or more of the following measures.
x
xReorient or relocate the receiving antenna.
x
xIncrease the separation between the equipment and receiver.
x
xConnect the equipment into an outlet on a circuit dierent from that to which the receiver is connected.
x
xConsult the dealer or on experienced radio/TV technician for help.
This device complies with Industry Canada's license-exempt RSSs. Operation is subject to the following two
conditions:
x
xThis device may not cause interference; and
x
xThis device must accept any interference, including interference that may cause undesired operation of the
device.
Other manuals for 5300-2
3
Table of contents
Other Winix Air Cleaner manuals

Winix
Winix 2020EU User manual

Winix
Winix 6300 User manual

Winix
Winix FreshHome PlasmaWave WACP150 User manual

Winix
Winix HR1000 User manual

Winix
Winix C535 User manual

Winix
Winix ZERO+ User manual

Winix
Winix Zero S Specification sheet

Winix
Winix 9800 User manual

Winix
Winix PlasmaWave 5300 User manual

Winix
Winix QS User manual

Winix
Winix Zero AUS-1050AZBU User manual

Winix
Winix NK305 User manual

Winix
Winix D480 User manual

Winix
Winix T1 User manual

Winix
Winix HR900 User manual

Winix
Winix ZERO User manual

Winix
Winix U300 User manual

Winix
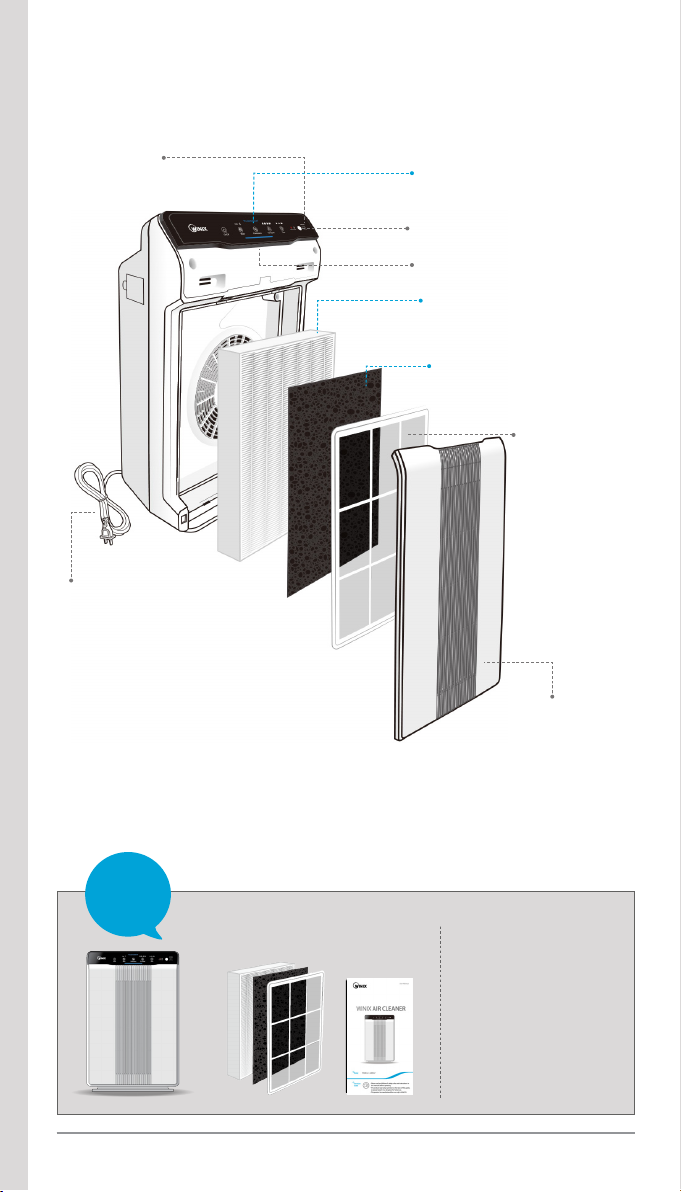
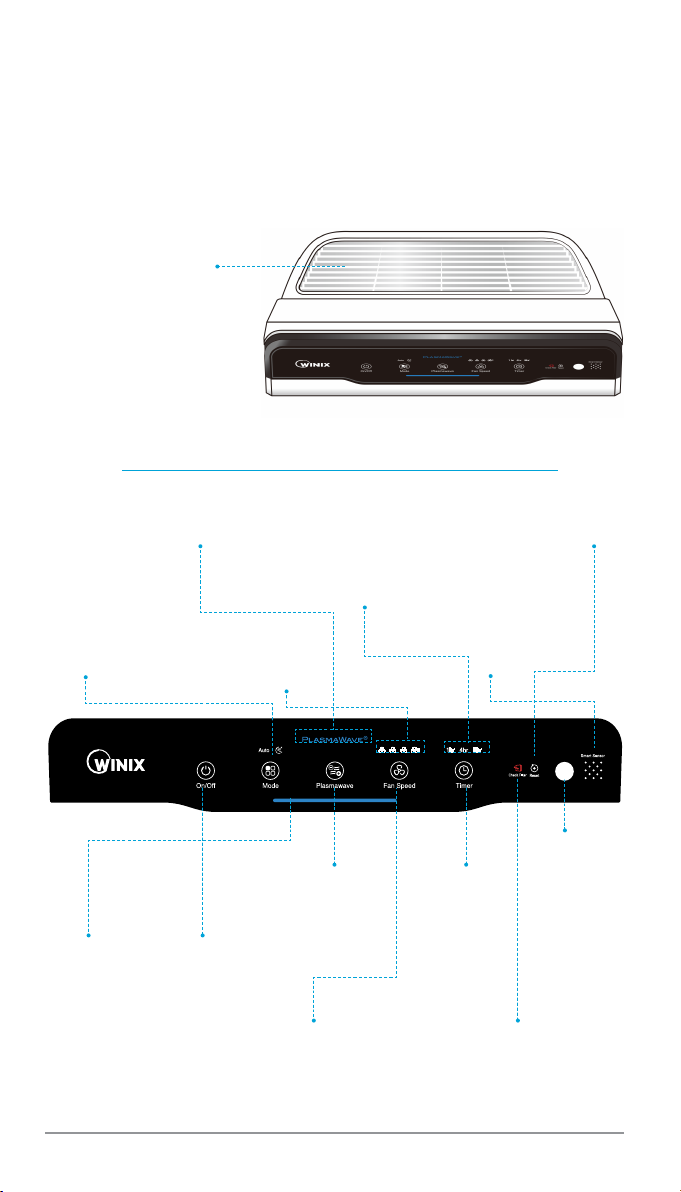
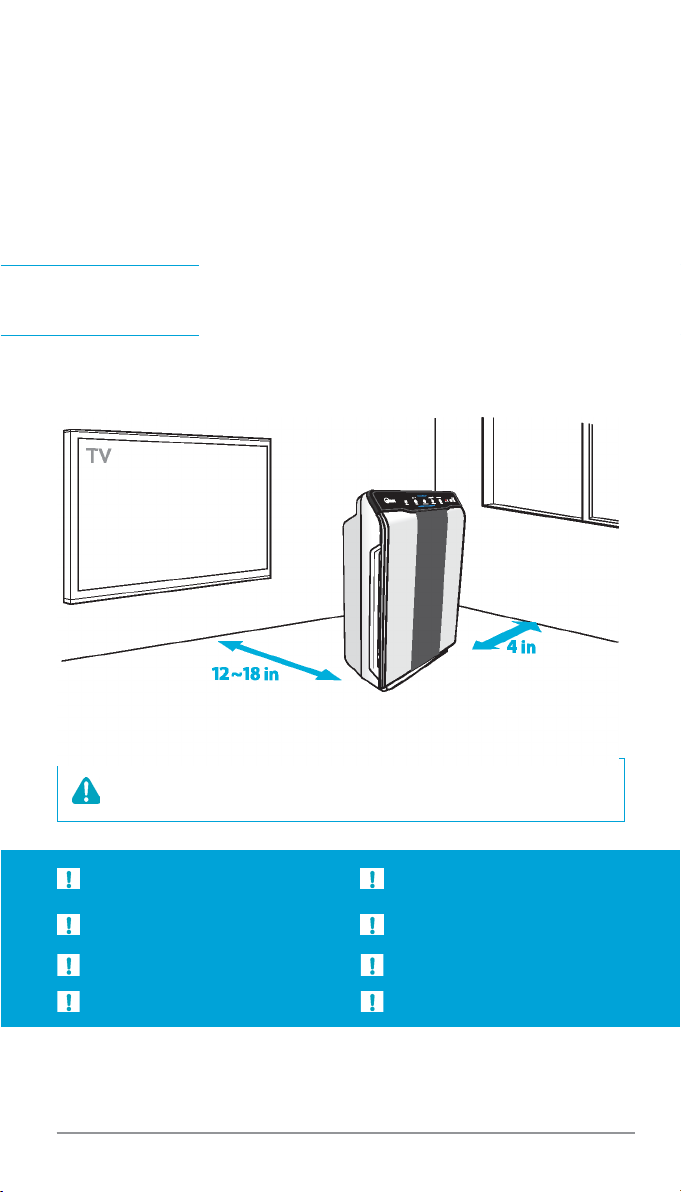
Winix Air Cleaner User manual

Winix
Winix AM90 User manual

Winix
Winix PlasmaWave 5300 User manual