Winix ZERO User manual

ˍPlease read and follow all safety rules and instructions
in this manual before operating.
ˍThe product warranty is printed on the back of this
guide, so please keep it in a safe place for future use.
WINIX AIR PURIFIER
ZERO (AZBU330-HWE)
User Manual
Model
Use & Care
Guide

ZEROEnglish
CONTENTS
French 24
Spanish 47
German 70
Italian 93
Dutch116
Polish139
▶This product is suitable for 220 - 240V only.
4-STAGE AIR PURIFICATION3
CONTROLS4
WHERE TO USE5
INSTALLING FILTERS6
SAFETY AND CAUTIONS8
INITIAL OPERATION9
AUTO & SLEEP10
MANUAL & TIMER11
PLASMAWAVE
®
& AIR QUALITY INDICATOR12
FILTER CARE13
PARTICLE SENSOR CARE17
CLEANING CARE18
FREQUENTLY ASKED QUESTIONS19
UNIT SPECIFICATIONS21
PRODUCT WARRANTY22

English ZERO
4-STAGE AIR PURIFICATION
Light sensor
Carbon lters
PlasmaWave
Control Panel / Display Panel
True HEPA lter
Particle
sensor
Front panel
Pre-lter
Power cord with plug
(This product is suitable
for 220V ~ 240V only.)
3
2
1
4
Unit Pre-lter/
(8) Carbon Filters/
(2) True HEPA Filter
User Manual

English ZERO
CONTROLS
소피아 1
Air
Outlet
Vent
소피아 2 영문
소피아 1
Reset Button
After replacing a lter,
press the RESET button
for at least 5 seconds.
Fan Speed
Indicator
Indicates the
current fan speed.
Timer Indicator
If timer has been set, the
LED light indicates the set
time of operation.
PlasmaWave Indicator
Indicates whether
PlasmaWave is enabled or
disabled.
Air Quality
Indicator
Color-coded LED
indicates one of
three levels of air
quality.
Mode Button
Press to cycle through
and set the desired
mode of operation
(Auto, Sleep).
Power Button
Turns the unit on
or o.
Fan Speed Button
Enables Manual operation of the
unit. Press to cycle through and
set the desired fan speed (Low,
Medium, High, Turbo).
PlasmaWave Button
Enables or disables
PlasmaWave .
Light Sensor
Detects the
amount of
ambient light
within the
environment,
to adjust the
brightness
of the LED
indicators.
Timer Button
Press to cycle
through and set
desired length of
operation (1hr,
4hr, 8hr,[NO
TIMER])
Change Filter Indicator
LED light indicates when it is time to
change the lter.

English ZERO
WHERE TO USE
Allow 30 - 45cm. of space between TVs, radios, and other electronic products
electromagnetic interference from certain electronics may cause product malfunction.
Place indoors away from direct sun light
direct exposure may cause product malfunction or failure.
Only place on hard, flat surfaces
flimsy or slanted surfaces may result in abnormal noise and vibrations.
30~45 cm
10 cm
WARNING Follow these instructions to reduce the risk of serious injury
or death and to reduce risk of damaging the unit.
Do not use around mist or fumes from
industrial oil or around large quantities of
metallic dust.
Do not place around heating elements.
Do not install in any sort of motor or
transport vehicle (trucks, boats, ships,
etc.).
Do not place in an area with excessive
amounts of noxious gases.
Do not place near any flammable
materials (aerosols, fuel, gases etc.).
Do not have unit facing into wind or draft.
Do not place below any electrical outlet. Do not place in excessively humid areas
where unit may become wet.
※ This unit is not intended to be used to preserve documents or in art
conservation.

English ZERO
This product comes with all required filters. The protective plastic wrap must be
removed from the filter before use.
※ Operating the unit without removing the plastic wrap may result in product
failure.
※ Unplug and make sure the unit is turned off before installing filter.
① Remove the front panel by grasping its
upper edge and gently pulling forward.
Latch
② Remove the filters from the unit, they are
protected inside a plastic wrap
③ Remove filters from protective plastic wrap.
ˍOperating the unit without removing
filters from plastic wrap may cause
abnormal noise, deformation, or fire as a
result of overheating.
Note
ˍRefer to pages 13 - 15for details on how to replace filters.
INSTALLING FILTERS

English ZERO
INSTALLING FILTERS
④ Install the filters until they fit securely in
place.
Filters must be installed in this order:
3 True HEPA Filter (rear)
2 Carbon filter (middle)
1 Pre-filter (front)
ˍTo install the Pre-filter, insert bottom tabs
into the slots on either side of the lower part
of the unit, then rotate upward to insert the
upper tabs into the slots at the top part of
the unit until sides audibly click into place.
True HEPA
lter
Carbon
lter
Pre-lter
⑤ Replace the front panel by first inserting
the latch at the bottom edge into the base
of the unit, then rotate the panel upward
toward the top of the unit until the magnets
pull the lid closed.
Latch
⑥ When to service and replace filter:
Filter Indicator Light When to
service When to replace
1 Pre-filter none Clean once every
14days Permanent
2 Carbon filter none
Can NOT be
WASHED
Replace every
3 months
3 True HEPA filter Lasts up to
6~12 months
※ Intervals between filter replacement may vary depending on environment.
※ For optimal use, Pre-filter can be cleaned once every 14days which can
extend the life of other filters.
To purchase replacement
Winix filters:
contact your local dealer
this unit
is compatible
with this
filter
FILTER
A
item: 115115

English ZERO
SAFETY AND CAUTIONS
Before operating this equipment, carefully read and follow these safety cautions
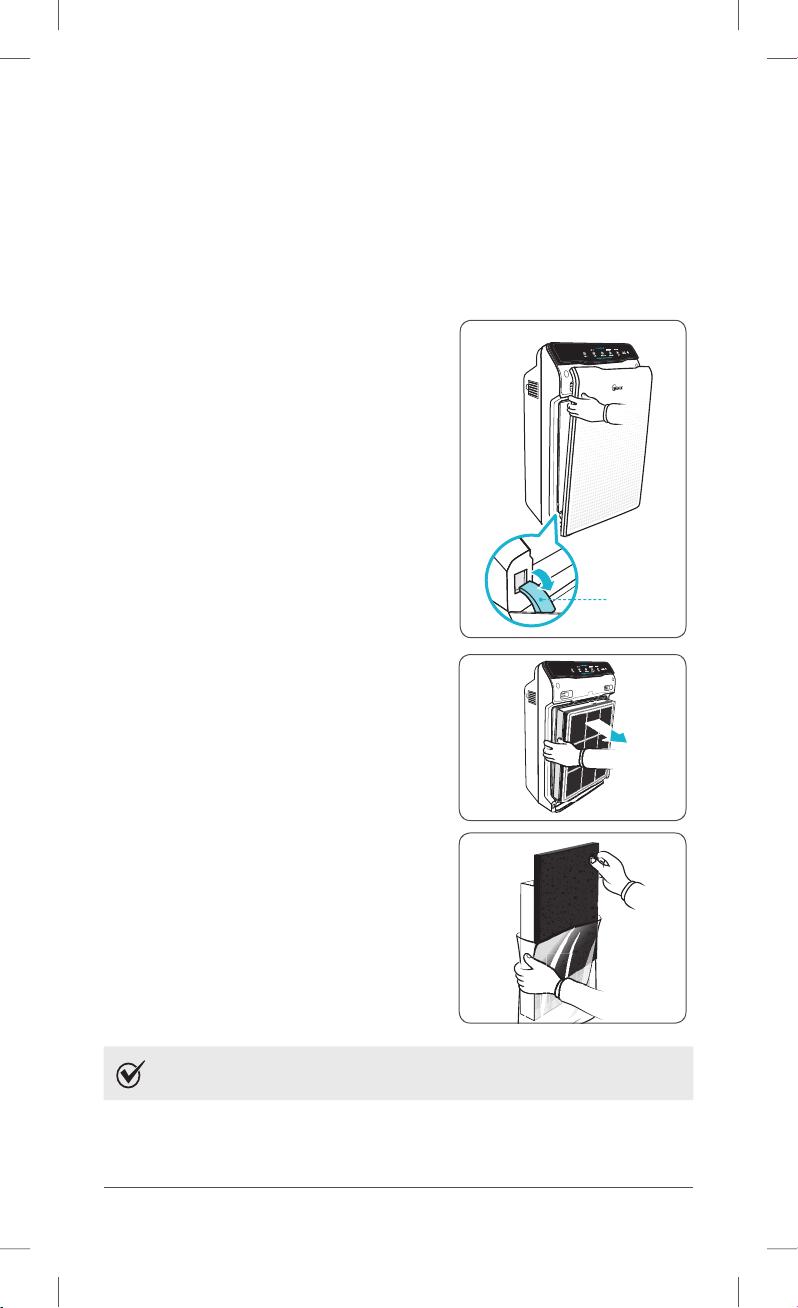
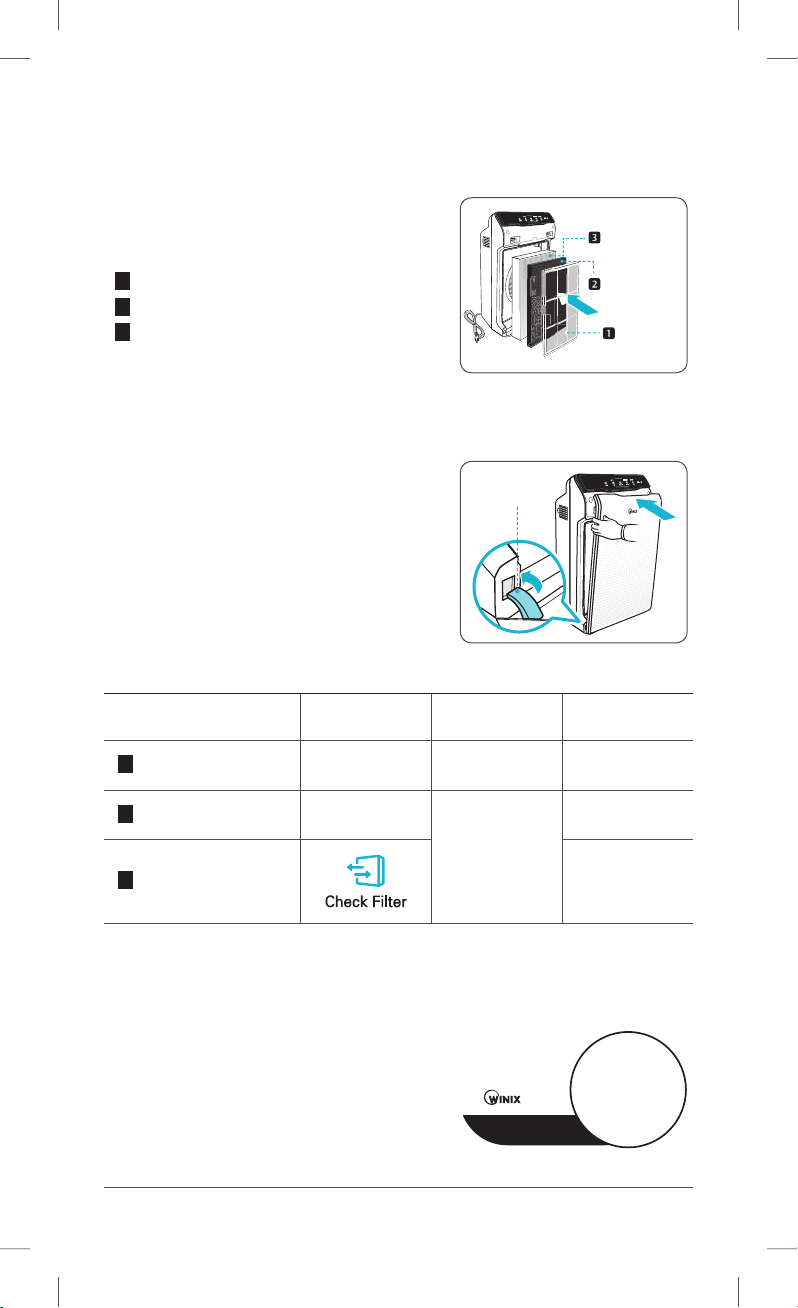
Ensure filters are inserted before running unit
running unit without filters can shorten the units life and cause electric shock or injury.
Be sure foreign objects are NOT inserted into the vents on the unit
objects can include pins, rods, and coins.
Do not touch any part of the interior of the unit with wet hands
the high voltage may cause electric shock.
Ensure unit intake and outlet vents do not become blocked
blockage may lead to increased internal termperatures causing product failure and
derformation.
Do not use the unit as a step stool or place heavy objects on it
personal injury may occur or product failure and deformation.
WARNING Follow these instructions to reduce the risk of serious
injury or death and to reduce risk of damaging the unit.
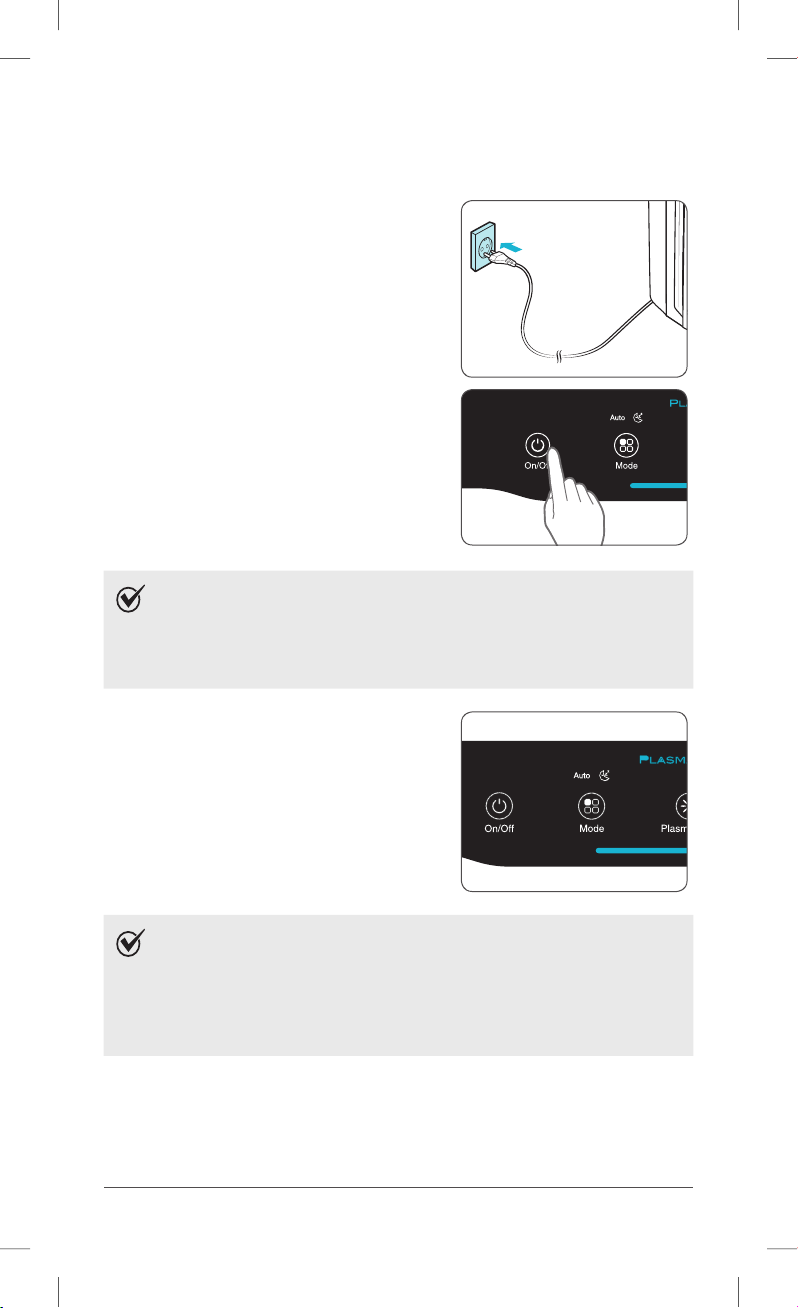
Do not pull on the power cord when
unplugging the unit
Do not tie or knot power cord when unit
is in operation
If the unit becomes submerged in water,
unplug it and contact customer service
Do not unplug or move the unit while in
operation
Do not plug additional appliances into
the same outlet or power supply
Do not touch the plug with wet hands
Unplug unit when not in operation for
extended periods of time
Cord can become damaged by forcefully
bending, pulling, twisting, bundling,
pinching or placing heavy objects on it
※ If the supply cord is damaged, it must be replaced by a special cord or assembly
available from the manufacturer or its service agent.
※ This appliance is not intended for use by a person (including children) with reduced
physical sensory or mental capabilities, or lack of experience and knowledge, unless
they have been given supervision or instruction concerning use of the appliance by
a person responsible for their safety.
※ Children should be supervised to ensure that they do not play with the appliance.

English ZERO
INITIAL OPERATION
① Insert the power cord into an electrical
outlet.
② Press the ‘Power’ button.
Note
ˍDuring the first 30seconds of power up, the Air Quality
Indicator will cycle through Blue, Yellow and Red colors.
The Particle Sensors take approximately 30seconds to
gauge the air quality in the environment, after which normal
operation will begin.
③ By default, when the unit first powers on, the
mode will be set to Auto with PlasmaWave
®
enabled.
ˍWhen in Auto mode, the fan speed will
be automatically adjusted according to
the environments air quality.
ˍPlasmaWave
®
works to remove harmful
airborne contaminants.
Note
ˍIn Auto mode, as the indoor air quality improves, the fan
speed will automatically be reduced to Low.
ˍWhen the unit is running, you may hear a chirping or buzzing
sound. The sound is from large particles passing through
PlasmaWave
®
, it is normal and does not signify product
failure. To disable PlasmaWave
®
, see page 12.

English ZERO
AUTO & SLEEP
1. Auto Mode
Enables auto operation based on the unit's air quality Particle Sensor.
① Press the Mode button to select Auto mode.
ˍThe LED ‘Auto’ light will indicate when
Auto mode is activated, and operation
will begin.
Note
ˍWhen in Auto mode the fan speed is automatically adjusted
according to the indoor air quality. As the indoor air quality
improves, the fan speed will automatically be reduced.
If the indoor air quality decreases, the fan speed will
automatically increase.
2. Sleep Mode
① Press the Mode button to select Sleep mode.
ˍThe LED "Sleep" light will indicate when
Sleep mode is activated, and operation
will begin.
Note
ˍWhen Sleep mode is selected, the fan speed is automatically
set to Low. The fan speed can be manually changed by
pressing the Fan Speed button, changing the unit into
manual mode.
ˍWhen Sleep Mode is activated, the Air Quality Indicator LED
light is disabled.

English ZERO
MANUAL & TIMER
3. Manual Mode (setting fan speed)
Users can opt to manually set the fan speed to Low, Medium, High, or Turbo.
① Press the Fan Speed button to set the
desired fan speed.
Note
ˍWhen Manual Mode is selected, Auto Mode is automatically
disabled.
4. Timer
The timer can be set to let the unit run for a specified period of time.
① Press the Timer button to select the desired
length of time.
ˍWhen the Timer LED light will indicate
the selected length of operation.
ˍEvery time the Timer button is pressed,
The Timer LED light will cycle through
the settings, (1hr, 4hr, 8hr, [NO TIMER]).

English ZERO
PLASMAWAVE®& AIR QUALITY INDICATOR
5. PlasmaWave
®
By default, PlasmaWave
®
is enabled whenever the unit is powered on.
① Press the Plasmawave button, when the unit
is on, to enable or disable this feature.
Note
ˍIn Auto mode, as the indoor air quality improves, the fan
speed will automatically be reduced to Low.
ˍWhen the unit is running, you may hear a chirping or buzzing
sound. The sound is from large particles passing through
PlasmaWave
®
, it is normal and does not signify product
failure.
6. Air Quality Indicator
When on, the LED light will indicate the current indoor air quality according to three
levels: BLUE (good), AMBER (fair), RED (poor).
Air Quality Indicator
Note
ˍAir quality level is displayed on the indicator, based on the
Particle Sensors. Depending on the immediate environment,
the indicator may change frequently in color or stay the
same for lengthy periods of time.

English ZERO
FILTER CARE
1. Know The Filters
When the Check Filter indicator LED is on, it is time to replace both the True HEPA and
Carbon Filters.
Filter Indicator Light When to
service When to replace
1 Pre-filter none Clean once every
14days Permanent
2 Carbon filter none
Can NOT be
WASHED
Replace every
3 months
3 True HEPA filter Lasts up to
6~12 months
※ Intervals between filter replacement may vary depending on environment.
※ For optimal use, Pre-filter can be cleaned once every 14days which can
extend the life of other filters.
To purchase replacement
Winix filters:
contact your local dealer
this unit
is compatible
with this
filter
FILTER
A
item: 115115
Carbon lter/
True HEPA lter
Note
ˍThe filters’ life varies depending on the level of pollutants in
the air. The more dust present in the environment, the more
dust accumulates in the filters, shortening the life.
ˍIf the filters are heavily soiled or have a bad odour, or if the
fan strength is significantly weakened, replace filters even if
the Change Filter indicator has not yet turned on.

English ZERO
FILTER CARE
2. Removing Filters
Turn the unit power off before removing filters.
① Remove the front panel by grasping its
upper edge and gently pulling forward.
Latch
② Press on the Pre-filter tabs near the top of
the filter, release and remove.
Tabs
Pre-lter
③ Pull out the Carbon filter and True HEPA
Filter.
3. Preparing New Filters
① Remove replacement filters from protective
plastic wrap.
ˍOperating the unit without removing
filters from plastic wrap may cause
abnormal noise, deformation, or fire as a
result of overheating.
NOTICE
ˍFor optimal performance, only Winix filters should be used
with this unit.

English ZERO
FILTER CARE
4. Replacing Filters
① Insert the True HEPA Filter first, then the
Carbon filter.
Carbon lter
True HEPA
lter
② Insert the Pre-filter.
ˍInsert bottom tabs of the Pre-filter into
the slots on either side of the lower part
of the unit, then rotate upward to insert
the upper tabs into the slots at the top
part of the unit until sides audibly click
into place.
Tabs
Pre-lter
③ Replace the front panel by first inserting
the latch at the bottom edge into the base
of the unit, then rotate the panel upward
toward the top of the unit until the magnets
pull the lid closed.
Latch
5. Resetting The Unit
① After replacing the filters, turn the power
back on and then use a thin object, such as
a paper clip, to press the RESET switch for
5seconds.

English ZERO
FILTER CARE
6. Cleaning the filter
Intervals between filter cleaning may vary depending on the air quality.
① Use a vacuum cleaner or soft brush to clean
the Pre-filter. If it is excessively soiled, rinse
in room temperature water.
ˍDo not use detergent or soap.
ˍAllow the filter to dry for 24hours or
more before using
※ If the pre-filter becomes damaged
or in any way needs replacement:
Please contact your local
dealer
NOTICE
ˍDo not use benzene, alcohol, or other volatile fluids, which
may cause damage or discoloration.
ˍThe Pre-filter is reusable after cleaning, ensuring it is
completely dry.
ˍDo not use hot water over 40
o
C or volatile fluids such as
paint thinner.
ˍAfter washing the filter, allow it to dry completely in a well
ventilated area. Otherwise, it may develop a bad odour.

English ZERO
PARTICLE SENSOR CARE
Particle Sensors Care
For optimal performance of the Particle Sensor, which detects airborne dust and
ultrafine particles, clean it every two months. Clean it more frequently when the unit is
running in a place with high dust levels.
① Open the Particle Sensor cover.
② Use a damp cotton swab to wipe the lens
and intake area of the Particle Sensor.
ˍTo clean the sensor area, use only water.
Do not use volatile substances such as
alcohol or acetone
Lens
Cotton swab
③ Wipe away any remaining moisture with a
dry cotton swab.
④ Close the Particle Sensor cover.
ˍThe Particle Sensors cover may be
cleaned using a vacuum cleaner

English ZERO
CLEANING CARE
1. Cleaning the Exterior & Interior
① Wipe with a soft damp cloth using room
temperature water. Afterwards, wipe it
down with a clean dry cloth.
ˍTo keep unit in peak condition, clean
every 1-2months.
② Open the front panel and clean the interior
with a vacuum cleaner.
ˍFor optimal performance, clean every
1-2months.
NOTICE
ˍWhen cleaning the unit, always unplug the power cord first
and then wait until the unit has cooled down.
ˍNever disassemble, repair, or modify this unit yourself.
ˍDo not use flammable sprays or liquid detergents.
ˍDo not allow children to clean or maintain the unit.
ˍBefore cleaning or maintaining, ensure unit is unplugged.

English ZERO
FREQUENTLY ASKED QUESTIONS
Problem Check / Actions to take
It does not
turn on at all.
ˍIs the plug securely attached to the outlet?
Make sure the outlet has power going to it, and
ensure the plug is secured.
ˍIs there a power outage?
Check to see if other lights and electrical
equipment are working and try again.
It doesn’t work
in Auto Mode.
ˍHas Auto Mode been selected?
Press the Mode button until Auto Mode is
selected.
ˍIs the sensor blocked or clogged?
Wipe Odour Sensor with wet cloth, then dry.
It vibrates and
makes a lot of
noise.
ˍIs it running on a slanted or uneven surface?
Move the unit to a hard, flat, even area of the
floor.

English ZERO
FREQUENTLY ASKED QUESTIONS
Problem Check / Actions to take
The power plug
and outlet feel
hot.
ˍIs the plug securely plugged in?
Make sure the plug is properly plugged into the
outlet.
There is a strange
smell.
ˍIs it being used in a place with a lot of smoke, dust,
or odours?
Clean the air intakes on either side and clean
the pre-filter.
Clean or change the filter.
The fan strength is
weak.
The unit is not
purifying the air.
ˍIs the Check Filter indicator light on?
Change the filters as required.
The display panel
is dim.
ˍIs the Light Sensor blocked by debris?
When Auto Mode is on, Sleep Mode is
automatically activated when the Light Sensor
detects that the room is dark.
Other manuals for ZERO
2
This manual suits for next models
1
Table of contents
Languages:
Other Winix Air Cleaner manuals

Winix
Winix C555 User manual

Winix
Winix AUS-0850AAPU User manual

Winix
Winix HR950 User manual

Winix
Winix ZERO+ WiFi User manual

Winix
Winix 2020EU User manual

Winix
Winix ZERO+ WiFi User manual

Winix
Winix AM90 User manual

Winix
Winix AM90 User manual

Winix
Winix PlasmaWave WACU300 User manual

Winix
Winix AAPU500-JLE User manual