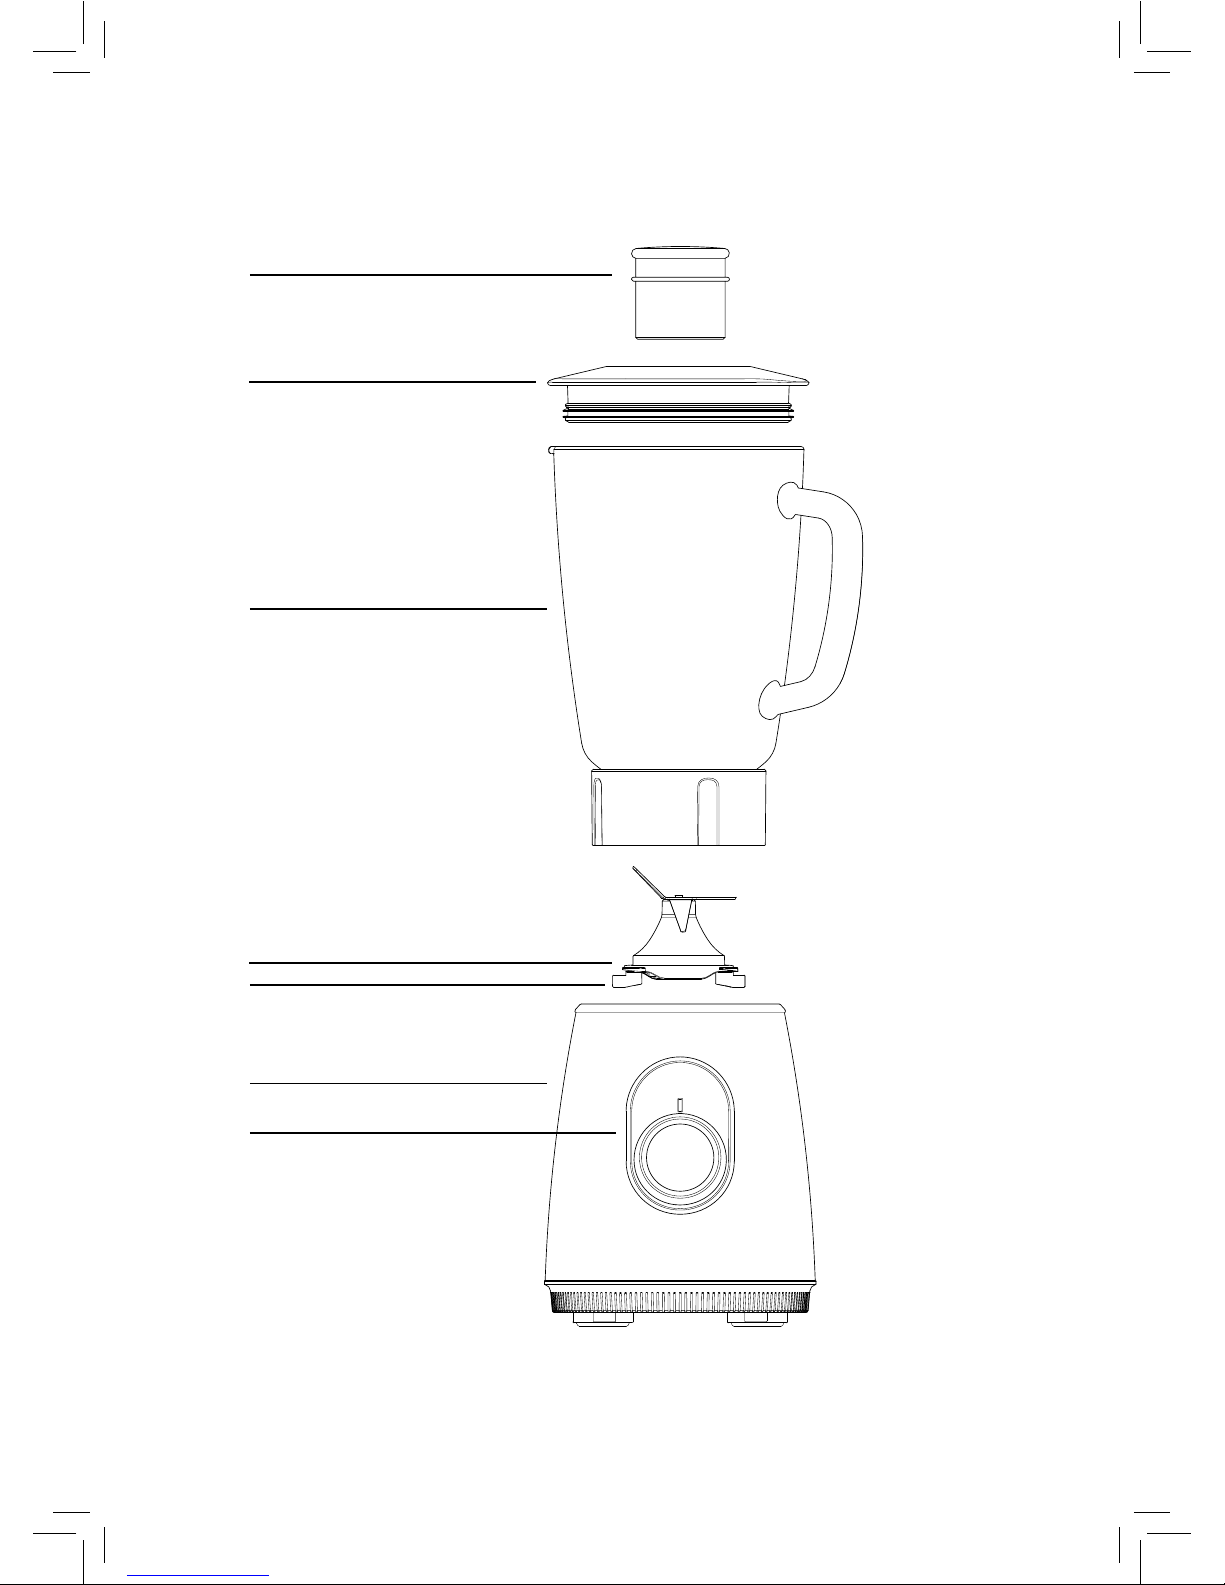
WMF KULT X User manual

Standmixer 1,5l
KULT X
Gebrauchsanweisung 4
Operating Manual 10
Mode d’emploi 16
Istruzioni per l’uso 22
Instrucciones de uso 28
de
en
fr
it
es
nl
da
sv
no
Gebruiksaanwijzing 34
Brugsanvisning 40
Användarguide 46
Käyttöohje 52
Bruksanvisning 58

1
2
3
4
5
6
7

Aufbau Standmixer
1 Verschlusskappe
2 Deckel
3 Glaskrug mit Sockel
4 Dichtring
5 Messerbaugruppe
6 Antriebseinheit
7 Wahlschalter
Table blender components
1 Cap
2 Lid
3 Glass jar with base
4 Sealing ring
5 Blade assembly
6 Drive unit
7 Selector switch
Montage du mixeur sur pied
1 Capuchon
2 Couvercle
3 Broc en verre avec socle
4 Joint
5 Bloc à couteaux
6 Bloc moteur
7 Sélecteur
Struttura del frullatore
1 Cappuccio
2 Coperchio
3 Brocca di vetro con base
4 Guarnizione
5 Gruppo lame
6 Unità di azionamento
7 Interruttore nella modalità
Montaje de la batidora de pie
1 Capuchón
2 Tapa
3 Jarra de cristal con zócalo
4 Anillo de junta
5 Unidad de cuchillas
6 Unidad de accionamiento
7 Conmutador selector
Componenten van staande
mixer
1 Afsluitkap
2 Deksel
3 Glazen kan met sokkel
4 Afdichtring
5 Messenmodule
6 Aandrijfunit
7 Keuzeschakelaar
Produktoversigt bordblender
1 Lukningskappe
2 Låg
3 Glaskande med base (3)
4 Tætningsring
5 Knivholder
6 Drivenhed
7 På omskifteren
Mixerns delar
1 Propp
2 Lock
3 Glaskanna med sockel
4 Tätningsring
5 Knivenhet
6 Drivenhet
7 Omkopplaren
Tehosekoittimen osat
1 Syöttöaukon korkki
2 Kansi
3 Lasikannu jalustalla
4 Tiivisterengas
5 Teräosa
6 Käyttöyksikkö
7 Valintakytkin
Mikser
1 Deksel
2 Lokk
3 Glassmugge med sokkel
4 Tetningsring
5 Knivinnretning
6 Drivenhet
7 Bryteren

4
Gebrauchsanweisung
Wichtige Sicherheitshinweise
▪ Geräte können von Personen mit reduzierten physi-
schen, sensorischen oder mentalen Fähigkeiten oder
Mangel an Erfahrung und/oder Wissen benutzt werden,
wenn sie beaufsichtigt oder bezüglich des sicheren
Gebrauchs des Gerätes unterwiesen wurden und die
daraus resultierenden Gefahren verstanden haben.
▪ Dieses Gerät darf durch Kinder nicht benutzt werden.
Das Gerät und seine Anschlussleitung ist von Kindern
fernzuhalten.
▪ Kinder sollten beaufsichtigt werden, um sicherzustellen,
dass sie nicht mit dem Gerät spielen.
▪ Das Gerät ist bei nicht vorhandener Aufsicht, bei Stö-
rung während des Betriebs und vor dem Zusammenbau,
dem Auseinandernehmen oder Reinigen stets durch
Ziehen des Netzsteckers vom Netz zu trennen.
▪ Wenn die Netzanschlussleitung dieses Gerätes beschä-
digt wird, muss sie durch den Hersteller oder seinen
Kundendienst oder eine ähnlich qualifizierte Person
ersetzt werden, um Gefährdungen zu vermeiden.
▪ Vorsicht beim Umgang mit den scharfen Schneidmes-
sern sowie beim Leeren des Krugs und beim Reinigen.
▪ Nach jedem Gebrauch den Glaskrug reinigen.
Vor dem Benutzen
Der Mixer darf nur für den vorgesehenen Zweck gemäß dieser Gebrauchsan-
weisung verwendet werden. Lesen Sie die Gebrauchsanweisung deshalb vor der
Inbetriebnahme sorgfältig. Sie gibt Anweisungen für den Gebrauch, die Reinigung
und die Pflege des Gerätes. Bei Nichtbeachtung übernehmen wir keine Haftung
für eventuelle Schäden. Bewahren Sie die Gebrauchsanweisung sorgfältig auf und
geben Sie diese gemeinsam mit dem Gerät an Nachbenutzer weiter. Beachten
Sie auch die Garantiehinweise am Ende. Das Gerät ist nicht für den gewerblichen
Gebrauch bestimmt, sondern nur für die Zubereitung von Lebensmitteln in
haushaltsüblichen Mengen.
Beim Gebrauch die Sicherheitshinweise beachten.
Technische Daten
Nennspannung: 220 – 240 V~ 50/60 Hz
Leistungsaufnahme: 800 W
Schutzklasse: II

5
de
de
Sicherheitshinweise
▪ Gerät nur an eine vorschriftsmäßig installierte Schutzkontaktsteckdose
anschließen. Zuleitung und Stecker müssen trocken sein.
▪ Die Anschlussleitung nicht über scharfe Kanten ziehen oder einklemmen, nicht
herunterhängen lassen sowie vor Hitze und Öl schützen.
▪ Das Gerät nicht auf heiße Oberflächen wie Herdplatten o. Ä. stellen und nicht
in der Nähe offener Flammen betreiben.
▪ Den Netzstecker nicht an der Leitung oder mit nassen Händen aus der Steck-
dose ziehen.
▪ Das Gerät nicht mit leerem Glaskrug einschalten.
▪ Das Gerät immer mit geschlossenem Deckel betreiben. Vor Abnehmen
des Deckels bzw. des Glaskruges unbedingt den Stillstand des Messers
abwarten.
▪ Bei laufendem Gerät keinesfalls mit Gegenständen im Glaskrug hantieren.
▪ Nicht in den Krug hinein greifen, bevor der Netzstecker gezogen ist.
▪ Vor dem Abnehmen des Glaskruges unbedingt den Wahlschalter auf die Aus-
Stellung 0 stellen.
▪ Achtung! Beim Verarbeiten von heißen Lebensmitteln besteht Verbrühungs-
gefahr. Im Extremfall könnte der Glaskrug beschädigt werden. Es dürfen nur
Lebensmittel mit maximal 60°C verarbeitet werden. In diesem Fall den Krug
höchstens halb füllen und den Deckel während des Betriebs mit der Hand fest
auf den Krug drücken.
▪ Vor dem Auswechseln von Zubehör oder Zusatzteilen, die im Betrieb bewegt
werden, muss das Gerät ausgeschaltet und vom Netz getrennt werden.
▪ Das Gerät nicht in Betrieb nehmen bzw. sofort Netzstecker ziehen, wenn:
⋅Gerät oder Netzkabel beschädigt ist
⋅der Verdacht auf einen Defekt nach einem Sturz oder Ähnlichem besteht.
In diesen Fällen das Gerät zur Reparatur geben.
▪ Die Antriebseinheit nicht in Wasser tauchen.
▪ Bei Zweckentfremdung, falscher Bedienung oder nicht fachgerechter Repa-
ratur wird keine Haftung für eventuelle Schäden übernommen. Ebenso sind
Garantieleistungen in solchen Fällen ausgeschlossen.
▪ Das Gerät ist nicht für den gewerblichen Gebrauch bestimmt.

6
Antriebseinheit
Die Drehzahl des leistungsstarken Motors können Sie am Wahlschalter (7) der
Antriebseinheit (6) stufenlos einstellen.
So lange Sie die Taste PULSE gedrückt halten, läuft der Motor mit maximaler
Drehzahl. Dies ist besonders nützlich zum nochmaligen Durchmischen vor dem
Ausgießen oder bei der Zerkleinerung von Eiswürfeln.
Um die Taste PULSE zu drücken, muss der Wahlschalter (7) auf der Position P
stehen oder das Gerät schon im Betrieb sein.
Achtung: Der Mixer lässt sich nur mit korrekt aufgesetztem Glaskrug (3) einschal-
ten. Eine Sicherheitsabschaltung verhindert den Betrieb ohne Krug (3).
Glaskrug
Die Verschlusskappe (1) im Deckel (2) kann durch Drehung im Uhrzeigersinn
abgenommen und als Messbecher (10/30/50 ml) verwendet werden.
Insbesondere zum Reinigen lässt sich der Glaskrug (3) demontieren. Stellen Sie ihn
dazu mit der Öffnung nach unten auf den Tisch und drehen Sie die Messerbau-
gruppe (5) im Uhrzeigersinn (siehe Abbildung).
Sie können nun die Messerbaugruppe (5) und den Dichtring (4) entnehmen.
Zur Montage wird zuerst der Dichtring (4) an der Messerbaugruppe (5) ange-
bracht. Achten Sie dabei auf den korrekten Sitz des Dichtrings (4) auf der Messer-
baugruppe (5). Setzen Sie die Messerbaugruppe (5) anschließend in den Glaskrug
(3) und drehen Sie diese gegen den Uhrzeigersinn fest.
Hinweis: Um die Dichtheit des Glaskruges zu gewährleisten, muss die Messerbau-
gruppe fest aufgedreht sein. Die Messerbaugruppe lässt sich leichter festdrehen,
wenn Sie einige Tropfen Speiseöl auf die Dichtseite des Glaskruges auftragen
(siehe Abb.).

7
de
Inbetriebnahme
Reinigen Sie Glaskrug (3), Deckel (2) und Verschlusskappe (1) vor der ersten Inbe-
triebnahme. Achten Sie darauf, dass Sie sich am scharfen Messer nicht verletzen.
Setzen Sie den Glaskrug (3) auf die Antriebseinheit (6).
Füllen Sie die Zutaten ein, verschließen Sie den Glaskrug (3) mit Deckel (2) und
Verschlusskappe (1) und stellen Sie den Wahlschalter (7) auf die gewünschte
Betriebsart.
Drehzahl Anwendung maximale Zeit
niedrig
(min)
Instant-Getränke, weiche Früchte und
Cocktails mit Alkohol
40-60 s
niedrig
(min)
Milchshakes 1 – 2 min
mittel Suppen, Milchshakes mit härteren
Früchten, Soßen, Babynahrung,
Gemüse
1,5 – 2 min
hoch
(max)
Nüsse, harter Käse, trockenes Brot 40-60 s
Weitere Zutaten können nach dem Abnehmen der Verschlusskappe (1) auch bei
laufendem Motor hinzugefügt werden.
Zerkleinern von Eiswürfeln
Füllen Sie maximal 10 Eiswürfel ein und verschließen Sie den Glaskrug mit Deckel
und Verschlusskappe. Stellen Sie den Wahlschalter (7) auf die Position P und
halten Sie die Taste PULSE für wenige Sekunden gedrückt.
Sobald die Eiswürfel wieder am Boden des Glaskruges liegen, können Sie erneut
für einige Sekunden die Taste PULSE drücken. Wiederholen Sie den Vorgang so
lange, bis das zerkleinerte Eis die gewünschte Konsistenz erreicht hat.
Allgemeine Hinweise
Als maximale Füllmenge wird 1,5 l empfohlen. Bei Füllung darüber hinaus könnte
es je nach Konsistenz der Zutaten zum Überlaufen kommen.
Sobald die Menge verarbeitet ist, schalten Sie das Gerät aus. Keinesfalls das
Gerät leer betreiben. Lassen Sie das Gerät nach der in der Tabelle angegebenen
maximalen Betriebszeit abkühlen, um den Motor nicht zu überlasten.
Tip: Besonders bei flüssigen Lebensmitteln empfehlen wir die Füllmenge zu
reduzieren um das Ausgießen zu erleichtern.
Vor dem Abnehmen des Glaskruges (3) unbedingt den Wahlschalter auf die Aus-
Stellung 0stellen.
Achtung, Verletzungsgefahr! Vor dem Abnehmen des Deckels (2) unbedingt
den Stillstand des Messers abwarten. Nicht in das Gerät hineingreifen,
solange der Netzstecker in der Steckdose steckt. Nach dem Gebrauch den
Glaskrug (3) vollständig entleeren. Keine Flüssigkeit im Krug (3) stehen lassen.

8
Reinigung und Pflege
Nach Gebrauch Netzstecker ziehen. Die Antriebseinheit (6) keinesfalls in Wasser
tauchen, sondern außen nur mit einem feuchten Tuch abwischen. Keine
scheuernden Reinigungsmittel verwenden. Achten Sie darauf, dass Sie sich beim
Reinigen des Glaskruges (3) nicht am scharfen Messer verletzen. Füllen Sie
unmittelbar nach dem Mixen warmes Spülwasser ein und lassen Sie den Motor
einige Sekunden laufen. Anschließend den Glaskrug (3) abnehmen und mit einer
Spülbürste reinigen.
spülmaschinen-
geeignet
unter fließendem
Wasser abspülbar
feucht abwischen
Verschluss-
kappe (1)
Deckel (2)
Glaskrug mit
Sockel (3)
Dichtring (4)
Messerbau-
gruppe (5)
Antriebseinheit
(6)
Garantie-Information
Für unsere Geräte übernehmen wir gegenüber dem Endkunden eine 24-monatige
Haltbarkeitsgarantie. Sie beginnt mit dem Kauf des Gerätes durch den Endkunden
und gilt im Gebiet der Bundesrepublik Deutschland.
Ansprüche aus dieser Garantie sind unter Vorlage des Kaufbelegs direkt gegen-
über unserem zentralen Kundendienst geltend zu machen.
Von der Garantie ausgeschlossen sind Schäden durch normalen Verschleiß,
unsachgemäßen Gebrauch, Glasbruch sowie unterbliebene Pflege.
Der Endkunde besitzt zusätzlich zu den Ansprüchen aus dieser Garantie gesetzli-
che Ansprüche wegen Mängeln des Gerätes gegenüber seinem direkten Verkäu-
fer/Händler, die durch diese Garantie nicht eingeschränkt werden.

9
de
Das Gerät entspricht den Europäischen Richtlinien 2006/95/EG, 2004/108/EG und
2009/125/EG.
Die Konformität nach EN60335 Klausel 11 wurde durch Verwendung des folgen-
den Rezeptes überprüft: 650g Karotten + 850g Wasser
Betrieb: 60 Sekunden, Drehzahl max
Dieses Produkt darf am Ende seiner Lebensdauer nicht über den normalen
Haushaltsabfall entsorgt werden, sondern muss an einem Sammelpunkt für das
Recycling von elektrischen und elektronischen Geräten abgegeben werden.
Die Werkstoffe sind gemäß ihrer Kennzeichnung wiederverwertbar. Mit der Wie-
derverwendung, der stofflichen Verwertung oder anderen Formen der Verwertung
von Altgeräten leisten Sie einen wichtigen Beitrag zum Schutze unserer Umwelt.
Bitte erfragen Sie bei der Gemeindeverwaltung die zuständige Entsorgungsstelle.
Änderungen vorbehalten

10
Operating Manual
Important safety information
▪ Devices can be used by persons with limited physical, sensory or men-
tal capabilities, and persons lacking experience and/or lacking knowl-
edge, if they are supervised or have received instructions regarding
how the device is to be used safely and have understood the resulting
hazards.
▪ This device may not be used by children. The device and its connecting
cable are to be kept away from children.
▪ Children should be supervised in order to ensure that they do not play
with the device.
▪ The device is always to be disconnected from the mains by discon-
necting the power plug when there is no supervision present or for a
fault during operation, prior to assembly, disassembly or cleaning.
▪ If the supply cable of this device is damaged, the manufacturer, their
customer service or a similarly qualified person must replace it in
order to avoid hazards.
▪ Use caution when handling the sharp cuttings blades, when emptying
the jar and when cleaning.
▪ Clean the glass jar after each use.
Prior to use
The mixer may only be used for its intended purpose according to these operating instructions.
Therefore, carefully read the operating instructions prior to commissioning. It provides instructions for
using, cleaning and maintaining of the device. We do not assume any liability for any damage if the
instructions are not observed. Keep the operating instructions well preserved and pass them on to the
subsequent user together with the device. Also note the warranty information at the end. The device
is not intended for commercial use, but rather only for the preparation of food in common household
amounts.
Observe the safety instructions during use.
Technical data
Rated voltage: 220 – 240 V~ 50/60 Hz
Power consumption: 800 W
Protection class: II

11
en
en
Safety instructions
▪ Only connect the device to properly installed earthed sockets. The wire and plug must be dry.
▪ Do not pull the connecting cable over sharp edges or clamp it. Do not let it hang down and protect
it from heat and oil.
▪ Do not place the device on hot surfaces, such as hot plates or similar, and do not operate near open
flames.
▪ Never disconnect the mains plug from the socket by the cord or with wet hands.
▪ Do not switch on the device with an empty glass jar.
▪ Always operate the device with a closed lid. Always wait for the blades to come to a stand-
still before removing the lid or the glass jar.
▪ Never handle objects in the glass jar while the device is running.
▪ Do not reach into the jar before the power plug has been unplugged.
▪ Always place the selector switch on the off position 0 before removing the glass jar.
▪ Attention! There is a risk of scalding when processing hot food. In extreme cases, the glass jar
could be damaged. Only food up to a maximum temperature of 60°C may be processed. In this
case, do not fill the jar more than halfway and firmly press the lid on the jar during operation.
▪ The device must be switched off and removed from the power supply before replacing accessories
or additional parts that move during operation.
▪ Stop using the appliance and/or connect it from the mains plug immediately if:
⋅The appliance or mains cable is damaged
⋅There is suspicion of a defect or something similar after it has fallen.
In such cases, send the appliance to be repaired.
▪ Do not immerse the drive unit in water.
▪ No liability is assumed for any damages in cases of misuse, improper operation or unprofessional
repairs. Claims under warranty are likewise excluded in such cases.
▪ The appliance is not designed for commercial use.

12
Drive unit
You can variably set the speed of the powerful motor on the selector switch (7)
of the drive unit (6).
The motor runs at maximum speed as long as the PULSE button is held down.
This is particularly useful for repeated mixing before pouring out or when
crushing ice cubes.
In order to press the PULSE button, the selector switch (7) must be on the P
position or the device must be in operation.
Attention: it is only possible to switch the mixer on if the glass jar (3) is fitted
correctly. A safety shutdown feature ensures the device cannot be used without
the glass jar (3).
Glass jar
The cap (1) in the lid (2) can be removed by turning it clockwise. It can then be
used as a measure (10/30/50 ml).
The glass jar (3) can be dismantled, especially for cleaning. To do so, place the jar
on the table with the opening facing down and rotate the blade assembly (5)
clockwise (see diagram).
You can now remove the blade assembly (5) and the sealing ring (4).
To assemble, begin by attaching the sealing ring (4) to the blade assembly (5).
When doing so, make sure the sealing ring (4) is fitted properly on the blade
assembly (5). Then, place the blade assembly (5) into the glass jar (3) and turn
anticlockwise until tightly fitted.
Note: In order to ensure the tightness of the glass jug, the blade unit must be
screwed on tightly. The blade unit is easier to tighten if you apply a few drops of
cooking oil on the sealing side of the glass jug (see figure).

13
en
Using the device
Clean the glass jar (3), lid (2) and cap (1) before using for the first time. Make sure
that you do not injure yourself on the sharp blade. Place the glass jar (3) on the
drive unit (6).
Add the ingredients, close the glass jar (3) with the lid (2) and cap (1) and set the
selector switch (7) to the desired operating mode.
Speed Use Maximum time
low
(min)
Instant drinks, soft fruits and cocktails
with alcohol
40-60 s
low
(min)
Milkshakes 1 – 2 min
medium Soups, milkshakes with harder fruits,
sauces, baby food, vegetables
1.5 – 2 min
high
(max)
Nuts, hard cheese, dry bread 40-60 s
Additional ingredients may be added while the motor is running. To do this,
simply remove the cap (1).
Crushing ice cubes
Insert up to 10 ice cubes and close the glass jug with the lid
and cap. Put the selector switch (7) on the Pposition and hold the PULSE button
down for a few seconds.
Once the ice cubes are on the bottom of the glass jug again, you press the PULSE
button down again for a few seconds again. Repeat the process until the crushed
ice has the desired consistency.
General information
1.5 l is recommended as the maximum fill level. Filling above this level may lead
to overflowing depending on the consistency of the ingredients.
As soon as the contents have been processed, switch off the device. Never oper-
ate the device empty. Allow the device to cool down following the maximum
operating time so that the motor is not overloaded.
Tip: Especially with liquid foods, we recommend reducing the fill capacity to
facilitate pouring.
Always set the selector switch to the Off position 0before removing the glass jar
(3).
Attention! Risk of injury! Always wait for the blades to come to a standstill
before removing the lid (2). Do not reach into the device before the power
plug has been unplugged. Completely empty the glass jar (3) following use. Do
not leave any liquid in the jar (3).

14
Cleaning and maintenance
Remove the power plug after use. The drive unit (6) should never be placed in
water, only wiped down with a damp cloth. Do not use any abrasive cleaning
agents. Be sure to avoid injury on the sharp blades when cleaning the glass jar
(3). Immediately after mixing, fill the jar with warm water for rinsing and allow
the motor to run for a few seconds. Then remove the glass jar (3) and clean with
a washing-up brush.
Dishwasher-safe Can be rinsed
under running
water
Wipe with damp
cloth
Cap (1)
Lid (2)
Glass jar with
base (3)
Sealing ring (4)
Blade assembly
(5)
Drive unit (6)

15
en
For UK use only
▪ This product is supplied with a 13 A plug conforming to BS 1363 fitted to the
mains lead. If the plug is unsuitable for your socket outlets or needs to be
replaced, please note the following. If the plug is a non-rewireable one, cut
it from the mains lead and immediately dispose of it. Never insert it into a
socket outlet as there is a very great risk of an electric shock.
▪ The replacement of the plug at the mains lead has to be done according to the
following instructions:
Important: The wires in this mains lead are coloured in accordance with the
following code:
blue Neutral
brown Live
As the colours of the wires in the mains lead of this
appliance may not correspond with the coloured markings
identifying the terminals in your plug, proceed as follows:
⋅the wire which is coloured blue must be connected to the terminal which
is marked with the letter N or coloured black,
⋅the wire which is coloured brown must be connected to the terminal
which is marked with the letter L or coloured red.
Do not connect any wire to the terminal which is marked
with the letter E or by the earth symbol , or coloured green or green and
yellow.
▪ If a 13 A (BS 1363) plug is used it must be fitted with a 13 A fuse conforming
to BS 1362 and be ASTA approved. If any other type of plug is used, the
appliance must be protected by a 10 A fuse either in the plug or adapter or at
the distribution board.
If in doubt - consult a qualified electrician.
▪ Never use the plug without closing the fuse cover.
The device complies with the European Directives 2006/95/EG, 2004/108/EG and
2009/125/EG.
The conformity according to EN60335 clause 11 was verified by using the
following recipe: 650 g carrott + 850 g water
Operation: 60 s, Speed: max
At the end of its service life, this product may not be disposed of in the normal
household waste, but rather must be disposed of at a collection point for recy-
cling electrical and electronic devices. The materials are recyclable according to
their labelling. You make an important contribution to protecting our environ-
ment by reusing, recycling or utilising old devices in other ways. Please ask the
municipal administration where the appropriate disposal facility is located.
Subject to change.

16
Mode d’emploi
Consignes de sécurité importantes
▪ Les personnes ayant des capacités physiques, sensorielles ou mentales
restreintes ou ayant un manque d’expérience et/ou de connaissance
peuvent utiliser ces appareils, s’ils sont surveillés et s’ils ont été ins-
truits pour utiliser cet appareil en toute sécurité et s’ils ont compris les
dangers pouvant résulter de l’usage de l’appareil.
▪ Les enfants n’ont pas le droit d’utiliser cet appareil. L’appareil et son
câble de raccordement est à tenir hors de la portée des enfants.
▪ Les enfants devraient être surveillés pour s’assurer qu’ils ne jouent pas
avec l’appareil.
▪ L’appareil doit toujours être débranché en cas d’absence de surveil-
lance, de dysfonctionnement pendant l’utilisation et avant le mon-
tage, le démontage ou le nettoyage.
▪ Si le câble d’alimentation de l’appareil est endommagé, il doit être
remplacé par le SAV central du fabricant ou par une personne quali-
fiée, afin d’éviter toute mise en danger.
▪ Attention en manipulant des couteaux tranchants aussi bien au
moment de l’évacuation que du nettoyage du broc en verre.
▪ Nettoyer le broc en verre après chaque utilisation.
Avant l’utilisation
Le mixeur ne doit être utilisé que pour l’usage prévu conformément à ce mode d’emploi. Lisez pour
cette raison minutieusement le manuel d’utilisation avant la mise en service. Il contient des consignes
importantes pour l’utilisation, le nettoyage et l’entretien de l’appareil. Nous déclinons toute respon-
sabilité pour des dommages éventuels dus au non-respect des consignes. Conservez soigneusement ce
manuel d’utilisation et transmettez-le avec l’appareil en cas de remise à une tierce personne. Consultez
également les informations de garantie à la fin de ce manuel d’utilisation. L’appareil n’est pas destiné à
un usage professionnel, mais à la préparation d’aliments dans des portions familiales.
Respecter les consignes de sécurité lors de l’utilisation.
Caractéristiques techniques
Tension du secteur : 220 – 240 V~ 50/60 Hz
Puissance : 800 W
Catégorie de protection : II

17
fr
fr
Consignes de sécurité
▪ Brancher l’appareil uniquement dans une prise électrique sécurisée, installée conformément aux
prescriptions. Le câble d’alimentation et la prise doivent être secs.
▪ Ne pas tirer le cordon d’alimentation sur des bords tranchants, ne pas le coincer, ne pas le laisser
pendre et le protéger de la chaleur et d’huile.
▪ Ne pas poser l’appareil sur des surfaces chaudes telles que des plaques de cuisson ou équivalent et
ne pas l’utiliser à proximité d’une flamme.
▪ Ne pas débrancher l’appareil en tirant sur le câble ou avec de mains mouillées.
▪ Ne pas mettre l’appareil en marche quand le broc en verre est vide.
▪ Toujours faire fonctionner l’appareil avec le couvercle fermé. Avant de retirer le couvercle ou
le broc en verre, attendre impérativement l’arrêt des lames.
▪ Ne jamais jouer avec des objets dans le broc en verre quand l’appareil tourne.
▪ Ne pas attraper le broc à l’intérieur tant que l’appareil n’est pas débranché.
▪ Avant de retirer le broc en verre, mettre impérativement le sélecteur en position 0..
▪ Attention! Risque de se brûler en manipulant des aliments chauds. Dans le pire des cas, le broc en
verre pourrait être abîmé. Les aliments ne doivent pas être travaillés à une température supérieure à
60°C. Dans ce cas, remplir le broc à moitié au maximum et tenir fermement le couvercle sur le broc
pendant le fonctionnement.
▪ Avant de remplacer les accessoires ou les pièces de rechange qui bougent pendant le fonctionne-
ment, il faut éteindre l’appareil et le débrancher.
▪ Ne pas mettre l’appareil en marche ou le débrancher immédiatement si:
⋅l’appareil ou le câble d’alimentation sont endommagés.
⋅si l’appareil pouvait être endommagé suite à une chute ou équivalent.
Dans ces cas emmener l’appareil en réparation.
▪ Ne pas immerger le bloc moteur dans l’eau.
▪ Nous déclinons toute responsabilité pour des dommages éventuels en cas d’utilisation détournée,
de mauvaise utilisation, de réparation inappropriée. Dans de tels cas, toute intervention sous
garantie est exclue.
▪ L’appareil ne doit pas faire l’objet d’un usage professionnel.

18
Bloc moteur
Vous pouvez régler le régime de ce puissant moteur à l‘aide du sélecteur (7) du
bloc moteur (6).
Tant que la touche PULSE reste enfoncée, le moteur tourne à plein régime. Cela
s‘avère particulièrement utile pour amalgamer à nouveau avant de verser ou lors
du pilage de glaçons.
Pour appuyer sur la touche PULSE le sélecteur (7) doit se trouver en position Pou
l‘appareil doit être en marche.
Attention: Le mixeur ne marche que si le broc en verre (3) est correctement
positionné. Un arrêt de sécurité bloque le fonctionnement sans broc (3).
Broc en verre
Le capuchon (1) du couvercle (2) peut être retiré en le tournant dans le sens
horaire et servir de pot gradué (10/30/50ml).
En ce qui concerne le nettoyage, le broc en verre (3) se démonte. Posez-le sur la
table avec l’ouverture vers le bas et tournez le bloc à couteaux (5) dans le sens
horaire (cf. illustration).
Vous pouvez à présent retirer le bloc à couteaux (5) et le joint (4).
L’opération de montage commence par la pose du joint (4) sur le bloc à couteaux
(5). Prenez soin de bien positionner le joint (4) sur le bloc à couteaux (5). Insérez
ensuite le bloc à couteaux dans le broc en verre (3) et tournez-le franchement
dans le sens antihoraire.
Consigne : Pour garantir l’étanchéité de la verseuse en verre, le bloc couteaux doit
être bien serré. Le bloc couteaux se serre facilement si vous lubrifiez avec
quelques gouttes d’huile alimentaire le côté d’étanchéité de la verseuse en verre
(cf. image).

19
fr
Mise en service
Nettoyez le broc en verre (3), le couvercle (2) et le capuchon (1) avant la première
mise en service. Faites attention à ne pas vous blesser avec les lames tranchantes.
Posez le broc en verre (3) sur le bloc moteur (6).
Versez les ingrédients, fermez le broc en verre (3) avec le couvercle (2) et le
capuchon, (1) puis réglez le sélecteur (7) au mode souhaité.
Régime Application Durée maxi-
male
bas
(min)
Boissons instantanées, fruits à chair
molle et cocktails avec alcool
40-60 s
bas
(min)
Milkshakes 1-2 min
moyen Soupes, milkshakes avec des fruits
à pâte dure, sauces, aliments pour
bébés, légumes
1,5-2 min
haut
(max)
Noix, fromage à pâte dure, pain sec 40-60 s
Il est possible d’ajouter d’autres ingrédients après le retrait du capuchon (1) même
quand le moteur tourne.
Piler des glaçons
Versez au maximum 10 glaçons et fermez le broc en verre avec le couvercle
et le capuchon. Réglez le sélecteur (7) en position Pet maintenez enfoncée la
touche PULSE pendant quelques secondes.
Dès que les glaçons se trouvent au fond du broc en verre, vous pouvez à nouveau
appuyer quelques secondes sur la touche PULSE. Répétez l’opération tant que la
glace pilée ne présente pas la consistance souhaitée.
Instructions générales
Il est recommandé de ne pas dépasser 1,5 l. En dépassant le remplissage préconisé,
il y a des risques de débordement des ingrédients en fonction du leur consistance.
Une fois que la quantité a été travaillée, éteignez l’appareil. Ne jamais faire tour-
ner l’appareil à vide. Laissez refroidir l’appareil en fonction du temps de service
maximal indiqué sur le tableau pour ne pas surcharger le moteur.
Astuce : Il est conseillé de réduire la quantité de remplissage pour verser plus
facilement, surtout quand il s’agit d’aliments liquides.
Avant de retirer le broc en verre, mettre impérativement le sélecteur en position
«0».
Attention, risque de blessure! Avant d’enlever le couvercle (2) attendre
impérativement l’arrêt complet de la lame. Ne pas attraper l’appareil par
l’intérieur tant qu’il est branché. Vider complètement le broc en verre (3) après
utilisation. Ne pas laisser croupir de liquide dans le broc (3).

20
Nettoyage et Entretien
Débrancher l’appareil après l’utilisation. Ne plonger le bloc moteur (6) en aucun
cas dans l’eau, mais l’essuyer à l’extérieur avec un chiffon humide. Ne pas utiliser
de nettoyants abrasifs. Faites attention à ne pas vous blesser avec les lames tran-
chantes pendant le nettoyage du broc en verre (3). Après avoir mixé, remplissez
immédiatement d’eau savonneuse et laissez tourner le moteur quelques secondes.
Ensuite, retirez le broc en verre (3) et lavez-le avec un brosse vaisselle.
lavable au lave-
vaisselle
rinçage pos-
sible sous l’eau
courante.
essuyer avec un
chiffon humide
Capuchon (1)
Couvercle (2)
Broc en verre
avec socle (3)
Joint (4)
Bloc à couteaux
(5)
Bloc moteur (6)
Other manuals for KULT X
14
Table of contents
Languages:
Other WMF Mixer manuals

WMF
WMF LINEO, LONO User manual

WMF
WMF STELIO User manual

WMF
WMF Mix & Go Duo User manual

WMF
WMF KULT pro Power User manual

WMF
WMF LINEO User manual

WMF
WMF KULT X Mix & Go User manual

WMF
WMF KULT pro Power User manual

WMF
WMF KULT pro Power User manual

WMF
WMF KULT pro Power User manual

WMF
WMF KULT X User manual
Popular Mixer manuals by other brands

Nickel-Electro
Nickel-Electro Clifton Range CM-1 instruction manual

Philips
Philips HR3740 user manual

Team Kalorik
Team Kalorik TKG CMM 1001 operating instructions

Bosch
Bosch MFQ35 series instruction manual

Oras
Oras Ventura 8020 Installation and maintenance guide

TZS First AUSTRIA
TZS First AUSTRIA FA-5259-4 instruction manual