YATO YT-72305 User manual

YT-72305
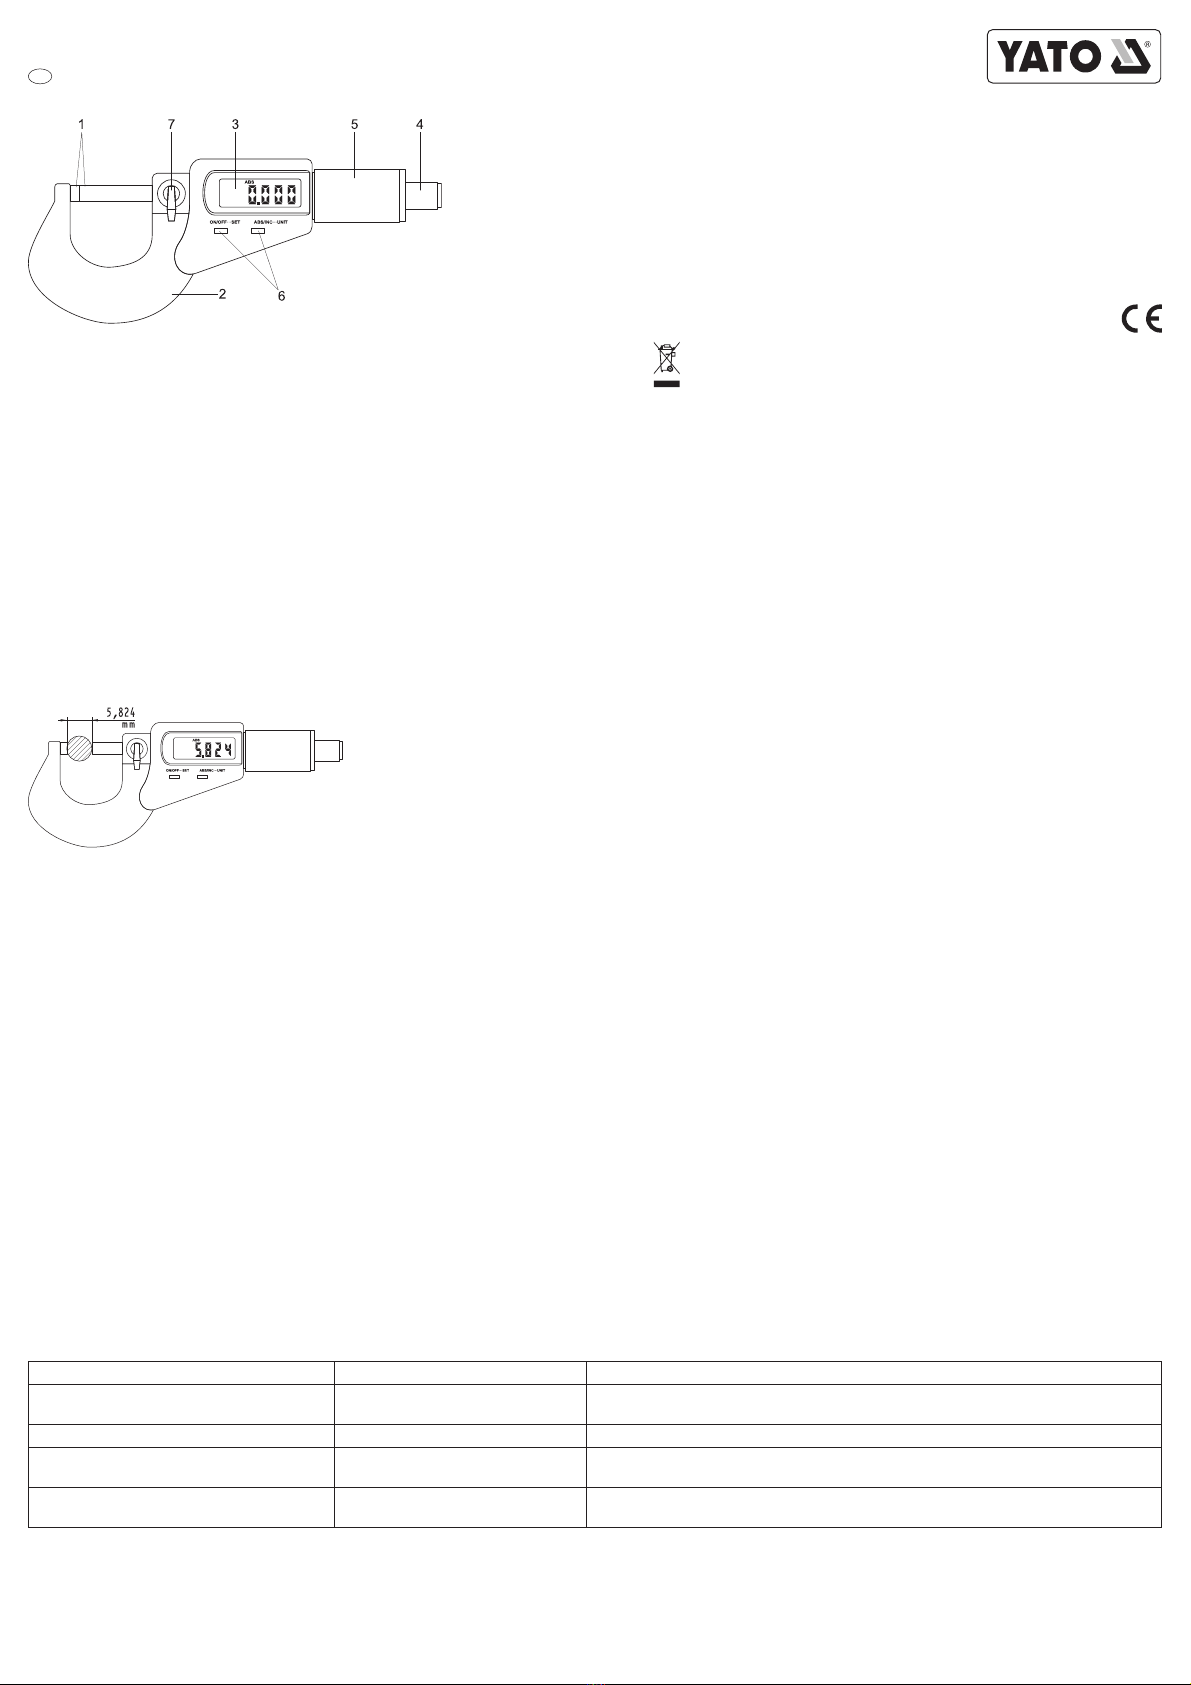
MIKROMETR ELEKTRONICZNY
PL
1. powierzchnie pomiarowe
2. kabłąk
3. wyświetlacz LCD
4. pokrętło trzpienia
5. pokrętło sprzęgła ciernego
6. przyciski sterujące
7. zacisk ustalający
Dane techniczne
Zakres pomiarowy: 0 - 25 mm
Rozdzielczość: 0,001 mm / 0,00005 cali
Dokładność: ±0,002 mm / ±0,0001 cala
Siła pomiaru: 5 - 10 N
Wyświetlacz: wyświetlacz ciekłokrystaliczny LCD
Pobór prądu: ≤35 μA
Zasilanie: jedna bateria srebrowa 1,55V, typ SR44
Temperatura robocza: 5OC - 40OC / 41OF - 104OF
Temperatura przechowywania: -20OC ÷ 60OC / -4OF ÷ 140OC
Wpływ wilgotności: bez znaczenia poniżej 80% wilgotności względnej
Pomiar bezwzględny
Poluzowaćzacisk ustalający.
Włączyćurządzenie naciskając przycisk „ON”. Wybraćjednostkępomiarowąnaciskając i przytrzymując przez ok. 2 sekundy przycisk „ABS/INC•••UNIT”. Za każdym razem wynik pomiaru będzie naprze-
miennie wyświetlany w calach lub milimetrach. Wynik w calach jest opisany za pomocąsymbolu „in” widocznego na ekranie wyświetlacza.
Wcisnąć przycisk „ABS/INC•••UNIT” ażdo ukazania sięsymbolu „ABS” na wyświetlaczu.
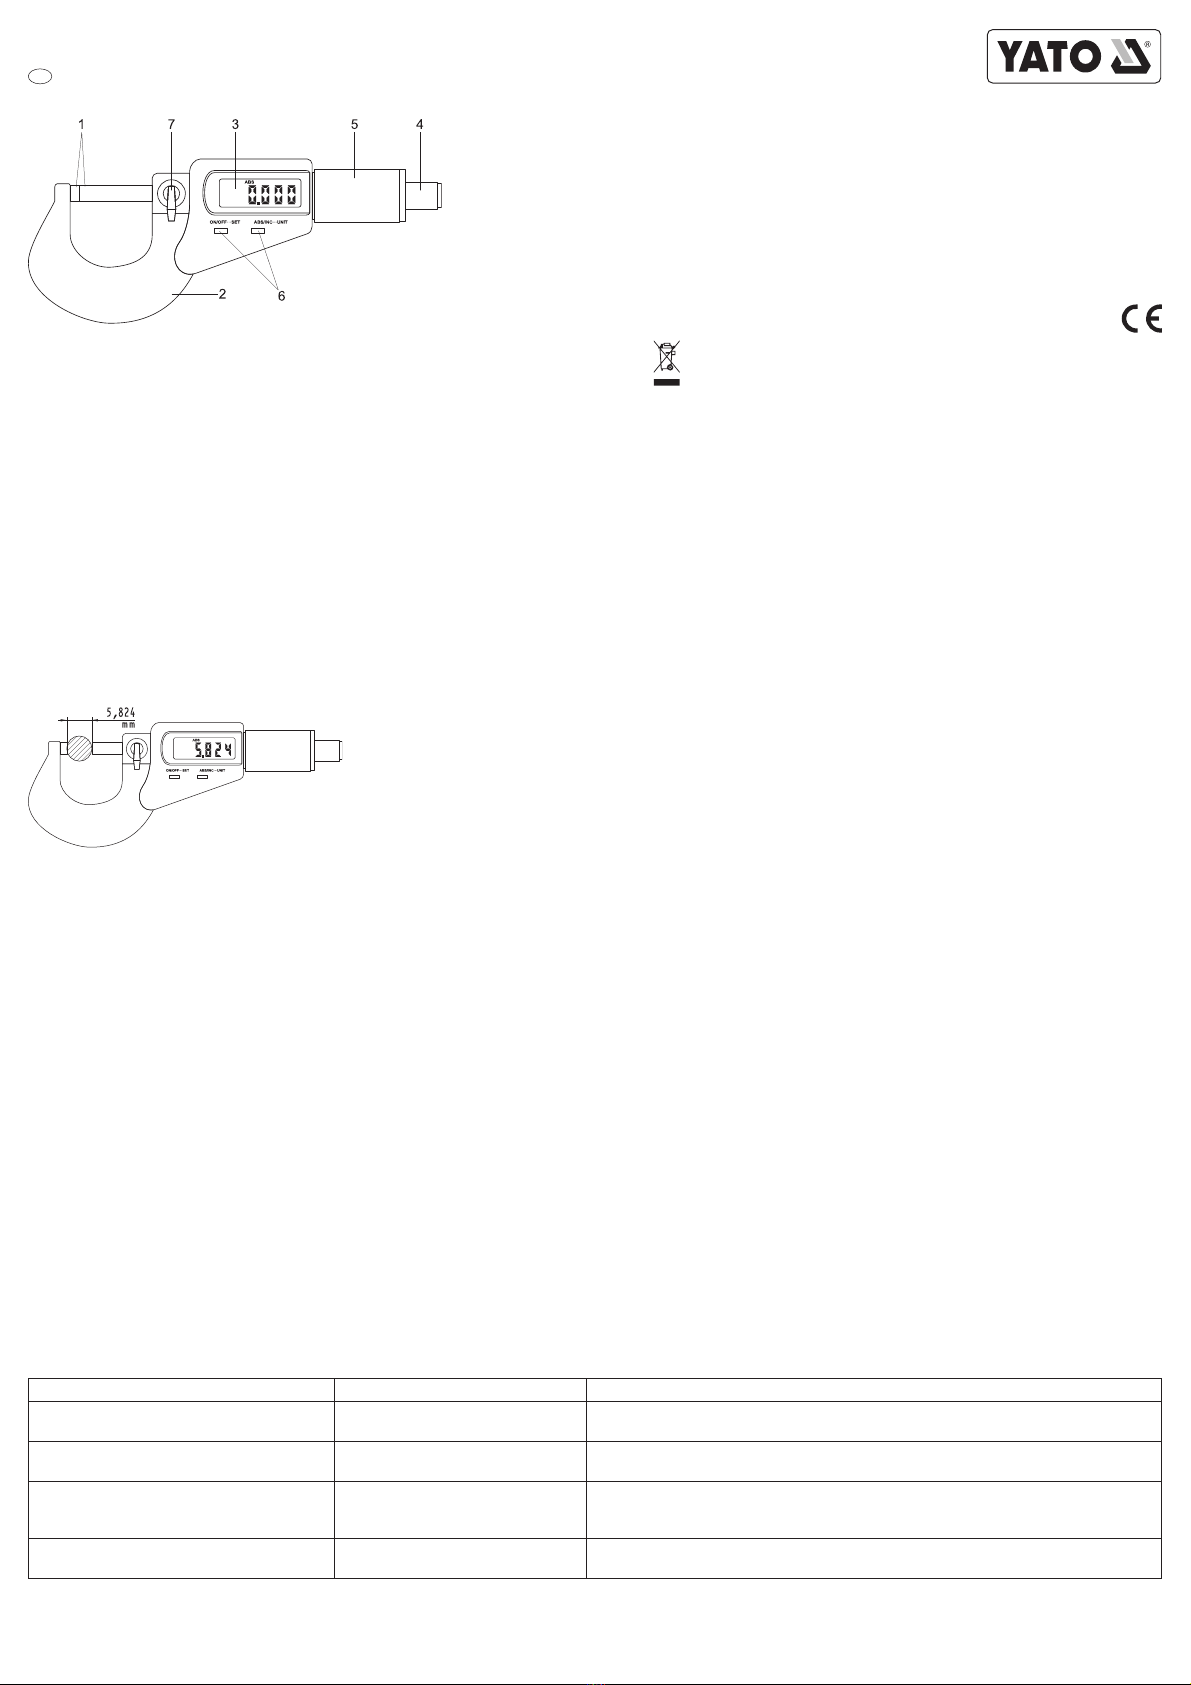
Rozsunąć powierzchnie pomiarowe na odległość nieco większąniżmierzony przedmiot. Następnie obracając za pomocąpokrętła trzpienia ustawićzgrubnie, a następnie kontynuowaćdokręcanie obra-
cając pokrętło sprzęgła ciernego. Przestaćdokręcaćgdy zadziała sprzęgło. Odczytaćwynik pomiaru z wyświetlacza.
Pomiar względny
Zasada pomiaru odpowiada opisanej powyżej, ale pomiar względny służy do porównania dwóch wymiarów. Po naciśnięciu przycisku „ABS/INC•••UNIT”, zostanie wyzerowane wskazanie, a na wyświe-
tlaczu będzie widoczny symbol „INC”. Po dokonaniu ponownego pomiaru można odczytaćróżnicęwymiarów.
Na wyposażeniu mikrometru znajduje siękulka stalowa w gumowym mocowaniu umożliwiającym montażna powierzchni pomiarowej mikrometru. Ułatwia ona pomiar elementów o małej powierzchni. Po
jej założeniu należy wyzerowaćwskazanie wg procedury opisanej powyżej.
Uwaga! Zalecane jest zamocowanie mierzonego elementu lub mikrometru przed rozpoczęciem pomiaru. Pozwoli to osiągnąć największądokładność pomiarową. Zalecane jest teżaby przeprowadzić
kilka pomiarów, tak aby uzyskaćśredniąarytmetyczna wyników.
Konserwacja
Mikrometr powinien zawsze byćsuchy i czysty (płyny mogąuszkodzićczęści ruchome).
Powierzchnie pomiarowe należy czyścićdelikatnie szmatkąbawełnianą. Nigdy nie należy używaćbenzyny, acetonu ani innych rozpuszczalników.
W celu oszczędności energii należy wyłączyćurządzenie, jeżeli ma ono pozostaćnieużywane przez dłuższy czas. Mikrometr zostałwyposażony w układ automatycznego odłączania zasilania po upływie
5 minut bezczynności.
Nidy nie wywieraćżadnego elektrycznego obciążenia na żadnączęść mikrometru i nigdy nie używaćpióra elektronicznego, gdyżmoże ono uszkodzićukłady elektroniczne produktu.
Wymiana baterii
Symbol baterii widoczny na wyświetlaczu oznacza wyczerpane baterie. Otworzyćkomorębaterii za pomocąmonety bądźdołączonego przyrządu, a następnie wymienićbaterie zwracając uwagęna
poprawnąbiegunowość.
Diagnostyka zakłóceń
Defekt Przyczyna Środek zaradczy
Wskazanie „E 1” na wyświetlaczu Nadmiar danych Przywrócićpowierzchnie pomiarowe do położenia początkowego lub wcisnąć przycisk „ON/
OFF···SET” w celu przywrócenia stanu początkowego
Wskazanie „E 3” na wyświetlaczu Błąd lub uszkodzenie czujnika
pomiarowego. Wyjąć i zamontowaćponownie baterię, jeżeli to nie pomoże, przekazaćprodukt do naprawy.
Niepoprawny wynik pomiaru
Zanieczyszczone powierzchnie
pomiarowe lub nieprawidłowy tryb
pomiaru.
Oczyścićpowierzchnie pomiarowe, powrócićdo położenia zerowego, wyzerowaćwskazanie,
powtórzyćpomiar.
Wyświetlacz sięnie świeci lub wskazanie nie jest
wyraźne.
Kiepski styk baterii
Napięcie baterii poniżej 1,4V
Zdjąć pokrywębaterii i poprawićjej położenie zapewniając dobre łączenie.
Wymienićbaterię.
Przygotowanie do pracy
Oczyścićpowierzchnie pomiarowe i prowadnicę. Do tego celu użyćszmatki bawełnianej. Nie używaćrozpuszczalników lub kwasów.
Sprawdzićpołożenie zerowe w tym celu, zetknąć powierzchnie pomiarowe kręcąc tylko za pomocąpokrętła sprzęgła ciernego. Następnie nacisnąć i przytrzymaćprzez ok. 2 sekundy przycisk opisany
„ON/OFF•••SET”, ażdo wyzerowania wskazania.
Uwaga! Nie dokręcaćza pomocąpokrętła trzpienia, może do doprowadzićdo przekłamania pomiarów.
Sprawdzić, czy wszystkie przyciski, przełączniki i wyświetlacz działająprawidłowo.
Podstawowe metody pomiarowe
OCHRONA ŚRODOWISKA
Symbol wskazujący na selektywne zbieranie zużytego sprzętu elektrycznego i elektronicznego. Zużyte urzą-
dzenia elektryczne sąsurowcami wtórnymi - nie wolno wyrzucaćich do pojemników na odpady domowe, po-
nieważzawierająsubstancje niebezpieczne dla zdrowia ludzkiego i środowiska! Prosimy o aktywnąpomoc
w oszczędnym gospodarowaniu zasobami naturalnymi i ochronie środowiska naturalnego przez przekazanie
zużytego urządzenia do punktu składowania zużytych urządzeńelektrycznych. Aby ograniczyćilość usuwanych
odpadów konieczne jest ich ponowne użycie, recykling lub odzysk w innej formie.
TOYA S.A. ul. Sołtysowicka 13-15, 51-168 Wrocław, Polska

YT-72305
ELECTRONIC MIKROMETER
PL
1. measurement surfaces
2. micrometer frame
3. LCD
4. mandrel knob
5. friction clutch knob
6. control buttons
7. fixing clamp
Technical data
Measurement range: 0 - 25 mm
Resolution: 0.001 mm / 0.00005 inches
Precision: ±0.002 mm / ±0.001 inch
Power of measurement: 5 - 10 N
Display: LCD
Electric energy consumption: ≤35 μA
Power supply: one silver battery 1.55V, type SR44
Operating temperature: 5OC - 40OC / 41OF - 104OF
Storage temperature: -20OC ÷ 60OC / -4OF ÷ 140OC
Humidity: With no importance below 80% of relative humidity
Absolute measurement
Loosen the fixing clamp.
Turn the device on, using the „ON” button. Select the unit of measurement, pressing the „ABS/INC•••UNIT” button and holding it for approximately two seconds. Each time the result of the measurement
will be alternately displayed in inches and millimetres. The result in inches is indicated with an „in” in the display.
Press the „ABS/INC•••UNIT” button, until „ABS” is displayed.
Separate the measurement surfaces to a distance which slightly exceeds the width of the object to be measured. Then using the mandrel knob turn to adjust the distance roughly, and then continue
tightening, turning the friction clutch knob. Stop tightening when the clutch has engaged. Read the result of the measurement from the display.
Relative measurement
The measurement principle is as the one mentioned above, but the purpose of relative measurements is to compare two measurements. Press the „ABS/INC•••UNIT” button to reset the display, which is
indicated with an „INC” symbol. Once another measurement has been realised, a difference of dimensions may be read.
The micrometer is equipped with a steel ball in a rubber fixture, which permits installation on the measurement surface of the micrometer. It facilitates measurements of small surface elements. Once it
has been installed, it is required to reset the display in accordance with the aforementioned procedure.
Attention! It is recommended to fix the object to be measured or the micrometer before the measurement has commenced. It will result in a higher precision of measurements.
It is recommended to realise a couple of measurements in order to obtain an arithmetic average of the results.
Maintenance
The device should always be dry and clean (liquids may damage its moving parts).
The measurement surfaces should be cleaned with care, using a cotton cloth. Do not ever use gasoline, acetone or other solvents.
In order to save energy turn the device off, if it is not going to be operated for a prolonged period. The micrometer is equipped with an automatic deactivation system which is triggered after five minutes
of inactivity.
Do not ever apply any electric load to any element of the micrometer and do not use an electronic pen, which might damage the electronic circuits of the device.
Replacement of the battery
The battery symbol in the display indicates low voltage of the battery. Open the battery compartment using a coin or the instrument provided, and then replace the battery, maintaining the correct polarity.
Troubleshooting
Defect Cause Remedy
„E 1” in the display Excess of data Return the measurement surfaces to the original position or press the „ON/OFF···SET” button in
order to restore the initial conditions
„E 3” in the display Error or failure of the measurement sensor Remove the battery and install it anew; if the problem does not disappear, have the device repaired
Incorrect result of the measurement Dirty measurement surfaces or incorrect
measurement mode
Clean the measurement surfaces, return to the zero position, reset the display and repeat
measurement
The display is not illuminated or the indication is
not clear
Incorrect contact of the battery
Battery voltage below 1.4V
Remove the battery lid and correct its position to ensure its proper contact.
Replace the battery
Preparation for work
Clean the measurement surfaces and the guide using a cotton cloth. Do not apply solvents and acids.
Verify the zero position, bringing the measurement surfaces into contact, turning using only the friction clutch knob. Then press the „ON/OFF•••SET” and hold it for approximately two seconds to reset
the display.
Attention! Do not tighten using the mandrel knob, which may lead to distorted measurements.
Verify the proper operation of all the buttons, switches and the display.
Basic measurement methods
ENVIRONMENTAL PROTECTION
Correct disposal of this product: This marking shown on the product and its literature indicates this kind of
product mustn’t be disposed with household wastes at the end of its working life in order to prevent possible
harm to the environment or human health. Therefore the customers is invited to supply to the correct disposal,
differentiating this product from other types of refusals and recycle it in responsible way, in order to re - use this
components. The customer therefore is invited to contact the local supplier office for the relative information to
the differentiated collection and the recycling of this type of product.
TOYA S.A. ul. Sołtysowicka 13-15, 51-168 Wrocław, Polska
Table of contents
Languages:
Other YATO Measuring Instrument manuals
Popular Measuring Instrument manuals by other brands

VOLTCRAFT
VOLTCRAFT 10 10 40 operating instructions

MFJ Enterprises
MFJ Enterprises MFJ-249D instruction manual

Teledyne
Teledyne 400E instruction manual

BRUEL & KJAER
BRUEL & KJAER 4809 Instructions and applications

PCE Instruments
PCE Instruments PCE-423N user manual

CITO
CITO THAW AI-CT-MAN-F instruction manual

Extech Instruments
Extech Instruments SDL400 user guide

Orbit Merret
Orbit Merret OM 402UNI manual

Oakton
Oakton 35631-00 operating instructions

IFM Electronic
IFM Electronic Efector 300 SI1007 operating instructions

Sibata
Sibata LB-6N2 Operation manual

Quandify
Quandify CubicSecure LTCS01 USER MANUAL & DATASHEET