Zultys ZIP 33i User manual

08
Fall
Z u l t y s , I n c . 7 85 L u c e r n e D r i v e , S u n n y v a l e , C a l i f o r n i a , U S A 9 4 0 8 5 w w w . z u l t y s . c o m
Author: Zultys Technical Support
This document provides detailed information related to the installation and configuration of the Zultys ZIP 33i &
ZIP 35i IP Phones. The document also covers the ‘ZIP 340M LCD Expansion Module’ and ‘EHS 3xi Electronic Hook
Switch Adapter’ accessories that are compatible with the ZIP 35i.
Where the term ‘ZIP 3xi’ appears in this manual the information relates to the ZIP 3xi series of phones being the
ZIP 33i and ZIP 35i.
Refer to Section 1 for important information regarding ZIP 3xi and MX firmware requirements.
March
13
ZIP 3xi Installation and Configuration Guide
(Rev 4a)
Technical Publications

ZIP 3xi Installation and Configuration Guide (0000000359)
Revision 4a / March 28, 2013
© 2013 Zultys, Inc. No reproduction or distribution without permission
Page 2 of 43
Technical Publications
Contents
1FIRMWARE REQUIREMENTS ...................................................................................................................... 3
2OVERVIEW OF THE DEPLOYMENT PROCESS ........................................................................................ 4
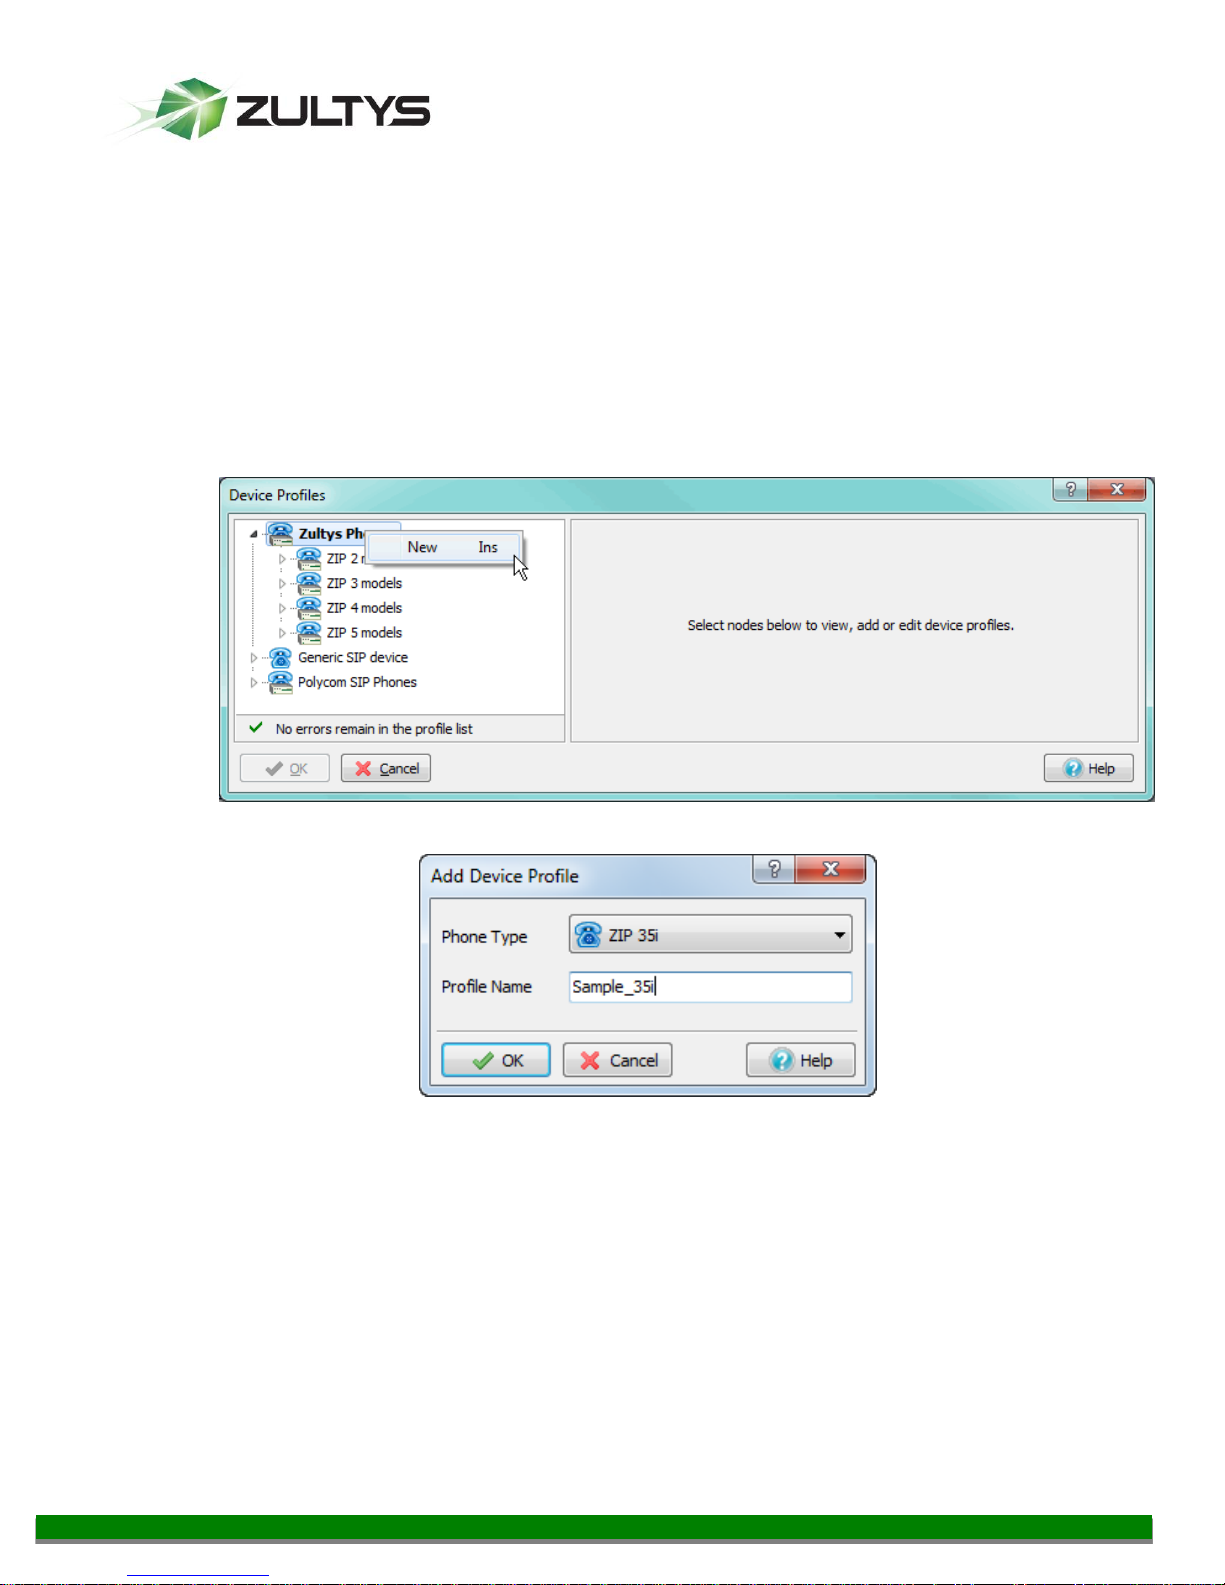
3CREATING A DEVICE PROFILE.................................................................................................................... 4
4OVERVIEW OF PROFILE TABS .................................................................................................................... 6
4.1 GENERAL TAB ................................................................................................................................................... 6
4.2 REGIONAL TAB.................................................................................................................................................. 8
4.3 SIP TAB............................................................................................................................................................. 9
4.3.1 LINES ............................................................................................................................................................................... 9
4.4 IP &PROVISIONING TAB ...............................................................................................................................10
4.4.1 LAN ...............................................................................................................................................................................11
4.4.2 SERVERS ........................................................................................................................................................................11
4.4.3 PROVISIONING..............................................................................................................................................................12
4.4.4 MANUALLY CONFIGURING THE PROVISIONING SERVER........................................................................................13
4.5 AUDIO &RTP.................................................................................................................................................15
4.5.1 DTMF FOR RTP ..........................................................................................................................................................15
4.5.2 CODECS..........................................................................................................................................................................16
4.5.3 QUALITY OF SERVICE:TOS/DIFFSERV ....................................................................................................................17
4.5.4 RING TONES..................................................................................................................................................................17
4.5.5 MISCELLANEOUS..........................................................................................................................................................17
4.6 VLAN TAB ......................................................................................................................................................18
4.6.1 LAN PORT ....................................................................................................................................................................19
4.6.2 PC PORT........................................................................................................................................................................19
4.6.3 LLDP .............................................................................................................................................................................19
4.6.4 VLAN CONFIGURATION EXAMPLES .........................................................................................................................20
4.7 KEYS TAB ........................................................................................................................................................21
4.7.1 LABEL TEMPLATE........................................................................................................................................................21
4.7.2 TYPE...............................................................................................................................................................................23
4.7.3 VALUE............................................................................................................................................................................25
4.7.4 LINE ...............................................................................................................................................................................25
4.8 ADVANCED TAB ..............................................................................................................................................25
5OVERVIEW OF ZIP 340M EXPANSION MODULE .................................................................................27
5.1 POWERING ZIP 340M EXPANSION MODULES ............................................................................................27
5.2 USING ZIP 340M’S AND EHS 3XI ELECTRONIC HOOK SWITCH ADAPTER TOGETHER............................27
5.3 PROVISIONING ZIP 340M EXPANSION MODULES ......................................................................................27
6EHS 3XI ELECTRONIC HOOK SWITCH ADAPTER ...............................................................................29
6.1 CONNECTING A PLANTRONICS WIRELESS HEADSET....................................................................................30
6.2 CONNECTING A GN NETCOM/JABRA WIRELESS HEADSET .........................................................................31

ZIP 3xi Installation and Configuration Guide (0000000359)
Revision 4a / March 28, 2013
© 2013 Zultys, Inc. No reproduction or distribution without permission
Page 3 of 43
Technical Publications
7ADDING A DEVICE.........................................................................................................................................32
8FIXED FUNCTION KEYS ...............................................................................................................................34
9CONTROLLING CONFIGURATIONS..........................................................................................................36
9.1 CONFIGURATION METHODS ...........................................................................................................................36
9.2 PHONE INITIALIZATION .................................................................................................................................36
10 UPGRADING FIRMWARE..........................................................................................................................36
10.1 UPGRADING FIRMWARE VIA DEVICE PROFILE...........................................................................................36
10.2 UPGRADING FIRMWARE VIA WEB INTERFACE...........................................................................................38
11 TROUBLESHOOTING TIPS AND TOOLS...............................................................................................39
11.1 FACTORY RESETTING PHONE ......................................................................................................................39
11.2 REBOOTING PHONE......................................................................................................................................39
11.3 PHONE DOES NOT USE THE CONFIGURATION FILE ON TFTP SERVER ......................................................40
11.4 HOW TO CHECK IF CONFIGURATION FILE IS DOWNLOADED......................................................................40
11.5 PERFORMING A NETWORK PACKET CAPTURE USING THE PHONE ............................................................40
11.6 CAPTURING SYSLOG INFORMATION............................................................................................................41
11.6.1 CAPTURING SYSLOG INFORMATION LOCALLY ON PHONE ...................................................................................41
11.6.2 ENABLING SYSLOG OUTPUT TO EXTERNAL SERVER VIA WEB INTERFACE .......................................................42
11.6.3 ENABLING SYSLOG OUTPUT TO EXTERNAL SERVER VIA CONFIGURATION FILE ..............................................42
12 EMERGENCY RECOVERY MODE .............................................................................................................43
1Firmware Requirements
To ensure correct operation of the ZIP 33i and ZIP 35i IP phones the following firmware
requirements must be strictly adhered to.
ZIP 33i with firmware 60.61.132.12 or earlier –MX firmware 7.2.4 or later is required
ZIP 33i with firmware 60.61.132.15 or later –MX firmware ‘7.2.4 + Patch 7203’ or later
is required.
ZIP 35i with firmware 65.61.132.15 or later –MX firmware ‘7.2.4 + Patch 7203’ or later
is required.
Important Note: Do not update the firmware of a ZIP 33i to 60.61.132.15 or later, prior
to first upgrading the MX system to the required firmware/patch level noted above. The
syntax for the ZIP 33i SIP Server settings changed from firmware 60.61.132.15 onwards.
MX Admin starting from ‘7.2.4 + Patch 7203’ generates ZIP 33i configuration files that
are compatible with 60.61.132.12 and earlier firmware as well as 60.61.132.15 and later
firmware.

ZIP 3xi Installation and Configuration Guide (0000000359)
Revision 4a / March 28, 2013
© 2013 Zultys, Inc. No reproduction or distribution without permission
Page 4 of 43
Technical Publications
In the event that a ZIP 33i is upgraded prior to the MX system being at a compatible
firmware release, or if the device or profile was not edited after upgrading the MX, the
device configuration files will need to be regenerated.
Starting with MX Admin 7.2.4 + Patch 7203 device configuration files may be
regenerated by right-clicking on the device in the ‘Configure | Devices’ screen and
selecting ‘Regenerate configuration files’. The configuration files will be regenerated
immediately and downloaded by the phone the next time it is power cycled or an
update is pushed to it assuming it is currently registered. In both cases, it is assumed
that the phone is able to contact the MX system’s TFTP server.
2Overview of the deployment process
This document covers the steps required to provision, deploy and manage the Zultys ZIP
33i and ZIP 35i IP phones with a Zultys MX system. ZIP 33i phones are supported in MX
Release 7.2.4 and later, the ZIP 35i phones are supported in MX Release 7.2.4 when
patch 7203 is applied, as well as later MX firmware releases. Prior to Release 7.2.4 there
is no support for the ZIP 33i or ZIP 35i phones.
In general the steps required to successfully deploy a ZIP 3xi phone are:
Upload the current phone firmware ROM file to the TFTP server of the MX
system for the model being deployed. Firmware versions starting with “60.”
relate to the ZIP 33i, versions starting with “65.” relate to the ZIP 35i. The current
firmware release for each model is available from the Zultys Knowledge Base
System (http://kbs.zultys.com). Refer to section 10.
Create a device profile with the relevant settings, including selection of the
firmware version to be used by the ZIP 3xi phones. Refer to section 3.
Add the ZIP 3xi devices to the MX system and assign the appropriate device
profile. Refer to section 7.
Add new users to the MX system, if required, then assign the newly provisioned
devices to their respective users.
To use automatic provisioning ensure that the DHCP server is correctly
configured to provide Option 66. Refer to section 4.4.3.
3Creating a Device Profile
A Device Profile defines a common set of configuration options that will be applied to all
phones that are allocated a particular Device Profile. This greatly simplifies the management
of deployed phones as changes only need to be performed in one place.

ZIP 3xi Installation and Configuration Guide (0000000359)
Revision 4a / March 28, 2013
© 2013 Zultys, Inc. No reproduction or distribution without permission
Page 5 of 43
Technical Publications
Prior to creating a new Device Profile, the system administrator should ensure that the
current firmware ROM file for the model being deployed has been uploaded to the TFTP
server of the MX system. Refer to section 10 for further information.
To create a new ZIP 3xi device profile:
1. In MX Administrator, select Configure | Devices.
2. Click the Profile button in the Managed Devices window.
3. In the Device Profiles window, right-click Zultys Phones and select New to create
a new device profile.
4. In the Add Device Profile window, set the Phone Type as required.
5. Type a Profile Name, in the screenshot above Sample_35i is used.
6. Refer to the section 4 for an explanation of the options configured via the Device
Profile.

ZIP 3xi Installation and Configuration Guide (0000000359)
Revision 4a / March 28, 2013
© 2013 Zultys, Inc. No reproduction or distribution without permission
Page 6 of 43
Technical Publications
4Overview of Profile Tabs
The device profile for each phone is divided into several tabs. Each tab configures
different aspects of the profile.
4.1 General Tab
The General tab contains settings related to firmware version and updating, password
settings, and various miscellaneous settings.
Download protocol: Defines the protocol used by the phone to download new
firmware.
oNone –Phone will not check for new firmware on power up.

ZIP 3xi Installation and Configuration Guide (0000000359)
Revision 4a / March 28, 2013
© 2013 Zultys, Inc. No reproduction or distribution without permission
Page 7 of 43
Technical Publications
oTFTP –Phone will use TFTP (Trivial File Transfer Protocol) to download
firmware image on power up if different to the currently installed
version. This is the default setting.
oHTTP –Phone will use HTTP (Hyper Text Transfer Protocol) to download
firmware image on power up if different to the currently installed
version. HTTP may perform more reliably over poor quality links. TCP
port 8080 is used when download protocol is HTTP and server set to MX.
Server: Defines the address of server where firmware image is stored.
oMX –Select this option when the internal TFTP/HTTP server of the MX
system is to be used, this will be the case for most deployments. For
HTTP TCP port 8080 is used.
Address –Lists the MX systems’IP addresses including LAN, WAN
and SBC Port Mapping addresses if configured. For external, for
phones connecting to a WAN or SBC address you may need to
configure port forwarding on external routers.
Filename –Lists the compatible firmware images stored on the
MX TFTP server. Select the desired filename from the dropdown.
If the files stored on the TFTP have recently been changed by
another system administrator, click the Refresh button to update
the list. If the field background is red the corresponding file is not
present on the TFTP server and thus the phone will be unable to
access the file. Files are uploaded to the TFTP server via the TFTP
Settings window accessible from the Configure | Devices screen.
Refer to section 10 for further information about the firmware
upgrade process.
oCustom –Select when an external TFTP/HTTP server is to be used. In the
corresponding address field type the full path and filename. For HTTP,
both the address and port may be defined.
TFTP example –192.168.1.100/60.61.132.8.rom
HTTP example –192.168.1.100:8080/tftpphone/60.61.132.8.rom
Phone Administration: Set passwords used to access various restricted sections
of the phone interface and the web interface.
oLocal User Password –Password to access User level restricted sections.
Default is ‘user.’ If the field is left blank, then no password is required.
oLocal Administrator Password –Password to access Administrator level
restricted sections. Default is ‘admin.’ If the field is left blank, then no
password is required.

ZIP 3xi Installation and Configuration Guide (0000000359)
Revision 4a / March 28, 2013
© 2013 Zultys, Inc. No reproduction or distribution without permission
Page 8 of 43
Technical Publications
Busy Lamp Field
oBLF Subscription Period: The period in seconds a Busy Lamp Field
subscription will last before phone re-subscribes. Default is ‘3600.’
Miscellaneous:
oMissed Call Indicator –When enabled, the phone will display the number
of missed calls on the idle screen and also store caller details for the
missed calls in the Call Log. When disabled, no missed call indication will
be displayed and the phone will not store any information about the
missed call in the Call Log.
oAuto-answer Intercom calls –When set to Yes, the phone will
automatically answer received Intercom calls. When set to No, the phone
will ring when an Intercom call is received. Default is ‘Yes.’
oMute Intercom calls –This setting is fixed at ‘No.’The microphone will
always be enabled when an intercom call is answered.
oBacklight –The period, in seconds that, the backlight will stay on
following the last activity (ZIP 35i only).
oSend Syslog event when device is not registered with the MX –When
set to Yes, in the event that the phone fails to register / re-register, a
message will appear in the Syslog of the MX system alerting the system
administrator to a potential issue with the phone or network. Default is
‘No.’
4.2 Regional tab
The Regional tab contains settings related to phone location including language, dial
tone, time zone and time format.

ZIP 3xi Installation and Configuration Guide (0000000359)
Revision 4a / March 28, 2013
© 2013 Zultys, Inc. No reproduction or distribution without permission
Page 9 of 43
Technical Publications
The settings on this screen will be automatically populated based on the default location
setting of the MX system. If required, change the settings to suit the phones location.
Language: Language for telephone user interface (TUI) of the phone.
Dial Tone: Determines the dial tone and call progress tones generated by the
phone.
Time Zone: The time zone the phone is located in. Time zones will also generally
impact DST dates.
Time Format: Time display format, 12 or 24 hour.
Date Format: Date display format (ZIP 35i only).
4.3 SIP Tab
The SIP Tab contains settings related to the registration addresses.
4.3.1 Lines
The ZIP 33i supports two independent SIP Registrations; the ZIP 35i supports three
independent SIP Registrations. In most cases only one registration is required. ‘Line’
registrations should not be confused with the number of Line Keys or Call Appearances
configured via the Keys tab. Multiple calls may be handled via a single registration.
Enable –Select checkbox to enable this Line.
Registrar Source –Defines the source of Registrar (SIP Server) address. Line 1
Registrar Source is always MX Address. The actual Registrar address is defined in
the Registration Details section.

ZIP 3xi Installation and Configuration Guide (0000000359)
Revision 4a / March 28, 2013
© 2013 Zultys, Inc. No reproduction or distribution without permission
Page 10 of 43
Technical Publications
Registration Expires –Defines the registration period in second. Default is
‘3600.’
Voice Mail –Defines the voice mail service number / URI related to the Line.
Default is ‘voice.mail’ and fixed when Registrar Source is MX Address.
The ‘Registration details’ section defines the server address information related to the
Line currently selected in the top section of the screen.
Registrar: Settings related to SIP Registrar address.
oAddress Source –Defines the source for Address setting. Line 1 is always
MX Address.
oAddress –Defines the Registrar address. When Address Source is MX
Address, the dropdown will list all LAN, WAN and SBC addresses
configured on the MX system. For phones deployed within the corporate
network, the LAN address of MX system should be selected. If using a
WAN or SBC address, the network must be configured appropriately to
allow external phones to connect.
oPort –Defines the port used for SIP signaling.
Outbound Proxy: Settings related to Outbound Proxy address.
oAddress Source –Defines the source for Address setting.
oAddress –Defines the Outbound Proxy address. For applications where
the phone is registering to an MX, this address should be the same as the
Registrar address.
oPort –Defines the port used for SIP signaling.
4.4 IP & Provisioning Tab
The IP and Provisioning tab contains settings for defining the IP address, DNS Servers,
NTP Server, and Provisioning method.

ZIP 3xi Installation and Configuration Guide (0000000359)
Revision 4a / March 28, 2013
© 2013 Zultys, Inc. No reproduction or distribution without permission
Page 11 of 43
Technical Publications
4.4.1 LAN
Select whether the IP address information is obtain automatically via DHCP or statically
defined in the phone. If static addressing is used, this screen defines the subnet mask
and default gateway parameters; the IP address of the phone is defined in the Edit
Device screen. It is recommended to use DHCP addressing.
4.4.2 Servers
Define the NTP Server and DNS Server addresses.
NTP Server –Address of NTP time server that the phone will synchronize its
clock with. By default the field is populated with the main IP address of the MX
system. To have the phone obtain the NTP server address via DHCP Option 42,
leave this field blank and ensure the DHCP server has Option 42 correctly
configured to point to a suitable NTP server. The MX system functions as an NTP
server.

ZIP 3xi Installation and Configuration Guide (0000000359)
Revision 4a / March 28, 2013
© 2013 Zultys, Inc. No reproduction or distribution without permission
Page 12 of 43
Technical Publications
Primary DNS / Secondary DNS –Address of DNS servers. If DHCP option is
selected, the DNS addresses will be obtained from DHCP server.
4.4.3 Provisioning
Define the protocol that the phones use to download their configuration files. The
internal DHCP server of the MX system provides Option 66 which allows all Zultys IP
phones to automatically download their configuration files from the built-in TFTP/HTTP
server. When using an external DHCP server, Option 66 must be configured to provide
the IP address of the MX system for automatic provisioning of a new phone to function.
If Option 66 is not enabled on the DHCP server, the provisioning server address must be
manually configured on the phone via the web interface or phone menu, refer to
Section 4.4.4 for further details.
Overview of provisioning server options:
Protocol: Select desired protocol to be used for configuration file download.
oDHCP (option 66) –Phone will obtain the TFTP server address via DHCP
option 66 and then download its configuration file using TFTP. The DHCP
server must have option 66 configured with the IP address of the MX
system. This is the default setting.
oTFTP –When selected, the phone will download its configuration file
using TFTP from the address specified in the Server section. For most
applications, the Server will be set to MX. For this option to work, the
phone must initially be able to locate and connect to the MX TFTP server
based on DHCP option 66; alternatively the address shown in the ‘URL
preview’ may be entered manually via the phone’s menu or web
interface.
oFTP - When selected, the phone will download its configuration file using
FTP from the address specified in the Server section. An external FTP
server is required and external TFTP server option must be configured on
the MX. The User Name field must be populated with the User Name and
Password of the FTP account in the format username:password. For this
option to work, the phone must initially be able to locate and connect to
the MX TFTP server based on DHCP option 66, otherwise the Auto
Provisioning URL setting on the phone must be populated manually with
the text shown in the URL preview field.
oHTTP –When selected, the phone will download its configuration file
using HTTP from the address specified in the Server section. For most
applications, the Server will be set to MX. For this option to work, the
phone must initially be able to locate and connect to the MX TFTP server

ZIP 3xi Installation and Configuration Guide (0000000359)
Revision 4a / March 28, 2013
© 2013 Zultys, Inc. No reproduction or distribution without permission
Page 13 of 43
Technical Publications
based on DHCP option 66; alternatively the address shown in the ‘URL
preview’ may be entered manually via the telephone’s menu.
oHTTPS - When selected, the phone will download its configuration file
using HTTPS from the address specified in the Server section. An external
HTTPS server is required and external TFTP server option must be
configured on the MX. For this option to work, the phone must initially be
able to locate and connect to the MX TFTP server based on DHCP option
66; alternatively the address shown in the ‘URL preview’ may be entered
manually via the telephone’s menu.
4.4.4 Manually configuring the Provisioning Server
The factory default state of the phone utilizes the DHCP (Option 66) automatic
provisioning method. It is strongly recommended that the Option 66 method is used to
automate the provisioning process.
If the DHCP method cannot be used the phone must be manually configured with the
address and protocol required to connect to the provisioning server. If the phone is
factory defaulted the provisioning method is reset to DHCP (Option 66).
Setting Provisioning Server Address via the phone webpage:
1. Browse to the IP address of the phone. The IP address may be found by pressing the
Confirm key at the idle screen.
2. Enter the username ‘admin’ and the administration password, default password is
‘admin.’
3. From the top menu select the Phone tab.
4. From the left menu select Auto Provision.
5. Populate the Server URL with the protocol and address for the provisioning server. For
example, assuming the MX system has an IP address of 192.168.1.100:
oFor TFTP –tftp://192.168.1.100
oFor HTTP –http://192.168.1.100:8080/tftpphone
oIf the network has a DHCP server with Option 66 enabled but Option 66 is not
pointing at the MX System then the DHCP Active option must also be set to Off.
6. Press to accept changes.
7. Power cycle the phone and confirm that it successfully downloads its configuration file.
A simple way to confirm correct download is to adjust the Display Name field of the
device in MX Administrator and confirm the screen updates accordingly.
Setting Provisioning Server Address via the Phone Menu:

ZIP 3xi Installation and Configuration Guide (0000000359)
Revision 4a / March 28, 2013
© 2013 Zultys, Inc. No reproduction or distribution without permission
Page 14 of 43
Technical Publications
1. On the phone press Menu, 3-Settings, 2-Advanced.
2. Enter the admin password (default is ‘admin’) then press Confirm key.
3. Press 7-Auto Provisioning, the phone screen indicates “URL:”.
8. Using the keypad of the phone, enter the required provisioning server protocol and
address. For example, assuming the MX system has an IP address of 192.168.1.100:
oFor TFTP –tftp://192.168.1.100
oFor HTTP –http://192.168.1.100:8080/tftpphone
oIf the network has a DHCP server with Option 66 enabled but Option 66 is not
pointing at the MX System, you must disable the DHCP Active option via the
webpage of the phone. See previous section.
4. Power cycle the phone and confirm that it successfully downloads its configuration file.
A simple way to confirm correct download is to adjust the Display Name field of the
device in MX Administrator and confirm the screen updates accordingly.

ZIP 3xi Installation and Configuration Guide (0000000359)
Revision 4a / March 28, 2013
© 2013 Zultys, Inc. No reproduction or distribution without permission
Page 15 of 43
Technical Publications
4.5 Audio & RTP
The Audio and RTP Tab contains setting related to DTMF, codecs, layer 3 QoS tagging,
ring tones and miscellaneous settings.
4.5.1 DTMF for RTP
Use the default of RFC 2833. Sending DTMF inband is not supported by the MX and
should not be selected.

ZIP 3xi Installation and Configuration Guide (0000000359)
Revision 4a / March 28, 2013
© 2013 Zultys, Inc. No reproduction or distribution without permission
Page 16 of 43
Technical Publications
4.5.2 Codecs
The Codecs section defines which codecs are enabled and their priority order.
The codec at the top of the list has the highest priority. Codecs which have the Disable
box checked are disabled.
Available codecs and the default ordering:
G.711 µ-Law
G.711 A-Law
G.729a
G.722 (Disabled by default)
To change priorities, select the codec and then press the Increase Priority or Decrease
Priority buttons as required. To disable a codec, check the Disable box.
The default codec settings are suitable for most deployment scenarios. Which codec is
ultimately used for a call depends on a combination of the device profile, MX codec
profile for the location(s) and the ITSP/SIP Trunk codec profile settings if applicable.
For international regions where ITSP’s and SIP Trunk providers prefer to use G.711 A-
Law, if the codec profile on MX has G.711 A-Law as the highest priority it may be
desirable to also make G.711 A-Law the highest priority on the phone.
G.722 is a wideband codec which may be negotiated only between IP phones connected
to the same MX system. The codec profile on the MX system must be set to ‘Don’t Care’
to allow G.722 to be negotiated. It is recommended to leave this codec disabled.

ZIP 3xi Installation and Configuration Guide (0000000359)
Revision 4a / March 28, 2013
© 2013 Zultys, Inc. No reproduction or distribution without permission
Page 17 of 43
Technical Publications
4.5.3 Quality of Service: ToS/Diffserv
The Quality of Service (QoS) section defines the settings for Layer 3 DSCP packet tagging.
DSCP may also be referred to as Diffserv or Type of Service (ToS) tagging. RTP and SIP
packets may be tagged with different DSCP values. The underlying network must be
provisioned to recognize DSCP/ToS tags and prioritize the packets accordingly.
RTP DSCP –Default value is 46 (EF)
SIP DSCP –Default value is 26 (AF31)
4.5.4 Ring Tones
The Ring Tones section defines the ring tone settings and Call waiting tone.
The phone has 8 built-in ring tones and supports distinctive ringing so that the user may
easily differentiate between ringing internal and external calls.
The default ring tone settings in a newly created profile are based on the Time Zone
setting for the Default Location of the MX system as defined on the Provision |
Locations screen, thus for most deployments the default settings are appropriate.
For US locations, Internal Calls are assigned a Ring Ring tone, and External Calls are
assigned a Ring Pause tone.
For Australia, New Zealand, UK and related countries, Internal Calls are assigned a Ring
Pause tone, and External Calls are assigned a Ring Ring tone.
For regions where no specific association is defined, the default settings will be the
same as for the US.
4.5.5 Miscellaneous
The Miscellaneous section defines settings related to Early Media support and handling
of Paging calls.

ZIP 3xi Installation and Configuration Guide (0000000359)
Revision 4a / March 28, 2013
© 2013 Zultys, Inc. No reproduction or distribution without permission
Page 18 of 43
Technical Publications
Early Media: Select this option to enable Early Media for the phone. Early Media
is a SIP mechanism that allows for inband audio to be passed through to the
phone prior to the call reaching a connected state. By default this option is
enabled.
Allow paging to interrupt active calls: When the phone is on an active call and a
paging call is received, if this option is enabled the active call will be placed on
hold and the paging call automatically answered. If disabled the active call will
not be interrupted and the user must manually answer the paging call to accept
it. The default setting is disabled. This option requires phone firmware version
6x.61.132.12 or later.
4.6 VLAN Tab
The VLAN tab contains settings related to VLAN tagging and LLDP support.
The phone incorporates a 2 port managed switch with the ability for voice and data
traffic to use different Virtual LAN’s. VLAN settings may be configured manually via the
profile options or automatically using LLDP (Link Layer Discovery Protocol).
When defining the VLAN settings in the profile, care must be taken to ensure that once
the phone downloads its configuration file it will be able to contact the MX system. If it
cannot contact the MX system due to a mismatch between the VLAN settings stored in
the phone and the configuration of the network, the phone will need to be factory reset
via the Menu | Settings | Advanced | Reset Factory screen of phone.

ZIP 3xi Installation and Configuration Guide (0000000359)
Revision 4a / March 28, 2013
© 2013 Zultys, Inc. No reproduction or distribution without permission
Page 19 of 43
Technical Publications
4.6.1 LAN Port
When VLAN support is enabled for the LAN Port, all phone related packets transmitted
from the LAN port will be tagged with the defined LAN port VLAN ID and Class of Service
(CoS) value.
All phone related packets received from the access network must be tagged with the
same VLAN ID. Effectively this can be thought of as the Voice VLAN.
4.6.2 PC Port
When VLAN support is enabled for the PC Port, untagged packets that enter the PC Port
will be tagged with the defined PC port VLAN ID as they egress from the LAN port of the
phone. All packets received at the LAN port which are tagged with the ID defined for the
PC port, will be passed to the PC port. Effectively this can be thought of as the Data
VLAN. If the Data VLAN is untagged on the access network, then this option should be
disabled.
4.6.3 LLDP
As an alternative to explicitly defining the VLAN ID’s for the LAN and PC ports, the Link
Layer Discovery Protocol (LLDP) may be used if supported by the access switch. LLDP
allows the VLAN settings to be defined at the access switch and automatically pushed to
the phone.
The advantage of using LLDP is that VLAN settings are determined at power up and do
not rely on parameters stored in the phone, this removes the risk of the phone
downloading a configuration that is invalid for the network it is connected to.

ZIP 3xi Installation and Configuration Guide (0000000359)
Revision 4a / March 28, 2013
© 2013 Zultys, Inc. No reproduction or distribution without permission
Page 20 of 43
Technical Publications
When LLDP is enabled, the phone broadcasts an LLDP request on power up and then at
the defined Packet Interval. The default period is ‘120 seconds.’
4.6.4 VLAN Configuration Examples
The following examples relate to manually defining the VLAN settings via the Device
Profile.
Tagged Voice VLAN, Untagged Data VLAN - For many deployments that use
VLAN tagging, packets related to the voice VLAN will be tagged and those related
to the data VLAN will be untagged and treated as part of the native VLAN by the
access switch. For the configuration shown below the Voice VLAN ID is 10 and
the Data VLAN is untagged.
Tagged Voice VLAN, Tagged Data VLAN –For a case where both voice and data
packets are tagged as they egress and ingress at the LAN port, the phone must
have VLAN’s enable for both the LAN and PC ports. For the configuration shown
below the Voice VLAN ID is 10 and the Data VLAN ID is 15.
Other manuals for ZIP 33i
6
This manual suits for next models
2
Table of contents
Other Zultys IP Phone manuals

Zultys
Zultys 37G User manual

Zultys
Zultys Z 21i User manual

Zultys
Zultys ZIP 4 5 Series User manual

Zultys
Zultys ZIP 33i User manual

Zultys
Zultys ZIP4x5 User manual

Zultys
Zultys ZIP 33G Instruction manual

Zultys
Zultys ZIP 37G User manual

Zultys
Zultys ZIP2x2 User manual

Zultys
Zultys ZIP 47G User manual

Zultys
Zultys ZIP 33i User manual