manuals.online logo
Brands
  1. Home
  2. •
  3. Brands
  4. •
  5. ZURN
  6. •
  7. Plumbing Product
  8. •
  9. ZURN Ecolotrol Z1310 User manual

ZURN Ecolotrol Z1310 User manual

Page 17
HYDRANTS
ZURN INDUSTRIES, LLC Specification Drainage Operation , 1801 Pittsburgh Avenue, Erie, PA 16502, 855.663.9876  Form No. ZMKTG210-15, 7/18
ENGINEERING SPECIFICATION: ZURN Z1310 Exposed Ecolotrol anti-siphon automatic
draining wall hydrant. Complete with non-freeze integral backflow preventer, bronze
casing, all bronze interior parts, non-turning operating rod with free-floating compres-
sion closure valve, replaceable bronze seat and seat washer, and combination 3/4” [19
mm] female or 1” [25 mm] male straight IP inlet. Stainless steel face with operating key.
Z1310 ECOLOTROL WALL HYDRANT – Exposed, Non-Freeze, Anti-Siphon, Automatic Draining
Inlet Descriptions
Standard -34FS
-34UN
Z1310 Ecolotrol Wall Hydrant
The Z1310 Ecolotrol is an exposed, automatic draining, non-freeze, anti-
siphon wall hydrant designed for commercial applications such as office
buildings, institutions, hospitals, malls and retail outlets, and schools.
Hydrant Features
• Certification – IAPMO®listed.
Approved under ASSE standard 1019-A
(3/4” [19 mm] connection).
• Integral Anti-Siphon Vacuum Breaker/Backflow Preventer – Unique
design utilizes an internal Equa-Balance®seal to prevent contamina-
tion of the potable water supply through back siphonage. The use of an
additional hose-connection vacuum breaker with ASSE 1011 approval
is not necessary.
• Valve Seat – Removable bronze valve seat with circular seating surface.
• Valve – One-piece assembly, replaceable, free-floating compression
closure valve plunger operates the water flow and drainage with a maxi-
mum of two and one-half (2-1/2) turns. No adjustments are necessary.
• Casing – Threaded brass pipe nipple.
• Operating Screw – Chrome-plated brass.
• Operating Rod – 3/8” [10 mm] solid brass.
• Faceplate – Constructed of type 304 stainless steel with brush finish.
• Modular Installation – Hydrant may be installed in a horizontal or
vertical orientation. Fits standard modular brick course when installed
horizontally.
• Drainage – Through circular drain ports of the nozzle.
• Operating Pressures – Minimum running pressure 8 psi. Maximum
static pressure 125 psi.
• Temperature Range – Minimum 33°F. Maximum 130°F.
®
SUFFIXES
–PB Polished Bronze Face
–RA2 12” [305 mm] Replacement Rod Assembly with Repair Kit (-RK)
–RA4 24” [610 mm] Replacement Rod Assembly with Repair Kit (-RK)
–RK Hydrant Parts Repair Kit
–SB Statuary Bronze Face (Specify light, medium, or dark finish.)
–WC Wall Clamp
–34FS 3/4” [19 mm] Solder Female Inlet Adapter
–34UN 3/4” [19 mm] IP 90° Inlet Elbow with Union Nut
OPTIONS
Wall Thickness 4” 6” 8” 10” 12” 14” 16” 18” 20” 22” 24”
Inches [mm] [102] [152] [203] [254] [305] [356] [406] [457] [508] [559] [610]
Overall Length* 63⁄4” 83⁄4” 103⁄4” 123⁄4” 143⁄4” 163⁄4” 183⁄4” 203⁄4” 223⁄4” 243⁄4” 263⁄4”
Inches [mm] [171] [222] [273] [324] [375] [425] [476] [527] [578] [629] [679]
Approx. Weight 5 5 5 8 8 8 11 11 14 14 14
Lbs. [Kg] [2] [2] [2] [4] [4] [4] [5] [5] [6] [6] [6]
*3/4” [19 mm] female and 1” [25 mm] male IPS connections.
Page 18
HYDRANTS
ZURN INDUSTRIES, LLC Specification Drainage Operation , 1801 Pittsburgh Avenue, Erie, PA 16502, 855.663.9876  Form No. ZMKTG210-15, 7/18
Z1310 ECOLOTROL WALL HYDRANT Parts Assembly, Parts List, and Operating Rod Assemblies
Z1310 Parts Assembly
Operating Rod Assemblies
4” Wall 4-3/4”
6” Wall 6-3/4”
8” Wall 8-3/4”
10” Wall 10-3/4”
12” Wall 12-3/4”
14” Wall 14-3/4”
16” Wall 16-3/4”
18” Wall 18-3/4”
20” Wall 20-3/4”
22” Wall 22-3/4”
24” Wall 24-3/4”
Z1310 Parts List
Item Description Qty. Part No.
1 Head 1 56061-003
2 Casing 1 50270-XXX
3 Valve Housing 1 31258-001
*4 Setscrew 1 51459-001
*5 Operating Screw 1 25049-002
*6 O-Ring 1 23750-028
*7 Operating Coupling 1 25147-001
8 Operating Rod 1 45042-XXX
10 Washer Guide 1 25050-001
*11 Washer 1 23075-001
*12 Screw #10-24 NC 1 14853-042
*13 Key 1 59546-001
14 Key Setscrew (Optional) 1 18006-027
*16 Removable Seat 1 25262-001
17 Wall Clamp (Optional) 1 50268-001
18 Wall Clamp Screw (Optional) 1 26050-004
19A 3/4” Nozzle 1 50799-005
19B 1” Nozzle 1 50799-006
20 Faceplate 1 56115-005
*21 Disc O-Ring 1 23750-204
22 Disc 1 50819-001
*23 Equa-Balance®Seal 1 50785-001
24 Faceplate Screw 5 22698-047
*25 Ball O-Ring 1 23750-232
*26 Ball 1 51458-001
*Items are available in -RK Repair Kit Option bag (#66955-201-9).
Page 19
HYDRANTS
ZURN INDUSTRIES, LLC Specification Drainage Operation , 1801 Pittsburgh Avenue, Erie, PA 16502, 855.663.9876  Form No. ZMKTG210-15, 7/18
Z1310 ECOLOTROL WALL HYDRANT Troubleshooting Guide
Z1310 Troubleshooting Guide
PROBLEM CAUSE SOLUTION
Hydrant will not operate when turned on. Water supply is shut off. Turn on water supply.
Cannot turn the hydrant on with key. Hydrant hasn’t been used for a long time – O-Ring Follow steps 1-2, 5, and 9-10 of the Service Guide.
has adhered to the operating screw and head.
Water running continuously from orifice in operating Debris between ball and O-Ring (in operating screw). Follow steps 1-2, 6, and 9-10 of the Service Guide.
screw. (Note: When first turning hydrant on, water Ball O-Ring not seated properly (in operating screw). Follow steps 1-2, 6, and 9-10 of the Service Guide.
may spit for a few seconds until ball seats on O-Ring.
Water sprays from holes around nozzle when Equa-Balance®seal is damaged. Follow steps 1-3 and 9-10 of the Service Guide.
hydrant is on.
Hydrant will not self-drain when it is shut off Screw nozzle is closed. Open screw nozzle so hose will drain some,
(hose and nozzle are attached). relieving pressure.
Gun nozzle is closed. Squeeze gun nozzle trigger so hose will drain some,
relieving pressure.
Water does not shut off completely when Debris between seat and washer. Follow steps 1-2, 4, and 8-10 of the Service Guide.
hydrant is turned off. Clean by turning water supply on and flush hydrant.
Washer is worn out. Follow steps 1-2, 4, and 7-10 of the Service Guide.
Wire draw in seat. Replace seat.
Hydrant exhibits low flow. Water supply to the hydrant is restricted.
Check water supply to ensure that all upstream valves
are fully open.
WARNING: Cancer and Reproductive Harm - www.P65Warnings.ca.gov
ADVERTENCIA: Cáncer y daño reproductivo - www.P65Warnings.ca.gov
AVERTISSEMENT: Cancer et eets néfastes sur la reproduction -
www.P65Warnings.ca.gov
Page 20
HYDRANTS
ZURN INDUSTRIES, LLC Specification Drainage Operation , 1801 Pittsburgh Avenue, Erie, PA 16502, 855.663.9876  Form No. ZMKTG210-15, 7/18
Z1310 Ecolotrol Wall Hydrant –
3/4” Hose Connection
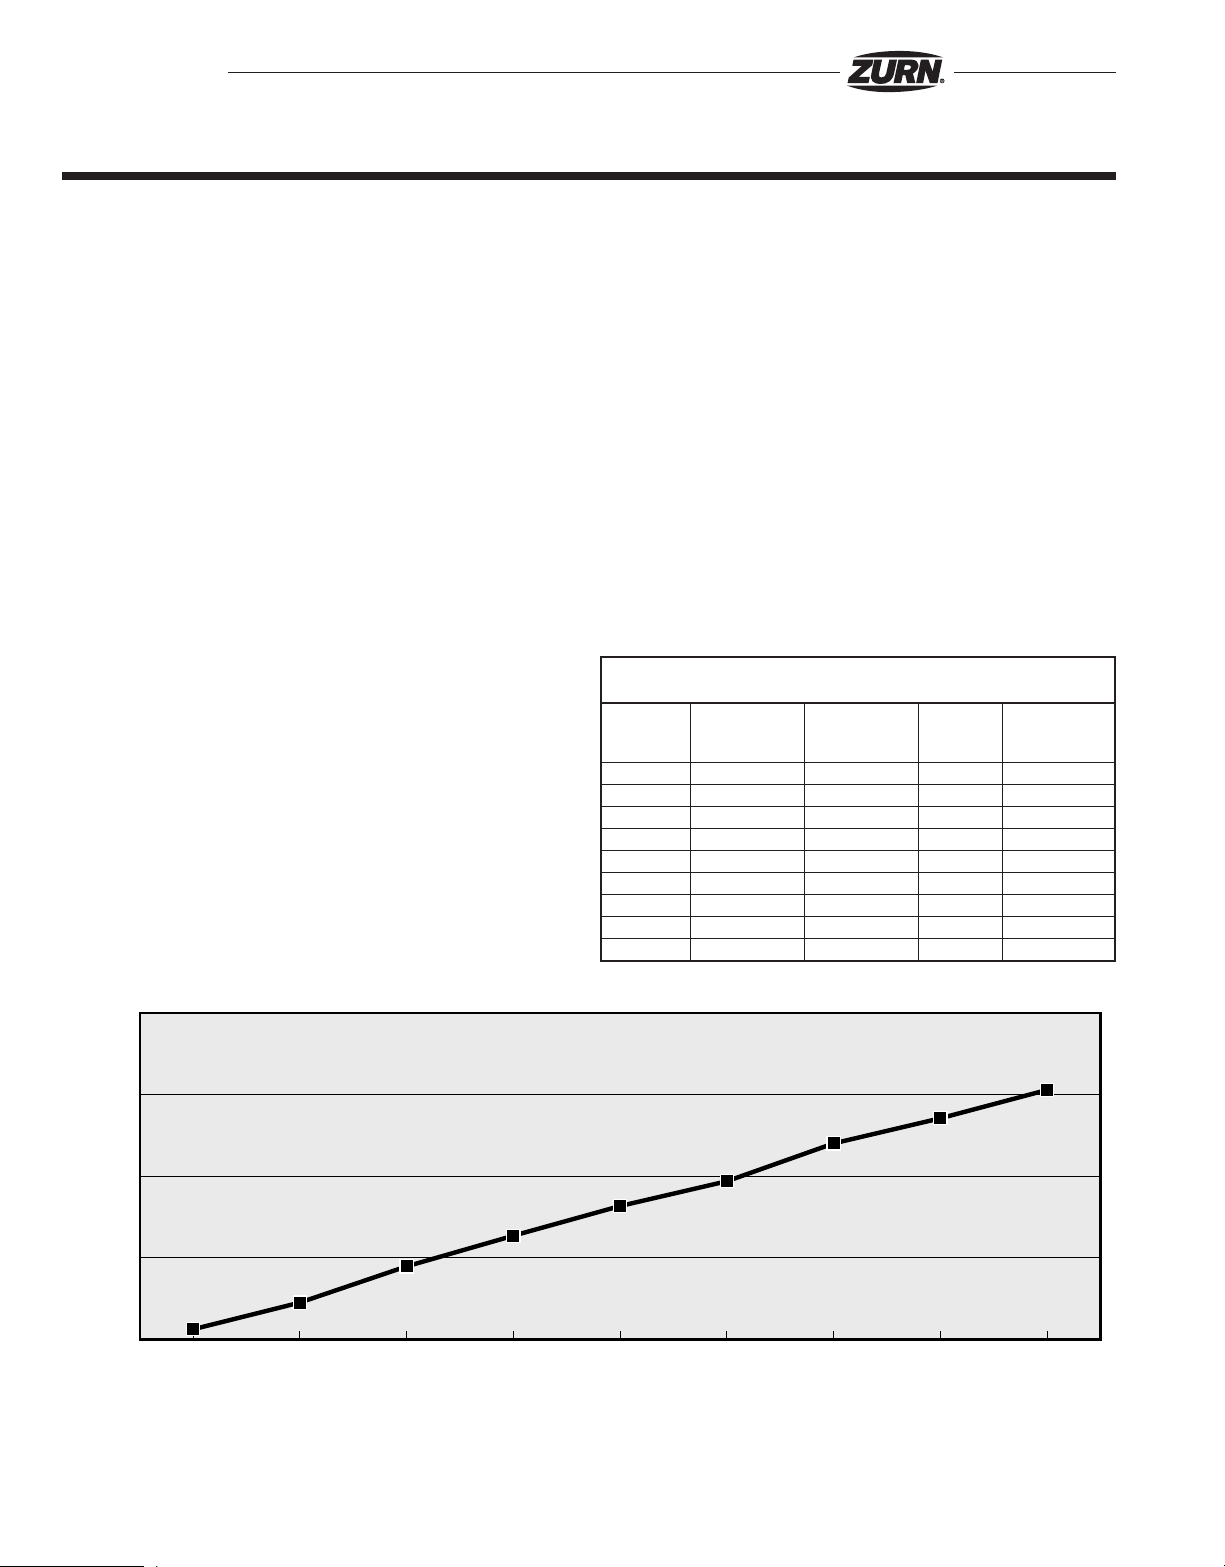
Static Running Inlet Running Outlet Pressure Drop
Pressure Pressure Pressure Flow Rate Across Unit
(psi) (psi) (psi) (gpm) (psi)
10 3.1 0.1 2.8 3.0
20 11.3 1.0 6.0 10.3
30 22.4 1.7 7.3 20.7
40 31.8 2.5 8.6 29.4
50 40.9 3.2 9.7 37.7
60 48.5 3.9 10.6 44.6
70 60.1 7.9 12.2 52.2
80 67.8 9.5 13.3 58.2
90 76.5 10.7 14.4 65.8
Z1310 ECOLOTROL WALL HYDRANT Service Guide
0
50
100
10 20 30 40 50 60 70 80 90
10.3
20.7
29.4
37.7
44.6
52.2
58.2
65.8
6.0
7.3
8.6
9.7
10.6
12.2
13.3
14.4
3.0
2.8
Running Inlet Pressure (psi)
Static Inlet Pressure (psi)
Pressure Drop Across Unit (psi)
Flow Rate (gpm)
Z1310 Service Guide
Step 1: Shutting Off the Water Supply to the Hydrant
Locate the supply shut-off valve and rotate until water supply is off.
Step 2: Removing the Faceplate and Adjacent Components
Using 1/8” Allen wrench, remove the five faceplate screws (24) from head (1)
by turning counterclockwise. Remove the faceplate (20), and nozzle (19).
If the Equa-Balance®seal was not the reason for service – skip to step 4.
Step 3: Replacing the Equa-Balance®Seal
Remove the current Equa-Balance®seal (23). Check seal for damage
(punctures, rips, etc.). Replace damaged seal with a new seal (23) observing
proper orientation (EQUA-BALANCE®SEAL SHOULD CUP INWARD IN ITS
REPLACED STATE.)
Step 4: Removing the Internal Operating Assembly
The internal operating assembly (4-8, 10-12, and 25-26) can be removed by
gripping the square end of the operating screw (5) with a pair of pliers and
pulling straight out.
If the operating screw O-Ring was not the reason for service – skip to step 6.
Step 5: Replacing the Operating Screw O-Ring
Remove the operating screw (5) from operating coupling (7) by turning
clockwise and slip the old O-Ring (6) off, and replace with new O-Ring (6).
Reinstall operating screw (5) into operating coupling (7) by turning counter-
clockwise. (Note: Lubricate the operating screw (5) threads and the O-Ring
(6) with Lubriplate FGL-2 if needed.)
If the operating screw assembly was not the reason for service – skip to
step 7.
Step 6: Checking Operating Screw Assembly
Remove the operating screw (5) from the operating coupling (7) by turning
clockwise, and using 5/32” Allen wrench, remove setscrew (4) by turning
counterclockwise, remove stainless steel ball (26) and check orientation of
O-Ring (25). If not seated properly, reseat, replace the ball (26) and replace
setscrew (4) using Allen wrench and turning clockwise until flush with
operating screw (5) or until tight and flush with operating screw (5).
(Note: Lubricate and reinstall as in step 5.)
If the hydrant shutoff washer was not the reason for service – skip to step 8.
Step 7: Replacing the Hydrant Shutoff Washer
Remove #10-24 NC x 3/8 screw (12) using a flat screwdriver and turning
screw (12) counterclockwise, remove washer (11) and replace with new
washer (11) and new screw (12) turning screw clockwise until tight.
Step 8: Replacing the Internal Operating Assembly
There is a flat or a V-notched boss inside of the hydrant head (1) that keeps
the operating coupling (7) from rotating when hydrant is turned on and off.
With operating screw (5) turned counterclockwise into operating coupling (7)
until it stops, and making sure that a flat side or corner of operating coupling
(7) lines up with appropriate boss, reinsert the internal operating assembly
into the hydrant.
Step 9: Replacing the Wall Plate
Insert nozzle (19) into place and fasten the faceplate (20) to head (1) using
the 1/8” Allen wrench and the five faceplate screws (24). Rotate the screws
clockwise until screws are snugged tight. (By hand only!)
Step 10: Turning On the Water Supply
Locate the water supply shut-off valve and rotate until water supply is on.
Z1310 Ecolotrol Wall Hydrant – 3/4"Hose Connection

Other ZURN Plumbing Product manuals

ZURN AQUASPEC Z82500 SERIES User manual

ZURN

ZURN AQUASPEC Z82500 SERIES User manual

ZURN Z880 User manual

ZURN

ZURN Z880 User manual

ZURN Z1035 User manual

ZURN

ZURN Z1035 User manual

ZURN Z-874 User manual

ZURN

ZURN Z-874 User manual

ZURN AQUASPEC Z83600 Series User manual

ZURN

ZURN AQUASPEC Z83600 Series User manual

ZURN Aquaspec Z82300-XL Series User manual

ZURN

ZURN Aquaspec Z82300-XL Series User manual

ZURN AQUASPEC WIDESPREAD Z83100 Series User manual

ZURN

ZURN AQUASPEC WIDESPREAD Z83100 Series User manual

ZURN HYDRO-X Power Serio Series User manual

ZURN

ZURN HYDRO-X Power Serio Series User manual

ZURN AQUASPEC Z81000 SERIES User manual

ZURN

ZURN AQUASPEC Z81000 SERIES User manual

ZURN plumbSMART ZEMS-IS Series User manual

ZURN

ZURN plumbSMART ZEMS-IS Series User manual

ZURN AquaSense AV ZR Series User manual

ZURN

ZURN AquaSense AV ZR Series User manual

ZURN ZN1201 User manual

ZURN

ZURN ZN1201 User manual

ZURN Connected Aqua-FIT Serio-W2 Series User manual

ZURN

ZURN Connected Aqua-FIT Serio-W2 Series User manual

ZURN AQUASPEC Z-81100 SERIES User manual

ZURN

ZURN AQUASPEC Z-81100 SERIES User manual

ZURN Sierra Z7440-XL-CST Series Use and care manual

ZURN

ZURN Sierra Z7440-XL-CST Series Use and care manual

ZURN plumbSMART ZEMS Series User manual

ZURN

ZURN plumbSMART ZEMS Series User manual

ZURN AquaSense Z6933 User manual

ZURN

ZURN AquaSense Z6933 User manual

ZURN Aquaspec Z82100 Series User manual

ZURN

ZURN Aquaspec Z82100 Series User manual

ZURN ZEMS6140AV User manual

ZURN

ZURN ZEMS6140AV User manual

ZURN AquaSense AV ZER Series User manual

ZURN

ZURN AquaSense AV ZER Series User manual

ZURN EZ1 Service manual

ZURN

ZURN EZ1 Service manual

ZURN AQUASPEC Z81100-XL Series User manual

ZURN

ZURN AQUASPEC Z81100-XL Series User manual

ZURN Aquaflush Z6000 User manual

ZURN

ZURN Aquaflush Z6000 User manual

ZURN Camaya Z6953-XL User manual

ZURN

ZURN Camaya Z6953-XL User manual

Popular Plumbing Product manuals by other brands

TLV PowerDyne HR80A instruction manual

TLV

TLV PowerDyne HR80A instruction manual

American Standard Moments Lavatory Faucet 256.1XX installation instructions

American Standard

American Standard Moments Lavatory Faucet 256.1XX installation instructions

Triton 86004810 Installation and operating instructions

Triton

Triton 86004810 Installation and operating instructions

Omnires SYSY36CR Installation and Maintenance

Omnires

Omnires SYSY36CR Installation and Maintenance

Helvex Squadra E-929 installation guide

Helvex

Helvex Squadra E-929 installation guide

Hans Grohe iBox Hub 25020180 Instructions for use/assembly instructions

Hans Grohe

Hans Grohe iBox Hub 25020180 Instructions for use/assembly instructions

American Standard Yorkville 2320 Elongated installation instructions

American Standard

American Standard Yorkville 2320 Elongated installation instructions

Kohler K-3048 installation guide

Kohler

Kohler K-3048 installation guide

Sanela SLWN 08P Mounting instructions

Sanela

Sanela SLWN 08P Mounting instructions

newform X-T 4224E instructions

newform

newform X-T 4224E instructions

BELLATERRA HOME 10167P4 Installation procedures

BELLATERRA HOME

BELLATERRA HOME 10167P4 Installation procedures

RIHO Artic A402 manual

RIHO

RIHO Artic A402 manual

Dyson AB 06 installation guide

Dyson

Dyson AB 06 installation guide

Hans Grohe Allegra Premia 16893XXX Service

Hans Grohe

Hans Grohe Allegra Premia 16893XXX Service

American Standard Portsmouth installation instructions

American Standard

American Standard Portsmouth installation instructions

BEMIS bioBidet BB-1000 SUPREME user manual

BEMIS

BEMIS bioBidet BB-1000 SUPREME user manual

Roca GENOVA Instructions for installation

Roca

Roca GENOVA Instructions for installation

aquabrass Pila 52N35 installation guide

aquabrass

aquabrass Pila 52N35 installation guide

manuals.online logo
manuals.online logoBrands
  • About & Mission
  • Contact us
  • Privacy Policy
  • Terms and Conditions

Copyright 2025 Manuals.Online. All Rights Reserved.