manuals.online logo
Brands
  1. Home
  2. •
  3. Brands
  4. •
  5. 3M
  6. •
  7. Measuring Instrument
  8. •
  9. 3M SE-400 Series User manual

3M SE-400 Series User manual

DANGERS, WARNINGS, CAUTIONS
Danger
Failure to observe the following procedures may result in serious personal injury.
•    Not for use in explosive or hazardous locations.  
•    Contains built-in lithium polymer battery.  Do not incinerate or dispose of in re.  Do not disassemble, alter, or re-construct.
Warning
Failure to observe the following procedures could damage the instrument.
•    Read the manual before operation. 
•    Do not store in temperatures outside -20°C to 60°C (-13°F to 140°F)
•    Do not immerse in liquids.
•    Condensation may damage your instrument.
•    Substitution of components may impair the accuracy of the instrument.  Repair should be done by authorized service 
personnel only.
Caution
•    The battery in this instrument has limited shelf-life, even if never used.
•    A non-condensing environment is required for proper measurements.
•    Do not charge battery outside the range of 0°C to 40°C (32°F to 104°F)
 Battery run-time may be reduced when operating at temperatures lower than 0°C (32°F).
•    It is recommended that the SE-400 Series is charged for approximately 4 hours before rst use.
•    The 3M SE-400 Series Sound Level Meter may not be sufcient to carry out a full risk assessment of workers exposed to 
hazardous noise levels.
Intended Use
The SE-400 Series is intended to measure sound pressure levels in air and provide local sound and noise detection 
measurements.  It is tted with 12 keys for powering on/off, viewing and/or running/stopping measurements, navigating and 
setting parameters (See Figure 1 for more information).   For suitability and proper use follow local regulations and refer to all 
information supplied.  For more information contact a safety professional/3M representative (Local Contact Details).
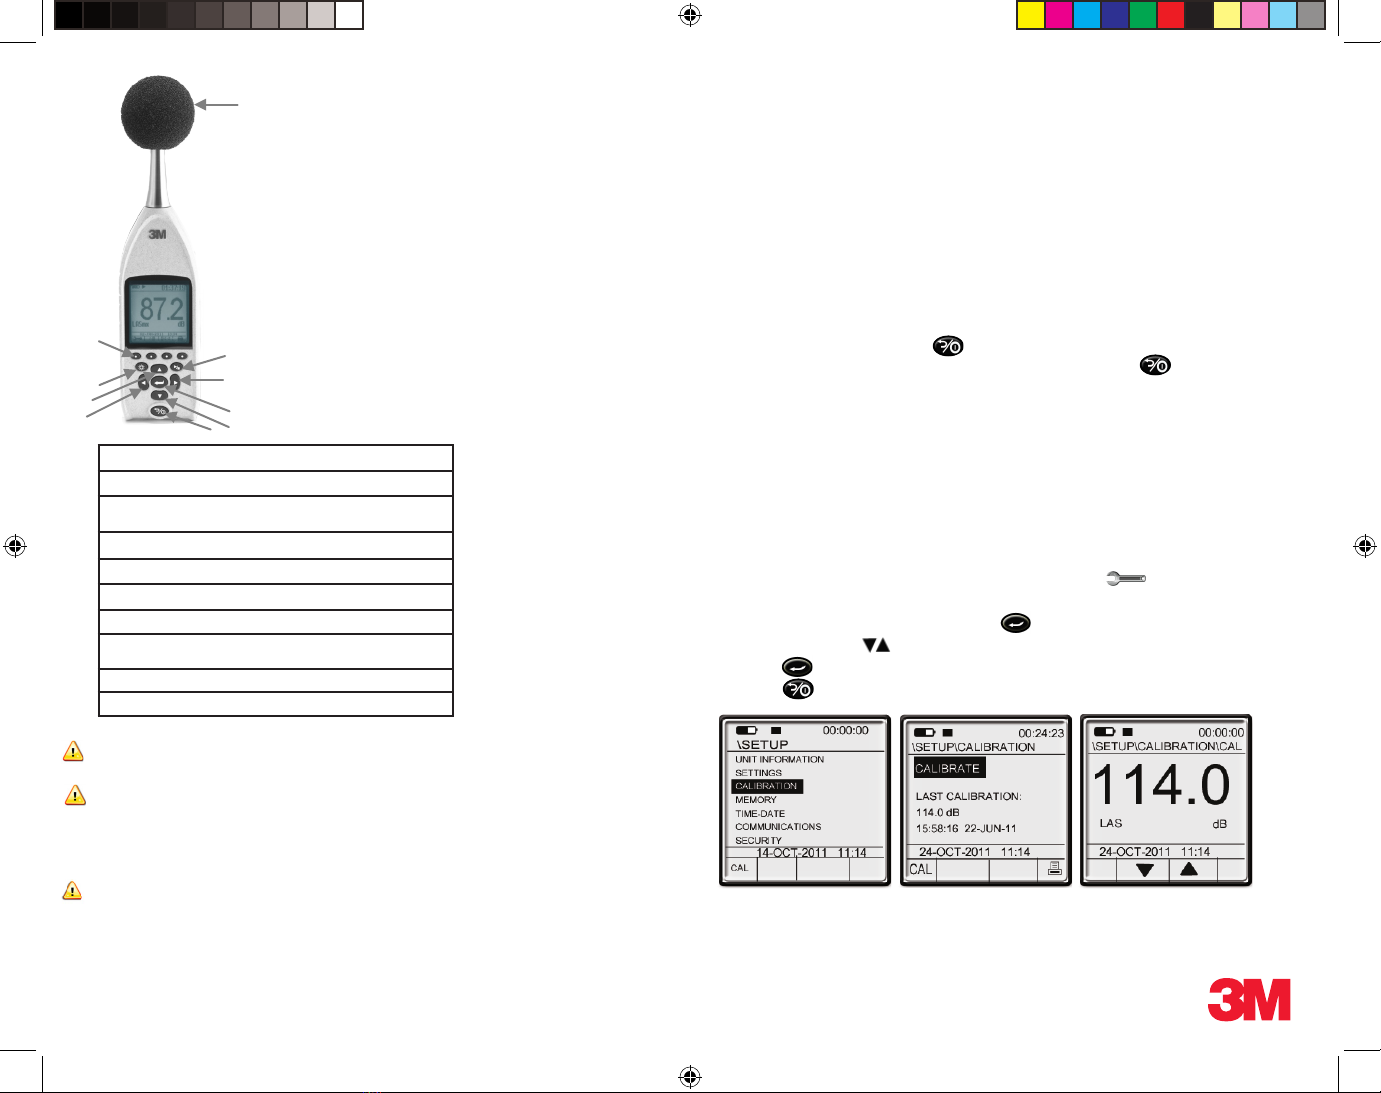
SE-400 SERIES DISPLAY AND KEYPAD
Figure 1
A.  Softkeys:  four softkeys used as additional menu options with specic screens.
B.  Backlight Key:  used to illuminate the background of the display screen.
C.  Up Arrow Key:  used to toggle through menu/setup options and scrolls through the 
      values on the measurement screen.
D.  Left Arrow Key:  used to navigate through menus and setup parameters.
E.  Run/Stop Key:  used to run and stop a logged session.
F.  Right Arrow Key:  used to navigate through menus and setup parameters.
G.  Enter Key:  used to select menus and conrm setup parameter changes.
H. Down Arrow Key:  used to toggle through menu/setup options and scrolls through the   
    values on the measurement screen. 
I.  On/Off/Esc Key:  used to power on, power off and/or escape or move back one screen.
J.  Windscreen:  used to reduce noise effects from wind with minimal effects on the readings.
A
B
C
D
E
F
G
 H
 I
J
GETTING STARTED
Attaching the Preamp
The SE-400 Series, model SE-401 is equipped with a removable preamp and is shipped unattached to the SLM.
1.  Place the preamp connector over the mating connector at the top of the instrument.  Gently press down while 
     rotating the preamp ring until the preamp connector drops into place.  
2.  Rotate the preamp ring until secure.
Charging
The SE-400 Series is charged using the supplied USB charger or personal computer’s USB port.  A fully depleted 
battery will require approximately 8 hours to fully charge when using the external battery charger.  
Status of battery icon: When charging, the battery indicator will scroll, shading in the indicator. When the 
battery is fully charged, the battery indicator will stop scrolling. 
Powering On/Off
   1.  To turn on the SE-400 Series, press the           key until the start screen appears.
   2.  To turn off the SE-400 Series,  ensure the meter is stopped.  Press and hold the            key until the 
         measurement screen disappears.   
Calibrating
It is advisable to perform a eld calibration before taking measurements to ensure your measurements are 
accurate in the current environment.
             
1.   Ensure the SE-400 Series is turned On, stopped, and not logging.
2.   Attach the calibrator and calibrator adapter to the SE-400 Series.  Set the calibrator to 1000 Hz and 114 dB 
     (if it is selectable).  
3.  Turn On the calibrator.
4.  From the measurement screen, press the corresponding softkey from the              menu.     
5.  Press the CAL softkey or select Calibration.   (See Figure 2-A).
6.  In the calibration screen, press CAL softkey or press            key (See Figure 2-B).
7.  Press the corresponding            softkeys to adjust the measurement to 114.0 dB  (See Figure 2-C).  
8.  Press the            key to save the changes or escape to abort.  
9.  Press the            key twice to return to the main measurement screen.  
      Figure 2-A Figure 2-B Figure 2-C
SE-400 QS_Final_global copy.indd 1 11/16/2011 5:02:15 PM
Windscreen
The SE-400 Series features a removable windscreen. This is primarily designed to reduce noise effects from 
wind with minimal effect on the readings. It is recommended to use the instrument with the windscreen on at 
all times in order to protect the microphone.
Positioning
For area monitoring and general sound level sessions, position the instrument in the eld at a 0o angle 
towards the noise source.  
Settings
1.  The frequency weighting and the time response may be changed on the instrument by pressing the 
     corresponding FS or ACZ softkeys when in stop mode from the measurement screen (See Figure 
     4-B).    
         2.  To access the settings menu, select the                setup icon with the corresponding softkey.  
•    To change the log interval, exchange rate, peak weighting, language, and/or contrast, select time/date, 
language settings by pressing             /            keys and press           key.  (See Figures 3-A and 3-B.)
Figure 3-A Figure 3-B
OPERATING
Run, stop, and view results
 1.  To start a session, press the           key.   The run icon will appear with a run-time clock indicating the 
      current duration of the session.
•    The multi-measurement screen (see Figure 4-A) will appear with the SPL displayed.  
         2.  Press the            /             arrows to scroll through measurements.  
 3.  Press the            key to view single measurement screen(see 4-B).  Press the            /           arrows to 
      scroll through the measurements.
Figure 4-A Figure 4-B
Occupational Health &
Environmental Safety Division
3M Center Building 0235-02-W-70
St. Paul, MN 55144-1000
U.S.A
Technical Service: 1-800-243-4630
Customer Service: 1-800-328-1667
Europe/Middle East/Africa
3M United Kingdom Plc 
3M Centre,
Cain Road, Bracknell
Berkshire RG12 8HT
United Kingdom
Tel: 0870 60 800 60
www.3M.com/uk/ohes
Please recycle. Printed in USA.
© 2011 3M Company
All rights reserved.
34-8708-6287-6
Viewing measurements in DMS
 1.  Optional:  To view the logged data in charts, tables, and customized reports, download the data into 
      3MTM Detection Management Software (DMS).  
Figure 5-A
IMPORTANT: 
For appropriate use of hearing protection devices, consult your safety professional, applicable local standards or contact 3M 
(Local Contact Details). Note: Hearing protection sold separately. This product complies with the requirements of IEC61672-1 
with the exception of clause 9.1c - “An instruction manual shall be provided as a printed document in one or more parts”. A 
printed copy of the instruction manual is available on request.
Time Response 
Frequency Weighting 
 LASmx value
SE-400 QS_Final_global copy.indd 2 11/16/2011 5:02:17 PM

Other manuals for SE-400 Series

1

This manual suits for next models

1

Other 3M Measuring Instrument manuals

3M NoisePro Series User manual

3M

3M NoisePro Series User manual

3M Clean-Trace NGi Luminometer User manual

3M

3M Clean-Trace NGi Luminometer User manual

3M SP-SE-2-1/1 User manual

3M

3M SP-SE-2-1/1 User manual

3M SD-200 User manual

3M

3M SD-200 User manual

3M PL300 User manual

3M

3M PL300 User manual

3M Dynatel 965AMS User manual

3M

3M Dynatel 965AMS User manual

3M Edge eg5 User manual

3M

3M Edge eg5 User manual

3M Dynatel 2250ME Series User manual

3M

3M Dynatel 2250ME Series User manual

3M EVM Series User manual

3M

3M EVM Series User manual

3M Dynatel 2250M User manual

3M

3M Dynatel 2250M User manual

3M SoundPro SE series User manual

3M

3M SoundPro SE series User manual

3M Workstation Monitor 724 User manual

3M

3M Workstation Monitor 724 User manual

3M SpotOn 370 User manual

3M

3M SpotOn 370 User manual

3M QUESTempo 36 User manual

3M

3M QUESTempo 36 User manual

3M Edge User manual

3M

3M Edge User manual

3M ScanEM-C User manual

3M

3M ScanEM-C User manual

3M CTM048 User manual

3M

3M CTM048 User manual

3M Attest 1295 User manual

3M

3M Attest 1295 User manual

3M LM1 User manual

3M

3M LM1 User manual

3M RFO 144 User manual

3M

3M RFO 144 User manual

3M 8900B Series User manual

3M

3M 8900B Series User manual

3M WIBGET WB-300 User manual

3M

3M WIBGET WB-300 User manual

3M 718 User manual

3M

3M 718 User manual

3M 110 Series User manual

3M

3M 110 Series User manual

Popular Measuring Instrument manuals by other brands

Novatek EM-129 operating manual

Novatek

Novatek EM-129 operating manual

Endress+Hauser Proline Promag 55 PROFIBUS PA operating instructions

Endress+Hauser

Endress+Hauser Proline Promag 55 PROFIBUS PA operating instructions

Hanna Instruments HI88703-02 instruction manual

Hanna Instruments

Hanna Instruments HI88703-02 instruction manual

TIRE MINDER i10 instruction manual

TIRE MINDER

TIRE MINDER i10 instruction manual

Burkert 8012 Series operating instructions

Burkert

Burkert 8012 Series operating instructions

Kroeplin C0 Series user manual

Kroeplin

Kroeplin C0 Series user manual

Bruker D8 Discover Standard operating procedure

Bruker

Bruker D8 Discover Standard operating procedure

Bushnell GOLF Ion Edge user manual

Bushnell GOLF

Bushnell GOLF Ion Edge user manual

Endress+Hauser Levelflex FMP50 operating instructions

Endress+Hauser

Endress+Hauser Levelflex FMP50 operating instructions

Denon Professional DR-900R user guide

Denon Professional

Denon Professional DR-900R user guide

Vivax Metrotech VM-540 user guide

Vivax Metrotech

Vivax Metrotech VM-540 user guide

DATREND Systems Vision Pad quick start guide

DATREND Systems

DATREND Systems Vision Pad quick start guide

Ametek Western Research IPS-4 user manual

Ametek

Ametek Western Research IPS-4 user manual

OTT Pluvio 2 S operating instructions

OTT

OTT Pluvio 2 S operating instructions

Keysight PNA-X N5244A Service guide

Keysight

Keysight PNA-X N5244A Service guide

Ludlum Measurements 3003 user manual

Ludlum Measurements

Ludlum Measurements 3003 user manual

Newport 1825-C Operator's manual

Newport

Newport 1825-C Operator's manual

Transducer Techniques SSI Operator's manual

Transducer Techniques

Transducer Techniques SSI Operator's manual

manuals.online logo
manuals.online logoBrands
  • About & Mission
  • Contact us
  • Privacy Policy
  • Terms and Conditions

Copyright 2025 Manuals.Online. All Rights Reserved.