N-3299E-A21908
(2014/11)
3299E-A21908
CZ Dvoutlačítkový vysílač
GB Two-button transmitter
3299E-A11908
CZ Čtyřtlačítkový vysílač
GB Four-button transmitter
ABB s.r.o.
Elektro-Praga
Resslova 3
466 02 Jablonec n. N. Tel.: +420 483 364 111
Czech Republic Hotline: +420 800 800 104
http://www.abb.cz/elektropraga E-mail: epj.jablonec@cz.abb.com
CZ
POPIS
Vysílačslouží ve spolupráci s přijímači systému
RF 868®k dálkovému bezdrátovému ovládání elek-
trických spotřebičů prostřednictvím kódovaného rádi-
ového signálu.
Při stisku tlačítka vysílače (obr. 1) se vyšle kódovaný
signál, který přijímačzachytí a provede
naprogramovanou funkci. Součástí vysílaného kódu
je i informace, které tlačítko (případněkombinace
tlačítek) bylo stisknuto. Tuto informaci přijímač
vyhodnocuje, takže jeden vysílačmůže v závislosti na
stisknutém tlačítku řídit několik přijímačů, nebo
provádět několik funkcí, nebo je možné několika
vysílači ovládat jeden přijímač.
Každý vysílačmá od výrobce nastaven svůj vlastní
neopakovatelný kód, takže nemůže docházet k vzá-
jemnému ovlivňování při používání několika vysílačů.
Vysílání kódu je indikováno problikáváním LED v
průzoru hmatníku po dobu stisku tlačítka.
Podle popisu v návodu příslušného přijímače lze
vysílače naprogramovat v tzv. vícetlačítkových
funkcích. Pro ovládání sdružených dvoutlačítkových
funkcí (např. ON + OFF, TIMER + OFF, JAL, ROLL)
lze použít dvojice horního a dolního tlačítka podle obr.
1a, c. Všechna tlačítka podle obr. 1c se použijí při
ovládání funkcí JAL aROLL ve třítlačítkovém módu.
UVEDENÍ DO PROVOZU
Upevnění vysílače na vybrané místo se provádí
přišroubováním nebo přilepením oboustrannou lepicí
páskou.
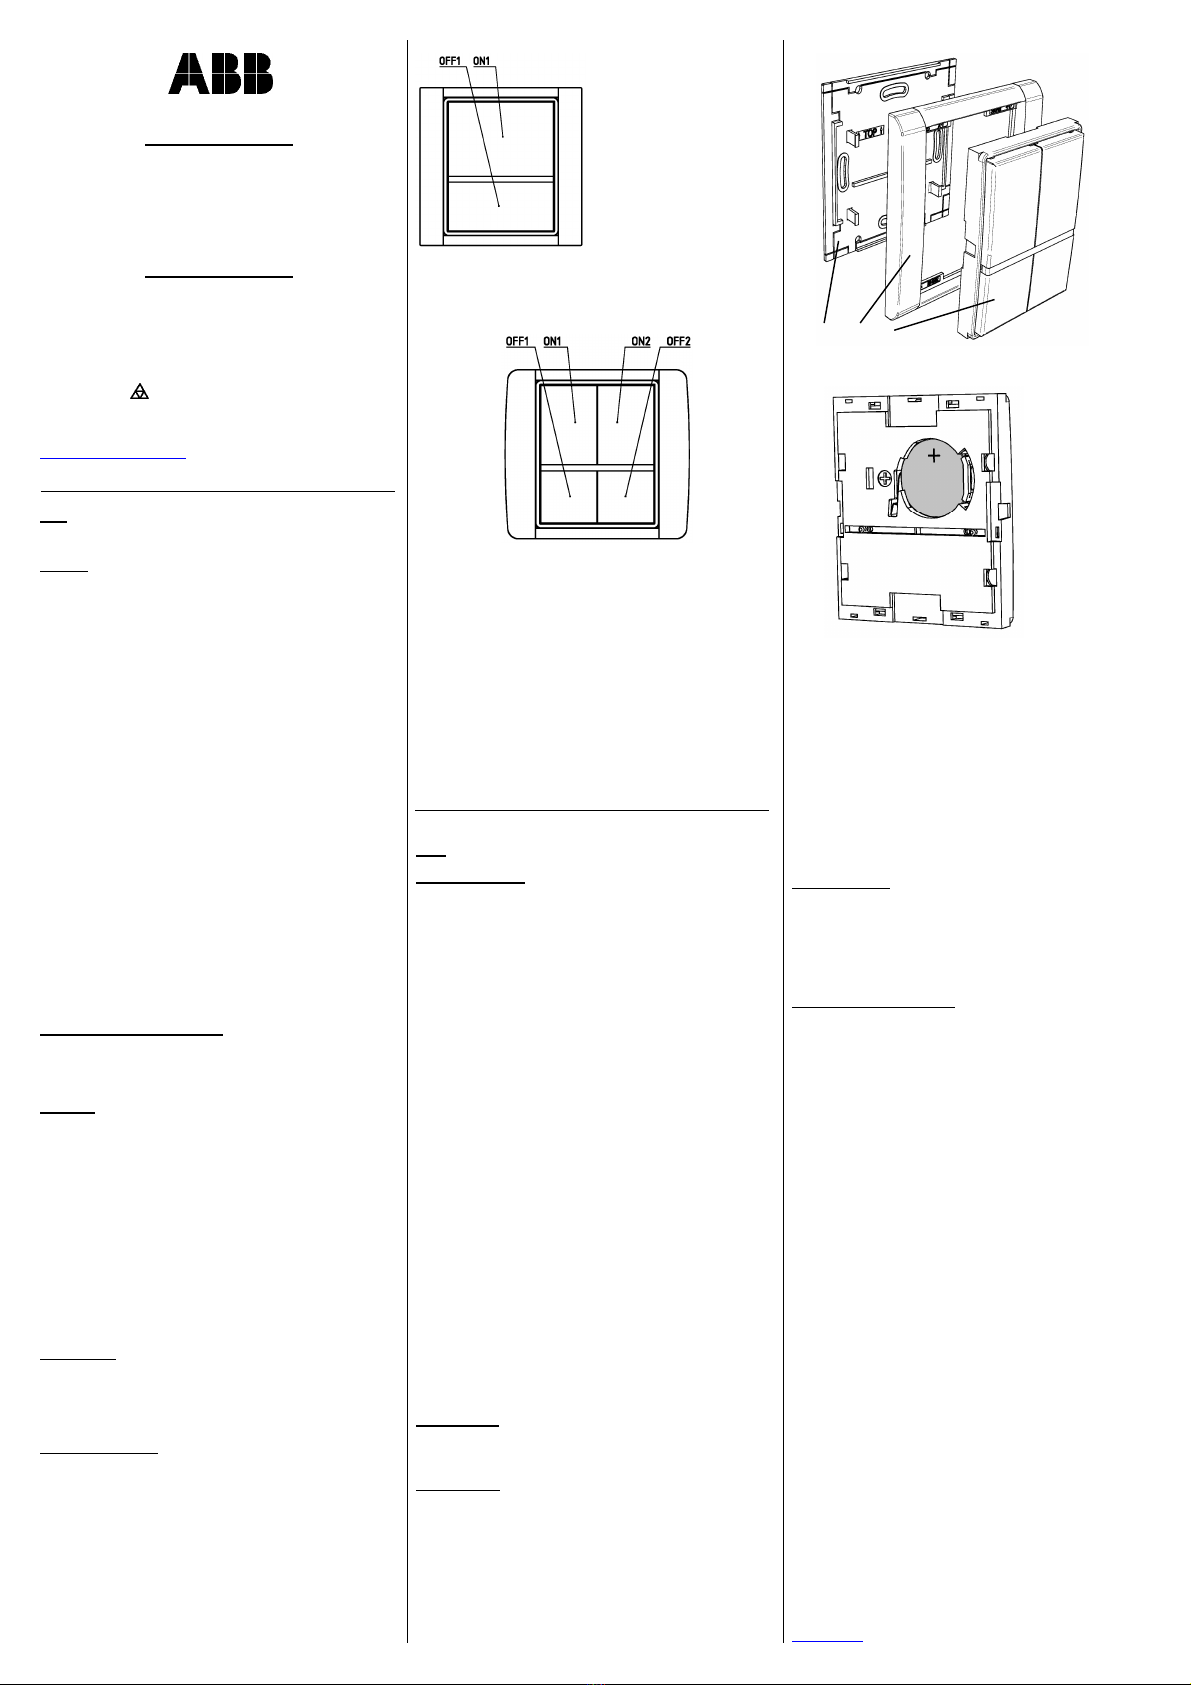
Montáž
- Po vyjmutí výrobku z obalu sejměte vysílací jednot-
ku (obr. 2c) ze základní desky (obr. 2a).
- Odstraňte izolační fólii mezi baterií (obr. 3) a kon-
taktem.
- Přišroubujte nebo přilepte základní desku (obr. 2a)
tak aby nápis TOP byl nahoře.
- Na základní desku přiložte rámeček (obr. 2b) – není
součástí dodávky.
- Vysílací jednotku nasuňte na základní desku – ba-
terie směrem nahoru.
Při instalaci do vícenásobného rámečku spolu s jiným
přístrojem je nutno předem odstranit přesahující část
základní desky odlomením v naznačeném místě.
Demontáž
- Vysílací jednotku (obr. 2c) sejměte ze základní
desky (obr. 2a) vložením vhodného nástroje mezi
boční část vysílací jednotky a rámeček (obr. 2b).
- Vysuňte vysílací jednotku a sejměte rámeček.
Výměna baterie
Na vybití baterie upozorňuje změna blikání LED.
Rovnoměrné pravidelné blikání se u vybité baterie
změní na nerovnoměrné problikávání. Na vybitou ba-
terii vysílače upozorňují i signalizační LED na někte-
rých přijímačích.
Výměna baterie (obr. 3) se provede po demontáži vy-
sílací jednotky ze základny.
Poznámky:
Přístroj je napájen 3V baterií a proto jej lze umístit i ve
vlhkém prostředí (koupelna, sklep) nebo přímo na
hořlavý podklad (např. na dřevěný obklad).
Pokud hmatník zůstane zablokován ve stisknutém
stavu na dobu delší než 60 s, vysílání kódu se auto-
maticky zruší.
Pro zajištění maximálního dosahu neumísťujte přístroj
na kovovou podložku nebo v blízkosti kovových
předmětů.
GB
DESCRIPTION
Use this transmitter along with receivers of the
RF 868®system for remote wireless control of electri-
cal appliances using encoded radio-frequency sig-
nals.
If any button of the transmitter is pressed (fig. 1a - c),
the transmitter sends a coded signal which is
received by the receiver and the programmed
function is carried out. The transmitted code includes
information about which button (or combination of
buttons) has been pressed. The receiver evaluates
this information, which means that based on the
button pressed, a single transmitter can control
several receivers or execute several functions, or
several transmitters can control a single receiver.
Each transmitter has its own default unique code set
by the manufacturer to avoid mutual interference
when using more transmitters.
Ongoing transmission of a code is indicated by a
short-blinking LED in the keyboard slot while the
button is depressed.
Transmitters can be programmed for so-called multi-
button functions according to the description in the
instruction manual of the respective receiver. To
control combined two-button functions (such as ON +
OFF, TIMER + OFF, JAL, ROLL), use the pair of
upper and lower button as illustrated in fig. 1a and c.
All buttons in fig. 1b and c can also be used to control
JAL and ROLL functions in the three-button mode.
FIRST USE
Mount the transmitter in the selected location by
screwing or sticking on double-sided adhesive tape.
Installation
- Unpack the product and remove the transmitter unit
(fig. 2b) from the main board (fig. 2a).
- Remove the insulation foil between the battery
(fig. 3) and the contact.
- Screw down or stick the main board (fig. 2a) so that
the TOP text faces up.
- Attach the frame (fig. 2c) (not included) to the main
board.
- Slide the transmitter unit onto the main board – with
the battery facing up.
If installing in a multiple frame along with other devic-
es, it is necessary to remove the sticking out part of
the main board by breaking it off at the marked posi-
tion
Disassembly
- Remove the transmitter unit (fig. 2b) from the main
board (fig. 2a) by inserting a suitable tool between
the side part of the transmitter unit and the frame
(fig. 2c).
- Slide out the transmitter unit and remove the frame.
Replacing the battery
A weak battery is indicated by a change in the LED
flashing. If the battery is weak, even and regular
flashing will change to irregular flashing. Indication
LEDs in some receivers will indicate a weak battery in
the transmitter, too.
If you need to replace the battery (fig. 3), dismount
the transmitter unit from the main board.
Notes:
The device is powered by a 3V battery and therefore
can be placed even in a humid area (such as a bath-
room or cellar) or directly on a flammable base (such
as a wood wall lining).
If the tactile area remains blocked in the depressed
position for a period longer than 60 s, transmission of
the code will automatically be cancelled.
To ensure the maximum range, do not place the de-
vice on a metal base or near metal objects.
Pro ABB s.r.o. vyrábí:
ENIKA.CZ s.r.o.
Vlkov33 Tel.: +420 493 773 311
509 01 NováPaka Fax: +420 493773322
Czech Republic E-mail:enika@enika.cz
http://www.enika.cz
Obr. 1a, Fig. 1a Obr. 1b, Fig.1b
Obr. 1c, Fig. 1c
Obr. 2, Fig. 2


