Absaar ATEK 4000 User manual

ENG
1
ATEK 4000
6/12V 4Amp
Smart Charger with LCD
Read this material before using this product. Failure to do so can result in serious injury. SAVE
THIS MANUAL

ENG
2
Specification :
Operation Voltage 220V 240V
Operation AC Frequency 50 Hz
Max Charging Current 4Amp
Charging stages 4 Stages
Battery Voltage 6V / 12V
Battery Capacity 5Ah - 120Ah
Charging stage memory time 12 Hours
Operation Temperature 0 40 oC
IP rating IP65
1. Product Introducon
ATEK 4000 is a smart charger based on the PWM high frequency switching
ower supply (AC-DC) technology and MCU (with 12bit ADC) control, featuring high
efficiency, low loss, small size, light weight, LCD display interface, and complete
protection function. It is the best choice for car, home and industrial battery charging
and has the following features:
Identify 6V/12V batteries automatically.
Adopt 4-stage smart charging principle: pre-charge constant current
constant voltage float charge;
Four charging modes are available: 6V/1A (slow), 12V/1A (slow), 12V/4A
(fast), 12V/4A (low temperature)
LCD display: analog graph, figure & character display, ensuring more
intuitive, clear and simplified operation;
Wrong battery prompt, reverse polarity prompt and protection, over
temperature protection, power-down memory, short circuit protection,
Separate button is available to select charging mode.

ENG
3
2. Appearance and LCD Diagram
1) Product structure
Fig. 1 LCD diagramm
2) Schéma LCD
Fig. 1 Structure Diagram
Fig. 2 LCD Diagram
a: reverse polarity icon
b: wrong battery icon
c: 12V battery icon
d: 6V battery icon
e: analog battery icon
f: slow mode icon
g: fast mode icon
h: LowTemp mode icon
i: Digit/character icon
A
: Power input 220vlt
H: LCD
F
: DEL power (green)
G: Fault DEL (red)
C
: Bottom shell
E
: Mode button
D: Top Shell
B : Output :
red: Positive
Black : Négative

ENG
4
3. Charging Features and Electrical Parameters
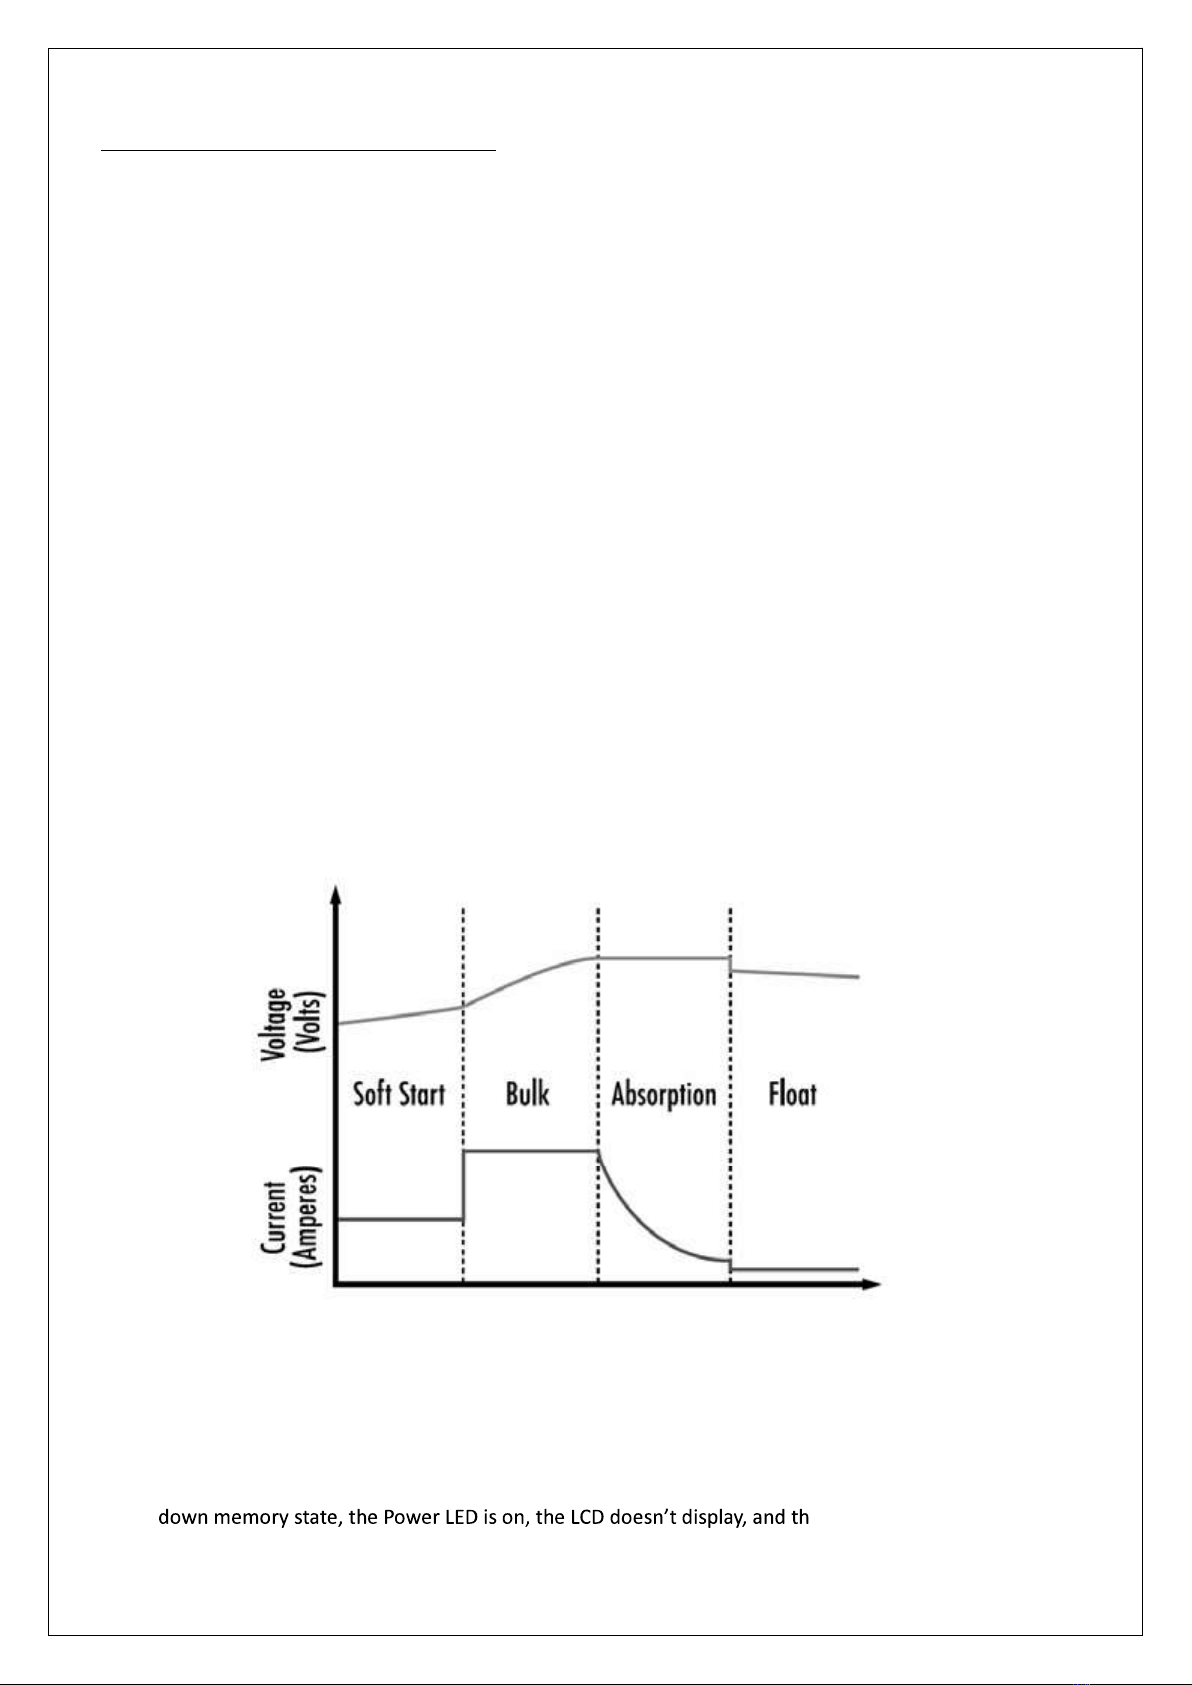
This product provides a 4-stage charging mode: pre-charge, constant current, constant voltage, and float charge, and
the features are as follows:
i) Pre-charge: idenfy the baery voltage before charging; if the baery voltage is lower than the reference
voltage, the baery will be pre-charged in order to avoid damage to the baery.
ii) Constant current: the main charging phase; the baery will be charged with the maximum current, 70%~85%
of the electricity is charged in this stage
iii) Constant voltage: in the process of constant voltage charging, the baery voltage will be higher and higher,
and the current will be smaller and smaller; when the charging current drops to 0.5C, the constant voltage
charging ends, and then enters next stage; the constant voltage charging stage is the boost charge, and the
baery is almost fully charged at the end of the stage;
iv) Float charge: it is a maintenance charge, and allows for a longer me of safe charge. Through trickle charge,
the baery can be charged to nearly 100%. Too small current is insufficient to cover the self-discharge of the
baery, and too large current will lead to over-charge and dehydraon. Long me charging with a small
current can eliminate the vulcanizaon of the negave electrode plate.
Fig. 3: Current & Voltage Charging Curves
1) Power-down memory funcon: in the charging process (constant current and follow-up stage), the product can
remember the current charging mode aer power outage, and restores the original state when the grid resumes; the
maximum me is 12h with baery connecon.
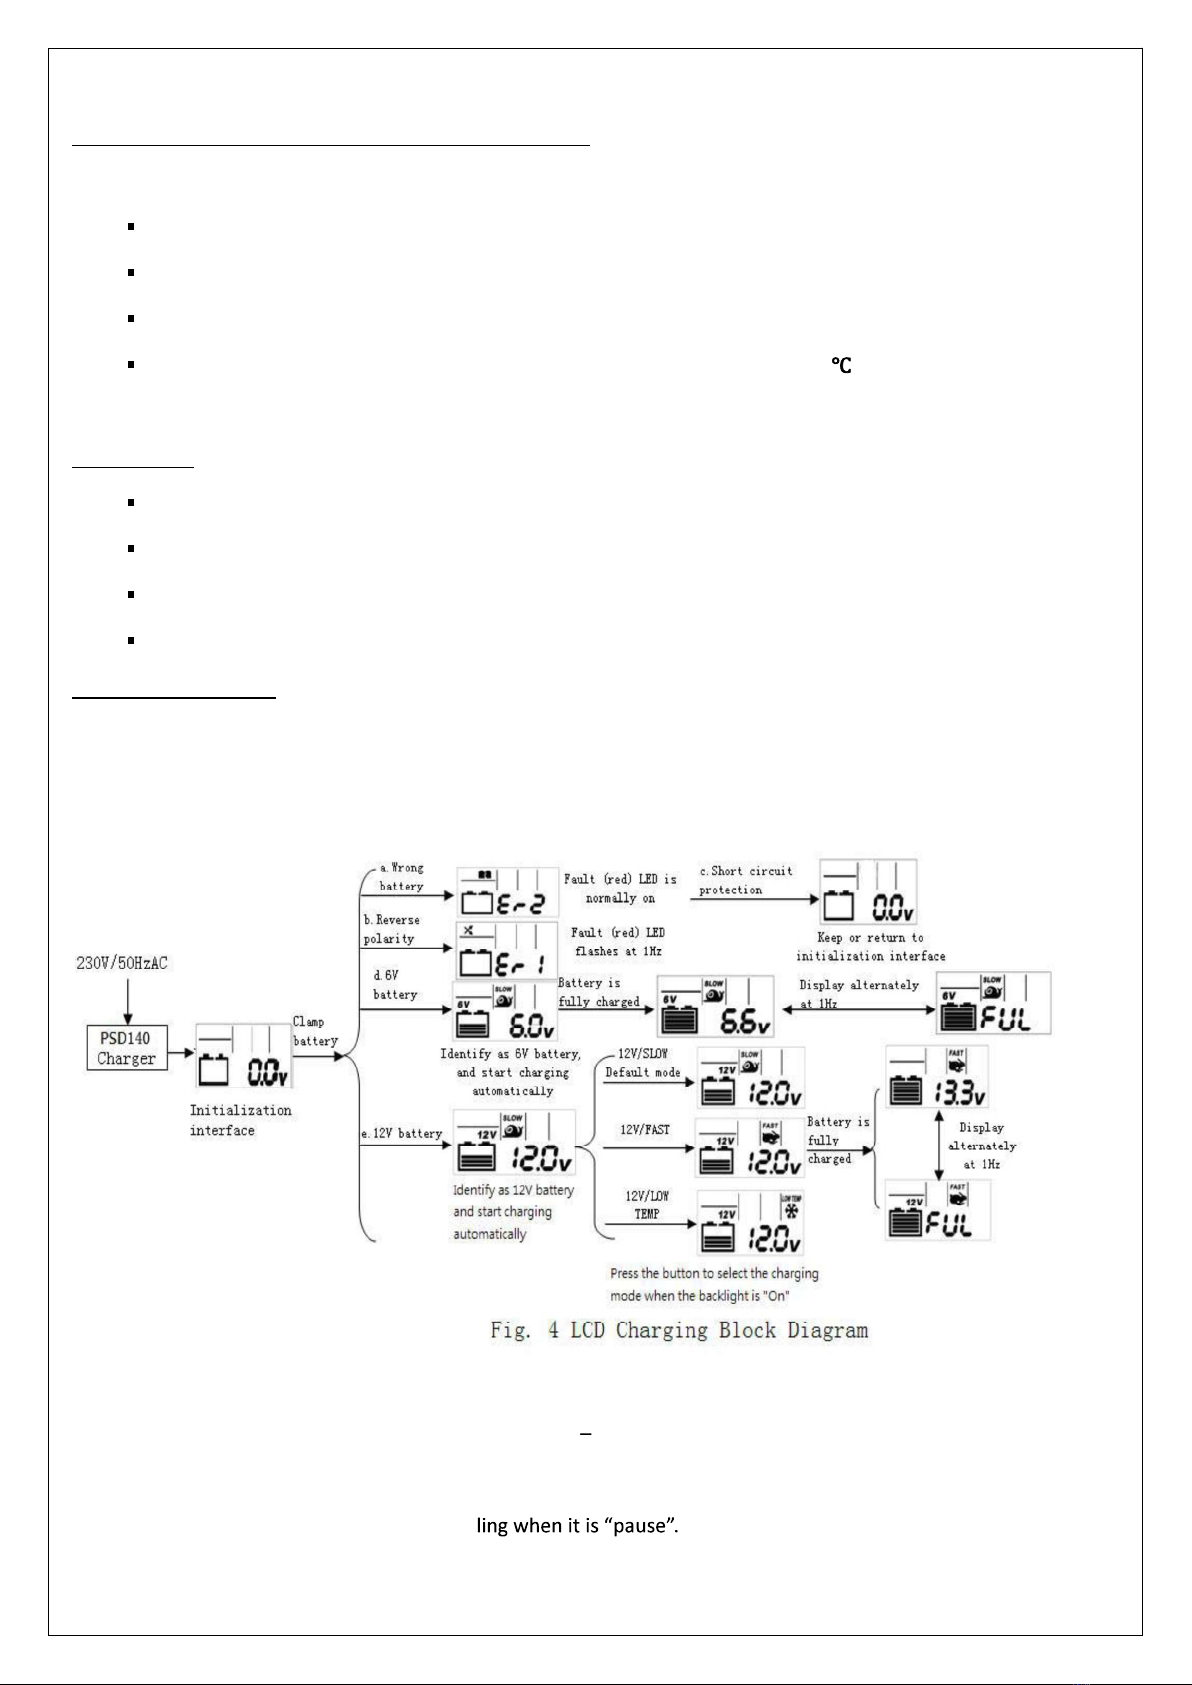
In power- e backlight is off;

ENG
5
2) Charging mode: idenfy 6V/12V baeries automacally; for 6V baeries, only 6V/1A SLOW mode is available; for
12V baeries, three charging modes are available, as follows:
6V 1A /SLOW charging mode (default)
12V 1A /SLOW charging mode
12V 4A /FAST charging mode
12V 4A /LOW TEMP charging mode (Environment temperature <10 )
The minimum voltages for automac idenficaon of 6V&12V baeries are 3V and 7.4V respecvely.
3) Protecon:
Short circuit protecon: keep or return to the inializaon interface.
Reverse polarity protecon: the LCD displays reverse polarity signal
Overheang protecon
IP65 dustproof and waterproof
4) LCD display funcon
The product integrates LCD, as shown in Fig. 2. It displays the analog baery status, charging mode, charging state,
real-me voltage, and error message, and integrates LED indicators. The specific LCD states are shown in Fig. 4
below:
Remark: i) 6V: When the baery voltage is between 3.5V 5V, the charger will work at 6V/Slow mode. LCD flashes the
real me baery voltage at 1Hz frequency and the baery icon scrolls. Press the buon to pause/resume the
charging process. The baery icon stops scrol

ENG
6
ii) 12V: When the baery voltage is between 7.4V and 10V. The charger will work at 12V/Slow mode. Press the
Aer charger the baery by 2 minutes, if bat
In these 2 cases, please press the buon to detect/check the baery status and start the charging process again.
need to disconnect the AC power and baery cable clamp
Keep charging the baery 4 hours (6V mode)/9 hours (12V mode) and the baery voltage is sll below the correct
level In this case, you must to disconnect the baery cable clamp, or
need to disconnect the power.
Please refer to below Fig. 5 and Fig.6.
Fig. 5: 6V LCD charging block diagram

ENG
7
Fig.5 and Fig. 6: 6V/ 12V
LCD charging block diagram
Precauons and Operang Instrucons
1) Precauons:
a. The supply voltage of the product is 220~240VAC; please make sure that the mains voltage meets the
specificaons of the product before using;
b. The charger is suitable for 6V/12V regular and Gel baeries with 5Ah ~ 120Ah capacity;
c. Clamp the baery anode with the red clip of the output line, and clamp the cathode with the black clip; it will
report error if the polarity is reverse;
d. The working environment of the product is 0°C~40°C; do not use beyond this range of temperature;
e. Before charging the baery, in order to prevent the equipment connected to the baery from damage or
unnecessary influence, disconnect the baery and the equipment before charging the baery;
2) Operang instrucons:
A. Connecon and reverse polarity: select the baery to be charged, confirm the input voltage and then insert the
power plug, enter into the inializaon interface as follows Fig. 7; clamp the red clip of the output side to the anode
of the baery, and clamp the black clip to the cathode; if the polarity is reverse, the red (Fault) LED flashes at 1Hz,
and LCD displays as shown in Fig. 8
Fig. 7 Fig. 8

ENG
8
B. Pre-charge, constant current & constant voltage charging: clamp the output terminal to the baery to idenfy 6V
or 12V baery; for 6V baery, it will start charging in 6V/slow mode immediately; for 12V baery, it enters 12V/slow
mode by default; you can press the MODE buon to switch among the three modes sequenally(Slow/Fast/Low
Temp), each me you press the buon, the backlight is turned on for 10 seconds; the display effect is shown in Fig. 9;
Fig. 9
C. Float charge: enter the float charging state, the baery icon shows full, and the real-me voltage and FUL
characters display alternately at 1Hz frequency.
buon; no mode selecon is possible during the float charge, as shown in Fig. 10 below:
Fig. 10
D. Power-down memory: in the charging process, unplug the power plug or in case of power outage, the product will
save the original charging mode as long as the baery voltage exceeds 5V; the LCD but
the maximum memory me is 12 hours; when the power resumes, it will
connue to charge in the original state;
E. Charging completes: unplug the power plug, and then remove the clips from the baery.
www.absaar.com
-MSA International- 5, rue bommel ZAE Robert Steichen L-4970 Hautcharage LUXEMBURG
Display
alternately
at 1Hz
Other manuals for ATEK 4000
1
Table of contents
Other Absaar Batteries Charger manuals
Popular Batteries Charger manuals by other brands

Icom
Icom BC-35 instruction manual

GOAL ZERO
GOAL ZERO Sherpa 40 user guide

FRONIUS
FRONIUS Selectiva 2040 2kW Service manual

Connect IT
Connect IT CCC-6100-BK user manual

B. Braun
B. Braun Aesculap Acculan 4 GA320 Instructions for use/Technical description

Silvercrest
Silvercrest SQWC A1 Operation and safety notes